GMC ACADIA 2013 Owner's Manual
Manufacturer: GMC, Model Year: 2013, Model line: ACADIA, Model: GMC ACADIA 2013Pages: 410, PDF Size: 5.46 MB
Page 211 of 410
Black plate (7,1)Acadia/Acadia Denali Owner Manual - 2013 - crc2 - 12/11/12
Climate Controls 8-7
turns off to show that the A/C mode
is not available. If the A/C is on and
the outside temperature drops
below a temperature which is too
cool for air conditioning to be
effective, the A/C indicator turns off
to show that the A/C mode has
been canceled.
On hot days, open the windows
briefly to let hot inside air escape.
This helps reduce the time it takes
for the interior of the vehicle to
cool down.
The air conditioning system
removes moisture from the air, so
water might drip under the vehicle
while idling or after turning off the
engine. This is normal.
@(Recirculation):Press to turn
the recirculation mode on or off. An
indicator light comes on when
recirculation is on. When the engine
is turned off, the recirculation mode
automatically turns off and must be
re-selected when the engine is
turned on again. This mode recirculates and helps to
quickly cool the air inside the
vehicle. It can be used to prevent
outside air and odors from entering
the vehicle.
The recirculation mode cannot be
used with floor, defog, or defrosting
modes. If recirculation is selected in
these modes, the indicator flashes
three times and turns off. The air
conditioning compressor also comes
on when this mode is activated.
While in recirculation mode the
windows can fog when the weather
is cold and damp. To clear the fog,
select either the defog or defrost
mode and increase the fan speed.
REAR:
Press to turn the rear
heating and air conditioning on or
off. See Rear Climate Control
System on page 8‑9 orRear
Climate Control System (with Rear
Seat Audio) on page 8‑10.
Rear Window Defogger
The rear window defogger uses a
warming grid to remove fog from the
rear window. R
1(Rear Window Defogger):
Press to turn the rear window
defogger on or off. The rear window
defogger stays on for about
10 minutes, before turning off. The
defogger also turns off when the
engine is turned off. Do not drive the
vehicle until all the windows are
clear.
For vehicles with heated outside
rearview mirrors, fog or frost is
cleared from the surface of the
mirror when the rear window defog
button is pressed.
Notice: Do not use a razor blade
or sharp object to clear the inside
rear window. Do not adhere
anything to the defogger grid
lines in the rear glass. These
actions may damage the rear
defogger. Repairs would not be
covered by your warranty.
Page 212 of 410
Black plate (8,1)Acadia/Acadia Denali Owner Manual - 2013 - crc2 - 12/11/12
8-8 Climate Controls
Sensors
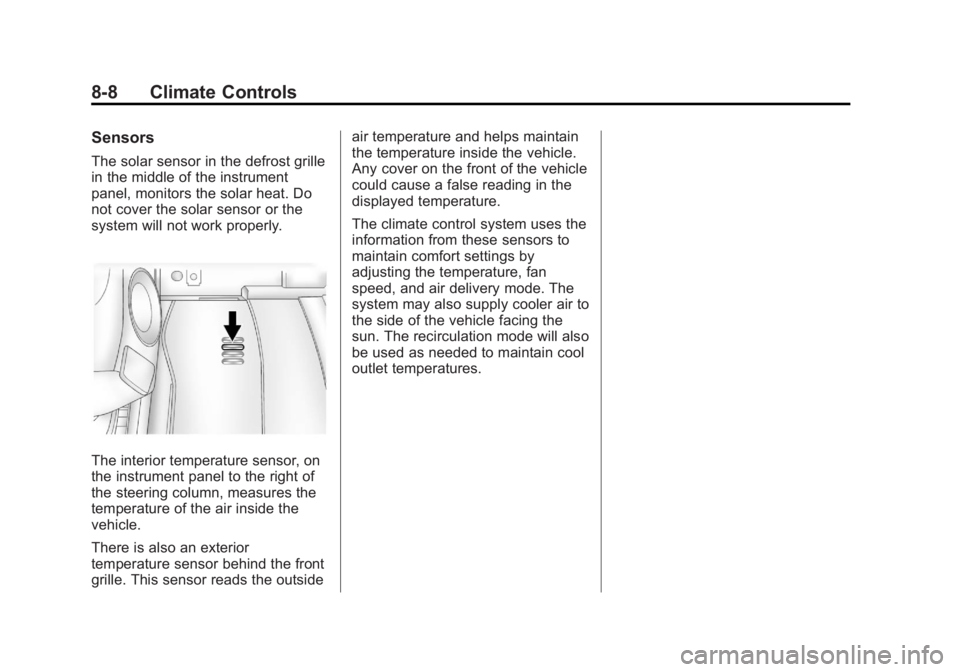
The solar sensor in the defrost grille
in the middle of the instrument
panel, monitors the solar heat. Do
not cover the solar sensor or the
system will not work properly.
The interior temperature sensor, on
the instrument panel to the right of
the steering column, measures the
temperature of the air inside the
vehicle.
There is also an exterior
temperature sensor behind the front
grille. This sensor reads the outsideair temperature and helps maintain
the temperature inside the vehicle.
Any cover on the front of the vehicle
could cause a false reading in the
displayed temperature.
The climate control system uses the
information from these sensors to
maintain comfort settings by
adjusting the temperature, fan
speed, and air delivery mode. The
system may also supply cooler air to
the side of the vehicle facing the
sun. The recirculation mode will also
be used as needed to maintain cool
outlet temperatures.
Page 213 of 410
Black plate (9,1)Acadia/Acadia Denali Owner Manual - 2013 - crc2 - 12/11/12
Climate Controls 8-9
Rear Climate Control System
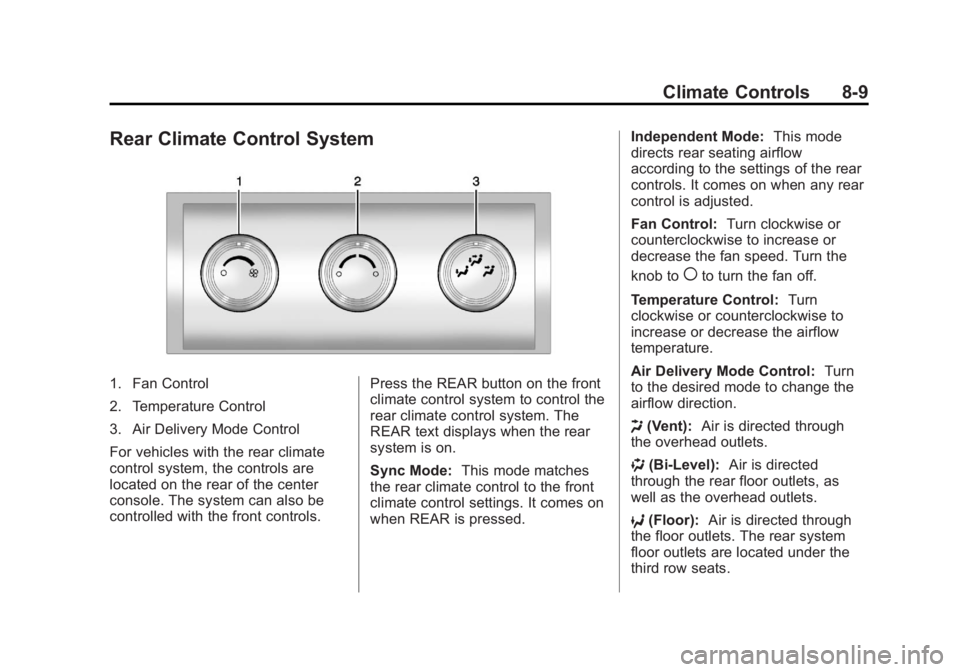
1. Fan Control
2. Temperature Control
3. Air Delivery Mode Control
For vehicles with the rear climate
control system, the controls are
located on the rear of the center
console. The system can also be
controlled with the front controls.Press the REAR button on the front
climate control system to control the
rear climate control system. The
REAR text displays when the rear
system is on.
Sync Mode:
This mode matches
the rear climate control to the front
climate control settings. It comes on
when REAR is pressed. Independent Mode:
This mode
directs rear seating airflow
according to the settings of the rear
controls. It comes on when any rear
control is adjusted.
Fan Control: Turn clockwise or
counterclockwise to increase or
decrease the fan speed. Turn the
knob to
(to turn the fan off.
Temperature Control: Turn
clockwise or counterclockwise to
increase or decrease the airflow
temperature.
Air Delivery Mode Control: Turn
to the desired mode to change the
airflow direction.
H (Vent): Air is directed through
the overhead outlets.
) (Bi-Level): Air is directed
through the rear floor outlets, as
well as the overhead outlets.
6 (Floor): Air is directed through
the floor outlets. The rear system
floor outlets are located under the
third row seats.
Page 214 of 410
Black plate (10,1)Acadia/Acadia Denali Owner Manual - 2013 - crc2 - 12/11/12
8-10 Climate Controls
Rear Climate Control System (with Rear Seat Audio)
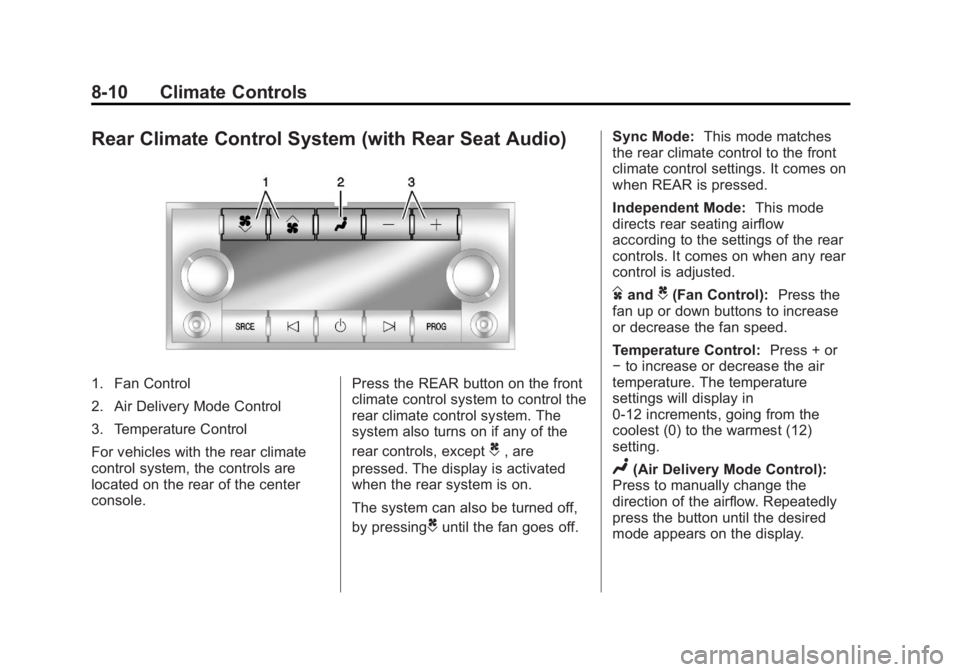
1. Fan Control
2. Air Delivery Mode Control
3. Temperature Control
For vehicles with the rear climate
control system, the controls are
located on the rear of the center
console.Press the REAR button on the front
climate control system to control the
rear climate control system. The
system also turns on if any of the
rear controls, except
C, are
pressed. The display is activated
when the rear system is on.
The system can also be turned off,
by pressing
Cuntil the fan goes off. Sync Mode:
This mode matches
the rear climate control to the front
climate control settings. It comes on
when REAR is pressed.
Independent Mode: This mode
directs rear seating airflow
according to the settings of the rear
controls. It comes on when any rear
control is adjusted.
DandC(Fan Control): Press the
fan up or down buttons to increase
or decrease the fan speed.
Temperature Control: Press + or
− to increase or decrease the air
temperature. The temperature
settings will display in
0-12 increments, going from the
coolest (0) to the warmest (12)
setting.
N(Air Delivery Mode Control):
Press to manually change the
direction of the airflow. Repeatedly
press the button until the desired
mode appears on the display.
Page 215 of 410
Black plate (11,1)Acadia/Acadia Denali Owner Manual - 2013 - crc2 - 12/11/12
Climate Controls 8-11
H(Vent):Air is directed through
the overhead outlets.
)(Bi-Level): Air is directed
through the rear floor outlets, as
well as the overhead outlets.
6(Floor): Air is directed through
the floor outlets. The rear system
floor outlets are located under the
third row seats.
Air Vents
Use the slider switch in the center of
the outlet, to change the direction of
the airflow. Use the thumbwheel
near the outlet to control the amount
of airflow or to shut off the airflow.
Keep all outlets open whenever
possible for best system
performance.
Operation Tips
.Clear away any ice, snow,
or leaves from the air inlets at
the base of the windshield that
can block the flow of air into the
vehicle.
.Use of non-GM approved hood
deflectors can adversely affect
the performance of the system.
.Keep the path under all seats
clear of objects to help circulate
the air inside the vehicle more
effectively.
.If fogging reoccurs while in vent
or bi-level modes with mild
temperature throughout the
vehicle, turn on the air
conditioner to reduce windshield
fogging.
Page 216 of 410
Black plate (12,1)Acadia/Acadia Denali Owner Manual - 2013 - crc2 - 12/11/12
8-12 Climate Controls
Maintenance
Passenger Compartment
Air Filter
The filter removes dust, pollen, and
other airborne irritants from outside
air and inside air when in
recirculation mode.
The filter should be replaced as part
of routine scheduled maintenance.
SeeMaintenance Schedule on
page 11‑2. To find out what type of
replacement filter to use, see
Maintenance Replacement Parts on
page 11‑13.
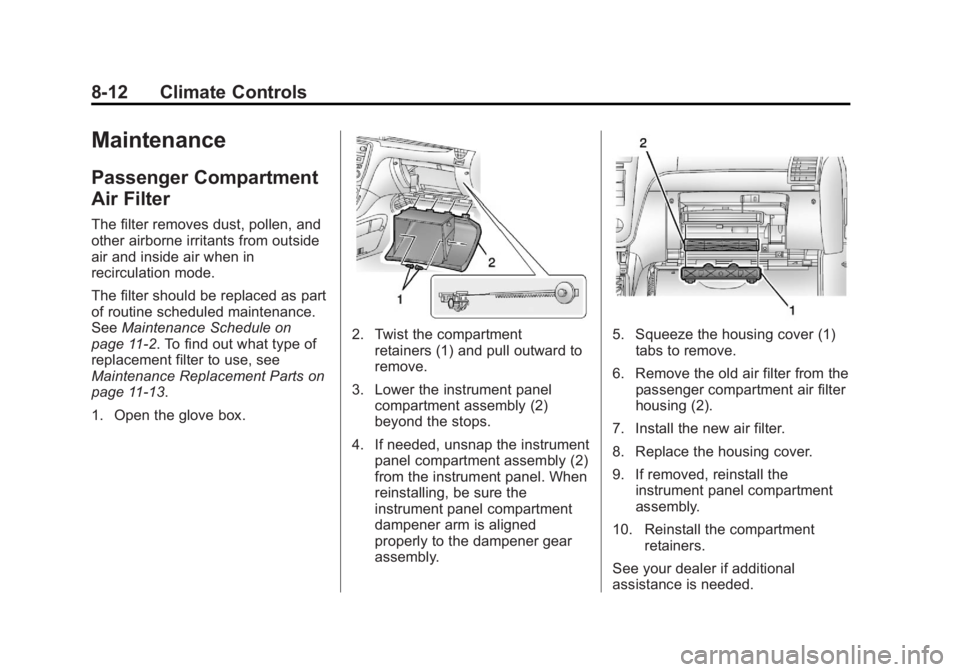
1. Open the glove box.
2. Twist the compartment retainers (1) and pull outward to
remove.
3. Lower the instrument panel compartment assembly (2)
beyond the stops.
4. If needed, unsnap the instrument panel compartment assembly (2)
from the instrument panel. When
reinstalling, be sure the
instrument panel compartment
dampener arm is aligned
properly to the dampener gear
assembly.5. Squeeze the housing cover (1)tabs to remove.
6. Remove the old air filter from the passenger compartment air filter
housing (2).
7. Install the new air filter.
8. Replace the housing cover.
9. If removed, reinstall the instrument panel compartment
assembly.
10. Reinstall the compartment retainers.
See your dealer if additional
assistance is needed.
Page 217 of 410
Black plate (1,1)Acadia/Acadia Denali Owner Manual - 2013 - crc2 - 12/11/12
Driving and Operating 9-1
Driving and
Operating
Driving Information
Distracted Driving . . . . . . . . . . . . . 9-2
Defensive Driving . . . . . . . . . . . . . 9-2
Drunk Driving . . . . . . . . . . . . . . . . . 9-3
Control of a Vehicle . . . . . . . . . . . 9-3
Braking . . . . . . . . . . . . . . . . . . . . . . . 9-3
Steering . . . . . . . . . . . . . . . . . . . . . . . 9-3
Off-Road Recovery . . . . . . . . . . . . 9-4
Loss of Control . . . . . . . . . . . . . . . . 9-5
Driving on Wet Roads . . . . . . . . . 9-5
Highway Hypnosis . . . . . . . . . . . . 9-6
Hill and Mountain Roads . . . . . . 9-6
Winter Driving . . . . . . . . . . . . . . . . . 9-7
If the Vehicle Is Stuck . . . . . . . . . 9-9
Vehicle Load Limits . . . . . . . . . . . 9-9
Starting and Operating
New Vehicle Break-In . . . . . . . . 9-14
Ignition Positions . . . . . . . . . . . . 9-14
Starting the Engine . . . . . . . . . . 9-16
Engine Heater . . . . . . . . . . . . . . . 9-17
Retained AccessoryPower (RAP) . . . . . . . . . . . . . . . 9-18 Shifting Into Park . . . . . . . . . . . . 9-18
Shifting out of Park . . . . . . . . . . 9-19
Parking over Things
That Burn . . . . . . . . . . . . . . . . . . 9-20
Engine Exhaust
Engine Exhaust . . . . . . . . . . . . . . 9-20
Running the Vehicle WhileParked . . . . . . . . . . . . . . . . . . . . . 9-21
Automatic Transmission
Automatic Transmission . . . . . 9-21
Manual Mode . . . . . . . . . . . . . . . . 9-23
Tow/Haul Mode . . . . . . . . . . . . . . 9-24
Drive Systems
All-Wheel Drive . . . . . . . . . . . . . . 9-25
Brakes
Antilock BrakeSystem (ABS) . . . . . . . . . . . . . . 9-25
Parking Brake . . . . . . . . . . . . . . . 9-26
Brake Assist . . . . . . . . . . . . . . . . . 9-27
Hill Start Assist (HSA) . . . . . . . 9-27
Ride Control Systems
StabiliTrak®System . . . . . . . . . 9-27
Cruise Control
Cruise Control . . . . . . . . . . . . . . . 9-29
Object Detection Systems
Ultrasonic Parking Assist . . . . 9-31
Side Blind Zone Alert (SBZA) . . . . . . . . . . . . . . . 9-33
Rear Vision Camera (RVC) . . . . . . . . . . . . . 9-35
Fuel
Fuel . . . . . . . . . . . . . . . . . . . . . . . . . 9-38
Recommended Fuel . . . . . . . . . 9-38
Gasoline Specifications . . . . . . 9-39
California Fuel
Requirements . . . . . . . . . . . . . . 9-39
Fuels in Foreign Countries . . . 9-40
Fuel Additives . . . . . . . . . . . . . . . 9-40
Filling the Tank . . . . . . . . . . . . . . 9-41
Filling a Portable Fuel Container . . . . . . . . . . . . . . . . . . . 9-42
Towing
General Towing
Information . . . . . . . . . . . . . . . . . 9-43
Driving Characteristics and Towing Tips . . . . . . . . . . . . . . . . 9-43
Trailer Towing . . . . . . . . . . . . . . . . 9-46
Towing Equipment . . . . . . . . . . . 9-48
Conversions and Add-Ons
Add-On Electrical Equipment . . . . . . . . . . . . . . . . . 9-50
Page 218 of 410
Black plate (2,1)Acadia/Acadia Denali Owner Manual - 2013 - crc2 - 12/11/12
9-2 Driving and Operating
Driving Information
Distracted Driving
Distraction comes in many forms
and can take your focus from the
task of driving. Exercise good
judgment and do not let other
activities divert your attention away
from the road. Many local
governments have enacted laws
regarding driver distraction. Become
familiar with the local laws in
your area.
To avoid distracted driving, always
keep your eyes on the road, hands
on the wheel, and mind on the drive.
.Do not use a phone in
demanding driving situations.
Use a hands-free method to
place or receive necessary
phone calls.
.Watch the road. Do not read,
take notes, or look up
information on phones or other
electronic devices.
.Designate a front seat
passenger to handle potential
distractions.
.Become familiar with vehicle
features before driving, such as
programming favorite radio
stations and adjusting climate
control and seat settings.
Program all trip information into
any navigation device prior to
driving.
.Wait until the vehicle is parked
to retrieve items that have fallen
to the floor.
.Stop or park the vehicle to tend
to children.
.Keep pets in an appropriate
carrier or restraint.
.Avoid stressful conversations
while driving, whether with a
passenger or on a cell phone.
{WARNING
Taking your eyes off the road too
long or too often could cause a
crash resulting in injury or death.
Focus your attention on driving.
Refer to the Infotainment section
and the infotainment manual for
more information on using that
system, including pairing and using
a cell phone.
Defensive Driving
Defensive driving means “always
expect the unexpected.” The first
step in driving defensively is to wear
the safety belt. See Safety Belts on
page 3‑14.
.Assume that other road users
(pedestrians, bicyclists, and
other drivers) are going to be
careless and make mistakes.
Anticipate what they might do
and be ready.
Page 219 of 410
Black plate (3,1)Acadia/Acadia Denali Owner Manual - 2013 - crc2 - 12/11/12
Driving and Operating 9-3
.Allow enough following distance
between you and the driver in
front of you.
.Focus on the task of driving.
Drunk Driving
Death and injury associated with
drinking and driving is a global
tragedy.
{WARNING
Drinking and then driving is very
dangerous. Your reflexes,
perceptions, attentiveness, and
judgment can be affected by even
a small amount of alcohol. You
can have a serious—or even
fatal —collision if you drive after
drinking.
Do not drink and drive or ride with
a driver who has been drinking.
Ride home in a cab; or if you are
with a group, designate a driver
who will not drink.
Control of a Vehicle
Braking, steering, and accelerating
are important factors in helping to
control a vehicle while driving.
Braking
Braking action involves perception
time and reaction time. Deciding to
push the brake pedal is perception
time. Actually doing it is
reaction time.
Average driver reaction time is
about three-quarters of a second. In
that time, a vehicle moving at
100 km/h (60 mph) travels 20 m
(66 ft), which could be a lot of
distance in an emergency.
Helpful braking tips to keep in mind
include:
.Keep enough distance between
you and the vehicle in front
of you.
.Avoid needless heavy braking.
.Keep pace with traffic. If the engine ever stops while the
vehicle is being driven, brake
normally but do not pump the
brakes. Doing so could make the
pedal harder to push down. If the
engine stops, there will be some
power brake assist but it will be
used when the brake is applied.
Once the power assist is used up, it
can take longer to stop and the
brake pedal will be harder to push.
Steering
Variable Effort Steering
Some vehicles have a steering
system that varies the amount of
effort required to steer the vehicle in
relation to the speed of the vehicle.
The amount of steering effort
required is less at slower speeds to
make the vehicle more
maneuverable and easier to park. At
faster speeds, the steering effort
increases to provide a sport-like feel
to the steering. This provides
maximum control and stability.
Page 220 of 410
Black plate (4,1)Acadia/Acadia Denali Owner Manual - 2013 - crc2 - 12/11/12
9-4 Driving and Operating
If the vehicle seems harder to steer
than normal when parking or driving
slowly, there may be a problem with
the system. You will still have power
steering, but steering will be stiffer
than normal at slow speeds. See
your dealer for service.
Hydraulic Power Steering
If your vehicle has hydraulic power
steering, it may require
maintenance. SeePower Steering
Fluid on page 10‑18.
If power steering assist is lost
because the engine stops, or there
is a system malfunction, the vehicle
can be steered but may require
increased effort. See your dealer if
there is a problem.
Curve Tips
.Take curves at a reasonable
speed.
.Reduce speed before entering a
curve.
.Maintain a reasonable, steady
speed through the curve.
.Wait until the vehicle is out of
the curve before accelerating
gently into the straightaway.
Steering in Emergencies
.There are some situations when
steering around a problem may
be more effective than braking.
.Holding both sides of the
steering wheel allows you to turn
180 degrees without removing
a hand.
.Antilock Brake System (ABS)
allows steering while braking.
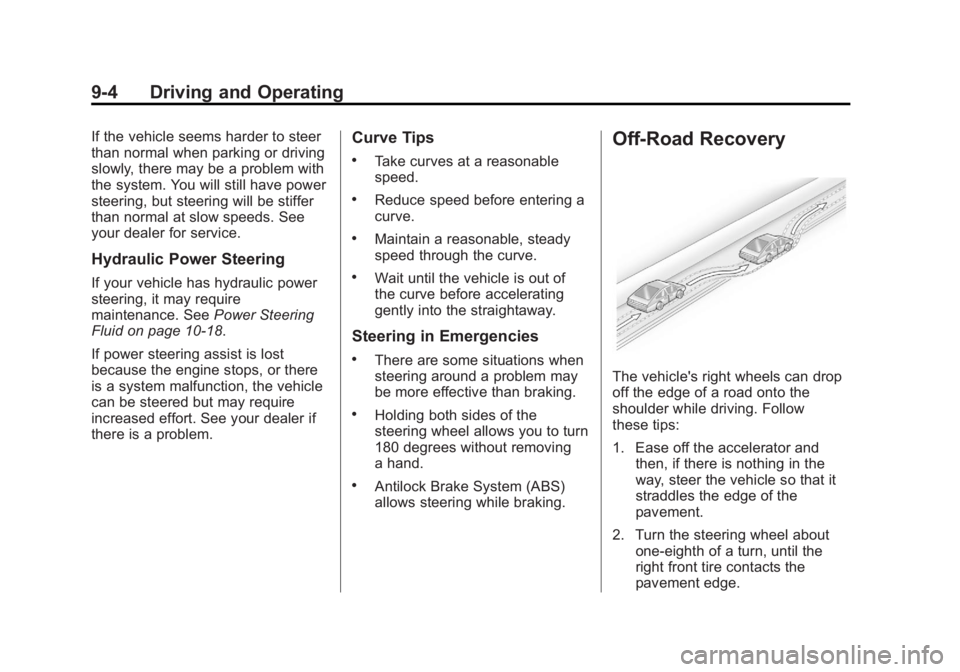
Off-Road Recovery
The vehicle's right wheels can drop
off the edge of a road onto the
shoulder while driving. Follow
these tips:
1. Ease off the accelerator and then, if there is nothing in the
way, steer the vehicle so that it
straddles the edge of the
pavement.
2. Turn the steering wheel about one-eighth of a turn, until the
right front tire contacts the
pavement edge.