Display setting GMC ACADIA 2017 Owner's Guide
[x] Cancel search | Manufacturer: GMC, Model Year: 2017, Model line: ACADIA, Model: GMC ACADIA 2017Pages: 419, PDF Size: 5.89 MB
Page 204 of 419
GMC Acadia/Acadia Denali Owner Manual (GMNA-Localizing-U.S./Canada/
Mexico-9803770) - 2017 - crc - 7/12/16
Climate Controls 203
Automatic Operation
The system automatically controls
the following four functions to heat
or cool the vehicle to the desired
temperature:
.Fan Speed
. Air Delivery Mode
. Air Conditioning
. Recirculation
When the AUTO indicator light is lit,
all four functions are operating
automatically. Each function can be
manually set and the selected
setting will be shown. This cancels
full automatic operation and the
AUTO indicator light turns off.
Functions that are not manually set
will continue to be automatically
controlled, although the AUTO
indicator light will not be lit.
To place the system in
automatic mode: 1. Press AUTO.
2. Set the driver and passenger temperature. To find your comfort setting,
start with 22 °C (72 °F) and
allow the system time to
stabilize. Then adjust the
temperature as needed for best
comfort.
To improve fuel efficiency and to
cool the vehicle faster, recirculation
may be automatically selected in
warm weather.
The recirculation light will not come
on when automatically controlled.
Press
@to manually select
recirculation; press it again to select
outside air.
Do not cover the solar sensor on the
top of the instrument panel near the
windshield. This sensor regulates
air temperature based on sun load.
See “Sensors” later in this section.
Manual Operation
O:Press to turn the climate control
system on or off. Outside air still
enters the vehicle and is directed to
the floor. This direction can be
changed by pressing the air
delivery mode.
9: Turn clockwise or
counterclockwise to increase or
decrease the fan speed. Press the
knob to turn the fan off.
Press AUTO to return to automatic
operation.
Driver and Passenger
Temperature Control : The
temperature can be adjusted
separately for the driver and
passenger.
Turn the knob clockwise or
counterclockwise to increase or
decrease the driver or passenger
temperature setting.
SYNC : Press to link the passenger
and rear climate temperature
settings to the driver setting. The
SYNC indicator light will turn on.
When the passenger or rear climate
temperature settings are adjusted,
the SYNC indicator light is off.
The driver side or passenger side
temperature display shows the
temperature setting increasing or
decreasing.
Page 206 of 419
GMC Acadia/Acadia Denali Owner Manual (GMNA-Localizing-U.S./Canada/
Mexico-9803770) - 2017 - crc - 7/12/16
Climate Controls 205
Heated Mirror :If equipped with
heated outside rearview mirrors, the
mirrors heat to help clear fog or frost
from the surface of the mirror when
the rear window defog button is
pressed. See Heated Mirrors 049.
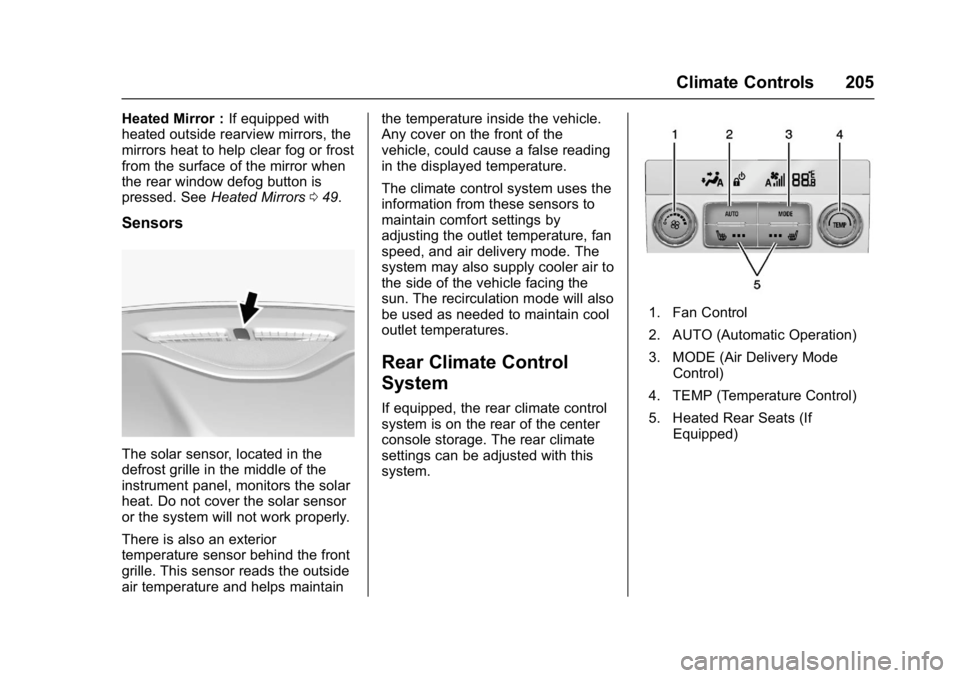
Sensors
The solar sensor, located in the
defrost grille in the middle of the
instrument panel, monitors the solar
heat. Do not cover the solar sensor
or the system will not work properly.
There is also an exterior
temperature sensor behind the front
grille. This sensor reads the outside
air temperature and helps maintain the temperature inside the vehicle.
Any cover on the front of the
vehicle, could cause a false reading
in the displayed temperature.
The climate control system uses the
information from these sensors to
maintain comfort settings by
adjusting the outlet temperature, fan
speed, and air delivery mode. The
system may also supply cooler air to
the side of the vehicle facing the
sun. The recirculation mode will also
be used as needed to maintain cool
outlet temperatures.
Rear Climate Control
System
If equipped, the rear climate control
system is on the rear of the center
console storage. The rear climate
settings can be adjusted with this
system.
1. Fan Control
2. AUTO (Automatic Operation)
3. MODE (Air Delivery Mode
Control)
4. TEMP (Temperature Control)
5. Heated Rear Seats (If Equipped)
Page 207 of 419
GMC Acadia/Acadia Denali Owner Manual (GMNA-Localizing-U.S./Canada/
Mexico-9803770) - 2017 - crc - 7/12/16
206 Climate Controls
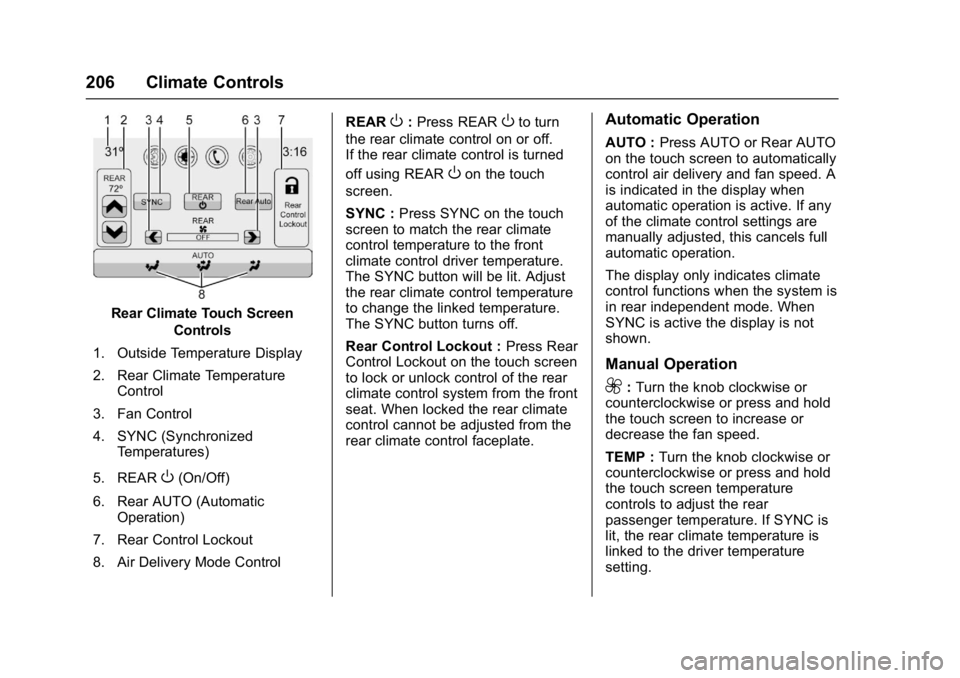
Rear Climate Touch ScreenControls
1. Outside Temperature Display
2. Rear Climate Temperature Control
3. Fan Control
4. SYNC (Synchronized Temperatures)
5. REAR
O(On/Off)
6. Rear AUTO (Automatic Operation)
7. Rear Control Lockout
8. Air Delivery Mode Control REAR
O:
Press REAROto turn
the rear climate control on or off.
If the rear climate control is turned
off using REAR
Oon the touch
screen.
SYNC : Press SYNC on the touch
screen to match the rear climate
control temperature to the front
climate control driver temperature.
The SYNC button will be lit. Adjust
the rear climate control temperature
to change the linked temperature.
The SYNC button turns off.
Rear Control Lockout : Press Rear
Control Lockout on the touch screen
to lock or unlock control of the rear
climate control system from the front
seat. When locked the rear climate
control cannot be adjusted from the
rear climate control faceplate.
Automatic Operation
AUTO : Press AUTO or Rear AUTO
on the touch screen to automatically
control air delivery and fan speed. A
is indicated in the display when
automatic operation is active. If any
of the climate control settings are
manually adjusted, this cancels full
automatic operation.
The display only indicates climate
control functions when the system is
in rear independent mode. When
SYNC is active the display is not
shown.
Manual Operation
9: Turn the knob clockwise or
counterclockwise or press and hold
the touch screen to increase or
decrease the fan speed.
TEMP : Turn the knob clockwise or
counterclockwise or press and hold
the touch screen temperature
controls to adjust the rear
passenger temperature. If SYNC is
lit, the rear climate temperature is
linked to the driver temperature
setting.
Page 229 of 419
GMC Acadia/Acadia Denali Owner Manual (GMNA-Localizing-U.S./Canada/
Mexico-9803770) - 2017 - crc - 7/12/16
228 Driving and Operating
starts, let go of the button and
the accelerator. If the vehicle
starts briefly but then stops
again, do the same thing. This
clears the extra gasoline from
the engine. Do not race the
engine immediately after
starting it. Operate the engine
and transmission gently until
the oil warms up and lubricates
all moving parts.
Stop/Start System
{Warning
Exiting the vehicle without first
shifting into P (Park) may cause
the vehicle to move. You or others
may be injured. Because the
vehicle has the auto engine stop/
start feature, the vehicle's engine
might seem to be shut off;
however, once the brake pedal is
released, the engine will start up
again.
Shift to P (Park) and turn the
ignition to LOCK/OFF, before
exiting the vehicle.If equipped with the 2.5L L4 engine,
the vehicle has a fuel saving stop/
start system to shut off the engine to
help conserve fuel.
Auto Engine Stop/Start
When the brakes are applied and
the vehicle is at a complete stop,
the engine may turn off. When
stopped, the tachometer displays
AUTO STOP. See
Tachometer
0 127. When the brake pedal is
released or the accelerator pedal is
pushed, the engine will restart.
Auto Stop may be deactivated if:
. A minimum vehicle speed is not
reached.
. The engine or transmission is
not at the required operating
temperature.
. The outside temperature is not
in the required operating range,
typically between −10 °C (14 °F)
and 50 °C (122 °F).
. The shift lever is in any gear
other than D (Drive).
. The battery charge is low. .
The interior comfort level has not
reached the required level for
the climate control system or
defog settings.
. The Auto Stop time is greater
than two minutes.
Engine Heater
The engine coolant heater can
provide easier starting and better
fuel economy during engine
warm-up in cold weather conditions
at or below 0 °F (−18 °C). Vehicles
with an engine coolant heater
should be plugged in at least four
hours before starting. Some models
may have an internal thermostat in
the cord which will prevent engine
coolant heater operation at
temperatures above 0 °F (−18 °C).
Page 246 of 419
GMC Acadia/Acadia Denali Owner Manual (GMNA-Localizing-U.S./Canada/
Mexico-9803770) - 2017 - crc - 7/12/16
Driving and Operating 245
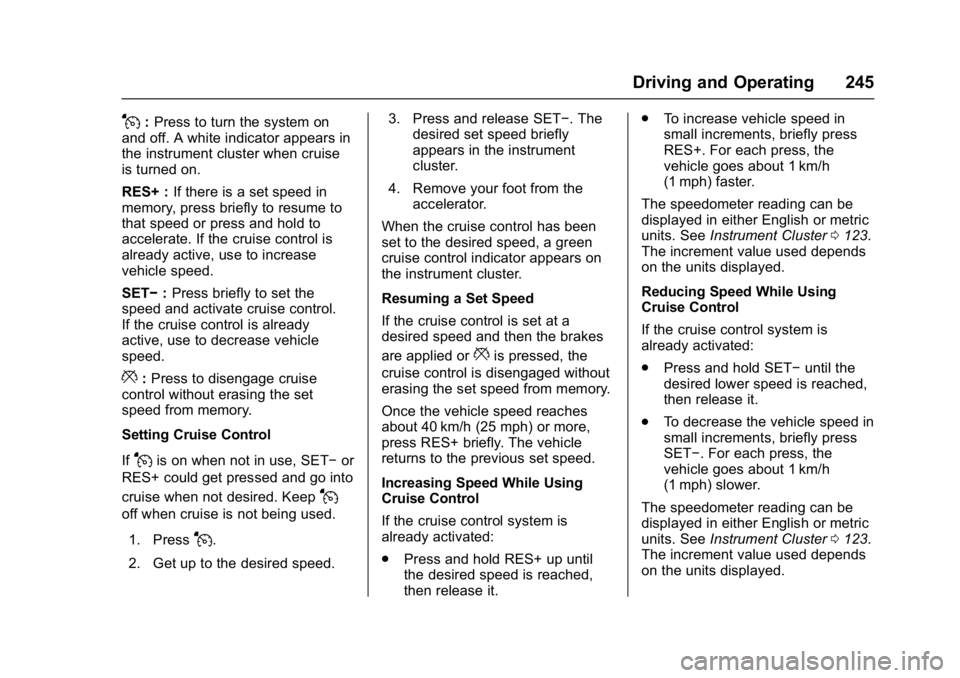
J:Press to turn the system on
and off. A white indicator appears in
the instrument cluster when cruise
is turned on.
RES+ : If there is a set speed in
memory, press briefly to resume to
that speed or press and hold to
accelerate. If the cruise control is
already active, use to increase
vehicle speed.
SET− :Press briefly to set the
speed and activate cruise control.
If the cruise control is already
active, use to decrease vehicle
speed.
*: Press to disengage cruise
control without erasing the set
speed from memory.
Setting Cruise Control
If
Jis on when not in use, SET− or
RES+ could get pressed and go into
cruise when not desired. Keep
J
off when cruise is not being used.
1. Press
J.
2. Get up to the desired speed. 3. Press and release SET−. The
desired set speed briefly
appears in the instrument
cluster.
4. Remove your foot from the accelerator.
When the cruise control has been
set to the desired speed, a green
cruise control indicator appears on
the instrument cluster.
Resuming a Set Speed
If the cruise control is set at a
desired speed and then the brakes
are applied or
*is pressed, the
cruise control is disengaged without
erasing the set speed from memory.
Once the vehicle speed reaches
about 40 km/h (25 mph) or more,
press RES+ briefly. The vehicle
returns to the previous set speed.
Increasing Speed While Using
Cruise Control
If the cruise control system is
already activated:
. Press and hold RES+ up until
the desired speed is reached,
then release it. .
To increase vehicle speed in
small increments, briefly press
RES+. For each press, the
vehicle goes about 1 km/h
(1 mph) faster.
The speedometer reading can be
displayed in either English or metric
units. See Instrument Cluster 0123.
The increment value used depends
on the units displayed.
Reducing Speed While Using
Cruise Control
If the cruise control system is
already activated:
. Press and hold SET− until the
desired lower speed is reached,
then release it.
. To decrease the vehicle speed in
small increments, briefly press
SET−. For each press, the
vehicle goes about 1 km/h
(1 mph) slower.
The speedometer reading can be
displayed in either English or metric
units. See Instrument Cluster 0123.
The increment value used depends
on the units displayed.
Page 249 of 419
GMC Acadia/Acadia Denali Owner Manual (GMNA-Localizing-U.S./Canada/
Mexico-9803770) - 2017 - crc - 7/12/16
248 Driving and Operating
Setting Adaptive Cruise Control
If
Jis on when not in use, it could
get pressed and go into cruise when
not desired. Keep
Joff when
cruise is not being used.
Select the set speed desired for
cruise. This is the vehicle speed
when no vehicle is detected in
its path.
ACC will not set at a speed less
than 25 km/h (16 mph), although it
can be resumed when driving at
lower speeds.
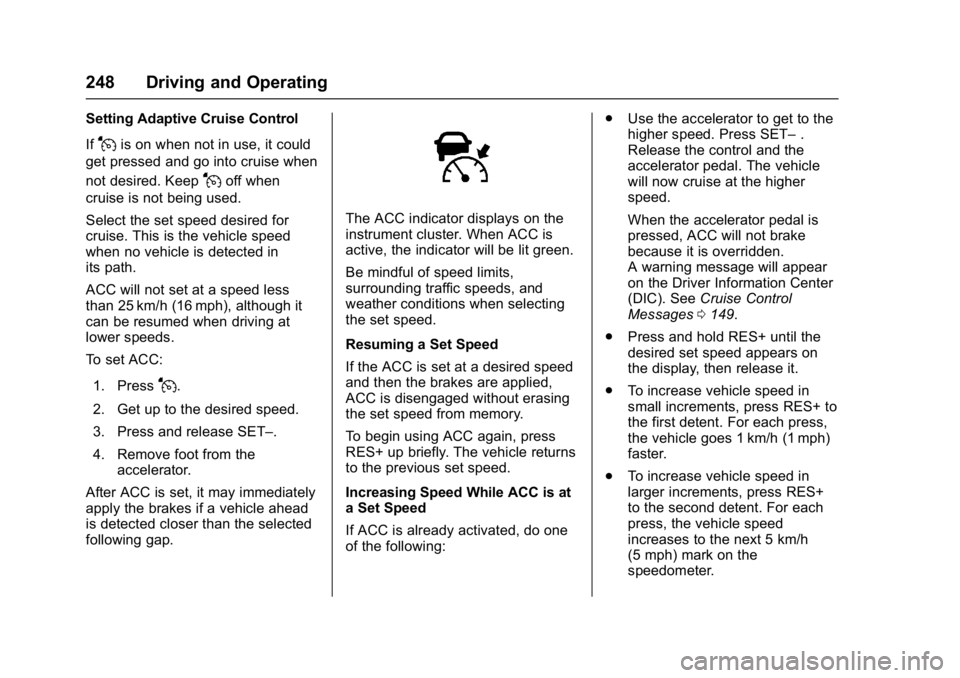
To set ACC:
1. Press
J.
2. Get up to the desired speed.
3. Press and release SET–.
4. Remove foot from the accelerator.
After ACC is set, it may immediately
apply the brakes if a vehicle ahead
is detected closer than the selected
following gap.
The ACC indicator displays on the
instrument cluster. When ACC is
active, the indicator will be lit green.
Be mindful of speed limits,
surrounding traffic speeds, and
weather conditions when selecting
the set speed.
Resuming a Set Speed
If the ACC is set at a desired speed
and then the brakes are applied,
ACC is disengaged without erasing
the set speed from memory.
To begin using ACC again, press
RES+ up briefly. The vehicle returns
to the previous set speed.
Increasing Speed While ACC is at
a Set Speed
If ACC is already activated, do one
of the following: .
Use the accelerator to get to the
higher speed. Press SET– .
Release the control and the
accelerator pedal. The vehicle
will now cruise at the higher
speed.
When the accelerator pedal is
pressed, ACC will not brake
because it is overridden.
A warning message will appear
on the Driver Information Center
(DIC). See Cruise Control
Messages 0149.
. Press and hold RES+ until the
desired set speed appears on
the display, then release it.
. To increase vehicle speed in
small increments, press RES+ to
the first detent. For each press,
the vehicle goes 1 km/h (1 mph)
faster.
. To increase vehicle speed in
larger increments, press RES+
to the second detent. For each
press, the vehicle speed
increases to the next 5 km/h
(5 mph) mark on the
speedometer.
Page 250 of 419
GMC Acadia/Acadia Denali Owner Manual (GMNA-Localizing-U.S./Canada/
Mexico-9803770) - 2017 - crc - 7/12/16
Driving and Operating 249
When it is determined that there is
no vehicle ahead or the vehicle
ahead is beyond the selected
following gap, then the vehicle
speed will increase to the set speed.
The speedometer reading can be
displayed in either English or metric
units. SeeInstrument Cluster 0123.
The increment value used depends
on the units displayed.
Reducing Speed While ACC is at a
Set Speed
If ACC is already activated, do one
of the following:
. Use the brake to get to the
desired lower speed. Press
SET– and release the
accelerator pedal. The vehicle
will now cruise at the lower
speed.
. Press and hold SET– until the
desired lower speed is reached,
then release it.
. To decrease the vehicle speed in
smaller increments, press SET−
to the first detent. For each
press, the vehicle goes about
1 km/h (1 mph) slower. .
To decrease the vehicle speed in
larger increments, press SET−
to the second detent. For each
press, the vehicle speed
decreases to the next 5 km/h
(5 mph) mark on the
speedometer.
The speedometer reading can be
displayed in either English or metric
units. See Instrument Cluster 0123.
The increment value used depends
on the units displayed.
Selecting the Follow Distance Gap
When a slower moving vehicle is
detected ahead within the selected
following gap, ACC will adjust the
vehicle's speed and attempt to
maintain the follow distance gap
selected.
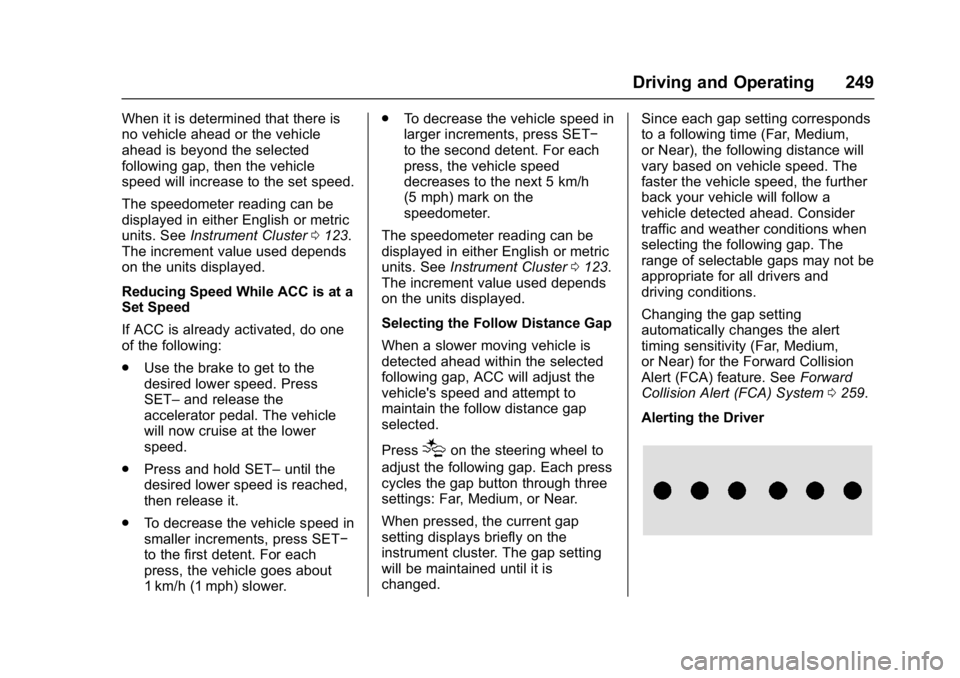
Press
[on the steering wheel to
adjust the following gap. Each press
cycles the gap button through three
settings: Far, Medium, or Near.
When pressed, the current gap
setting displays briefly on the
instrument cluster. The gap setting
will be maintained until it is
changed. Since each gap setting corresponds
to a following time (Far, Medium,
or Near), the following distance will
vary based on vehicle speed. The
faster the vehicle speed, the further
back your vehicle will follow a
vehicle detected ahead. Consider
traffic and weather conditions when
selecting the following gap. The
range of selectable gaps may not be
appropriate for all drivers and
driving conditions.
Changing the gap setting
automatically changes the alert
timing sensitivity (Far, Medium,
or Near) for the Forward Collision
Alert (FCA) feature. See
Forward
Collision Alert (FCA) System 0259.
Alerting the Driver
Page 261 of 419
GMC Acadia/Acadia Denali Owner Manual (GMNA-Localizing-U.S./Canada/
Mexico-9803770) - 2017 - crc - 7/12/16
260 Driving and Operating
{Warning
FCA does not provide a warning
to help avoid a crash, unless it
detects a vehicle. FCA may not
detect a vehicle ahead if the FCA
sensor is blocked by dirt, snow,
or ice, or if the windshield is
damaged. It may also not detect a
vehicle on winding or hilly roads,
or in conditions that can limit
visibility such as fog, rain,
or snow, or if the headlamps or
windshield are not cleaned or in
proper condition. Keep the
windshield, headlamps, and FCA
sensors clean and in good repair.
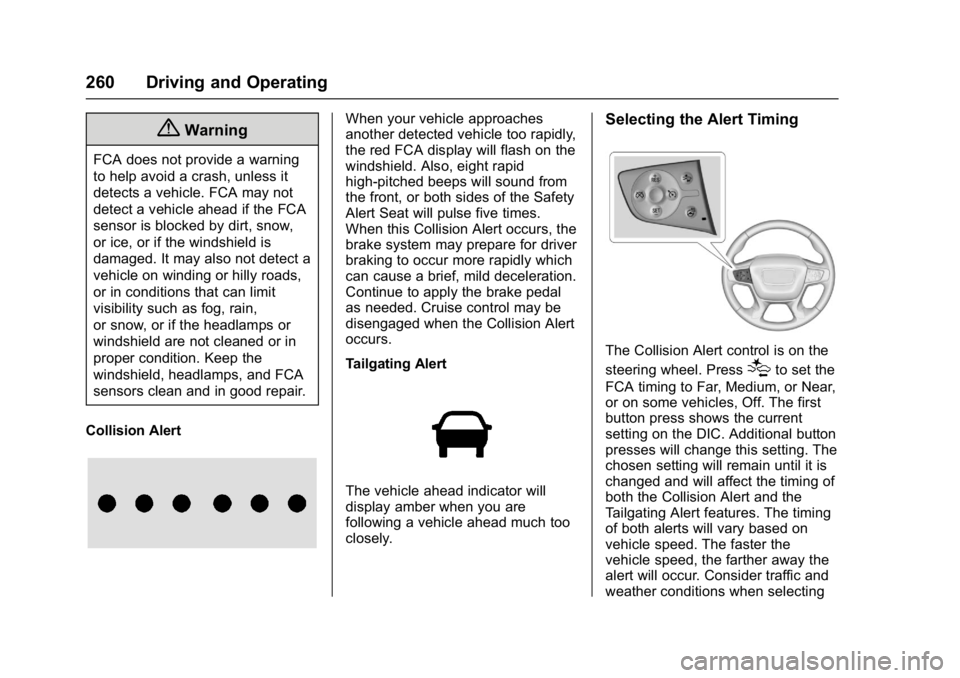
Collision Alert
When your vehicle approaches
another detected vehicle too rapidly,
the red FCA display will flash on the
windshield. Also, eight rapid
high-pitched beeps will sound from
the front, or both sides of the Safety
Alert Seat will pulse five times.
When this Collision Alert occurs, the
brake system may prepare for driver
braking to occur more rapidly which
can cause a brief, mild deceleration.
Continue to apply the brake pedal
as needed. Cruise control may be
disengaged when the Collision Alert
occurs.
Tailgating Alert
The vehicle ahead indicator will
display amber when you are
following a vehicle ahead much too
closely.
Selecting the Alert Timing
The Collision Alert control is on the
steering wheel. Press
[to set the
FCA timing to Far, Medium, or Near,
or on some vehicles, Off. The first
button press shows the current
setting on the DIC. Additional button
presses will change this setting. The
chosen setting will remain until it is
changed and will affect the timing of
both the Collision Alert and the
Tailgating Alert features. The timing
of both alerts will vary based on
vehicle speed. The faster the
vehicle speed, the farther away the
alert will occur. Consider traffic and
weather conditions when selecting
Page 329 of 419
GMC Acadia/Acadia Denali Owner Manual (GMNA-Localizing-U.S./Canada/
Mexico-9803770) - 2017 - crc - 7/12/16
328 Vehicle Care
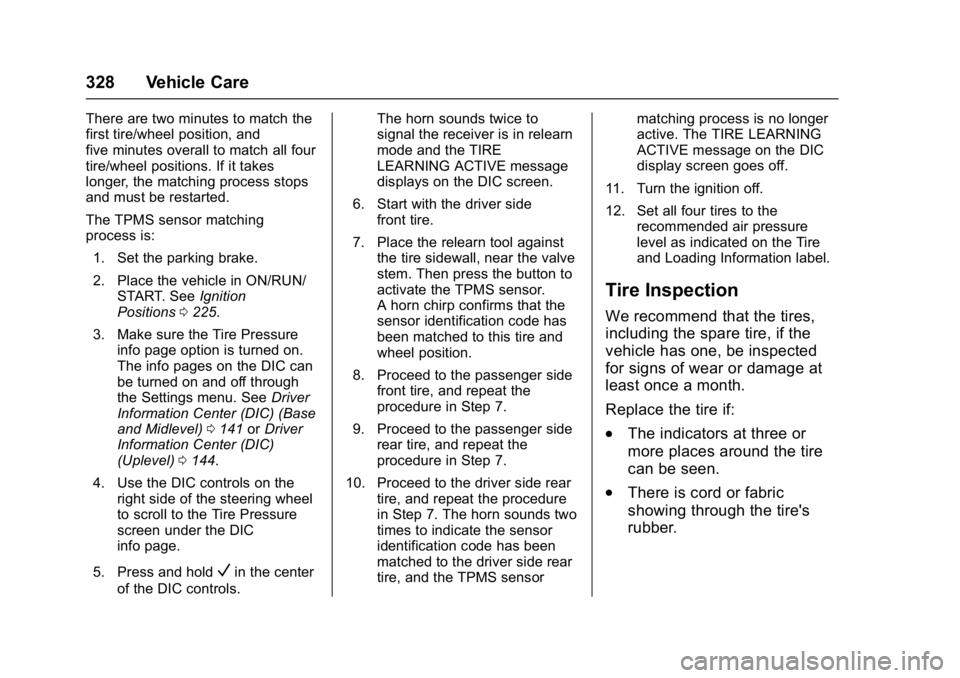
There are two minutes to match the
first tire/wheel position, and
five minutes overall to match all four
tire/wheel positions. If it takes
longer, the matching process stops
and must be restarted.
The TPMS sensor matching
process is:1. Set the parking brake.
2. Place the vehicle in ON/RUN/ START. See Ignition
Positions 0225.
3. Make sure the Tire Pressure info page option is turned on.
The info pages on the DIC can
be turned on and off through
the Settings menu. See Driver
Information Center (DIC) (Base
and Midlevel) 0141 orDriver
Information Center (DIC)
(Uplevel) 0144.
4. Use the DIC controls on the right side of the steering wheel
to scroll to the Tire Pressure
screen under the DIC
info page.
5. Press and hold
Vin the center
of the DIC controls. The horn sounds twice to
signal the receiver is in relearn
mode and the TIRE
LEARNING ACTIVE message
displays on the DIC screen.
6. Start with the driver side front tire.
7. Place the relearn tool against the tire sidewall, near the valve
stem. Then press the button to
activate the TPMS sensor.
A horn chirp confirms that the
sensor identification code has
been matched to this tire and
wheel position.
8. Proceed to the passenger side front tire, and repeat the
procedure in Step 7.
9. Proceed to the passenger side rear tire, and repeat the
procedure in Step 7.
10. Proceed to the driver side rear tire, and repeat the procedure
in Step 7. The horn sounds two
times to indicate the sensor
identification code has been
matched to the driver side rear
tire, and the TPMS sensor matching process is no longer
active. The TIRE LEARNING
ACTIVE message on the DIC
display screen goes off.
11. Turn the ignition off.
12. Set all four tires to the recommended air pressure
level as indicated on the Tire
and Loading Information label.
Tire Inspection
We recommend that the tires,
including the spare tire, if the
vehicle has one, be inspected
for signs of wear or damage at
least once a month.
Replace the tire if:
.The indicators at three or
more places around the tire
can be seen.
.There is cord or fabric
showing through the tire's
rubber.
Page 401 of 419
GMC Acadia/Acadia Denali Owner Manual (GMNA-Localizing-U.S./Canada/
Mexico-9803770) - 2017 - crc - 7/12/16
400 OnStar
from each other and use a
combination of letters, numbers,
and symbols to increase the
security.
. Change the default name of the
SSID (Service Set Identifier).
This is your network’s name that
is visible to other wireless
devices. Choose a unique name
and avoid family names or
vehicle descriptions.
OnStar Wi-Fi
®Hotspot (If
Equipped)
The vehicle may have a built-in
Wi-Fi hotspot that provides access
to the Internet and web content at
4G LTE speed. Up to seven mobile
devices can be connected. A data
plan is required. Use the in-vehicle
controls only when it is safe to
do so.
1. To retrieve Wi-Fi hotspot information, press
=, wait for
the prompt, then say “Wi-Fi
settings.” On some vehicles,
touch Wi-Fi Settings on the
screen. 2. The Wi-Fi settings will display
the Wi-Fi hotspot name (SSID),
password, and on some
vehicles, the connection type
(no Internet connection, 3G,
4G, 4G LTE), and signal quality
(poor, good, excellent).
3. To change the SSID or password, press
Qor call
1-888-4ONSTAR to connect
with an Advisor.
After initial set-up, your vehicle’s
Wi-Fi hotspot will connect
automatically to your mobile
devices. Manage data usage by
turning Wi-Fi on or off on your
mobile device, using the
RemoteLink mobile app, or by
contacting an OnStar Advisor.
OnStar RemoteLink
®Mobile App
(If Equipped)
Download the OnStar RemoteLink
mobile app to select Apple
®iOS,
Android™, BlackBerry®,
or Windows®mobile devices.
OnStar Subscribers can access the
following services from a mobile
device: .
Remotely start/stop the vehicle,
if factory-equipped.
. Lock/unlock doors, if equipped
with automatic locks.
. Activate the horn and lamps.
. Check the vehicle’s fuel level, oil
life, or tire pressure,
if factory-equipped with the Tire
Pressure Monitor System.
. Send directions to the vehicle.
. Locate the vehicle on a map
(U.S. market only).
. Turn the vehicle's Wi-Fi hotspot
on/off, manage settings, and
monitor data consumption,
if equipped.
For OnStar RemoteLink information
and compatibility, see
www.onstar.com (U.S.) or
www.onstar.ca (Canada).
Remote Services
Contact an OnStar Advisor to
unlock the doors or sound the horn
and flash the lamps.