seats GMC ACADIA 2020 Get To Know Guide
[x] Cancel search | Manufacturer: GMC, Model Year: 2020, Model line: ACADIA, Model: GMC ACADIA 2020Pages: 20, PDF Size: 8.68 MB
Page 4 of 20

4
REMOTE KEYLESS ENTRY TRANSMITTER
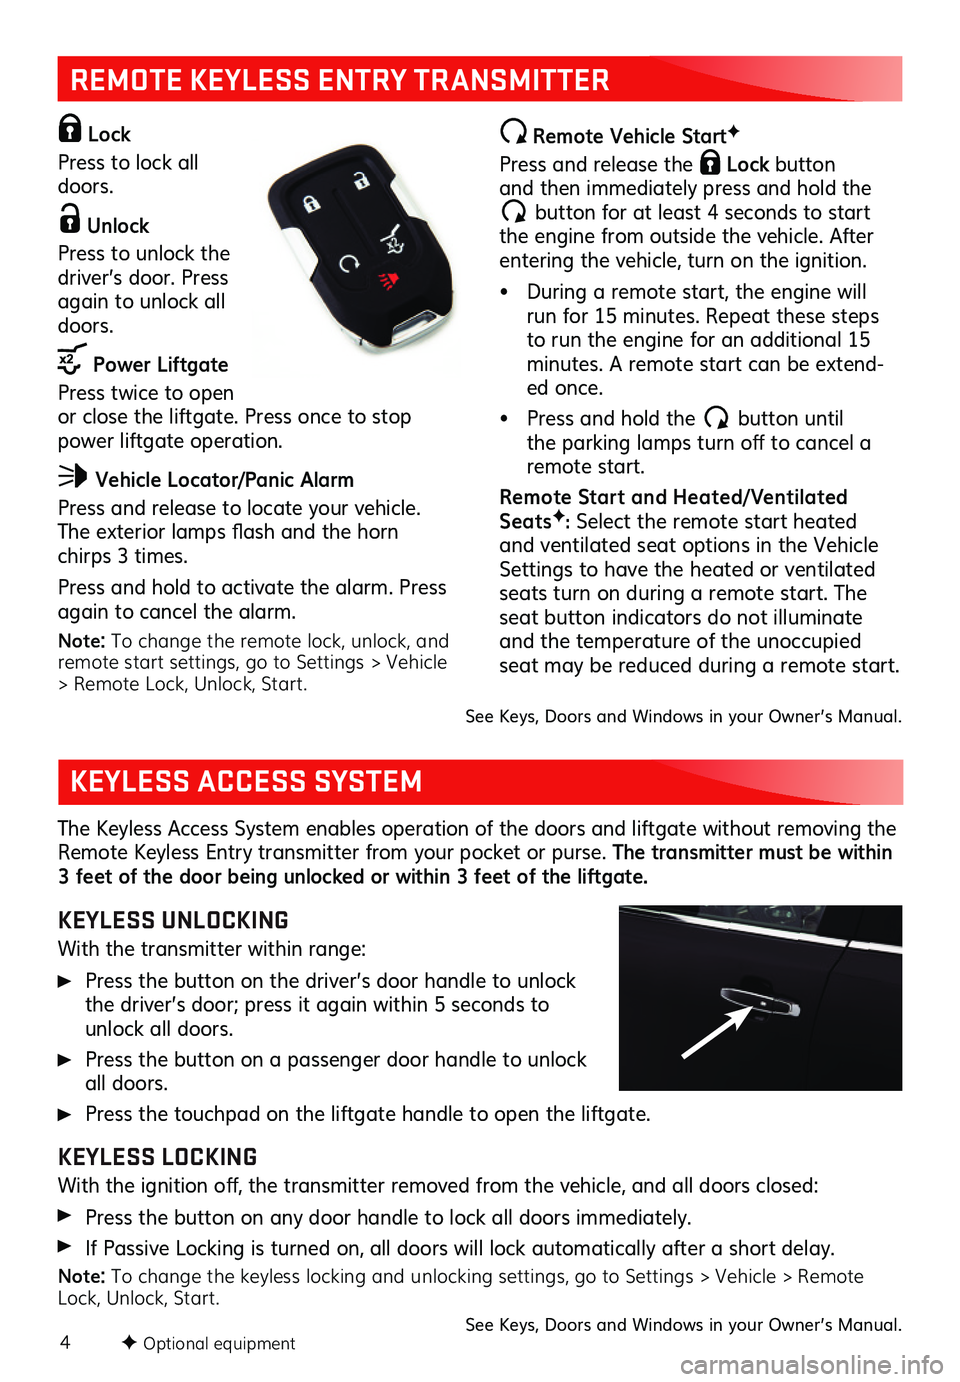
Lock
Press to lock all doors.
Unlock
Press to unlock the driver’s door. Press again to unlock all doors.
Power Liftgate
Press twice to open or close the liftgate. Press once to stop power liftgate operation.
Vehicle Locator/Panic Alarm
Press and release to locate your vehicle. The exterior lamps flash and the horn chirps 3 times.
Press and hold to activate the alarm. Press again to cancel the alarm.
Note: To change the remote lock, unlock, and remote start settings, go to Settings > Vehicle > Remote Lock, Unlock, Start.
Remote Vehicle StartF
Press and release the Lock button and then immediately press and hold the
button for at least 4 seconds to start the engine from outside the vehicle. After entering the vehicle, turn on the ignition.
• During a remote start, the engine will run for 15 minutes. Repeat these steps to run the engine for an additional 15 minutes. A remote start can be extend-ed once.
• Press and hold the button until the parking lamps turn off to cancel a remote start.
Remote Star t and Heated/ Ventilated SeatsF: Select the remote start heated and ventilated seat options in the Vehicle Settings to have the heated or ventilated seats turn on during a remote start. The seat button indicators do not illuminate and the temperature of the unoccupied seat may be reduced during a remote start.
The Keyless Access System enables operation of the doors and liftgate without removing the Remote Keyless Entry transmitter from your pocket or purse. The transmitter must be within 3 feet of the door being unlocked or within 3 feet of the liftgate.
KEYLESS UNLOCKING
With the transmitter within range:
Press the button on the driver’s door handle to unlock the driver’s door; press it again within 5 seconds to unlock all doors.
Press the button on a passenger door handle to unlock all doors.
Press the touchpad on the liftgate handle to open the liftgate.
KEYLESS LOCKING
With the ignition off, the transmitter removed from the vehicle, and all doors closed:
Press the button on any door handle to lock all doors immediately.
If Passive Locking is turned on, all doors will lock automatically after a short delay.
Note: To change the keyless locking and unlocking settings, go to Settings > Vehicle > Remote Lock, Unlock, Start. See Keys, Doors and Windows in your Owner’s Manual.
KEYLESS ACCESS SYSTEM
See Keys, Doors and Windows in your Owner’s Manual.
F Optional equipment
Page 7 of 20

7
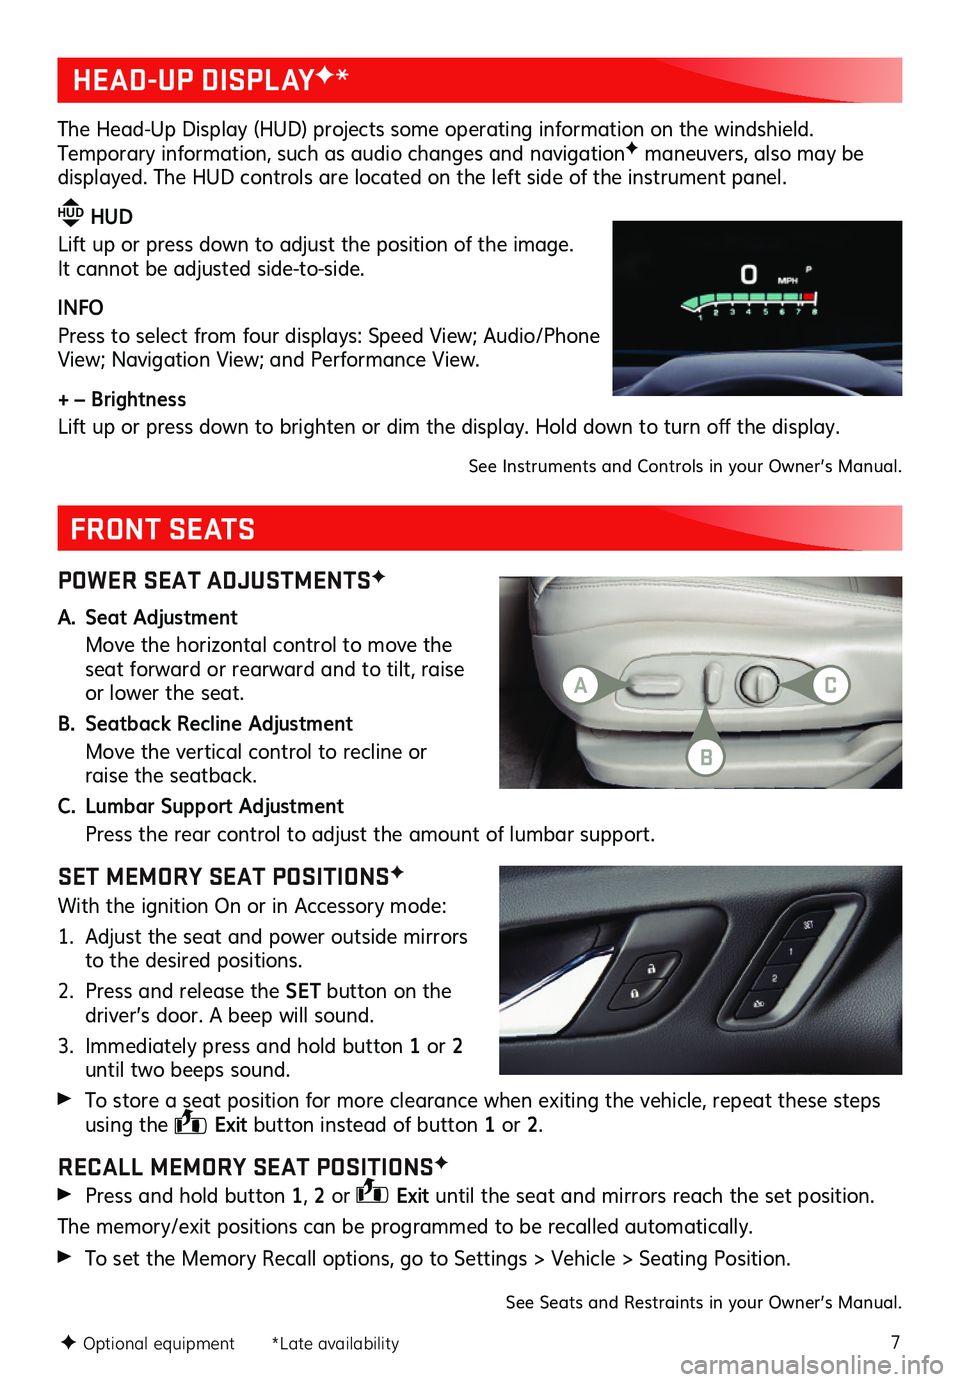
POWER SEAT ADJUSTMENTSF
A. Seat Adjustment
Move the horizontal control to move the seat forward or rearward and to tilt, raise or lower the seat.
B. Seatback Recline Adjustment
Move the vertical control to recline or raise the seatback.
C. Lumbar Support Adjustment
Press the rear control to adjust the amount of lumbar support.
SET MEMORY SEAT POSITIONSF
With the ignition On or in Accessory mode:
1. Adjust the seat and power outside mirrors to the desired positions.
2. Press and release the SET button on the driver’s door. A beep will sound.
3. Immediately press and hold button 1 or 2 until two beeps sound.
To store a seat position for more clearance when exiting the vehicle, repeat these steps using the Exit button instead of button 1 or 2.
RECALL MEMORY SEAT POSITIONSF
Press and hold button 1, 2 or Exit until the seat and mirrors reach the set position.
The memory/exit positions can be programmed to be recalled automatically.
To set the Memory Recall options, go to Settings > Vehicle > Seating Position.
FRONT SEATS
HEAD-UP DISPLAYF*
The Head-Up Display (HUD) projects some operating information on the windshield. Temporary information, such as audio changes and navigationF maneuvers, also may be
displayed. The HUD controls are located on the left side of the instrument panel.
HUD HUD
Lift up or press down to adjust the position of the image. It cannot be adjusted side-to-side.
INFO
Press to select from four displays: Speed View; Audio/Phone View; Navigation View; and Performance View.
+ – Brightness
Lift up or press down to brighten or dim the display. Hold down to turn off the display.
See Instruments and Controls in your Owner’s Manual.
F Optional equipment *Late availability
See Seats and Restraints in your Owner’s Manual.
AC
B
Page 8 of 20

8
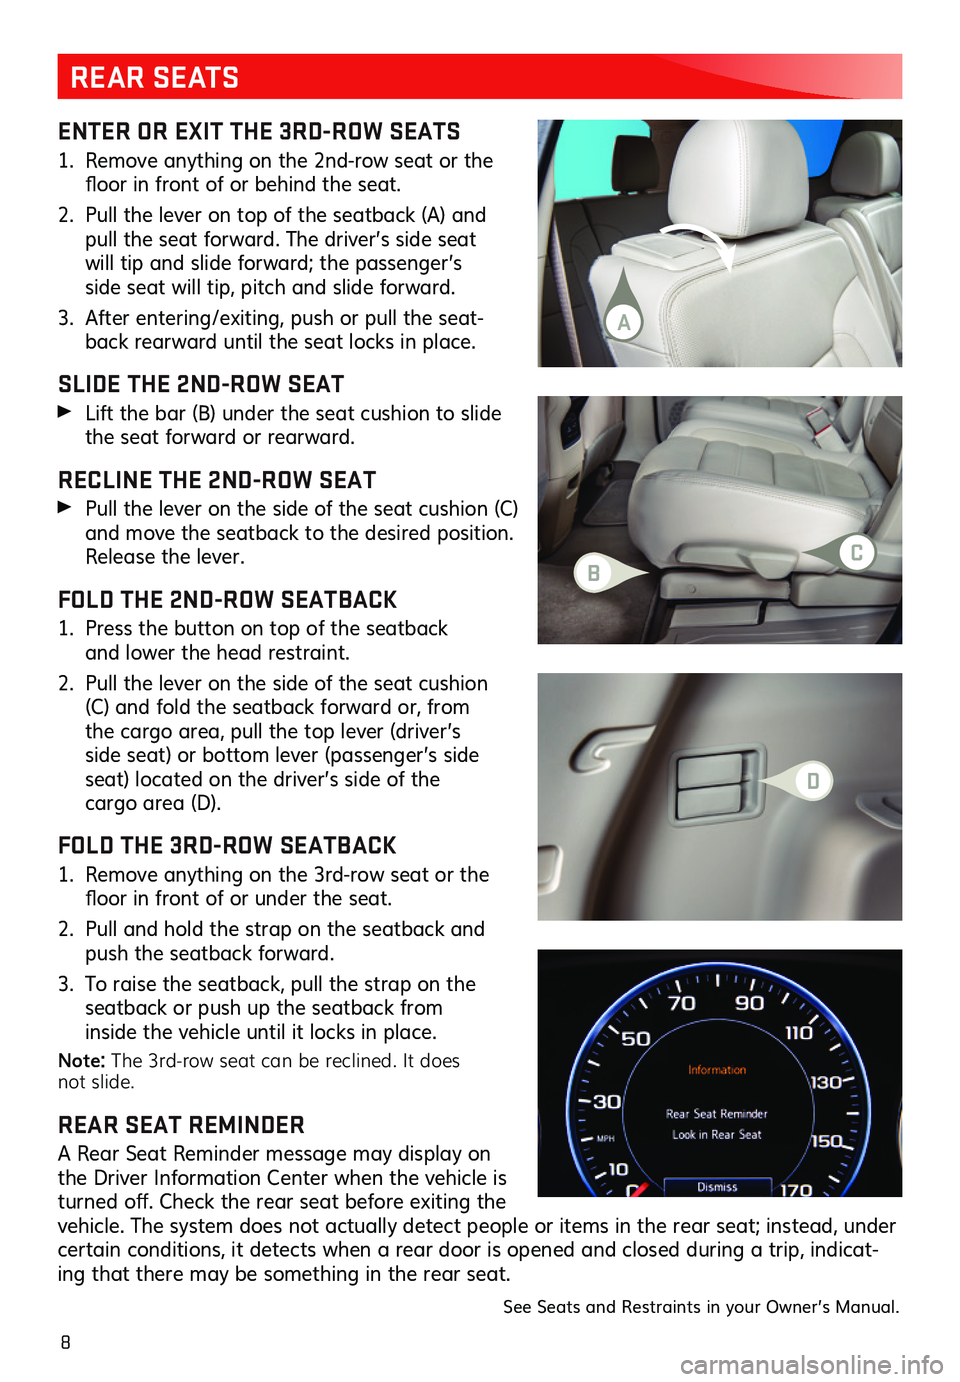
ENTER OR EXIT THE 3RD-ROW SEATS
1. Remove anything on the 2nd-row seat or the floor in front of or behind the seat.
2. Pull the lever on top of the seatback (A) and pull the seat forward. The driver’s side seat will tip and slide forward; the passenger’s side seat will tip, pitch and slide forward.
3. After entering/exiting, push or pull the seat-back rearward until the seat locks in place.
SLIDE THE 2ND-ROW SEAT
Lift the bar (B) under the seat cushion to slide the seat forward or rearward.
RECLINE THE 2ND-ROW SEAT
Pull the lever on the side of the seat cushion (C) and move the seatback to the desired position. Release the lever.
FOLD THE 2ND-ROW SEATBACK
1. Press the button on top of the seatback and lower the head restraint.
2. Pull the lever on the side of the seat cushion (C) and fold the seatback forward or, from the cargo area, pull the top lever (driver’s side seat) or bottom lever (passenger’s side seat) located on the driver’s side of the cargo area (D).
FOLD THE 3RD-ROW SEATBACK
1. Remove anything on the 3rd-row seat or the floor in front of or under the seat.
2. Pull and hold the strap on the seatback and push the seatback forward.
3. To raise the seatback, pull the strap on the
seatback or push up the seatback from inside the vehicle until it locks in place.
Note: The 3rd-row seat can be reclined. It does not slide.
REAR SEAT REMINDER
A Rear Seat Reminder message may display on the Driver Information Center when the vehicle is turned off. Check the rear seat before exiting the vehicle. The system does not actually detect people or items in the rear seat; instead, under certain conditions, it detects when a rear door is opened and closed during a trip, indicat-ing that there may be something in the rear seat.
REAR SEATS
See Seats and Restraints in your Owner’s Manual.
B
D
C
A
Page 14 of 20

14
AUTOMATIC CLIMATE CONTROLS
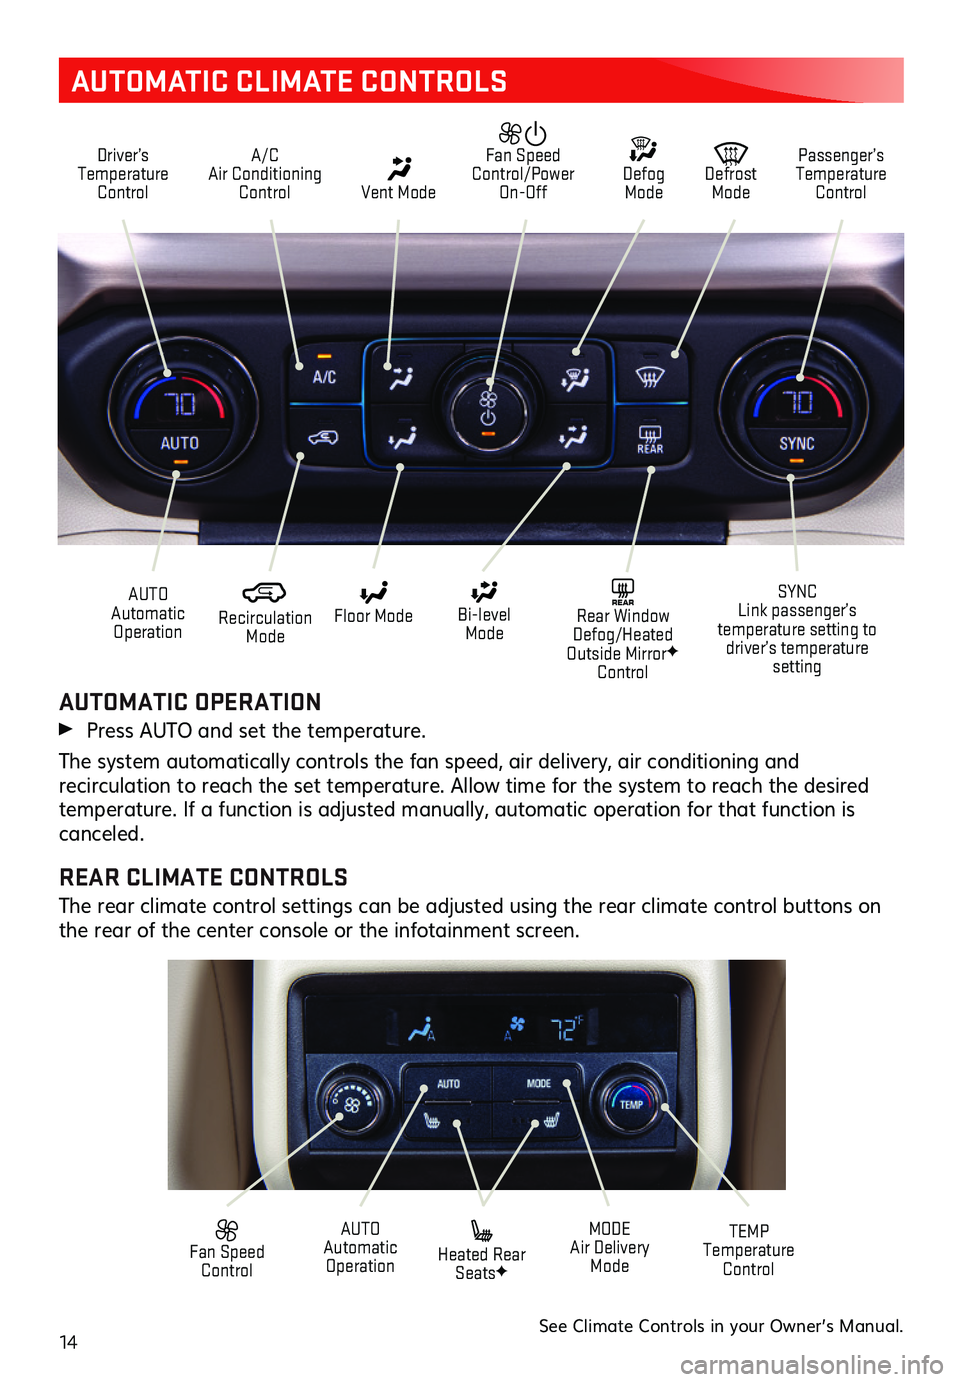
Driver’s Temperature Control
A/C Air Conditioning Control Vent Mode
Defrost Mode
Defog Mode
Passenger’s Temperature Control
Fan Speed Control/Power On-Off
Recirculation Mode
AUTO Automatic Operation
Floor Mode
Heated Rear SeatsF
Bi-level Mode
SYNC Link passenger’s temperature setting to driver’s temperature setting
TEMP Temperature Control
REAR Rear Window Defog/Heated Outside MirrorF Control
MODE Air Delivery Mode
AUTO Automatic Operation
Fan Speed Control
AUTOMATIC OPERATION
Press AUTO and set the temperature.
The system automatically controls the fan speed, air delivery, air conditioning and
recirculation to reach the set temperature. Allow time for the system to reach the desired temperature. If a function is adjusted manually, automatic operation for that function is canceled.
REAR CLIMATE CONTROLS
The rear climate control settings can be adjusted using the rear climate control buttons on the rear of the center console or the infotainment screen.
See Climate Controls in your Owner’s Manual.