mirror GMC ACADIA 2021 Get To Know Guide
[x] Cancel search | Manufacturer: GMC, Model Year: 2021, Model line: ACADIA, Model: GMC ACADIA 2021Pages: 20, PDF Size: 1.78 MB
Page 2 of 20
2
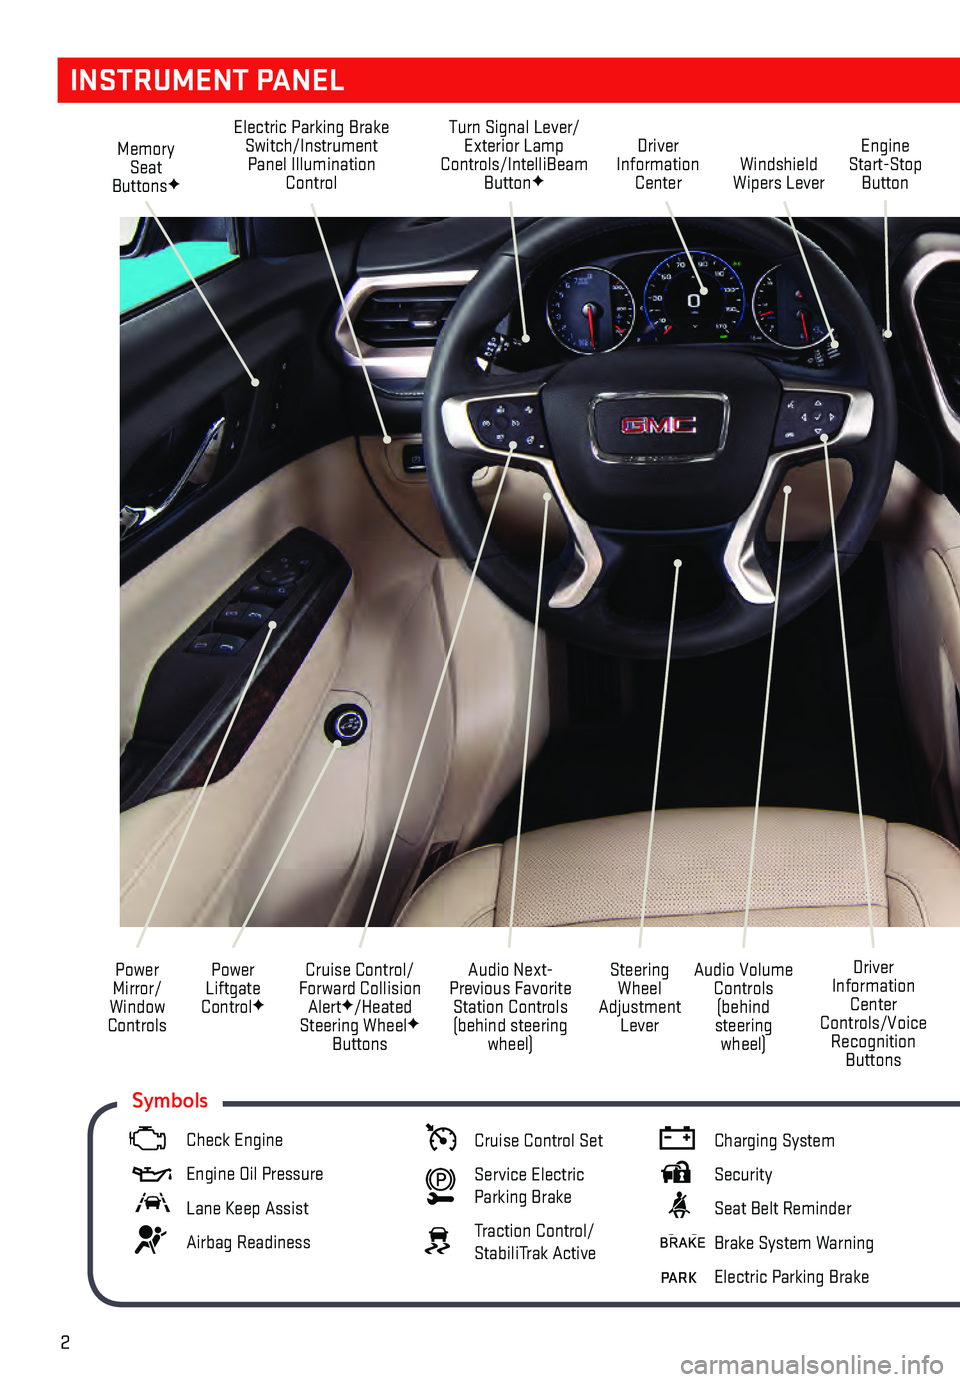
Memory Seat
ButtonsF
Electric Parking Brake Switch/Instrument Panel Illumination Control Turn Signal Lever/
Exterior Lamp
Controls/IntelliBeam Button
FWindshield
Wipers Lever Engine
Start-Stop Button
Driver
Information Center
Power
Liftgate
Control
F
Cruise Control/
Forward Collision Alert
F/Heated
Steering WheelF Buttons
Power
Mirror/
Window
Controls
Audio Volume Controls (behind
steering wheel) Driver
Information Center
Controls/Voice Recognition Buttons
Audio Next-
Previous Favorite Station Controls (behind steering wheel) Steering
Wheel
Adjustment Lever
INSTRUMENT PANEL
Check Engine
Engine Oil Pr essure
Lane Keep Assist
Airbag Readiness
Cruise Control Set
Service Electric
Parking Brake
Traction Control/
StabiliTrak Active
Charging System
Security
Seat Belt Reminder
Brake System Warning
PARK Electric Parking Brake
Symbols
Page 7 of 20
7
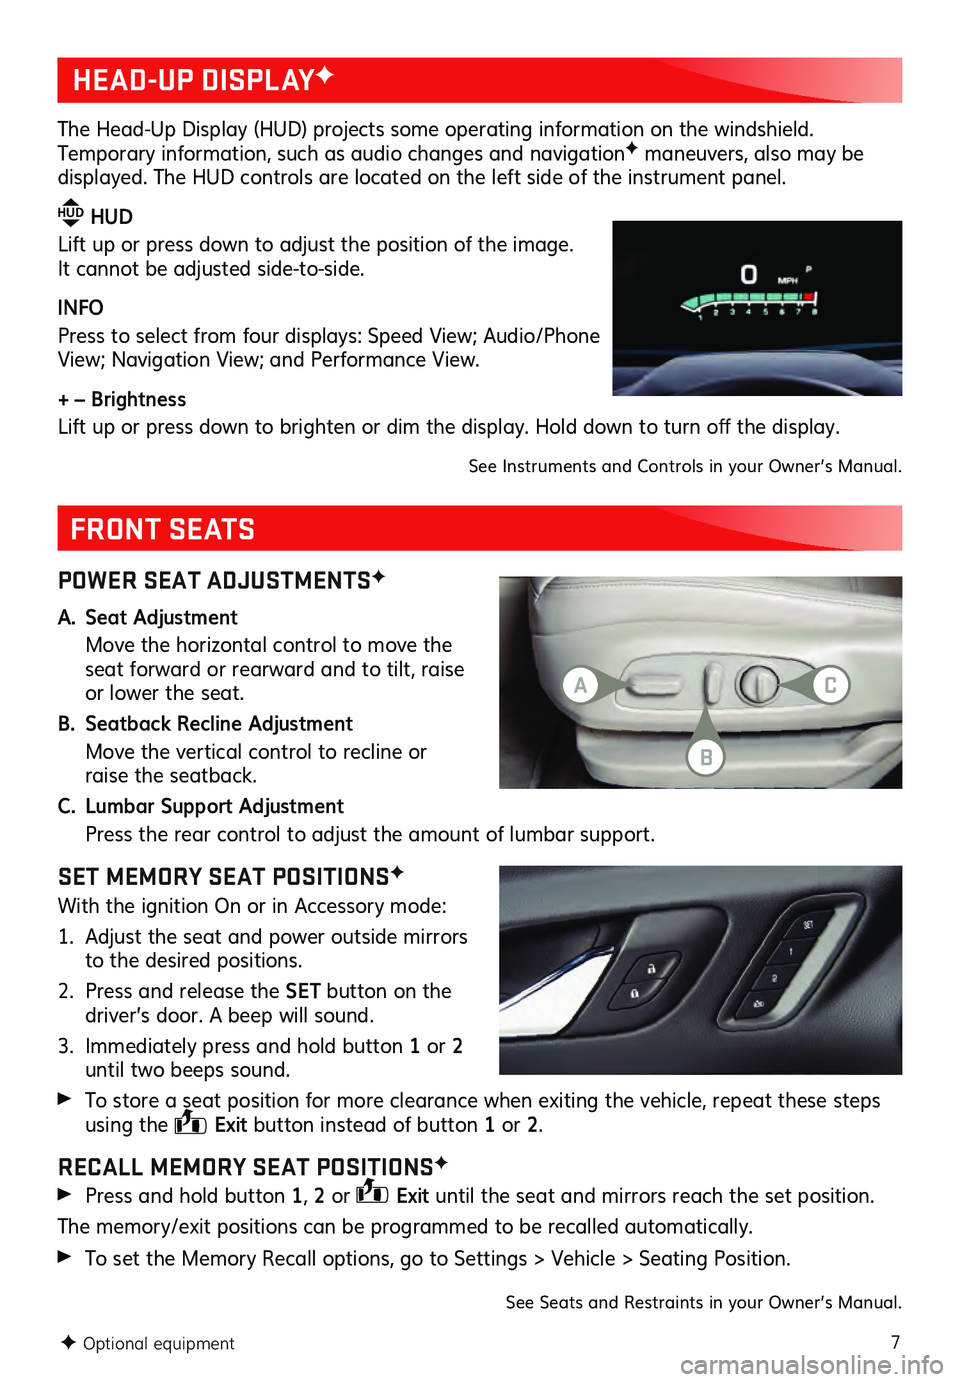
POWER SEAT ADJUSTMENTSF
A. Seat Adjustment
Move the horizontal control to move the seat forward or rearward and to tilt, raise
or lower the seat.
B. Seatback Recline Adjustment
Move the vertic al control to recline or raise the seatback.
C. Lumbar Support Adjustment
Press the rear control to adjust the amount of lumbar support.
SET MEMORY SEAT POSITIONSF
With the ignition On or in Accessory mode:
1. Adjust the seat and power outside mirrors to the desired positions.
2. Press and release the SET button on the
driver’s door. A beep will sound.
3. Immedia tely press and hold button 1 or 2
until two beeps sound.
To store a s eat position for more clearance when exiting the vehicle, repeat these steps using the Exit
button instead of button 1 or 2 .
RECALL MEMORY SEAT POSITIONSF
Press and hold button 1, 2 or Exit until the seat and mirrors reach the set position.
The memory/exit positions can be programmed to be recalled automatically.
To set the Memory Rec all options, go to Settings > Vehicle > Seating Position.
FRONT SEATS
HEAD-UP DISPLAYF
The Head-Up Display (HUD) projects some operating information on the windshield. Temporary information, such as audio changes and navigationF maneuvers, also may be displayed. The HUD controls are located on the left side of the instrument panel.
HUD HUD
Lift up or press down to adjust the position of the image.
It cannot be adjusted side-to-side.
INFO
Press to select from four displays: Speed View; Audio/Phone
View; Navigation View; and Performance View.
+ – Brightness
Lift up or pres s down to brighten or dim the dis play. Hold down to tu rn off the dis play.
See Instruments and Controls in your Owner’s Manual.
F Optional equipment
See Seats and Restraints in your Owner’s Manual.
AC
B
Page 14 of 20
14
AUTOMATIC CLIMATE CONTROLS
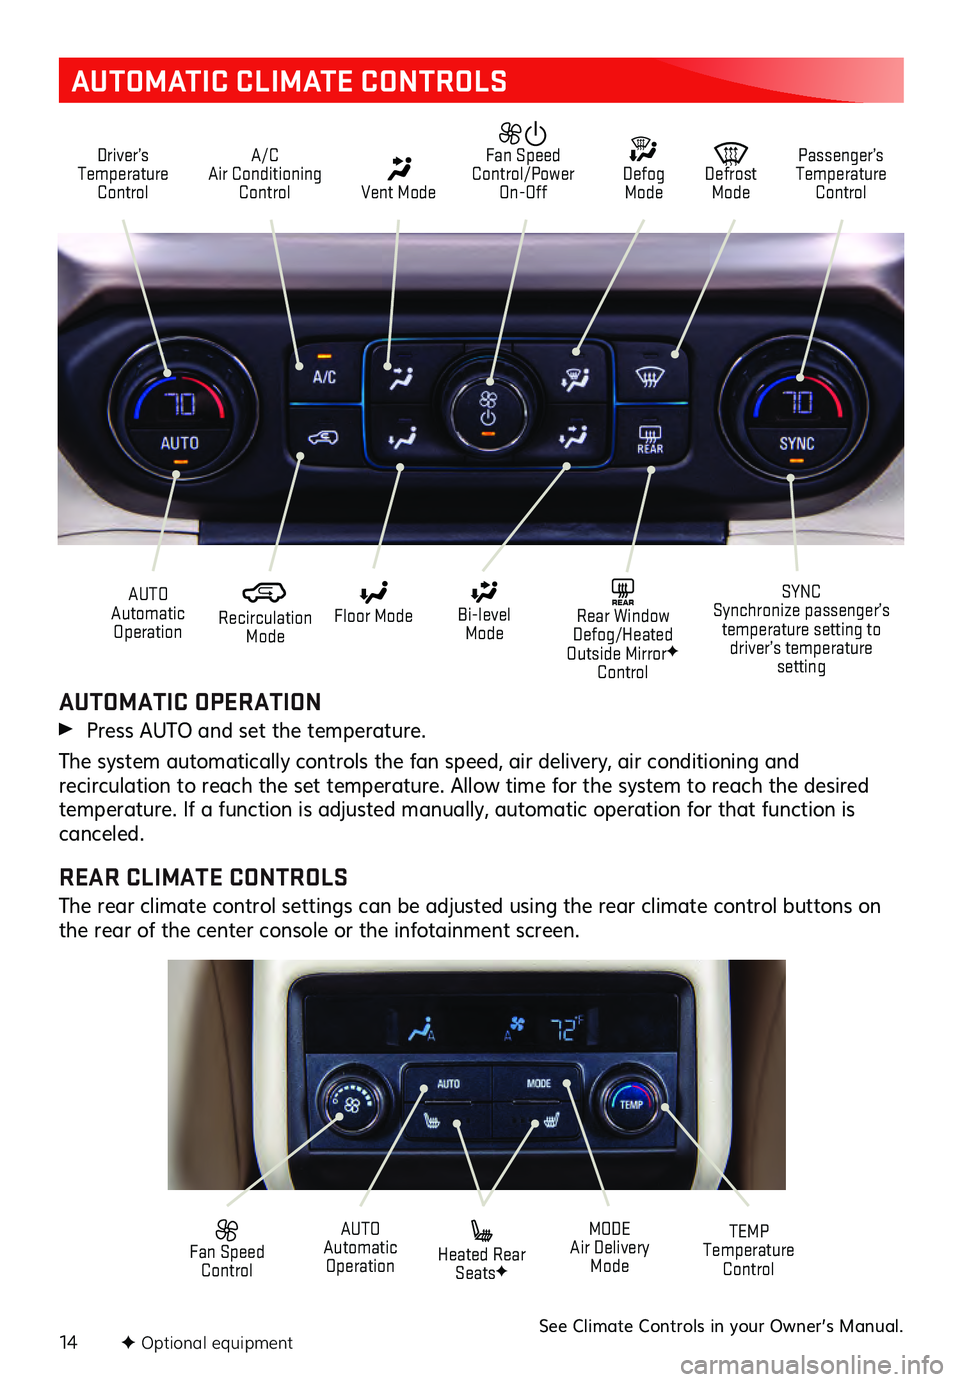
Driver’s Temperature Control A/C
Air Conditioning Control Vent Mode
Defrost Mode Defog Mode Passenger’s
Temperature Control
Fan Speed
Control/Power On-Off
Recirculation Mode
AUTO
Automatic Operation Floor Mode
Heated Rear SeatsF
Bi-level Mode SYNC
Synchronize passenger’s temperature setting to driver’s temperature setting
TEMP
Temperature ControlREAR Rear Window
Defog/Heated
Outside Mirror
F
Control
MODE
Air Delivery Mode
AUTO
Automatic Operation
Fan Speed Control
AUTOMATIC OPERATION
Press AUTO and set the temperature.
The system automatically controls the fan speed, air delivery, air conditioning and recirculation to reach the set temperature. Allow time for the system to reach the desired temperature. If a function is adjusted manually, automatic operation for that function is
canceled.
REAR CLIMATE CONTROLS
The rear climate control settings can be adjusted using the rear climate control buttons on
the rear of the center console or the infotainment screen.
See Climate Controls in your Owner’s Manual.F Optional equipment
Page 16 of 20
16
DRIVER ASSISTANCE SYSTEMS
Safety or driver assistance features are no substitute for the driver’s responsibility to operate the
vehicle in a safe manner. The driver should remain attentive to traffic, surroundings and road
conditions at all times. Read your Owner’s Manual for important feature limitations and information.
SAFETY ALERT SEATF – The driver’s seat pulses — left side, right side or simultaneously
— to alert the driver of the direction of potential hazards.
Audible alerts or seat pulsing alerts may be selected. To change the alert settings, go to Settings > Vehicle > Collision/Detection Systems > Alert Type.
LANE CHANGE ALERT WITH SIDE BLIND ZONE ALERT – While driving, the system
displays a warning symbol on the left or right side mirror when a moving vehic le is detected rapidly approac hing or is in a s ide blind zone. The warning s ymbol fla shes if a tu rn signal is activated when a vehicle has been detected on the same side.
To turn on or off, go to Settings > Vehic le > Collis ion/Detection Sys tems > L ane
Change Alert.
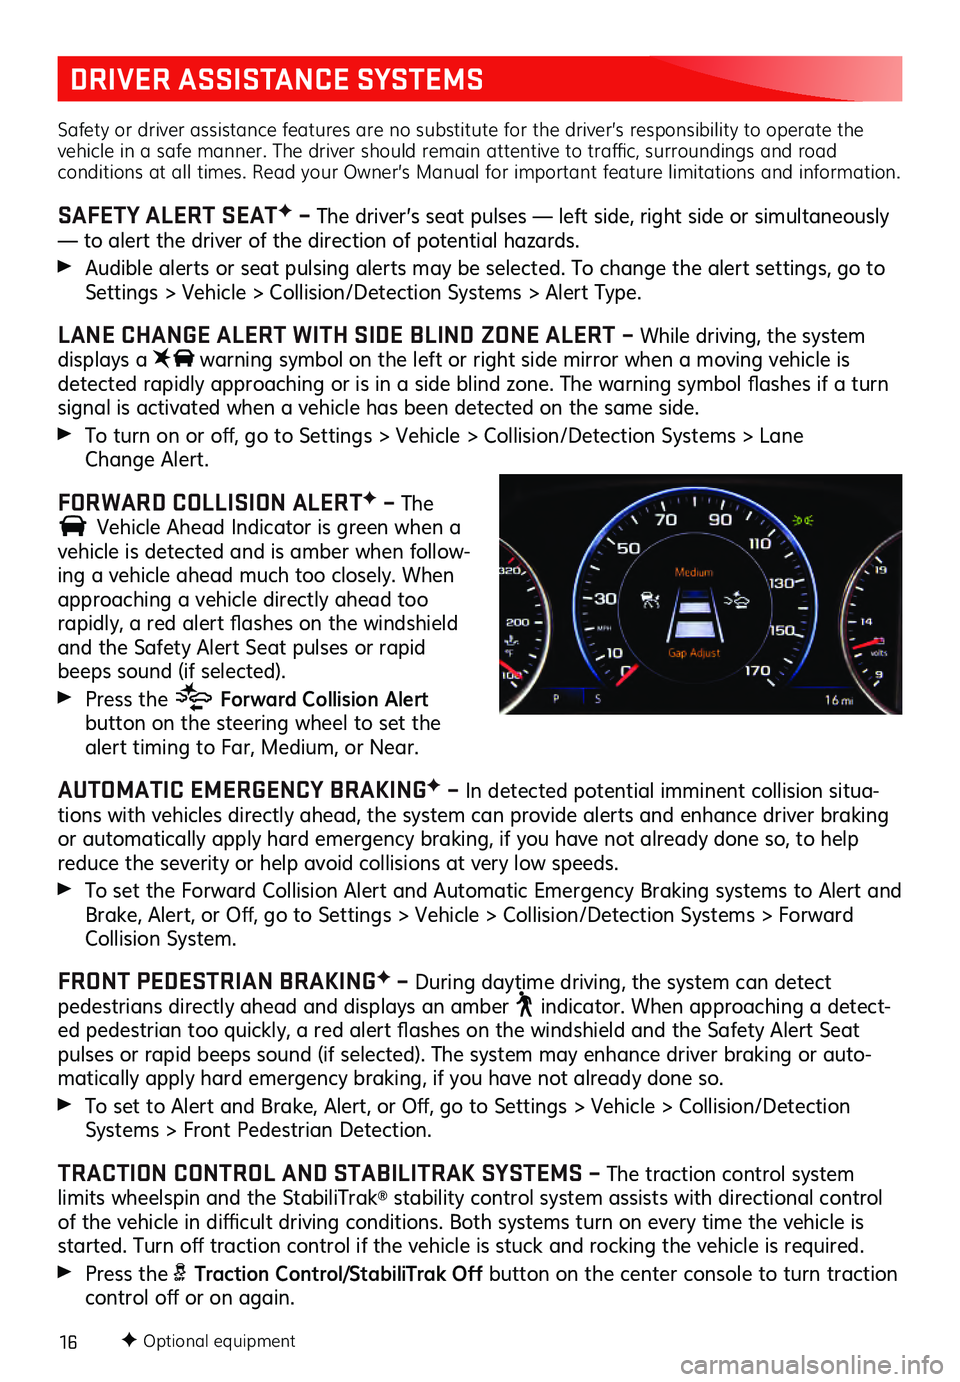
FORWARD COLLISION ALERTF – The
Vehicle Ahead Indicator is green when a vehicle is detected and is amber when follow-
ing a vehicle ahead much too closely. When
approaching a vehicle directly ahead too
rapidly, a red alert fla shes on the windshield and the Safety Alert Seat pulses or rapid beeps sound (if selected).
Press the Forward Collision Alert button on the steering wheel to set the alert timing to Far, Mediu m, or Near.
AUTOMATIC EMERGENCY BRAKINGF – In detected potential imminent collision situa -
tions with vehicles directly ahead, the system can provide alerts and enhance driver braking
or automatically apply hard emergency braking, if you have not already done so, to help
reduce the severity or help avoid collisions at very low speeds.
To set the Forwa rd Collis ion Alert and Au tomatic Emergency Braking s ystems to Alert and Brake, Alert, or Off, go to Settings > Vehic le > Collis ion/Detection Sys tems > Forwa rd Collision System.
FRONT PEDESTRIAN BRAKINGF – During daytime driving, the system can detect pedestrians directly ahead and displays an amber indicator. When approaching a detect-ed pedestrian too quic kly, a red alert fla shes on the winds hield and the Sa fety Alert Seat pulses or rapid beeps sound (if selected). The system may enhance driver braking or auto -
matically apply hard emergency braking, if you have not already done so.
To set to Alert and Brake, Alert, or Off, go to Settings > Vehic le > Collis ion/Detection Systems > Front Pedes trian Detec tion.
TRACTION CONTROL AND STABILITRAK SYSTEMS – The traction control system
limits wheelspin and the StabiliTrak® stability control system assists with directional control of the vehicle in diffi cult driving c onditions. Both s ystems tu rn on every time the vehicle is started. Turn off tra ction c ontrol if the vehicle is s tuck and rocking the vehicle is requ ired.
Press the Traction Control/StabiliTrak Off button on the center console to turn traction control off or on again.
F Optional equipment
Page 18 of 20
18
CRUISE CONTROL
SETTING CRUISE CONTROL
1. Press the On/Off button. The Cruise Control symbol will illuminate in white on the
instrument cluster.
2. When traveling at the des ired speed, press the SET– button to set the speed. The
symbol will illuminate in green on the instrument cluster.
ADJUSTING CRUISE CONTROL
RES+ Resume/Accelerate
Press to resume a set speed. When the
system is active, press to increase speed.
SET– Set/Coast
When the system is active, press to decrease
speed.
Cancel
Press to cancel the Cruise Control without erasing the set speed from memory. Pressing the
brake pedal will also cancel the Cruise Control.
The set speed is eras ed when Cru ise Control or the vehicle ignition is tu rned off.
ADAPTIVE CRUISE CONTROLF
The system maintains the Cruise Control set speed and a following gap — the time between
your vehicle and a vehicle detected directly ahead — by accelerating or braking automati -
cally while you continue to steer.
Press the Following Gap button to select a following gap s etting of Far, Mediu m, or Near. This is also the Forwa rd Collis ion AlertF setting.
Press and hold the Cancel button to switch between regular Cruise Control and Adaptive Cruise Control.
See Driving and Operating in your Owner’s Manual.
F Optional equipment
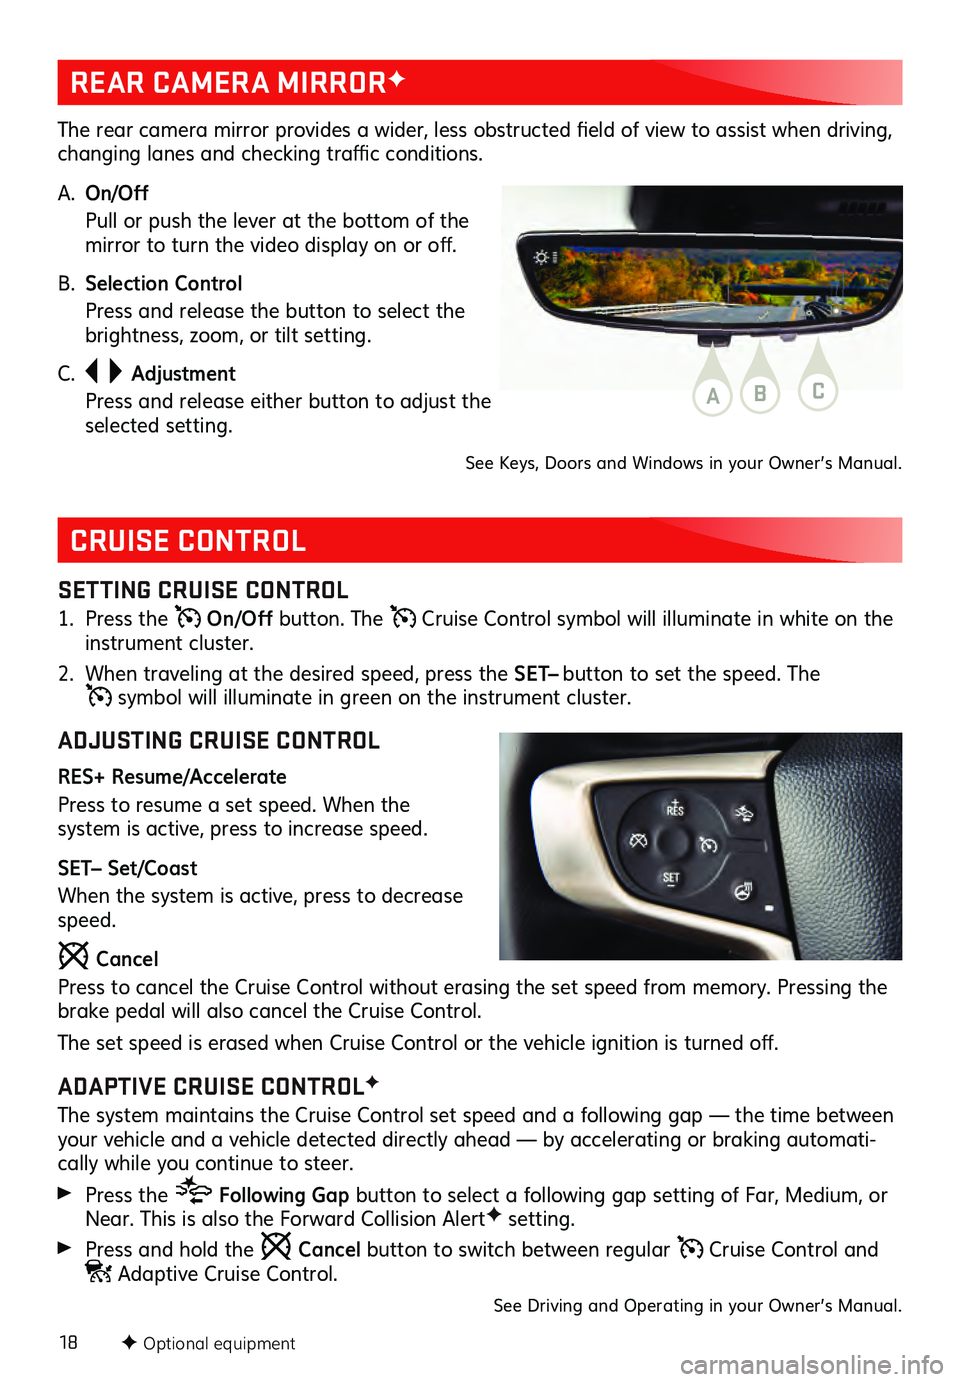
REAR CAMERA MIRRORF
The rear camera mirror provides a wider, les s obs tructed field of view to as sist when driving, changing lanes and c hecking tra ffic c onditions.
A. On/Off
Pull or push the lever at the bottom of the mirror to tu rn the video dis play on or off.
B. Selection Control
Press and release the button to select the brightness, zoom, or tilt setting.
C.
Adjustment
Press and release either button to adjust the selected setting.
See Keys, Doors and Windows in your Owner’s Manual.
ABC