GMC ACADIA 2023 Owners Manual
Manufacturer: GMC, Model Year: 2023, Model line: ACADIA, Model: GMC ACADIA 2023Pages: 384, PDF Size: 17.04 MB
Page 311 of 384
GMC Acadia/Acadia Denali Owner Manual (GMNA-Localizing-U.S./Canada/
Mexico-16402009) - 2023 - CRC - 3/28/22
310 Vehicle Care
such as troughs or ruts, is normal. If the
vehicle is vibrating when driving on a
smooth road, the tires and wheels may
need to be rebalanced. See your dealer for
proper diagnosis.
Wheel Replacement
Replace any wheel that is bent, cracked,
or badly rusted or corroded. If wheel nuts
keep coming loose, the wheel, wheel bolts,
and wheel nuts should be replaced. If the
wheel leaks air, replace it. Some aluminum
wheels can be repaired. See your dealer if
any of these conditions exist.
Your dealer will know the kind of wheel that
is needed.
Each new wheel should have the same
load-carrying capacity, diameter, width,
offset, and be mounted the same way as
the one it replaces.
Replace wheels, wheel bolts, wheel nuts,
or Tire Pressure Monitor System (TPMS)
sensors with new GM original equipment
parts.
{Warning
Using the wrong replacement wheels,
wheel bolts, or wheel nuts can be
dangerous. It could affect the braking and
handling of the vehicle. Tires can lose air
and cause loss of control, resulting in a
crash. Always use the correct wheel,
wheel bolts, and wheel nuts for
replacement.
{Warning
Replacing a wheel with a used one is
dangerous. How it has been used or how
far it has been driven may be unknown.
It could fail suddenly and cause a crash.
When replacing wheels, use a new GM
original equipment wheel.
Caution
The wrong wheel can also cause
problems with bearing life, brake cooling,
speedometer or odometer calibration,
headlamp aim, bumper height, vehicle
ground clearance, and tire or tire chain
clearance to the body and chassis.
Tire Chains
{Warning
If the vehicle has 235/55R20, 245/65R17,
or 255/65R17 size tires, do not use tire
chains. There is not enough clearance.
Tire chains used on a vehicle without the
proper amount of clearance can cause
damage to the brakes, suspension,
or other vehicle parts. The area damaged
by the tire chains could cause loss of
control and a crash. Use another type of
traction device only if its manufacturer
recommends it for the vehicle's tire size
combination and road conditions. Follow
that manufacturer's instructions. To avoid
vehicle damage, drive slow and readjust
or remove the traction device if it
contacts the vehicle. Do not spin the
wheels. If traction devices are used,
install them on the front tires.
Caution
If the vehicle is equipped with a tire size
other than 235/55R20, 245/65R17, or 255/
65R17 use tire chains only where legal
(Continued)
Page 312 of 384
GMC Acadia/Acadia Denali Owner Manual (GMNA-Localizing-U.S./Canada/
Mexico-16402009) - 2023 - CRC - 3/28/22
Vehicle Care 311
Caution (Continued)
and only when necessary. Use low profile
chains that add no more than 12 mm
thickness to the tire tread and inner
sidewall. Use chains that are the proper
size for the tires. Install them on the tires
of the front axle. Do not use chains on
the tires of the rear axle. Tighten them
as tightly as possible with the ends
securely fastened. Drive slowly and follow
the chain manufacturer's instructions.
If the chains contact the vehicle, stop and
retighten them. If the contact continues,
slow down until it stops. Driving too fast
or spinning the wheels with chains on
will damage the vehicle.
If a Tire Goes Flat
It is unusual for a tire to blow out while
driving, especially if the tires are maintained
properly. SeeTires0293. If air goes out of
a tire, it is much more likely to leak out
slowly. But if there is ever a blowout, here
are a few tips about what to expect and
what to do: If a front tire fails, the flat tire creates a
drag that pulls the vehicle toward that side.
Take your foot off the accelerator pedal and
grip the steering wheel firmly. Steer to
maintain lane position, and then gently
brake to a stop, well off the road,
if possible.
A rear blowout, particularly on a curve, acts
much like a skid and may require the same
correction as used in a skid. Stop pressing
the accelerator pedal and steer to straighten
the vehicle. It may be very bumpy and
noisy. Gently brake to a stop, well off the
road, if possible.
{Warning
Driving on a flat tire will cause
permanent damage to the tire.
Re-inflating a tire after it has been driven
on while severely underinflated or flat
may cause a blowout and a serious crash.
Never attempt to re-inflate a tire that has
been driven on while severely
underinflated or flat. Have your dealer or
an authorized tire service center repair or
replace the flat tire as soon as possible.
{Warning
Lifting a vehicle and getting under it to
do maintenance or repairs is dangerous
without the appropriate safety equipment
and training. If a jack is provided with
the vehicle, it is designed only for
changing a flat tire. If it is used for
anything else, you or others could be
badly injured or killed if the vehicle slips
off the jack. If a jack is provided with the
vehicle, only use it for changing a
flat tire.
If a tire goes flat, avoid further tire and
wheel damage by driving slowly to a level
place, well off the road, if possible. Turn on
the hazard warning flashers. See Hazard
Warning Flashers 0131.
If your vehicle is loaded at or near
maximum cargo capacity, it may be difficult
to fit the jack under the vehicle due to the
environment (shoulder slope, road debris,
etc.). Removal of some weight may improve
the ability to fit the jack under the vehicle
at the correct jacking location.
Page 313 of 384
GMC Acadia/Acadia Denali Owner Manual (GMNA-Localizing-U.S./Canada/
Mexico-16402009) - 2023 - CRC - 3/28/22
312 Vehicle Care
{Warning
Changing a tire can be dangerous. The
vehicle can slip off the jack and roll over
or fall causing injury or death. Find a
level place to change the tire. To help
prevent the vehicle from moving:1. Set the parking brake firmly.
2. Put the vehicle in P (Park).
3. Turn the vehicle off and do not restart the vehicle while it is raised.
4. Do not allow passengers to remain in the vehicle.
5. Place wheel blocks, if equipped, on both sides of the tire at the opposite
corner of the tire being changed.
This vehicle may come with a jack and spare
tire or a tire sealant and compressor kit. To
use the jacking equipment to change a spare
tire safely, follow the instructions below.
Then see Tire Changing 0318. To use the
tire sealant and compressor kit, see Tire
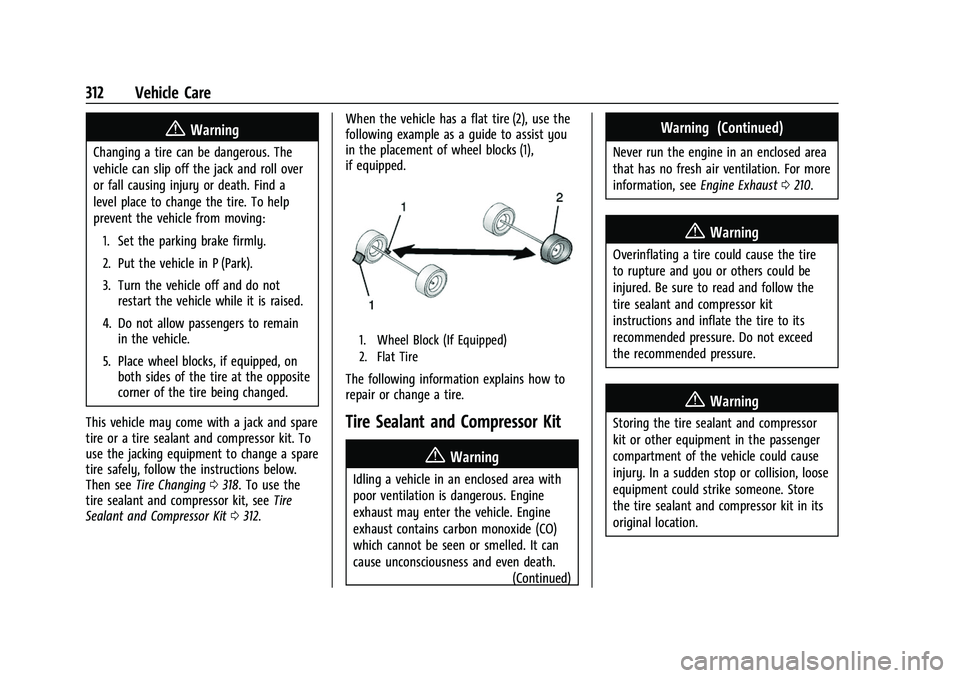
Sealant and Compressor Kit 0312. When the vehicle has a flat tire (2), use the
following example as a guide to assist you
in the placement of wheel blocks (1),
if equipped.
1. Wheel Block (If Equipped)
2. Flat Tire
The following information explains how to
repair or change a tire.
Tire Sealant and Compressor Kit
{Warning
Idling a vehicle in an enclosed area with
poor ventilation is dangerous. Engine
exhaust may enter the vehicle. Engine
exhaust contains carbon monoxide (CO)
which cannot be seen or smelled. It can
cause unconsciousness and even death.
(Continued)
Warning (Continued)
Never run the engine in an enclosed area
that has no fresh air ventilation. For more
information, seeEngine Exhaust0210.
{Warning
Overinflating a tire could cause the tire
to rupture and you or others could be
injured. Be sure to read and follow the
tire sealant and compressor kit
instructions and inflate the tire to its
recommended pressure. Do not exceed
the recommended pressure.
{Warning
Storing the tire sealant and compressor
kit or other equipment in the passenger
compartment of the vehicle could cause
injury. In a sudden stop or collision, loose
equipment could strike someone. Store
the tire sealant and compressor kit in its
original location.
Page 314 of 384
GMC Acadia/Acadia Denali Owner Manual (GMNA-Localizing-U.S./Canada/
Mexico-16402009) - 2023 - CRC - 3/28/22
Vehicle Care 313
If this vehicle has a tire sealant and
compressor kit, there may not be a spare
tire or tire changing equipment, and on
some vehicles there may not be a place to
store a tire.
The tire sealant and compressor can be used
to temporarily seal punctures up to 6 mm
(0.25 in) in the tread area of the tire. It can
also be used to inflate an underinflated tire.
If the tire has been separated from the
wheel, has damaged sidewalls, or has a
large puncture, the tire is too severely
damaged for the tire sealant and
compressor kit to be effective. SeeRoadside
Assistance Program 0354.
Read and follow all of the tire sealant and
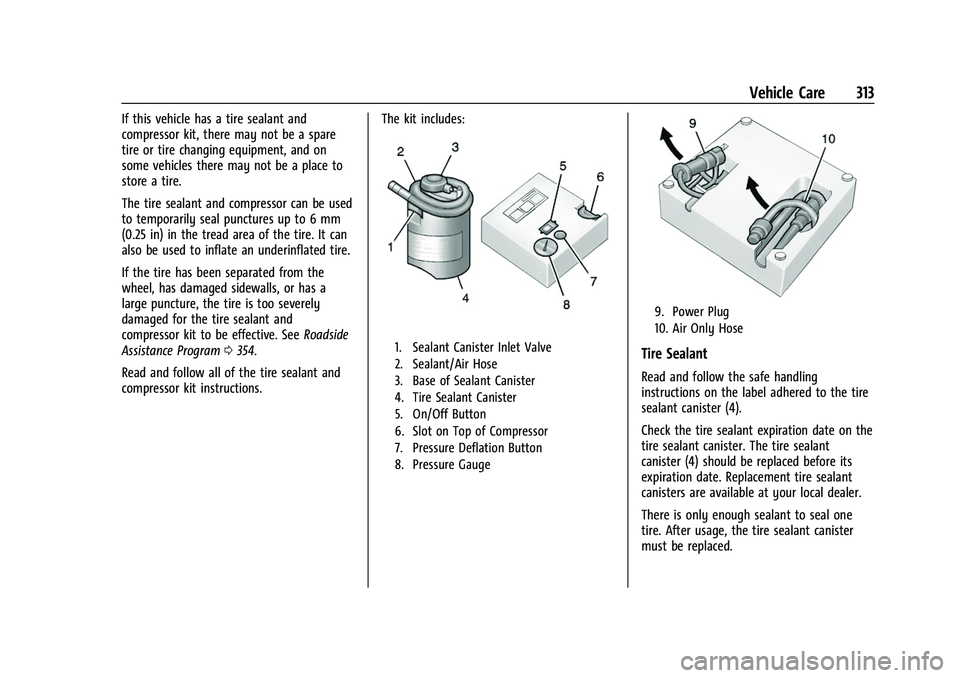
compressor kit instructions. The kit includes:
1. Sealant Canister Inlet Valve
2. Sealant/Air Hose
3. Base of Sealant Canister
4. Tire Sealant Canister
5. On/Off Button
6. Slot on Top of Compressor
7. Pressure Deflation Button
8. Pressure Gauge
9. Power Plug
10. Air Only Hose
Tire Sealant
Read and follow the safe handling
instructions on the label adhered to the tire
sealant canister (4).
Check the tire sealant expiration date on the
tire sealant canister. The tire sealant
canister (4) should be replaced before its
expiration date. Replacement tire sealant
canisters are available at your local dealer.
There is only enough sealant to seal one
tire. After usage, the tire sealant canister
must be replaced.
Page 315 of 384
GMC Acadia/Acadia Denali Owner Manual (GMNA-Localizing-U.S./Canada/
Mexico-16402009) - 2023 - CRC - 3/28/22
314 Vehicle Care
Using the Tire Sealant and Compressor
Kit to Temporarily Seal and Inflate a
Punctured Tire
When using the tire sealant and compressor
kit during cold temperatures, warm the kit
in a heated environment for five minutes.
This will help to inflate the tire faster.
If a tire goes flat, avoid further tire and
wheel damage by driving slowly to a level
place. Turn on the hazard warning flashers.
SeeHazard Warning Flashers 0131.
See If a Tire Goes Flat 0311 for other
important safety warnings.
Do not remove any objects that have
penetrated the tire.
1. Remove the tire sealant canister (4) and compressor from its storage location. See
Storing the Tire Sealant and Compressor
Kit 0318.
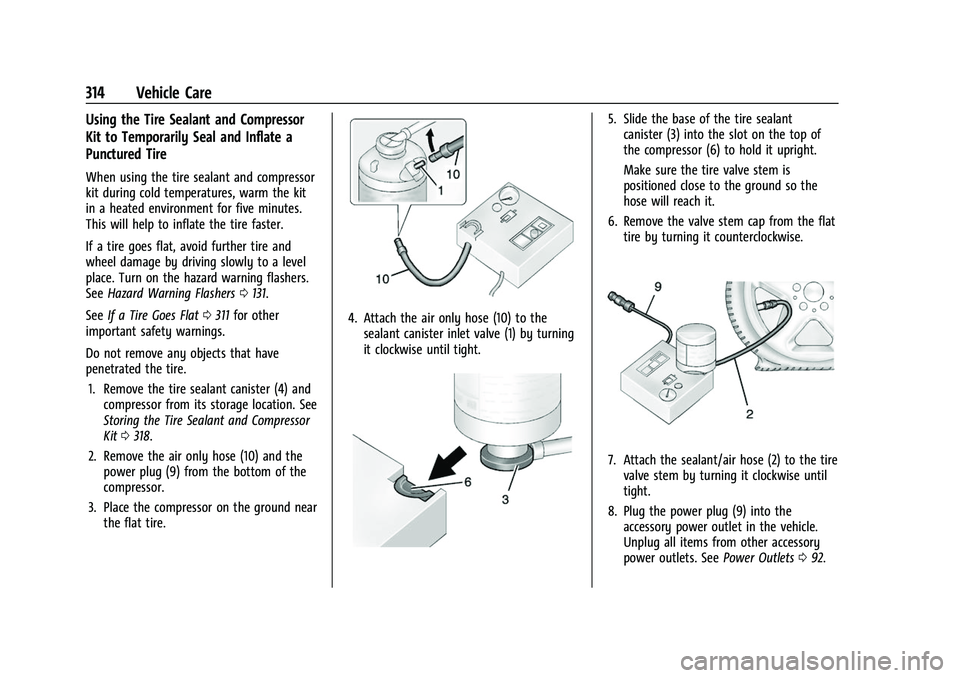
2. Remove the air only hose (10) and the power plug (9) from the bottom of the
compressor.
3. Place the compressor on the ground near the flat tire.
4. Attach the air only hose (10) to thesealant canister inlet valve (1) by turning
it clockwise until tight.
5. Slide the base of the tire sealantcanister (3) into the slot on the top of
the compressor (6) to hold it upright.
Make sure the tire valve stem is
positioned close to the ground so the
hose will reach it.
6. Remove the valve stem cap from the flat tire by turning it counterclockwise.
7. Attach the sealant/air hose (2) to the tirevalve stem by turning it clockwise until
tight.
8. Plug the power plug (9) into the accessory power outlet in the vehicle.
Unplug all items from other accessory
power outlets. See Power Outlets092.
Page 316 of 384
GMC Acadia/Acadia Denali Owner Manual (GMNA-Localizing-U.S./Canada/
Mexico-16402009) - 2023 - CRC - 3/28/22
Vehicle Care 315
If the vehicle has an accessory power
outlet, do not use the cigarette lighter.
If the vehicle only has a cigarette lighter,
use the cigarette lighter.
Do not pinch the power plug cord in the
door or window.
9. Start the vehicle. The vehicle must be running while using the air compressor.
10. Press the on/off button (5) to turn the tire sealant and compressor kit on.
The compressor will inject sealant and air
into the tire.
The pressure gauge (8) will initially show
a high pressure while the compressor
pushes the sealant into the tire. Once
the sealant is completely dispersed into
the tire, the pressure will quickly drop
and start to rise again as the tire inflates
with air only.
11. Inflate the tire to the recommended inflation pressure using the pressure
gauge (8). The recommended inflation
pressure can be found on the Tire and
Loading Information label. See Tire
Pressure 0299.
The pressure gauge (8) may read higher
than the actual tire pressure while the
compressor is on. Turn the compressor off to get an accurate pressure reading.
The compressor may be turned on/off
until the correct pressure is reached.
Caution
If the recommended pressure cannot be
reached after approximately 25 minutes,
the vehicle should not be driven farther.
The tire is too severely damaged and the
tire sealant and compressor kit cannot
inflate the tire. Remove the power plug
from the accessory power outlet and
unscrew the inflating hose from the tire
valve. See
Roadside Assistance Program
0 354.
12. Press the on/off button (5) to turn the tire sealant and compressor kit off.
The tire is not sealed and will continue
to leak air until the vehicle is driven and
the sealant is distributed in the tire.
Therefore, Steps 13–21 must be done
immediately after Step 12.
Be careful while handling the tire sealant
and compressor kit as it could be warm
after usage.
13. Unplug the power plug (9) from the accessory power outlet in the vehicle. 14. Turn the sealant/air hose (2)
counterclockwise to remove it from the
tire valve stem.
15. Replace the tire valve stem cap.
16. Remove the tire sealant canister (4) from the slot on top of the compressor (6).
17. Turn the air only hose (10) counterclockwise to remove it from the
tire sealant canister inlet valve (1).
18. Turn the sealant/air hose (2) clockwise onto the sealant canister inlet valve (1)
to prevent sealant leakage.
19. Return the air only hose (10) and power plug (9) back to their original storage
location.
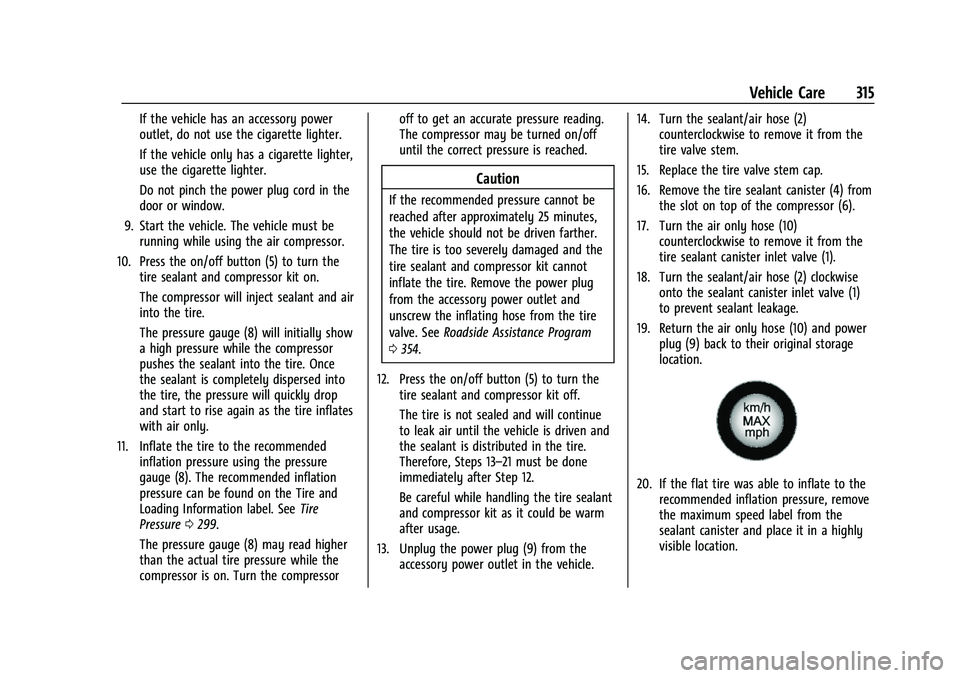
20. If the flat tire was able to inflate to therecommended inflation pressure, remove
the maximum speed label from the
sealant canister and place it in a highly
visible location.
Page 317 of 384
GMC Acadia/Acadia Denali Owner Manual (GMNA-Localizing-U.S./Canada/
Mexico-16402009) - 2023 - CRC - 3/28/22
316 Vehicle Care
Do not exceed the speed on this label
until the damaged tire is repaired or
replaced.
21. Return the equipment to its original storage location in the vehicle.
22. Immediately drive the vehicle 8 km (5 mi) to distribute the sealant in
the tire.
23. Stop at a safe location and check the tire pressure. Refer to Steps 1–10 under
“Using the Tire Sealant and Compressor
Kit without Sealant to Inflate a Tire (Not
Punctured).”
If the tire pressure has fallen more than
68 kPa (10 psi) below the recommended
inflation pressure, stop driving the
vehicle. The tire is too severely damaged
and the tire sealant cannot seal the tire.
SeeRoadside Assistance Program 0354.
If the tire pressure has not dropped
more than 68 kPa (10 psi) from the
recommended inflation pressure, inflate
the tire to the recommended inflation
pressure.
24. Wipe off any sealant from the wheel, tire, or vehicle. 25. Dispose of the used tire sealant
canister (4) at a local dealer or in
accordance with local state codes and
practices.
26. Replace it with a new canister available from your dealer.
27. After temporarily sealing a tire using the tire sealant and compressor kit, take the
vehicle to an authorized dealer within
161 km (100 mi) of driving to have the
tire repaired or replaced.
Using the Tire Sealant and Compressor
Kit without Sealant to Inflate a Tire (Not
Punctured)
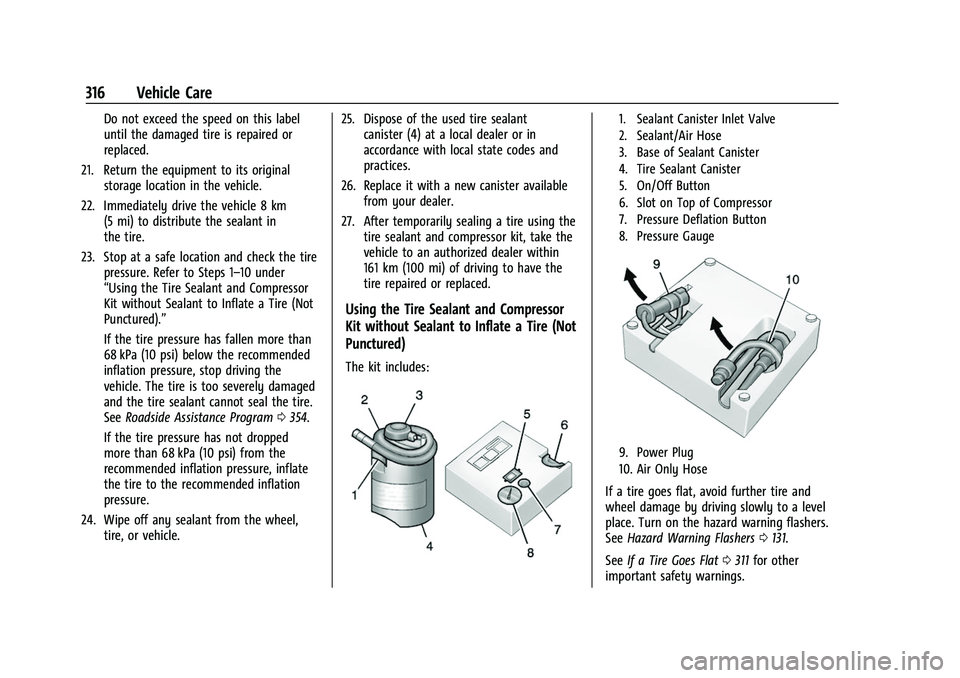
The kit includes:
1. Sealant Canister Inlet Valve
2. Sealant/Air Hose
3. Base of Sealant Canister
4. Tire Sealant Canister
5. On/Off Button
6. Slot on Top of Compressor
7. Pressure Deflation Button
8. Pressure Gauge
9. Power Plug
10. Air Only Hose
If a tire goes flat, avoid further tire and
wheel damage by driving slowly to a level
place. Turn on the hazard warning flashers.
SeeHazard Warning Flashers 0131.
See If a Tire Goes Flat 0311 for other
important safety warnings.
Page 318 of 384
GMC Acadia/Acadia Denali Owner Manual (GMNA-Localizing-U.S./Canada/
Mexico-16402009) - 2023 - CRC - 3/28/22
Vehicle Care 317
1. Remove the compressor from its storagelocation. See Storing the Tire Sealant and
Compressor Kit 0318.
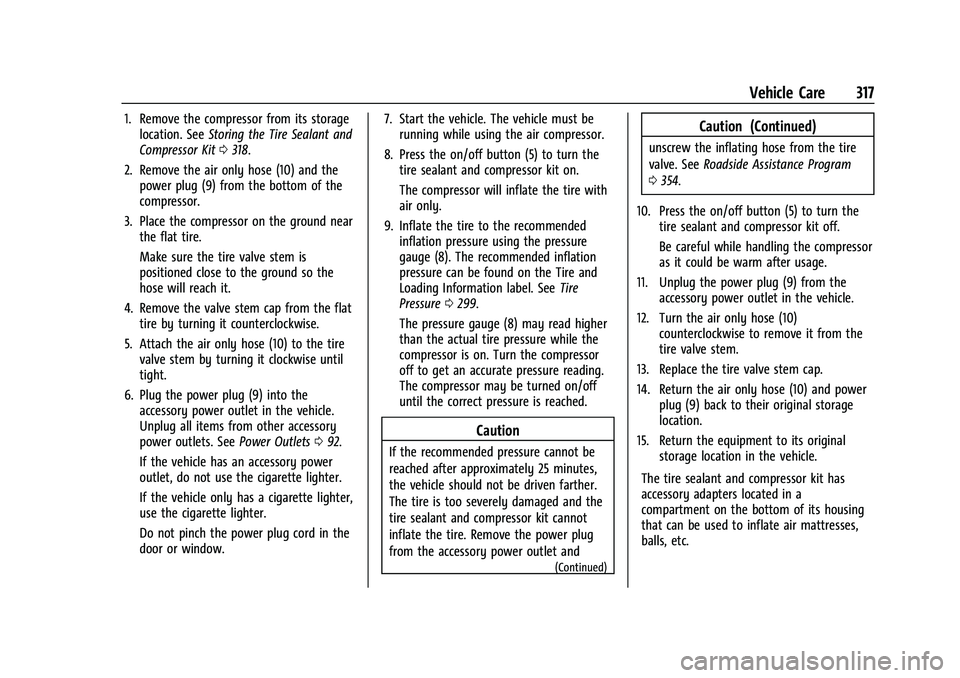
2. Remove the air only hose (10) and the power plug (9) from the bottom of the
compressor.
3. Place the compressor on the ground near the flat tire.
Make sure the tire valve stem is
positioned close to the ground so the
hose will reach it.
4. Remove the valve stem cap from the flat tire by turning it counterclockwise.
5. Attach the air only hose (10) to the tire valve stem by turning it clockwise until
tight.
6. Plug the power plug (9) into the accessory power outlet in the vehicle.
Unplug all items from other accessory
power outlets. See Power Outlets092.
If the vehicle has an accessory power
outlet, do not use the cigarette lighter.
If the vehicle only has a cigarette lighter,
use the cigarette lighter.
Do not pinch the power plug cord in the
door or window. 7. Start the vehicle. The vehicle must be
running while using the air compressor.
8. Press the on/off button (5) to turn the tire sealant and compressor kit on.
The compressor will inflate the tire with
air only.
9. Inflate the tire to the recommended inflation pressure using the pressure
gauge (8). The recommended inflation
pressure can be found on the Tire and
Loading Information label. See Tire
Pressure 0299.
The pressure gauge (8) may read higher
than the actual tire pressure while the
compressor is on. Turn the compressor
off to get an accurate pressure reading.
The compressor may be turned on/off
until the correct pressure is reached.
Caution
If the recommended pressure cannot be
reached after approximately 25 minutes,
the vehicle should not be driven farther.
The tire is too severely damaged and the
tire sealant and compressor kit cannot
inflate the tire. Remove the power plug
from the accessory power outlet and
(Continued)
Caution (Continued)
unscrew the inflating hose from the tire
valve. See Roadside Assistance Program
0 354.
10. Press the on/off button (5) to turn the tire sealant and compressor kit off.
Be careful while handling the compressor
as it could be warm after usage.
11. Unplug the power plug (9) from the accessory power outlet in the vehicle.
12. Turn the air only hose (10) counterclockwise to remove it from the
tire valve stem.
13. Replace the tire valve stem cap.
14. Return the air only hose (10) and power plug (9) back to their original storage
location.
15. Return the equipment to its original storage location in the vehicle.
The tire sealant and compressor kit has
accessory adapters located in a
compartment on the bottom of its housing
that can be used to inflate air mattresses,
balls, etc.
Page 319 of 384
GMC Acadia/Acadia Denali Owner Manual (GMNA-Localizing-U.S./Canada/
Mexico-16402009) - 2023 - CRC - 3/28/22
318 Vehicle Care
Storing the Tire Sealant and
Compressor Kit
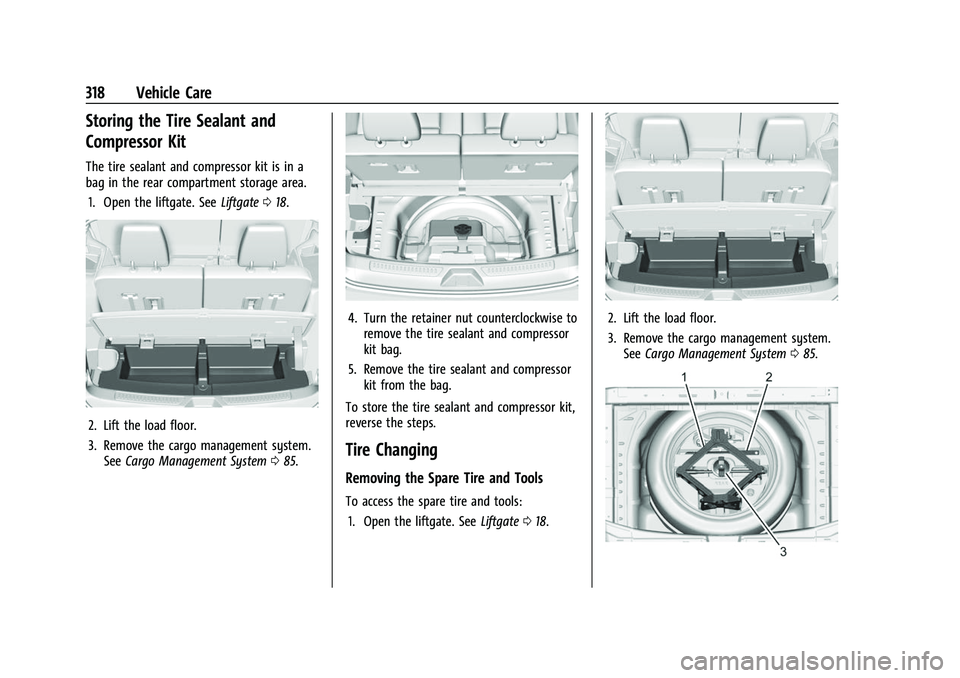
The tire sealant and compressor kit is in a
bag in the rear compartment storage area.1. Open the liftgate. See Liftgate018.
2. Lift the load floor.
3. Remove the cargo management system.
See Cargo Management System 085.
4. Turn the retainer nut counterclockwise to
remove the tire sealant and compressor
kit bag.
5. Remove the tire sealant and compressor kit from the bag.
To store the tire sealant and compressor kit,
reverse the steps.
Tire Changing
Removing the Spare Tire and Tools
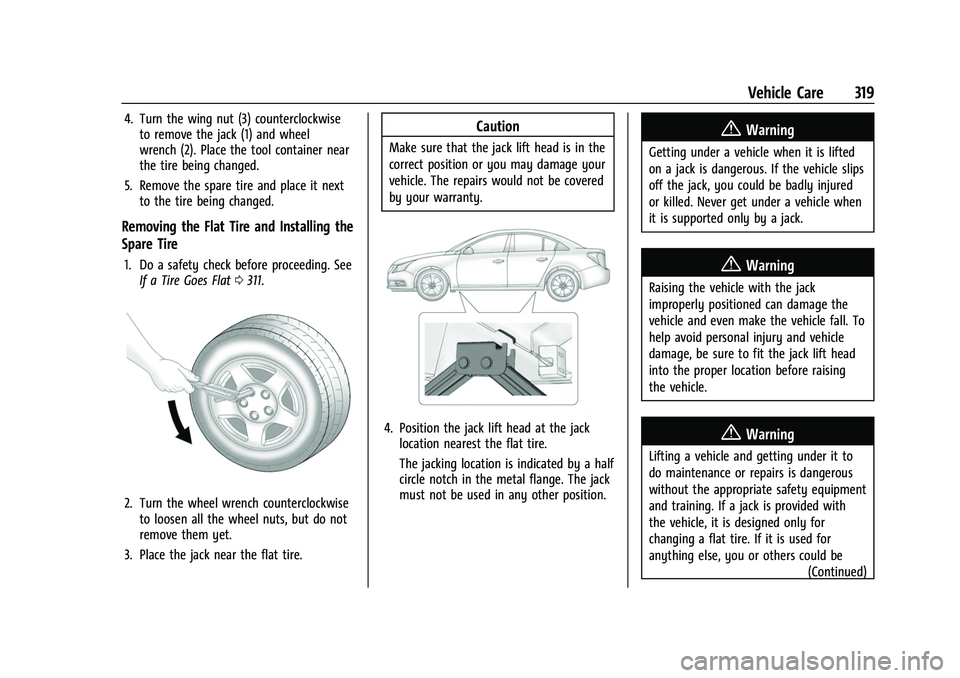
To access the spare tire and tools: 1. Open the liftgate. See Liftgate018.
2. Lift the load floor.
3. Remove the cargo management system.
See Cargo Management System 085.
Page 320 of 384
GMC Acadia/Acadia Denali Owner Manual (GMNA-Localizing-U.S./Canada/
Mexico-16402009) - 2023 - CRC - 3/28/22
Vehicle Care 319
4. Turn the wing nut (3) counterclockwiseto remove the jack (1) and wheel
wrench (2). Place the tool container near
the tire being changed.
5. Remove the spare tire and place it next to the tire being changed.
Removing the Flat Tire and Installing the
Spare Tire
1. Do a safety check before proceeding. SeeIf a Tire Goes Flat 0311.
2. Turn the wheel wrench counterclockwise
to loosen all the wheel nuts, but do not
remove them yet.
3. Place the jack near the flat tire.
Caution
Make sure that the jack lift head is in the
correct position or you may damage your
vehicle. The repairs would not be covered
by your warranty.
4. Position the jack lift head at the jack location nearest the flat tire.
The jacking location is indicated by a half
circle notch in the metal flange. The jack
must not be used in any other position.
{Warning
Getting under a vehicle when it is lifted
on a jack is dangerous. If the vehicle slips
off the jack, you could be badly injured
or killed. Never get under a vehicle when
it is supported only by a jack.
{Warning
Raising the vehicle with the jack
improperly positioned can damage the
vehicle and even make the vehicle fall. To
help avoid personal injury and vehicle
damage, be sure to fit the jack lift head
into the proper location before raising
the vehicle.
{Warning
Lifting a vehicle and getting under it to
do maintenance or repairs is dangerous
without the appropriate safety equipment
and training. If a jack is provided with
the vehicle, it is designed only for
changing a flat tire. If it is used for
anything else, you or others could be
(Continued)