GMC CANYON 2009 Owner's Manual
Manufacturer: GMC, Model Year: 2009, Model line: CANYON, Model: GMC CANYON 2009Pages: 414, PDF Size: 2.48 MB
Page 341 of 414
{CAUTION:
Someone standing too close during the procedure
could be injured by the jack. If the spare tire does
not slide off the jack completely, make sure no
one is behind you or on either side of you as you
pull the jack out from the under spare.
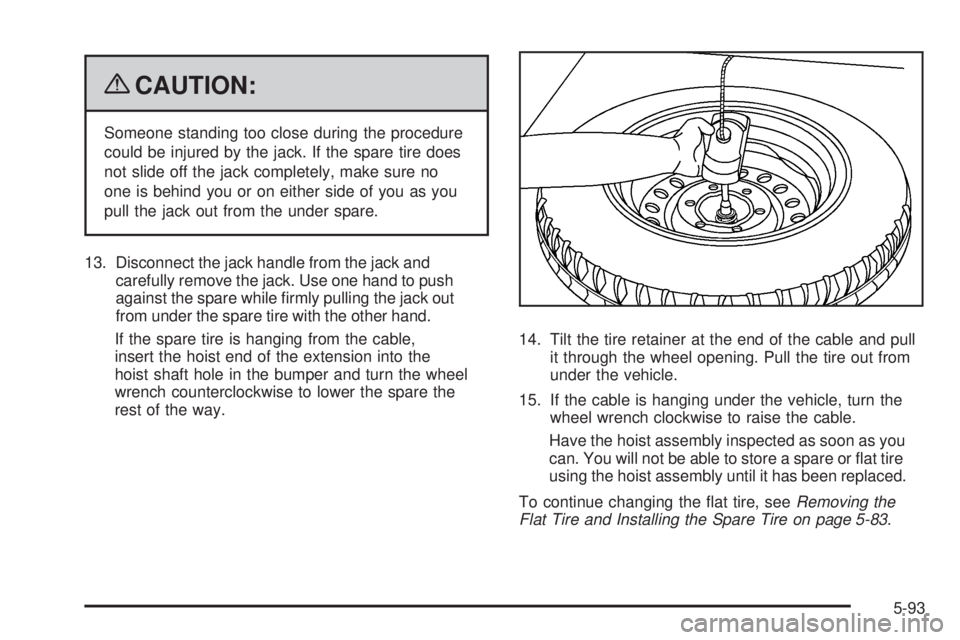
13. Disconnect the jack handle from the jack and
carefully remove the jack. Use one hand to push
against the spare while �rmly pulling the jack out
from under the spare tire with the other hand.
If the spare tire is hanging from the cable,
insert the hoist end of the extension into the
hoist shaft hole in the bumper and turn the wheel
wrench counterclockwise to lower the spare the
rest of the way.14. Tilt the tire retainer at the end of the cable and pull
it through the wheel opening. Pull the tire out from
under the vehicle.
15. If the cable is hanging under the vehicle, turn the
wheel wrench clockwise to raise the cable.
Have the hoist assembly inspected as soon as you
can. You will not be able to store a spare or �at tire
using the hoist assembly until it has been replaced.
To continue changing the �at tire, seeRemoving the
Flat Tire and Installing the Spare Tire on page 5-83.
5-93
Page 342 of 414
Storing a Flat or Spare Tire
and Tools
{CAUTION:
Storing a jack, a tire, or other equipment in the
passenger compartment of the vehicle could
cause injury. In a sudden stop or collision, loose
equipment could strike someone. Store all these in
the proper place.
Notice:Storing an aluminum wheel with a �at tire
under your vehicle for an extended period of time or
with the valve stem pointing up can damage the
wheel. Always stow the wheel with the valve stem
pointing down and have the wheel/tire repaired
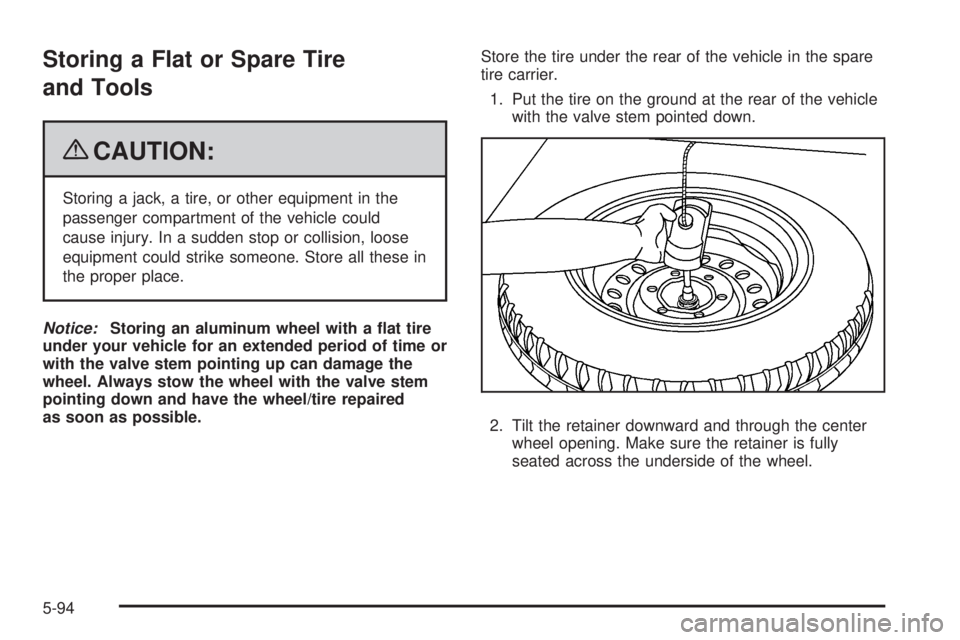
as soon as possible.Store the tire under the rear of the vehicle in the spare
tire carrier.
1. Put the tire on the ground at the rear of the vehicle
with the valve stem pointed down.
2. Tilt the retainer downward and through the center
wheel opening. Make sure the retainer is fully
seated across the underside of the wheel.
5-94
Page 343 of 414
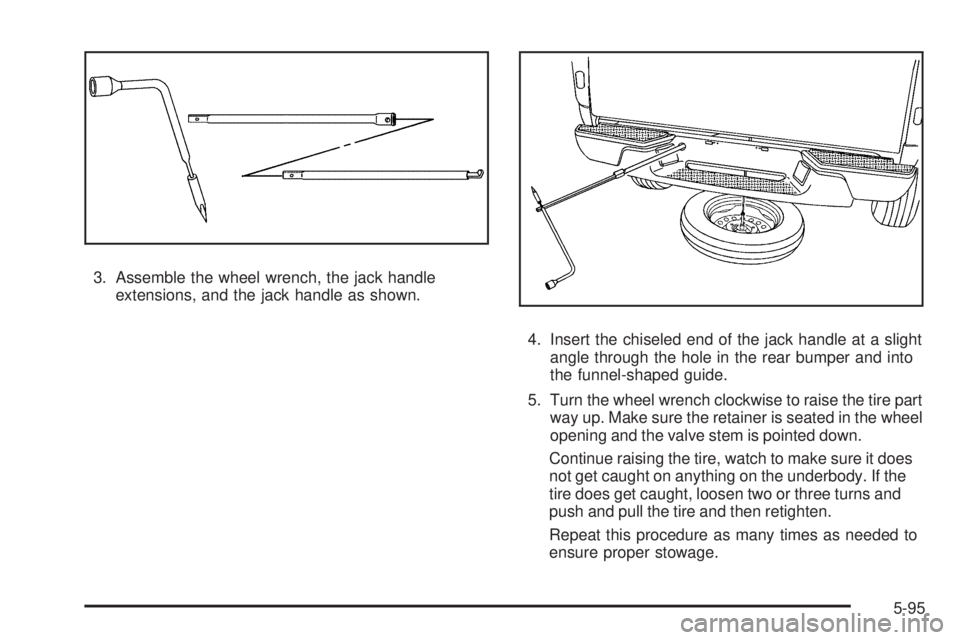
3. Assemble the wheel wrench, the jack handle
extensions, and the jack handle as shown.
4. Insert the chiseled end of the jack handle at a slight
angle through the hole in the rear bumper and into
the funnel-shaped guide.
5. Turn the wheel wrench clockwise to raise the tire part
way up. Make sure the retainer is seated in the wheel
opening and the valve stem is pointed down.
Continue raising the tire, watch to make sure it does
not get caught on anything on the underbody. If the
tire does get caught, loosen two or three turns and
push and pull the tire and then retighten.
Repeat this procedure as many times as needed to
ensure proper stowage.
5-95
Page 344 of 414
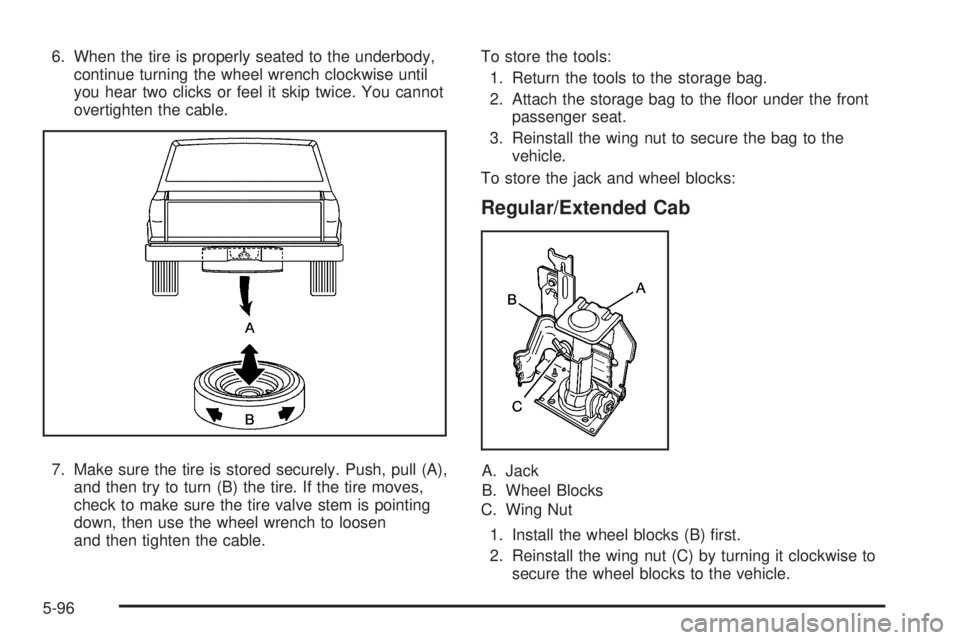
6. When the tire is properly seated to the underbody,
continue turning the wheel wrench clockwise until
you hear two clicks or feel it skip twice. You cannot
overtighten the cable.
7. Make sure the tire is stored securely. Push, pull (A),
and then try to turn (B) the tire. If the tire moves,
check to make sure the tire valve stem is pointing
down, then use the wheel wrench to loosen
and then tighten the cable.To store the tools:
1. Return the tools to the storage bag.
2. Attach the storage bag to the �oor under the front
passenger seat.
3. Reinstall the wing nut to secure the bag to the
vehicle.
To store the jack and wheel blocks:
Regular/Extended Cab
A. Jack
B. Wheel Blocks
C. Wing Nut
1. Install the wheel blocks (B) �rst.
2. Reinstall the wing nut (C) by turning it clockwise to
secure the wheel blocks to the vehicle.
5-96
Page 345 of 414

3. Lower the jack (A) all the way and insert the jack
into the bracket.
4. Raise the jack by turning the handle clockwise to
secure the jack within the bracket.
5. Put the cover in position and insert and tighten the
wing nut to secure it.Crew Cab
A. Jack
B. Wheel Blocks
C. Wing Nut
1. Attach the wheel blocks (B) to the jack (A) with the
wheel block retainer and the wing nut (C).
2. Reinstall the jack and wheel block assembly in the
mounting bracket. Be sure to position the holes in
the base of the jack onto the pins in the mounting
bracket.
3. Turn the handle to raise the jack until it is secure,
but do not overtighten the jack in the bracket.
5-97
Page 346 of 414
Spare Tire
Compact Spare Tire
Your vehicle may have a compact spare tire. Although
the compact spare tire was fully in�ated when your
vehicle was new, it can lose air over time. Check the
in�ation pressure regularly. It should be 60 psi (420 kPa).
Notice:If the vehicle has four-wheel drive and the
compact spare tire is installed on the vehicle, do not
drive in four-wheel drive until you can have the �at
tire repaired and/or replaced. You could damage the
vehicle, and the repair costs would not be covered by
your warranty. Never use four-wheel drive when the
compact spare tire is installed on the vehicle.
After installing the compact spare on your vehicle, you
should stop as soon as possible and make sure your
vehicle’s spare tire is correctly in�ated. The compact
spare is made to perform well at speeds up to 62 mph
(100 km/h) for distances up to 500 miles (804 km).For heavy payloads or towing, and for low traction or
four-wheel-drive conditions, repair or replace the full-size
tire. Of course, it is best to replace your vehicle’s spare
with a full-size tire as soon as you can. The spare tire
will last longer and be in good shape in case you need
it again.
Notice:When the compact spare is installed, do
not take the vehicle through an automatic car wash
with guide rails. The compact spare can get
caught on the rails which can damage the tire,
wheel and other parts of the vehicle.
Do not use your compact spare on other vehicles.
And do not mix your compact spare tire or wheel with
other wheels or tires. They will not �t. Keep your
spare tire and its wheel together.
Notice:Tire chains will not �t the compact spare.
Using them can damage the vehicle and can damage
the chains too. Do not use tire chains on the compact
spare.
5-98
Page 347 of 414
Full-Size Spare Tire
Your vehicle may have a full-size spare tire, which, when
new, was fully in�ated. A spare tire may lose air over
time, so check its in�ation pressure regularly. See
Inflation - Tire Pressure on page 5-61andLoading the
Vehicle on page 4-33for information regarding proper tire
in�ation and loading your vehicle. For instruction on how
to remove, install, or store a spare tire, seeRemoving the
Flat Tire and Installing the Spare Tire on page 5-83and
Storing a Flat or Spare Tire and Tools on page 5-94.
Your vehicle may have a different size spare tire than
the road tires originally installed on your vehicle.
This spare was developed for use on your vehicle, so it
is alright to drive on it. If your vehicle has four-wheel
drive and the different size spare tire is installed, keep
the vehicle in two-wheel drive.
Notice:If the vehicle has four-wheel drive and the
different size spare tire is installed on the vehicle,
do not drive in four-wheel drive until you canhave your �at tire repaired and/or replaced. You
could damage the vehicle, and the repair costs
would not be covered by your warranty. Never use
four-wheel drive when the different size spare
tire is installed on the vehicle.
After installing the spare tire on your vehicle, you should
stop as soon as possible and make sure the spare is
correctly in�ated. The spare tire is made to perform well
at speeds up to 62 mph (100 km/h) for distances up
to 500 miles (804 km). For heavy payloads or towing,
and for low traction or four-wheel-drive conditions, repair
or replace the full-size tire. Have the damaged or �at
road tire repaired or replaced as soon as you can
and installed back onto your vehicle. This way, the spare
tire will be available in case you need it again.
Do not mix tires and wheels of different sizes, because
they will not �t. Keep your spare tire and its wheel
together.
5-99
Page 348 of 414
Appearance Care
Interior Cleaning
The vehicle’s interior will continue to look its best if it is
cleaned often. Although not always visible, dust and dirt
can accumulate on the upholstery. Dirt can damage
carpet, fabric, leather, and plastic surfaces. Regular
vacuuming is recommended to remove particles from the
upholstery. It is important to keep the upholstery from
becoming and remaining heavily soiled. Soils should be
removed as quickly as possible. The vehicle’s interior
may experience extremes of heat that could cause stains
to set rapidly.
Lighter colored interiors may require more frequent
cleaning. Use care because newspapers and garments
that transfer color to home furnishings may also transfer
color to the vehicle’s interior.
When cleaning the vehicle’s interior, only use cleaners
speci�cally designed for the surfaces being cleaned.
Permanent damage may result from using cleaners on
surfaces for which they were not intended. Use glass
cleaner only on glass. Remove any accidental over-spray
from other surfaces immediately. To prevent over-spray,
apply cleaner directly to the cleaning cloth.Notice:Using abrasive cleaners when cleaning
glass surfaces on the vehicle, could scratch
the glass and/or cause damage to the rear window
defogger. When cleaning the glass on the vehicle,
use only a soft cloth and glass cleaner.
Many cleaners contain solvents that may become
concentrated in the vehicle’s breathing space. Before
using cleaners, read and adhere to all safety instructions
on the label. While cleaning the vehicle’s interior,
maintain adequate ventilation by opening the vehicle’s
doors and windows.
Dust may be removed from small buttons and knobs
using a small brush with soft bristles.
Products that remove odors from the vehicle’s upholstery
and clean the vehicle’s glass can be obtained from your
dealer/retailer.
Do not clean the vehicle using:
A knife or any other sharp object to remove a soil
from any interior surface.
A stiff brush. It can cause damage to the vehicle’s
interior surfaces.
Heavy pressure or aggressive rubbing with a
cleaning cloth. Use of heavy pressure can damage
the interior and does not improve the effectiveness
of soil removal.
5-100
Page 349 of 414
Laundry detergents or dishwashing soaps with
degreasers can leave residue that streaks and
attracts dirt. For liquid cleaners, about 20 drops per
gallon (3.78 L) of water is a good guide. Use only
mild, neutral-pH soaps.
Too much cleaner that saturates the upholstery.
Organic solvents such as naptha, alcohol, etc. that
can damage the vehicle’s interior.
Fabric/Carpet
Use a vacuum cleaner with a soft brush attachment
frequently to remove dust and loose dirt. A canister
vacuum with a beater bar in the nozzle may only be used
on �oor carpet and carpeted �oor mats. For any soil,
always try to remove it �rst with plain water or club soda.
Before cleaning, gently remove as much of the soil as
possible using one of the following techniques:
For liquids: gently blot the remaining soil with a paper
towel. Allow the soil to absorb into the paper towel
until no more can be removed.
For solid dry soils: remove as much as possible and
then vacuum.To clean:
1. Saturate a lint-free, clean white cloth with water or
club soda.
2. Wring the cloth to remove excess moisture.
3. Start on the outside edge of the soil and gently rub
toward the center. Continue cleaning, using a clean
area of the cloth each time it becomes soiled.
4. Continue to gently rub the soiled area until the
cleaning cloth remains clean.
5. If the soil is not completely removed, use a mild
soap solution and repeat the cleaning process
that was used with plain water.
If any of the soil remains, a commercial fabric cleaner
or spot lifter may be necessary. When a commercial
upholstery cleaner or spot lifter is to be used, test a small
hidden area for colorfastness �rst. If the locally cleaned
area gives any impression that a ring formation may
result, clean the entire surface.
After the cleaning process has been completed, a paper
towel can be used to blot excess moisture from the
fabric or carpet.
5-101
Page 350 of 414
Leather
A soft cloth dampened with water can be used to remove
dust. If a more thorough cleaning is necessary, a soft
cloth dampened with a mild soap solution can be used.
Allow the leather to dry naturally. Do not use heat to dry.
Never use steam to clean leather. Never use spot lifters
or spot removers on leather. Many commercial leather
cleaners and coatings that are sold to preserve and
protect leather may permanently change the appearance
and feel of the leather and are not recommended. Do not
use silicone or wax-based products, or those containing
organic solvents to clean the vehicle’s interior because
they can alter the appearance by increasing the gloss in a
non-uniform manner. Never use shoe polish on leather.
Instrument Panel, Vinyl, and Other
Plastic Surfaces
A soft cloth dampened with water may be used to remove
dust. If a more thorough cleaning is necessary, a clean
soft cloth dampened with a mild soap solution can be
used to gently remove dust and dirt. Never use spot lifters
or removers on plastic surfaces. Many commercial
cleaners and coatings that are sold to preserve and
protect soft plastic surfaces may permanently changethe appearance and feel of the interior and are not
recommended. Do not use silicone or wax-based
products, or those containing organic solvents to
clean the vehicle’s interior because they can alter the
appearance by increasing the gloss in a non-uniform
manner.
Some commercial products may increase gloss on the
instrument panel. The increase in gloss may cause
annoying re�ections in the windshield and even make it
difficult to see through the windshield under certain
conditions.
Care of Safety Belts
Keep belts clean and dry.
{CAUTION:
Do not bleach or dye safety belts. It may severely
weaken them. In a crash, they might not be able
to provide adequate protection. Clean safety belts
only with mild soap and lukewarm water.
5-102