controls GMC CANYON 2010 User Guide
[x] Cancel search | Manufacturer: GMC, Model Year: 2010, Model line: CANYON, Model: GMC CANYON 2010Pages: 448, PDF Size: 2.62 MB
Page 121 of 448
Power Windows
{WARNING:
Leaving children in a vehicle with the keys is
dangerous for many reasons, children or others
could be badly injured or even killed. They could
operate the power windows or other controls or
even make the vehicle move. The windows will
function and they could be seriously injured or
killed if caught in the path of a closing window.
Do not leave keys in a vehicle with children.
When there are children in the rear seat use the
window lockout button to prevent unintentional
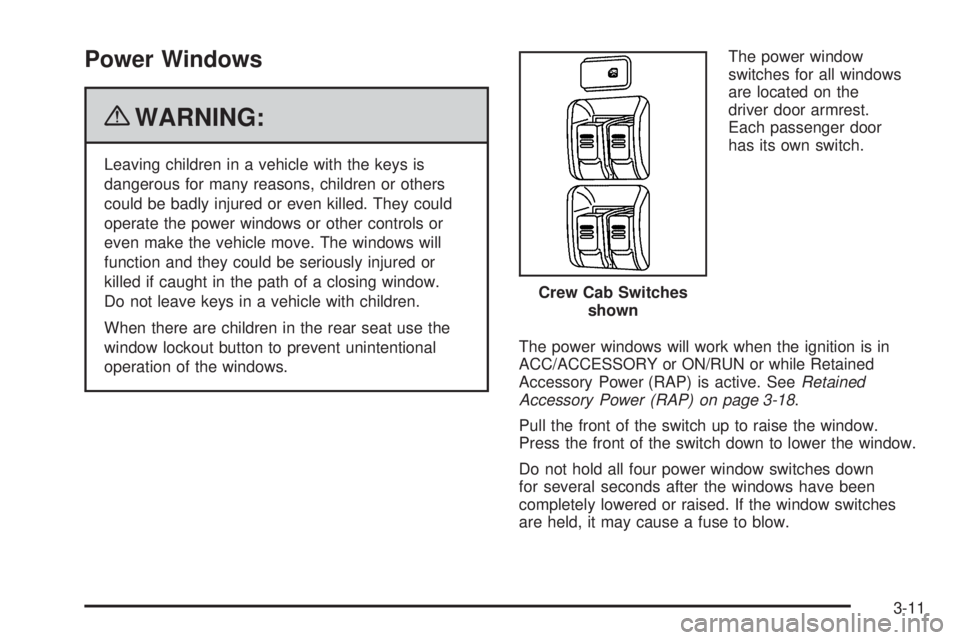
operation of the windows.The power window
switches for all windows
are located on the
driver door armrest.
Each passenger door
has its own switch.
The power windows will work when the ignition is in
ACC/ACCESSORY or ON/RUN or while Retained
Accessory Power (RAP) is active. SeeRetained
Accessory Power (RAP) on page 3-18.
Pull the front of the switch up to raise the window.
Press the front of the switch down to lower the window.
Do not hold all four power window switches down
for several seconds after the windows have been
completely lowered or raised. If the window switches
are held, it may cause a fuse to blow.Crew Cab Switches
shown
3-11
Page 148 of 448
Compass Variance
The mirror is set to zone eight. If you do not live in zone
eight or drive out of the area, the compass variance
needs to be changed to the appropriate zone.
To adjust for compass variance:
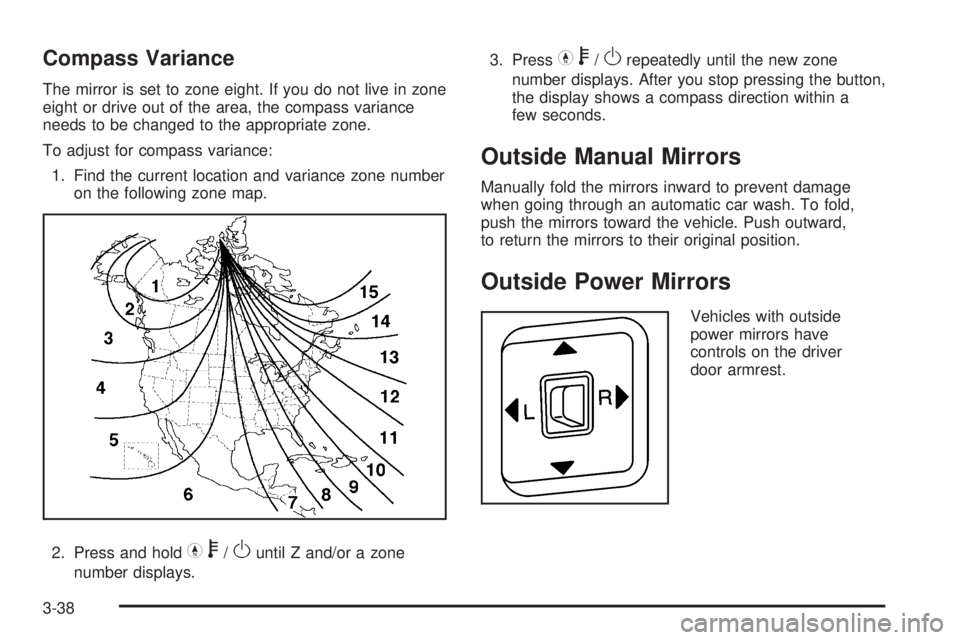
1. Find the current location and variance zone number
on the following zone map.
2. Press and hold
Yb/Ountil Z and/or a zone
number displays.3. Press
Yb/Orepeatedly until the new zone
number displays. After you stop pressing the button,
the display shows a compass direction within a
few seconds.
Outside Manual Mirrors
Manually fold the mirrors inward to prevent damage
when going through an automatic car wash. To fold,
push the mirrors toward the vehicle. Push outward,
to return the mirrors to their original position.
Outside Power Mirrors
Vehicles with outside
power mirrors have
controls on the driver
door armrest.
3-38
Page 153 of 448
Instrument Panel Overview...............................4-3
Hazard Warning Flashers................................4-3
Horn .............................................................4-3
Tilt Wheel.....................................................4-3
Turn Signal/Multifunction Lever.........................4-4
Turn and Lane-Change Signals........................4-4
Headlamp High/Low-Beam Changer..................4-5
Flash-to-Pass.................................................4-5
Windshield Wipers..........................................4-5
Windshield Washer.........................................4-6
Cruise Control................................................4-7
Exterior Lamps.............................................4-10
Headlamps on Reminder................................4-11
Daytime Running Lamps (DRL).......................4-11
Automatic Headlamp System..........................4-12
Fog Lamps ..................................................4-12
Exterior Cargo Lamps....................................4-13
Instrument Panel Brightness...........................4-13
Dome Lamp .................................................4-13
Dome Lamp Override....................................4-14
Exit Lighting.................................................4-14
Electric Power Management...........................4-14
Battery Run-Down Protection..........................4-15
Accessory Power Outlet(s).............................4-15
Ashtray(s) and Cigarette Lighter......................4-16Climate Controls............................................4-16
Climate Control System.................................4-16
Outlet Adjustment.........................................4-18
Warning Lights, Gages, and Indicators............4-18
Instrument Panel Cluster................................4-19
Speedometer and Odometer...........................4-20
Trip Odometer..............................................4-20
Tachometer.................................................4-20
Safety Belt Reminders...................................4-21
Airbag Readiness Light.................................
.4-22
Passenger Airbag Status Indicator...................4-23
Charging System Light..................................4-24
Up-Shift Light...............................................4-24
Brake System Warning Light..........................4-25
Antilock Brake System (ABS) Warning Light.....4-26
StabiliTrak
®/Traction Control System (TCS)
Warning Light...........................................4-26
Engine Coolant Temperature Gage..................4-27
Tire Pressure Light.......................................4-28
Malfunction Indicator Lamp.............................4-28
Oil Pressure Light.........................................4-31
Security Light...............................................4-32
Cruise Control Light......................................4-32
Highbeam On Light.......................................4-32
Fuel Gage...................................................4-32
Section 4 Instrument Panel
4-1
Page 157 of 448
Turn Signal On Chime
If a turn signal is left on for more than 3/4 of a mile
(1.2 km), a chime will sound at each flash of the turn
signal and the message TURN SIGNAL will also appear
in the DIC. To turn the chime and message off, move
the turn signal lever to the off position.
See “TURN SIGNAL” underDIC Warnings and
Messages on page 4-37for more information.
Headlamp High/Low-Beam Changer
23Headlamp High/Low Beam Changer:Push
the turn signal/multifunction lever away from you to turn
the high beams on.
Pull the lever towards you to return to low beams.
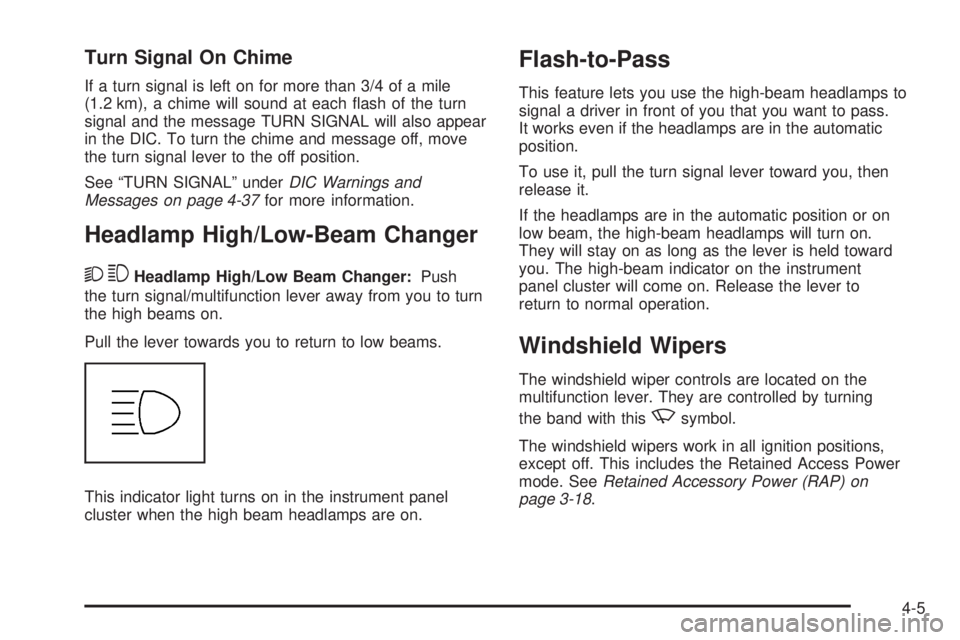
This indicator light turns on in the instrument panel
cluster when the high beam headlamps are on.
Flash-to-Pass
This feature lets you use the high-beam headlamps to
signal a driver in front of you that you want to pass.
It works even if the headlamps are in the automatic
position.
To use it, pull the turn signal lever toward you, then
release it.
If the headlamps are in the automatic position or on
low beam, the high-beam headlamps will turn on.
They will stay on as long as the lever is held toward
you. The high-beam indicator on the instrument
panel cluster will come on. Release the lever to
return to normal operation.
Windshield Wipers
The windshield wiper controls are located on the
multifunction lever. They are controlled by turning
the band with this
zsymbol.
The windshield wipers work in all ignition positions,
except off. This includes the Retained Access Power
mode. SeeRetained Accessory Power (RAP) on
page 3-18.
4-5
Page 159 of 448
Cruise Control
With cruise control, a speed of about 40 km/h (25 mph)
or more can be maintained without keeping your foot
on the accelerator. Cruise control does not work
at speeds below about 40 km/h (25 mph).
Cruise control will not work if the parking brake is set, or
if the master cylinder brake fluid level is low.
If the brakes are applied, the cruise control shuts off.
{WARNING:
Cruise control can be dangerous where you
cannot drive safely at a steady speed. So, do not
use the cruise control on winding roads or in
heavy traffic.
Cruise control can be dangerous on slippery
roads. On such roads, fast changes in tire traction
can cause excessive wheel slip, and you could
lose control. Do not use cruise control on slippery
roads.
If the vehicle’s StabiliTrak
®/Traction Control System
(TCS) begins to limit wheel spin while the cruise control
is on, the cruise control automatically disengages.SeeStabiliTrak
®System on page 5-6orTraction
Control System (TCS) on page 5-8. When road
conditions allow you to safely use it again, the
cruise control can be turned back on.
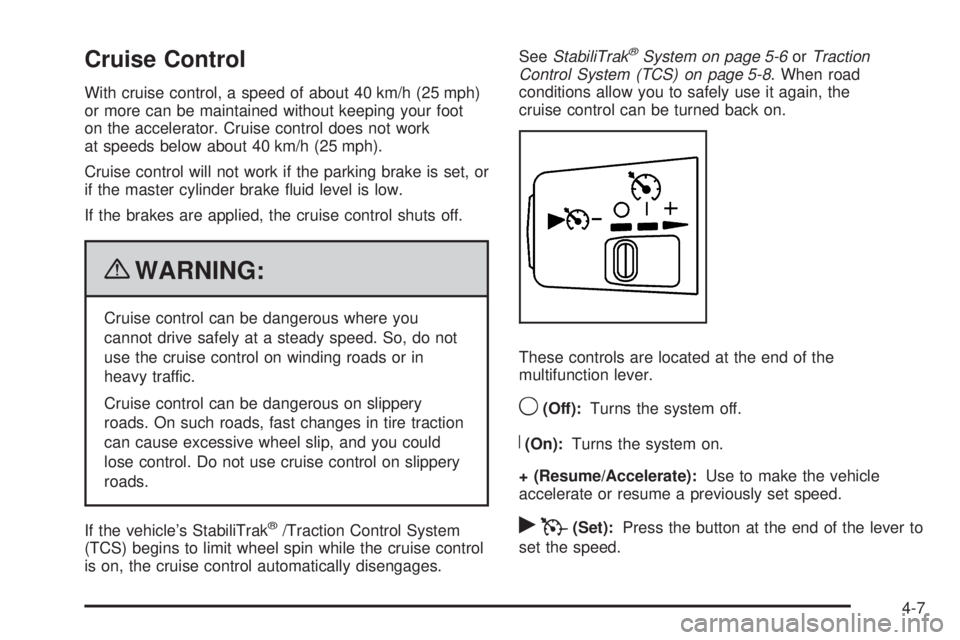
These controls are located at the end of the
multifunction lever.
9(Off):Turns the system off.
R(On):Turns the system on.
+ (Resume/Accelerate):Use to make the vehicle
accelerate or resume a previously set speed.
rT(Set):Press the button at the end of the lever to
set the speed.
4-7
Page 168 of 448
Ashtray(s) and Cigarette Lighter
The vehicle may have a removable ashtray and cigarette
lighter.
The ashtray is located in the center console area.
The ashtray can be removed for cleaning. When the
ashtray is removed, this area can also be used as
a cupholder.
Notice:If papers, pins, or other �ammable items
are put in the ashtray, hot cigarettes or other
smoking materials could ignite them and possibly
damage the vehicle. Never put �ammable items
in the ashtray.
To use the lighter, press it in all the way, and let go.
When it is ready, it will pop back out by itself.
Notice:Holding a cigarette lighter in while it is
heating does not let the lighter back away from
the heating element when it is hot. Damage from
overheating can occur to the lighter or heating
element, or a fuse could be blown. Do not hold
a cigarette lighter in while it is heating.
Climate Controls
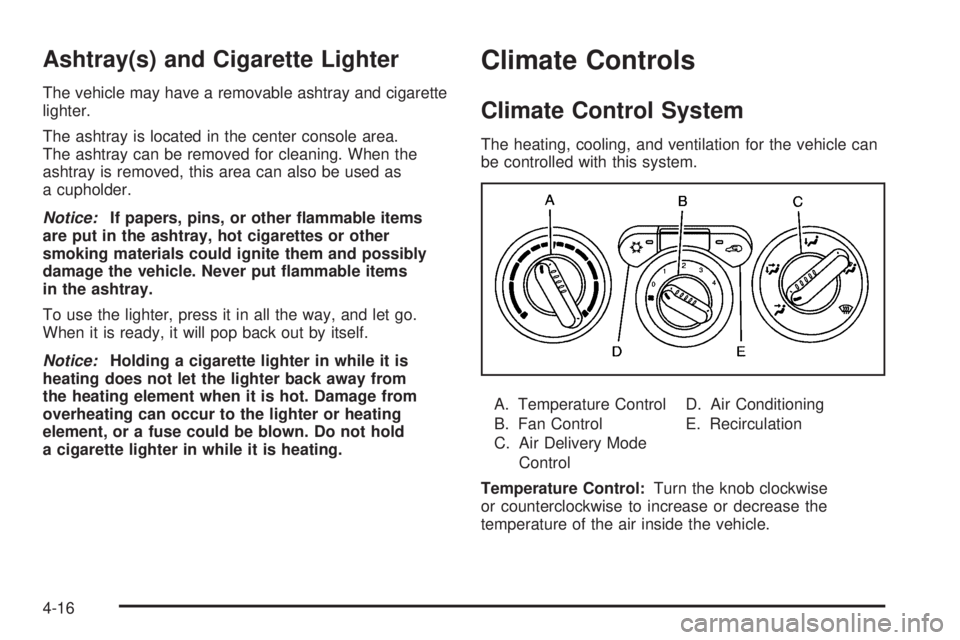
Climate Control System
The heating, cooling, and ventilation for the vehicle can
be controlled with this system.
A. Temperature Control
B. Fan Control
C. Air Delivery Mode
ControlD. Air Conditioning
E. Recirculation
Temperature Control:Turn the knob clockwise
or counterclockwise to increase or decrease the
temperature of the air inside the vehicle.
4-16
Page 181 of 448
If the check engine light comes on and stays on, while
the engine is running, this indicates that there is an
OBD II problem and service is required.
Malfunctions often are indicated by the system before
any problem is apparent. Being aware of the light
can prevent more serious damage to the vehicle.
This system assists the service technician in correctly
diagnosing any malfunction.
Notice:If the vehicle is continually driven with
this light on, after a while, the emission controls
might not work as well, the vehicle’s fuel economy
might not be as good, and the engine might not
run as smoothly. This could lead to costly repairs
that might not be covered by the vehicle warranty.
Notice:Modi�cations made to the engine,
transmission, exhaust, intake, or fuel system
of the vehicle or the replacement of the original
tires with other than those of the same Tire
Performance Criteria (TPC) can affect the vehicle’s
emission controls and can cause this light to come
on. Modi�cations to these systems could lead to
costly repairs not covered by the vehicle warranty.
This could also result in a failure to pass a required
Emission Inspection/Maintenance test. See
Accessories and Modifications on page 6-3.This light comes on during a malfunction in one of
two ways:
Light Flashing:A misfire condition has been detected.
A misfire increases vehicle emissions and could
damage the emission control system on the vehicle.
Diagnosis and service might be required.
To prevent more serious damage to the vehicle:
•Reduce vehicle speed.
•Avoid hard accelerations.
•Avoid steep uphill grades.
•If towing a trailer, reduce the amount of cargo being
hauled as soon as it is possible.
If the light continues to flash, when it is safe to do so,
stop the vehicle. Find a safe place to park the vehicle.
Turn the key off, wait at least 10 seconds, and restart
the engine. If the light is still flashing, follow the previous
steps and see your dealer/retailer for service as soon
as possible.
4-29
Page 194 of 448
Audio System(s)
Determine which radio the vehicle has and read the
following pages to become familiar with its features.
{WARNING:
Taking your eyes off the road for extended periods
could cause a crash resulting in injury or death to
you or others. Do not give extended attention to
entertainment tasks while driving.
This system provides access to many audio and non
audio listings.
To minimize taking your eyes off the road while driving,
do the following while the vehicle is parked:
•Become familiar with the operation and controls of
the audio system.
•Set up the tone, speaker adjustments, and preset
radio stations.
For more information, seeDefensive Driving on
page 5-2.Notice:Contact your dealer/retailer before adding
any equipment.
Adding audio or communication equipment could
interfere with the operation of the vehicle’s engine,
radio, or other systems, and could damage them.
Follow federal rules covering mobile radio and
telephone equipment.
Notice:The chime signals related to safety belts,
parking brake, and other functions of your vehicle
operate through the radio/entertainment system.
If that equipment is replaced or additional equipment
is added to your vehicle, the chimes may not
work. Make sure that replacement or additional
equipment is compatible with your vehicle before
installing it. SeeAccessories and Modifications
on page 6-3.
The vehicle has Retained Accessory Power (RAP).
With RAP, the audio system can be played even after
the ignition is turned off. SeeRetained Accessory
Power (RAP) on page 3-18for more information.
4-42
Page 200 of 448
To adjust all tone and speaker controls to the middle
position, push and hold the AUDIO knob when no tone
or speaker control displays. ALL CENTERED displays
and a beep sounds.
•For the AM-FM Radio, adjust both tone controls and
both speaker controls to the middle position, first
exit out of audio mode by pressing another button,
causing the radio to perform that function or wait
five seconds for the display to return to time of day.
Then press and hold for more than two seconds until
a beep sounds. CEN (center) displays.
AUTO EQ (Automatic Equalization):Press to
select customized equalization settings designed for
country/western, jazz, talk, pop, rock, and classical.
To return to the manual mode, press the AUTO
EQ button until CUSTOM displays. Then manually
adjust the bass/treble, or bass/midrange/treble by
using the AUDIO knob.
Adjusting the Speakers (Balance/Fade)
AUDIO:To adjust the balance between the right and
the left speakers, push and release until BAL (balance)
displays. Turn to move the sound toward the right or the
left speakers.
•For the AM-FM Radio, press and hold
the
wxarrows to move the sound toward
the right or the left speakers.
To adjust the fade between the front and the rear
speakers, push and release the AUDIO knob until FADE
or depending on the radio, FAD displays. Turn the knob
to move the sound toward the front or the rear speakers.
•For the AM-FM Radio, press and hold
the
wxarrows to move the sound toward
the right or the left speakers.
4-48
Page 201 of 448
To adjust the balance or the fade to the middle position,
push the AUDIO knob to select BAL or FADE/FAD,
then push it again and hold it until one beep sounds.
•For the AM-FM Radio, adjust balance or fade to the
middle position by selecting BAL or FAD. Press and
hold AUDIO for more than two seconds until a
beep sounds. B (balance) and a zero or F (fade)
and a zero displays.
To adjust all tone and speaker controls to the middle
position, push and hold the AUDIO knob when no tone
or speaker control is displayed. ALL CENTERED
displays and a beep sounds.
•For the AM-FM Radio, adjust both tone controls and
both speaker controls to the middle position by
exiting out of audio mode. To do this, press any
button for the radio to perform that function or
wait five seconds for the display to return to time
of day. Then press and hold AUDIO for more than
two seconds until a beep sounds. CEN (center)
displays.
Fade might not be available if the vehicle is a regular
cab model.
Finding a Program Type (PTY) Station
(RDS and XM)
To select and find a desired PTY perform the following:
1. Press the P-TYPE to activate program type
select mode. P-TYPE or TYPE and a PTY displays.
2. Turn the P-TYPE knob again, to select a PTY.
3. Once the desired PTY displays, press the SEEK /
TYPE button to select and to take you to the PTY’s
first station.
4. To go to another station within that PTY by pressing
the SEEK / TYPE button twice to display the PTY
and then go to another station.
To cancel the seek, press the SEEK / TYPE button.
This also exits the program type seek mode and returns
to the last tuned station.
If both PTY and TRAF (traffic) are on, the radio
searches for stations with the selected PTY and traffic
announcements.
4-49