buttons GMC CANYON 2016 Get To Know Guide
[x] Cancel search | Manufacturer: GMC, Model Year: 2016, Model line: CANYON, Model: GMC CANYON 2016Pages: 16, PDF Size: 1.15 MB
Page 2 of 16
2
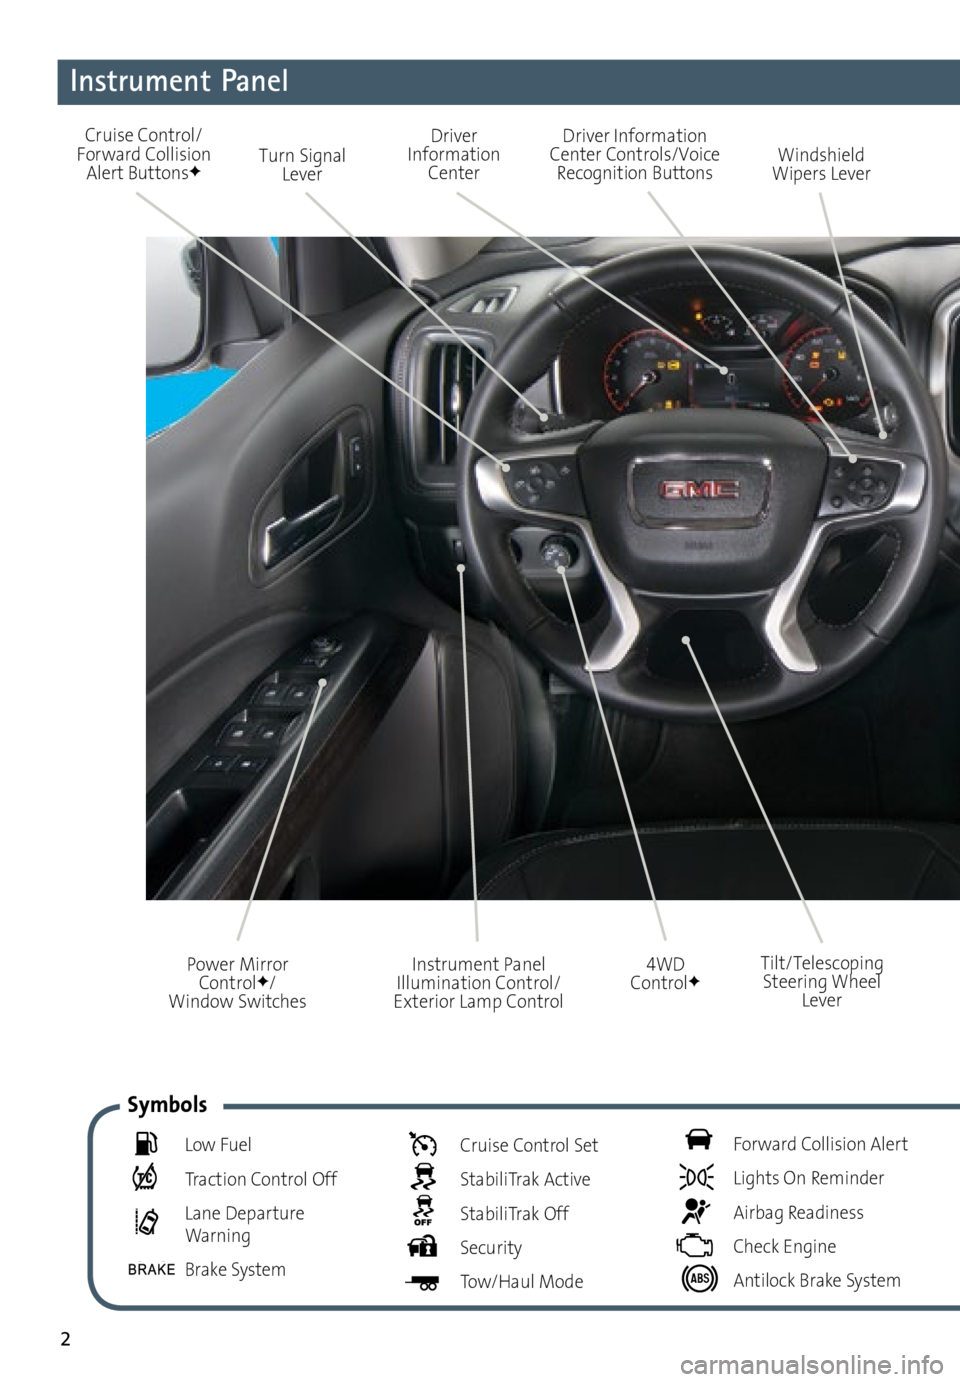
Instrument Panel
Cruise Control/
Forward Collision Alert Buttons
FTurn Signal Lever Driver Information
Center Controls/Voice Recognition Buttons Windshield
Wipers Lever
4WD
Control
F
Driver
Information Center
Instrument Panel
Illumination Control/
Exterior Lamp Control
Power Mirror
Control
F/
Window Switches Tilt/Telescoping
Steering Wheel Lever
Low Fuel
Traction Control Off
Lane Departure Warning
Brake System
Cruise Control Set
StabiliTrak Active
StabiliTrak Off
Security
Tow/Haul Mode
Forward Collision Alert
Lights On Reminder
Airbag Readiness
Check Engine
Antilock Brake System
Symbols
Page 3 of 16
3
Refer to your Owner Manual
to learn about the information
being relayed by the lights,
gauges and indicators on the
instrument cluster.
See In Brief in your Owner Manual.
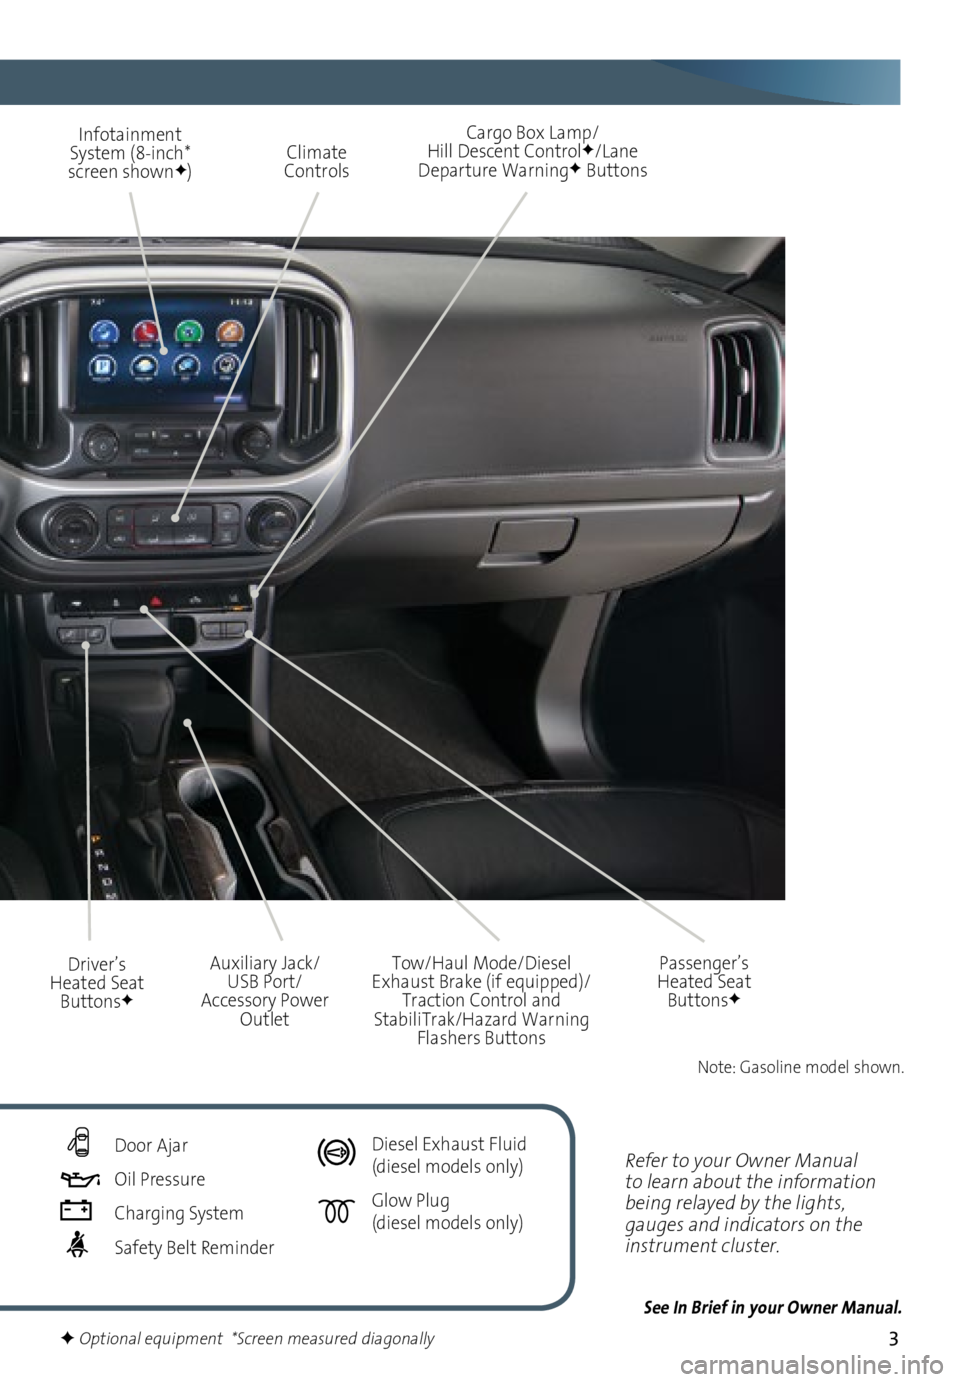
Climate
Controls
Infotainment
System (8-inch*
screen shownF) Cargo Box Lamp/
Hill Descent ControlF/Lane
Departure WarningF Buttons
Driver’s
Heated Seat Buttons
F
Tow/Haul Mode/Diesel
Exhaust Brake (if equipped)/ Traction Control and
StabiliTrak/Hazard Warning Flashers Buttons
Auxiliary Jack/
USB Port/
Accessory Power Outlet Passenger’s
Heated Seat Buttons
F
F Optional equipment *Screen measured diagonally
Door Ajar
Oil Pressure
Charging System
Safety Belt Reminder
Diesel Exhaust Fluid
(diesel models only)
Glow Plug (diesel models only)
Note: Gasoline model shown.
Page 4 of 16
4
Unlock
Press to unlock the driver’s door.
Press again to unlock all doors.
Lock
Press to lock all doors.
Vehicle Locator/Panic Alarm
Press and release to locate your vehicle.
Press and hold to activate the alarm.
Remote Keyless Entry Transmitter (Key Fob)F
Tilt/TelescopingF Steering Wheel
Head Restraints
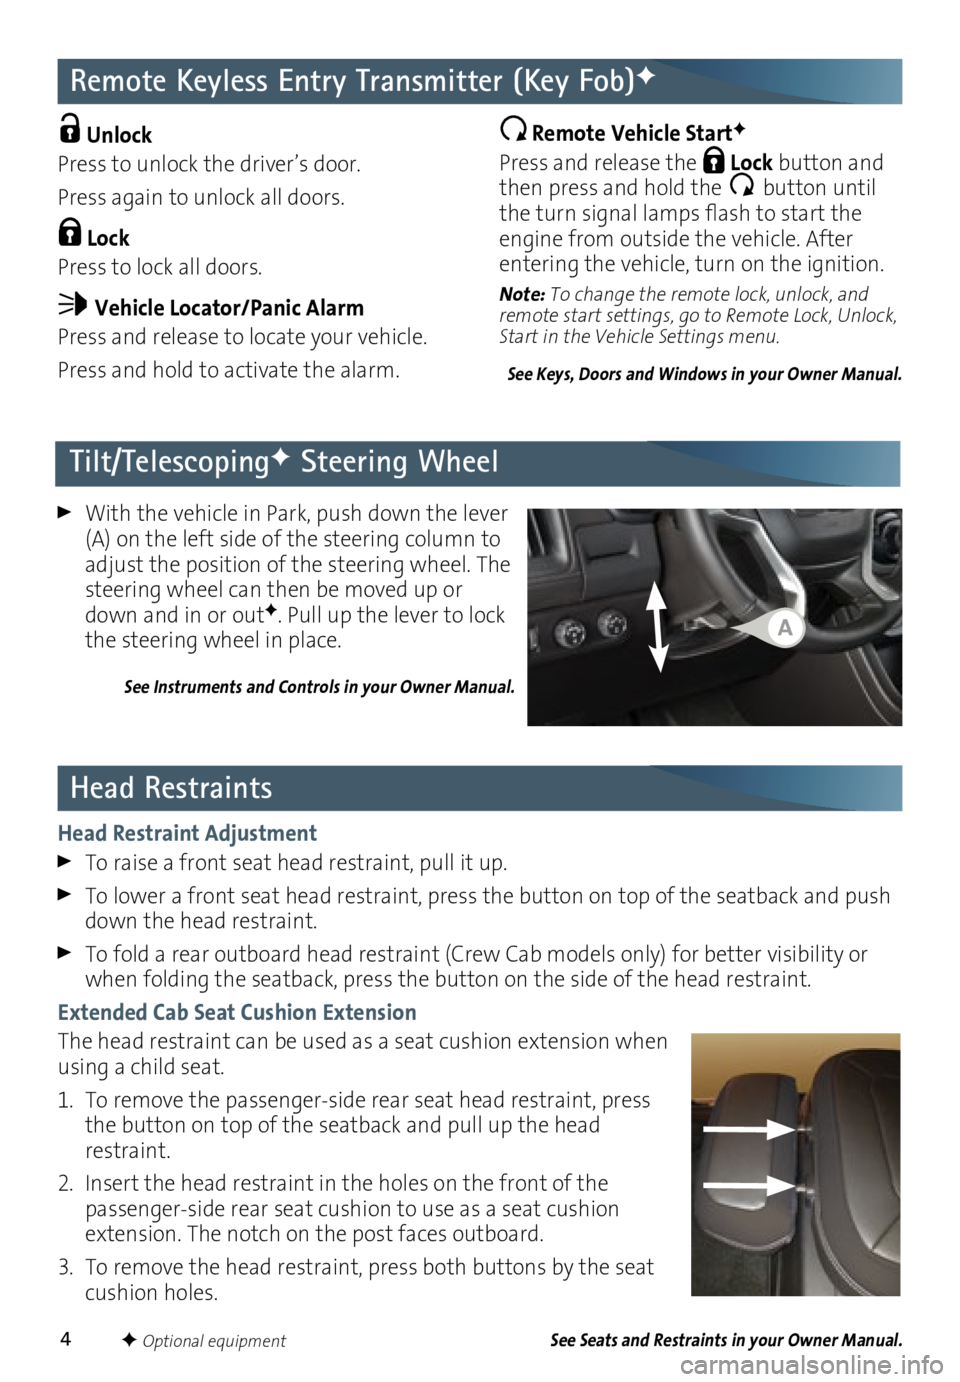
With the vehicle in Park, push down the lever
(A) on the left side of the steering column to
adjust the position of the steering wheel. The
steering wheel can then be moved up or
down and in or out
F. Pull up the lever to lock
the steering wheel in place.
See Instruments and Controls in your Owner Manual.
Remote Vehicle StartF
Press and release the Lock button and
then press and hold the button until
the turn signal lamps flash to start the
engine from outside the vehicle. After
entering the vehicle, turn on the ignition.
Note: To change the remote lock, unlock, and
remote start settings, go to Remote Lock, Unlock,
Start in the Vehicle Settings menu.
See Keys, Doors and Windows in your Owner Manual.
Head Restraint Adjustment
To raise a front seat head restraint, pull it up.
To lower a front seat head restraint, press the button on top of the seatback and push
down the head restraint.
To fold a rear outboard head restraint (Crew Cab models only) for better visibility or
when folding the seatback, press the button on the side of the head restraint.
Extended Cab Seat Cushion Extension
The head restraint can be used as a seat cushion extension when
using a child seat.
1. To remove the passenger-side rear seat head restraint, press
the button on top of the seatback and pull up the head
restraint.
2. Insert the head restraint in the holes on the front of the
passenger-side rear seat cushion to use as a seat cushion
extension. The notch on the post faces outboard.
3. To remove the head restraint, press both buttons by the seat
cushion holes.
See Seats and Restraints in your Owner Manual.
A
F Optional equipment
Page 7 of 16
7
Radio with 4.2-Inch* Screen
Setting the Time
1. Use the MENU knob to select Settings
on the home page.
2. Use the MENU knob to select Time
and Date; then select Time to adjust
the clock.
3. Turn the MENU knob to adjust the
hours, minutes and AM or PM. Press
the knob to go to the next value.
Audio Players
Use a Bluetooth or USB connection to link
to a variety of compatible mobile devices.
Refer to your Owner Manual for operating
instructions. Storing Favorite Stations
Up to 25 radio stations from all bands
(AM, FM or XMF) can be stored, in any
order, on up to five pages.
1. Tune in the desired radio station.
2. Press the
or button to display the
page where the station is to be stored.
3. Press and hold one of the five favorite
keys until a beep is heard.
4. Repeat the steps to store another
favorite station.
See Infotainment System in your Owner Manual.
Refer to your Owner Manual for important safety information about using the infotainment
system while driving.
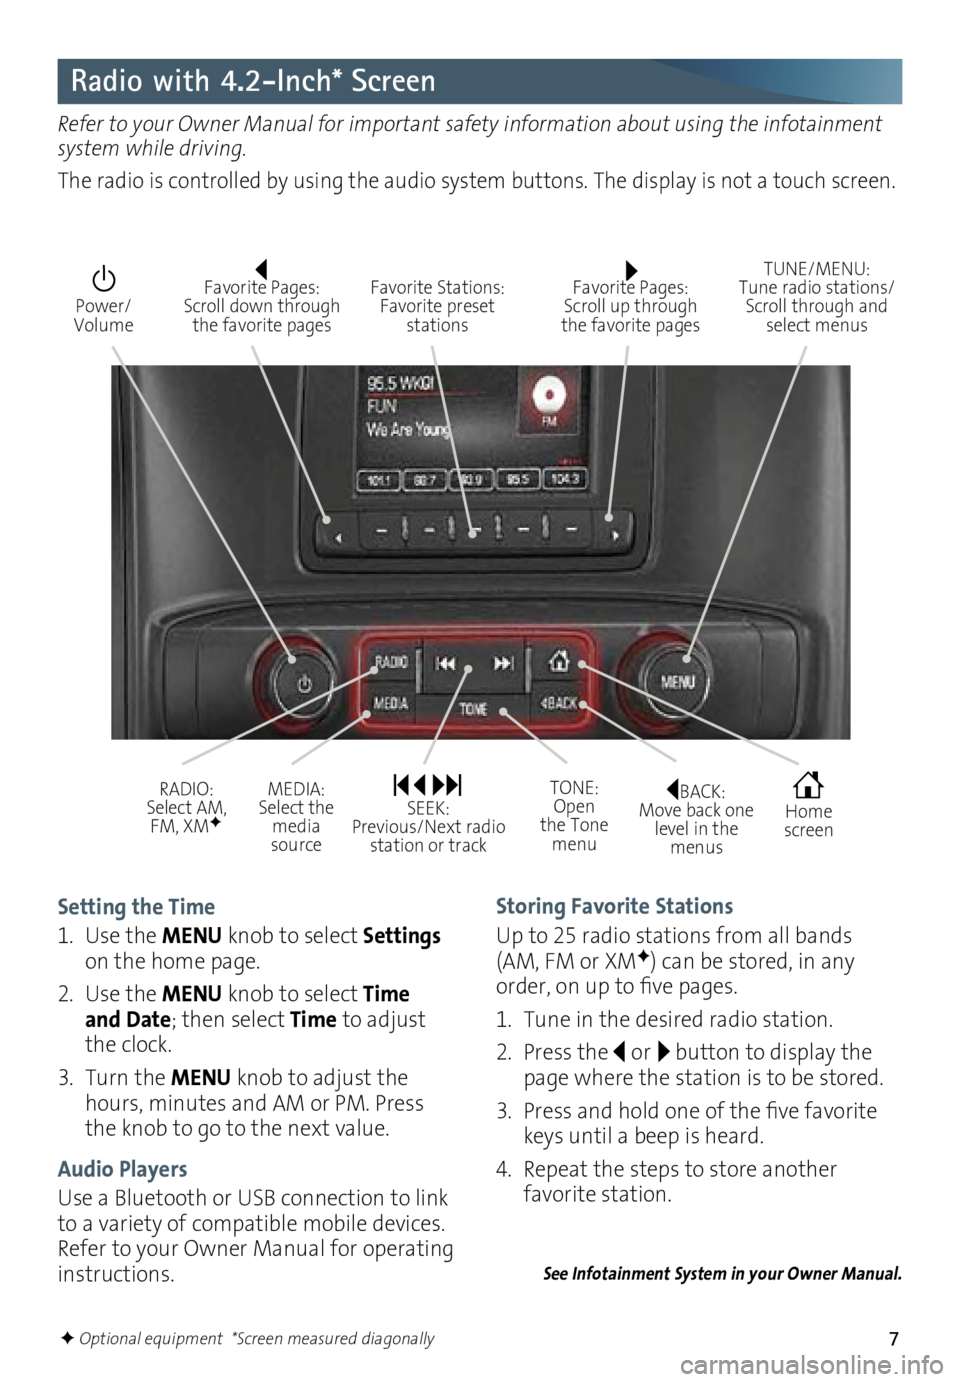
The radio is controlled by using the audio system buttons. The display is not a touch screen.
BACK: Move back one
level in the menus Home
screen
TONE: Open
the Tone menu
Power/
Volume
Favorite Pages: Scroll up through
the favorite pages TUNE/MENU:
Tune radio stations/
Scroll through and select menus
Favorite Stations: Favorite preset
stations
Favorite Pages: Scroll down through the favorite pages
RADIO:
Select AM, FM, XMF
MEDIA: Select the media
source SEEK: Previous/Next radio station or track
F Optional equipment *Screen measured diagonally
Page 8 of 16
8
GMC IntelliLink Radio with 8-Inch* Color ScreenF
Refer to your Owner Manual for important safety information about using the infotainment
system while driving.
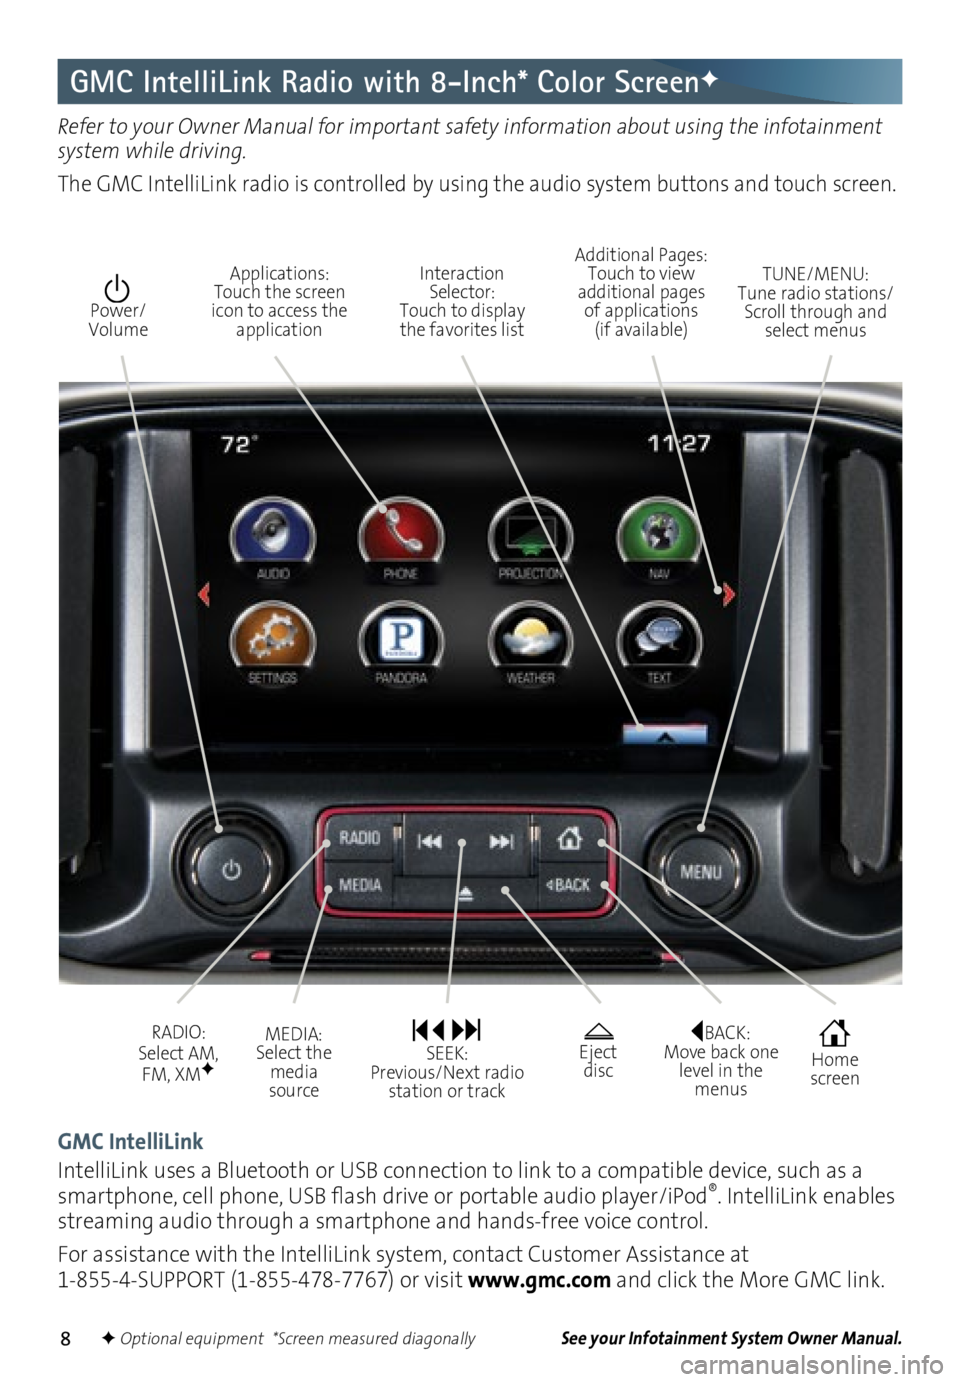
The GMC IntelliLink radio is controlled by using the audio system buttons and touch screen.
Interaction Selector: Touch to display the favorites list TUNE/MENU:
Tune radio stations/
Scroll through and select menus
Applications: Touch the screen
icon to access the application Additional Pages:
Touch to view
additional pages of applications (if available)
Power/ Volume
GMC IntelliLink
IntelliLink uses a Bluetooth or USB connection to link to a compatible device, such as a
smartphone, cell phone, USB flash drive or portable audio player/iPod
®. IntelliLink enables
streaming audio through a smartphone and hands-free voice control.
For assistance with the IntelliLink system, contact Customer Assistance at
1-855-4-SUPPORT (1-855-478-7767) or visit www.gmc.com and click the More GMC link.
See your Infotainment System Owner Manual.
BACK: Move back one
level in the menus Home
screen
MEDIA: Select the
media
source
RADIO: Select AM,
FM, XMF
SEEK: Previous/Next radio station or track
Eject disc
F Optional equipment *Screen measured diagonally
Page 9 of 16
9
GMC IntelliLink Radio with 8-Inch* Color ScreenF
F Optional equipment
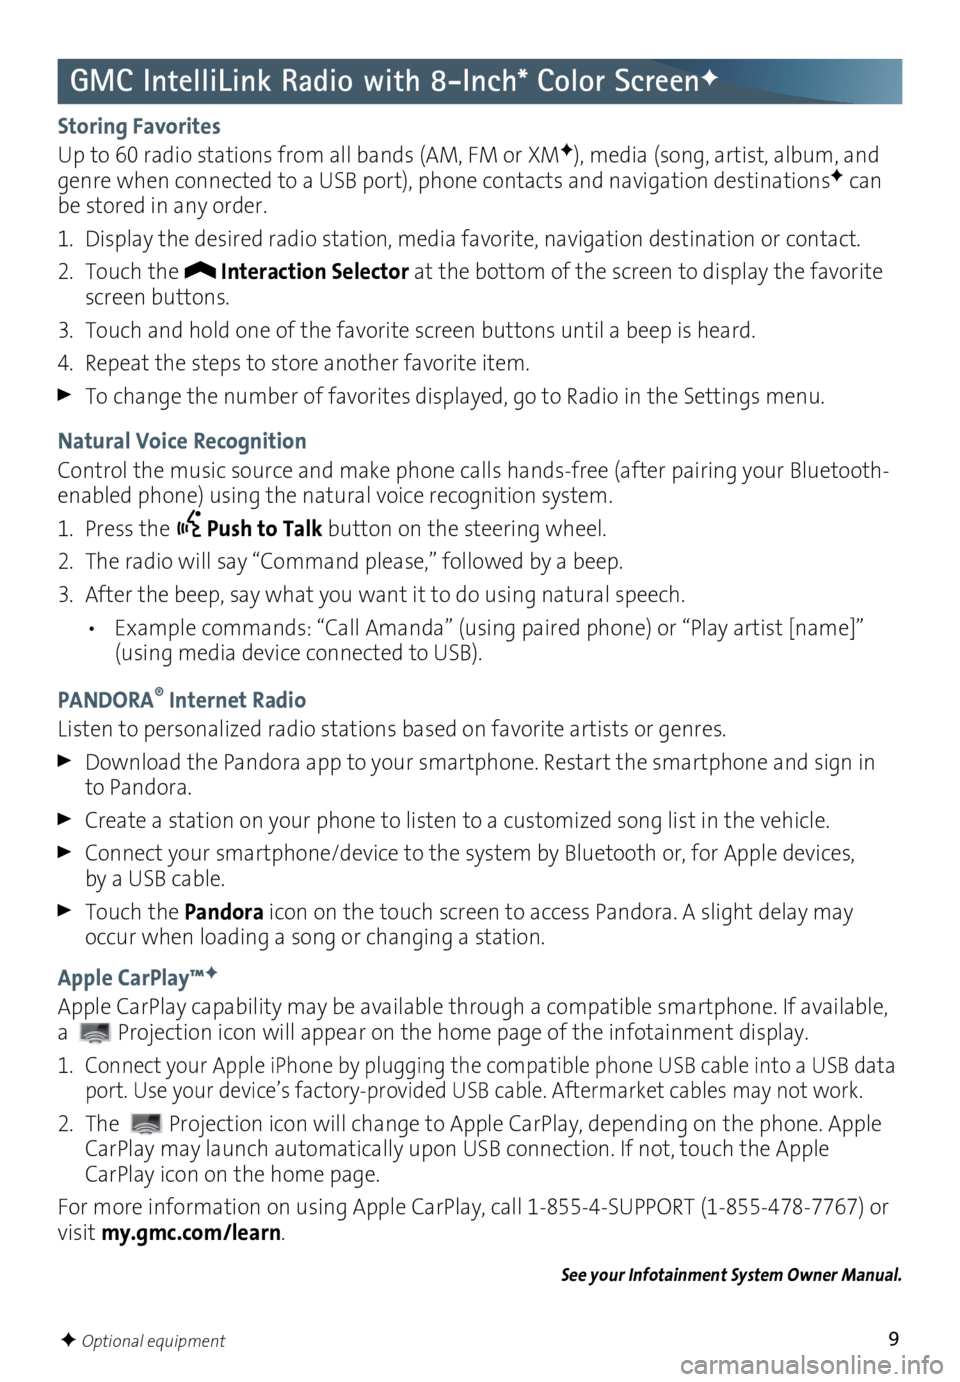
Storing Favorites
Up to 60 radio stations from all bands (AM, FM or XMF), media (song, artist, album, and
genre when connected to a USB port), phone contacts and navigation destinationsF can
be stored in any order.
1. Display the desired radio station, media favorite, navigation destination or contact.
2. Touch the
Interaction Selector at the bottom of the screen to display the favorite
screen buttons.
3. Touch and hold one of the favorite screen buttons until a beep is heard.
4. Repeat the steps to store another favorite item.
To change the number of favorites displayed, go to Radio in the Settings menu.
Natural Voice Recognition
Control the music source and make phone calls hands-free (after pairing your Bluetooth-
enabled phone) using the natural voice recognition system.
1. Press the
Push to Talk button on the steering wheel.
2. The radio will say “Command please,” followed by a beep.
3. After the beep, say what you want it to do using natural speech.
• Example commands: “Call Amanda” (using paired phone) or “Play artist [name]”
(using media device connected to USB).
PANDORA
® Internet Radio
Listen to personalized radio stations based on favorite artists or genres.
Download the Pandora app to your smartphone. Restart the smartphone and sign in
to Pandora.
Create a station on your phone to listen to a customized song list in the vehicle.
Connect your smartphone/device to the system by Bluetooth or, for Apple devices, by a USB cable.
Touch the Pandora icon on the touch screen to access Pandora. A slight delay may
occur when loading a song or changing a station.
Apple CarPlay™
F
Apple CarPlay capability may be available through a compatible smartphone. If available,
a
Projection icon will appear on the home page of the infotainment display.
1.
Connect your Apple iPhone by plugging the compatible phone USB cable into a USB data
port. Use your device’s factory-provided USB cable. Aftermarket cables may not work.
2. The Projection icon will change to Apple CarPlay, depending on the phone. Apple
CarPlay may launch automatically upon USB connection. If not, touch the Apple
CarPlay icon on the home page.
For more information on using Apple CarPlay, call 1-855-4-SUPPORT (1-855-478-7767) or
visit my.gmc.com/learn.
See your Infotainment System Owner Manual.
Page 11 of 16
11
Audio Steering Wheel ControlsF
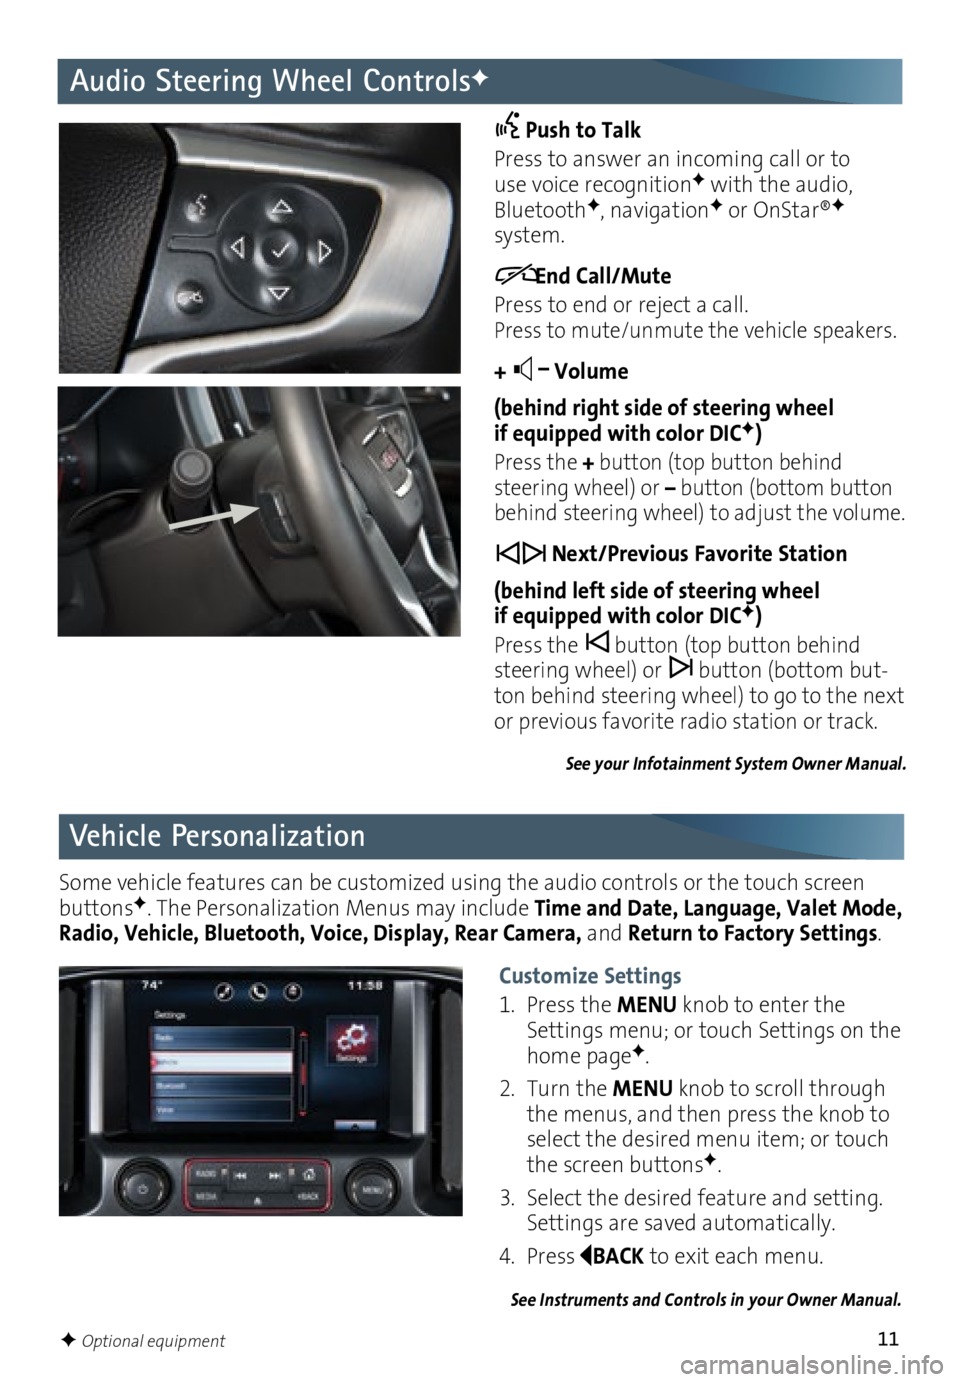
Push to Talk
Press to answer an incoming call or to use voice recognitionF with the audio, BluetoothF, navigationF or OnStar®F system.
End Call/Mute
Press to end or reject a call.
Press to mute/unmute the vehicle speakers.
+ –
Volume
(behind right side of steering wheel
if equipped with color DIC
F)
Press the + button (top button behind
steering wheel) or – button (bottom button
behind steering wheel) to adjust the volume.
Next/Previous Favorite Station
(behind left side of steering wheel
if equipped with color DIC
F)
Press the button (top button behind
steering wheel) or button (bottom but-ton behind steering wheel) to go to the next
or previous favorite radio station or track.
See your Infotainment System Owner Manual.
Vehicle Personalization
Some vehicle features can be customized using the audio controls or the touch screen
buttonsF. The Personalization Menus may include Time and Date, Language, Valet Mode,
Radio, Vehicle, Bluetooth, Voice, Display, Rear Camera, and Return to Factory Settings.
See Instruments and Controls in your Owner Manual.
Customize Settings
1. Press the MENU knob to enter the
Settings menu; or touch Settings on the
home page
F.
2. Turn the MENU knob to scroll through
the menus, and then press the knob to
select the desired menu item; or touch
the screen buttons
F.
3. Select the desired feature and setting.
Settings are saved automatically.
4. Press
BACK to exit each menu.
F Optional equipment
Page 14 of 16
14
Driver Assistance Systems
Traction Control and StabiliTrak Systems
The driver assistance systems use advanced technologies to help avoid collisions by
providing visual and audible alerts under some imminent collision conditions.
Forward Collision Alert
F – The Vehicle Ahead indicator will illuminate in green on the
instrument cluster when a vehicle is detected and will illuminate in amber when follow-ing a vehicle ahead too closely.
If your vehicle approaches another vehicle too rapidly, the
will flash, red lights will
flash on the windshield and rapid beeps will sound.
Press the Collision Alert button on the left side of the steering wheel to set the
alert sensitivity to Far, Medium, Near, or Off. The setting is displayed in the Driver
Information Center.
Lane Departure Warning
F – When crossing a detected lane marking, without using a
turn signal, the system flashes an amber visual alert on the instrument cluster and
beeps sound on the left or right side of the vehicle.
Press the Lane Departure Warning button on the center of the instrument panel to
turn the system on or off.
Rear Vision Camera
F – Provides a view directly behind the vehicle when backing up.
To turn the Rear Vision Camera Guidelines on or off, go to Settings > Rear Camera.
See Driving and Operating in your Owner Manual.
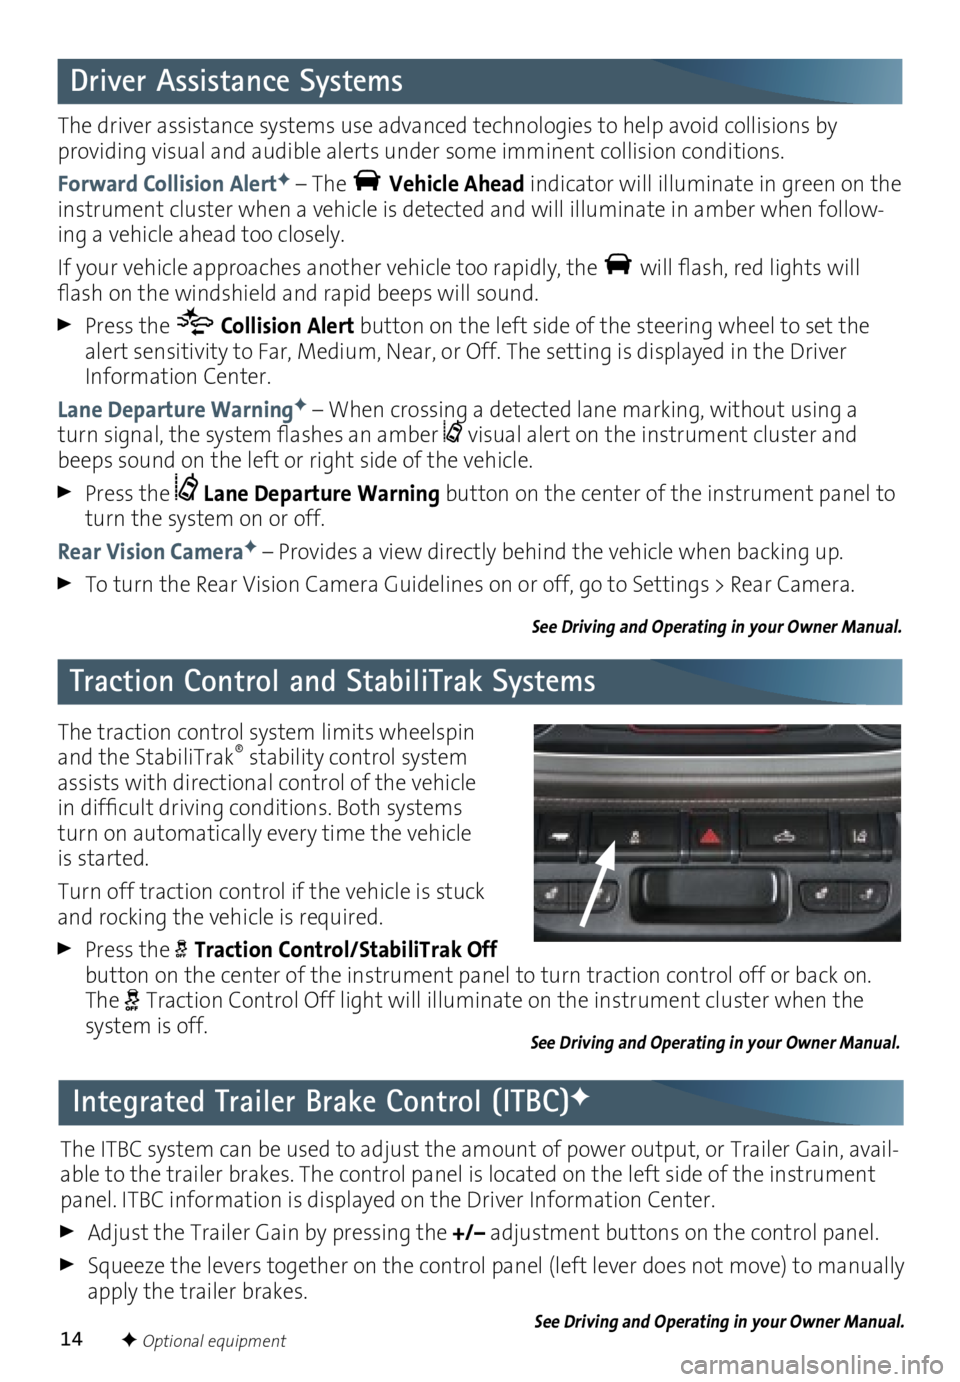
The traction control system limits wheelspin
and the StabiliTrak® stability control system
assists with directional control of the vehicle
in difficult driving conditions. Both systems
turn on automatically every time the vehicle
is started.
Turn off traction control if the vehicle is stuck
and rocking the vehicle is required.
Press the Traction Control/StabiliTrak Off
button on the center of the instrument panel to turn traction control off or back on.
The
Traction Control Off light will illuminate on the instrument cluster when the
system is off.
See Driving and Operating in your Owner Manual.
F Optional equipment
Integrated Trailer Brake Control (ITBC)F
The ITBC system can be used to adjust the amount of power output, or Trailer Gain, avail-able to the trailer brakes. The control panel is located on the left side of the instrument
panel. ITBC information is displayed on the Driver Information Center.
Adjust the Trailer Gain by pressing the +/– adjustment buttons on the control panel.
Squeeze the levers together on the control panel (left lever does not move) to manually
apply the trailer brakes.
See Driving and Operating in your Owner Manual.