light GMC CANYON 2018 Get To Know Guide
[x] Cancel search | Manufacturer: GMC, Model Year: 2018, Model line: CANYON, Model: GMC CANYON 2018Pages: 417, PDF Size: 5.47 MB
Page 150 of 417
GMC Canyon/Canyon Denali Owner Manual (GMNA-Localizing-U.S./Canada-
11354423) - 2018 - crc - 10/12/17
Lighting 149
Reading Lamps
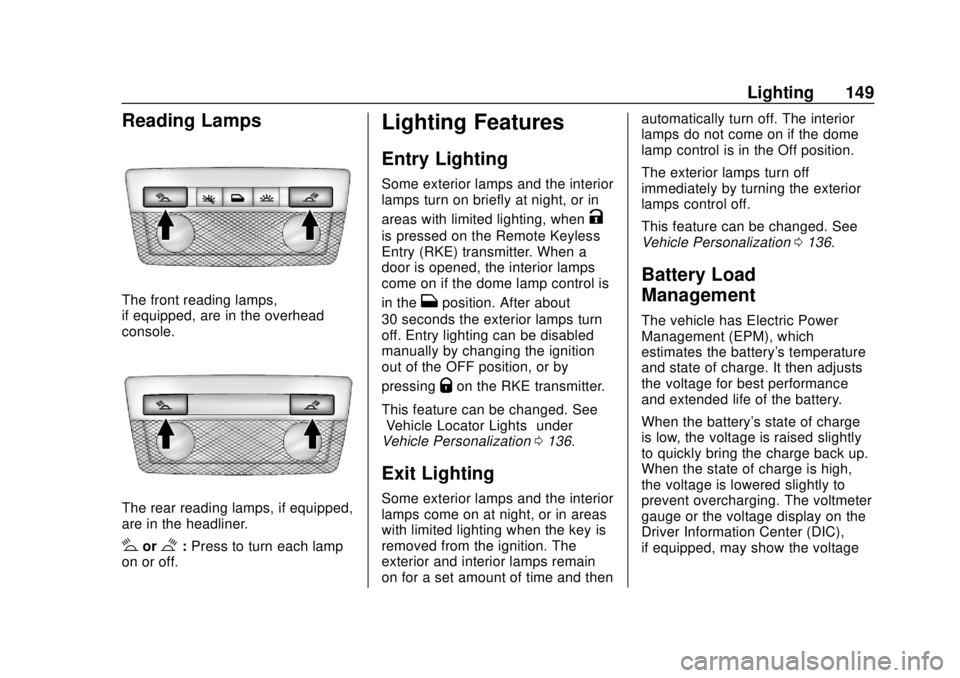
The front reading lamps,
if equipped, are in the overhead
console.
The rear reading lamps, if equipped,
are in the headliner.
#or$:Press to turn each lamp
on or off.
Lighting Features
Entry Lighting
Some exterior lamps and the interior
lamps turn on briefly at night, or in
areas with limited lighting, when
K
is pressed on the Remote Keyless
Entry (RKE) transmitter. When a
door is opened, the interior lamps
come on if the dome lamp control is
in the
Hposition. After about
30 seconds the exterior lamps turn
off. Entry lighting can be disabled
manually by changing the ignition
out of the OFF position, or by
pressing
Qon the RKE transmitter.
This feature can be changed. See
“Vehicle Locator Lights” under
Vehicle Personalization 0136.
Exit Lighting
Some exterior lamps and the interior
lamps come on at night, or in areas
with limited lighting when the key is
removed from the ignition. The
exterior and interior lamps remain
on for a set amount of time and then automatically turn off. The interior
lamps do not come on if the dome
lamp control is in the Off position.
The exterior lamps turn off
immediately by turning the exterior
lamps control off.
This feature can be changed. See
Vehicle Personalization
0136.
Battery Load
Management
The vehicle has Electric Power
Management (EPM), which
estimates the battery's temperature
and state of charge. It then adjusts
the voltage for best performance
and extended life of the battery.
When the battery's state of charge
is low, the voltage is raised slightly
to quickly bring the charge back up.
When the state of charge is high,
the voltage is lowered slightly to
prevent overcharging. The voltmeter
gauge or the voltage display on the
Driver Information Center (DIC),
if equipped, may show the voltage
Page 151 of 417
GMC Canyon/Canyon Denali Owner Manual (GMNA-Localizing-U.S./Canada-
11354423) - 2018 - crc - 10/12/17
150 Lighting
moving up or down. This is normal.
If there is a problem, an alert will be
displayed.
The battery can be discharged at
idle if the electrical loads are very
high. This is true for all vehicles.
This is because the generator
(alternator) may not be spinning fast
enough at idle to produce all the
power that is needed for very high
electrical loads.
A high electrical load occurs when
several of the following are on, such
as: headlamps, high beams, fog
lamps, rear window defogger,
climate control fan at high speed,
heated seats, engine cooling fans,
trailer loads, and loads plugged into
accessory power outlets.
EPM works to prevent excessive
discharge of the battery. It does this
by balancing the generator's output
and the vehicle's electrical needs.
It can increase engine idle speed to
generate more power, whenever
needed. It can temporarily reduce
the power demands of some
accessories.Normally, these actions occur in
steps or levels, without being
noticeable. In rare cases at the
highest levels of corrective action,
this action may be noticeable to the
driver. If so, a DIC message might
be displayed and it is recommended
that the driver reduce the electrical
loads as much as possible.
Battery Power Protection
This feature shuts off the dome and
reading lamps, if they are left on for
more than 10 minutes after the
ignition is turned off. The cargo
lamp shuts off after 20 minutes. This
prevents the battery from
running down.
Exterior Lighting Battery
Saver
The exterior lamps turn off about
10 minutes after the ignition is
turned off, if the parking lamps or
headlamps have been manually left
on. This protects against draining
the battery. To restart the 10-minute
timer, turn the exterior lamp control
to the
Oposition and then back to
the
;or2position.
To keep the lamps on for more than
10 minutes, the ignition must be on
or in ACC/ACCESSORY.
Page 155 of 417
GMC Canyon/Canyon Denali Owner Manual (GMNA-Localizing-U.S./Canada-
11354423) - 2018 - crc - 10/12/17
154 Infotainment System
4.6
.Radio: Press and release to
go to the next station or
channel. Press and hold to
fast seek the next strongest
station or channel.
. USB/BT Music/Pictures:
Press and hold to go to the
next content. Press and
hold to fast forward.
5.
#
. Press and release to
access the phone screen,
answer an incoming call,
or access the device home
screen. Press and hold to
access Press to Talk.
Home Page
Infotainment Display Buttons
Infotainment display buttons show
on the screen when available. When
a function is unavailable, the button
may gray out. When a function is
selected, the button may highlight.
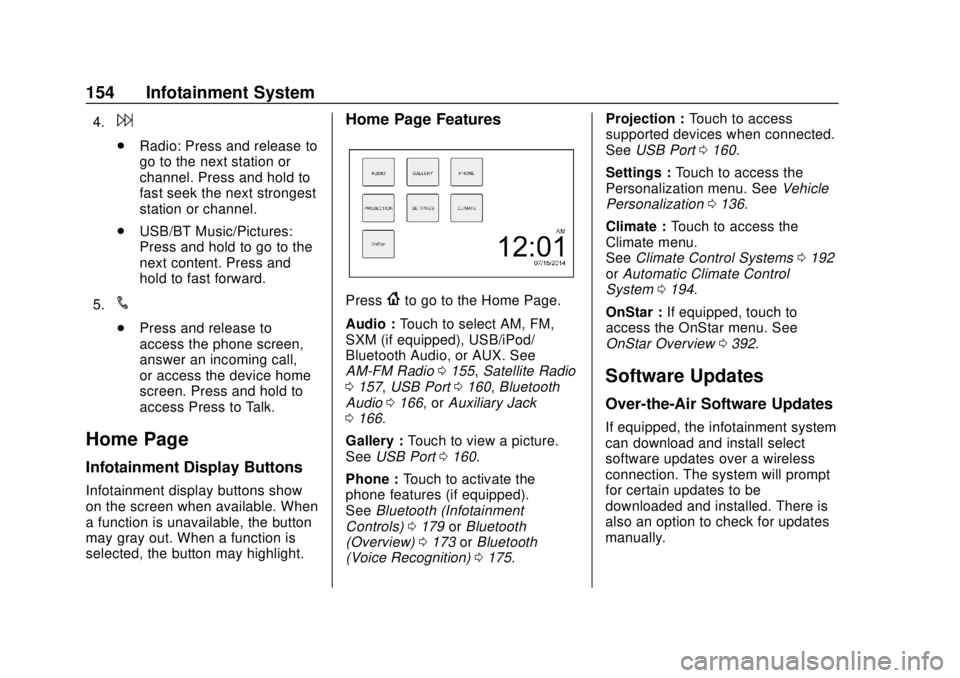
Home Page Features
Press{to go to the Home Page.
Audio : Touch to select AM, FM,
SXM (if equipped), USB/iPod/
Bluetooth Audio, or AUX. See
AM-FM Radio 0155, Satellite Radio
0 157, USB Port 0160, Bluetooth
Audio 0166, or Auxiliary Jack
0 166.
Gallery : Touch to view a picture.
See USB Port 0160.
Phone : Touch to activate the
phone features (if equipped).
See Bluetooth (Infotainment
Controls) 0179 orBluetooth
(Overview) 0173 orBluetooth
(Voice Recognition) 0175. Projection :
Touch to access
supported devices when connected.
See USB Port 0160.
Settings : Touch to access the
Personalization menu. See Vehicle
Personalization 0136.
Climate : Touch to access the
Climate menu.
See Climate Control Systems 0192
or Automatic Climate Control
System 0194.
OnStar : If equipped, touch to
access the OnStar menu. See
OnStar Overview 0392.
Software Updates
Over-the-Air Software Updates
If equipped, the infotainment system
can download and install select
software updates over a wireless
connection. The system will prompt
for certain updates to be
downloaded and installed. There is
also an option to check for updates
manually.
Page 182 of 417
GMC Canyon/Canyon Denali Owner Manual (GMNA-Localizing-U.S./Canada-
11354423) - 2018 - crc - 10/12/17
Infotainment System 181
highlighted by5.
.
Z/5indicates the hands-free
and phone music functions are
enabled.
.
5indicates only the hands-free
function is enabled.
.
Zindicates only Bluetooth
music is enabled.
Pairing a Phone - No SSP and No
Paired Device
When there is no paired device on
the infotainment system and SSP is
not supported:
1. Press
{.
2. Touch PHONE, press
#on the
center stack, or press
gon the
steering wheel without OnStar.
3. Touch Search Device.
4. Touch the desired device to pair on the searched list
screen. 5. Input the Personal
Identification Number (PIN)
code (default: 1234) to the
Bluetooth device. When the
Bluetooth device and
infotainment system are
successfully paired, the
PHONE screen is displayed on
the infotainment system.
When the connection fails, a failure
message is displayed on the
infotainment system.
If a Bluetooth device was previously
connected, the infotainment system
executes the auto connection.
However, if the Bluetooth setting on
the Bluetooth device is turned off, a
failure message is displayed on the
infotainment system.
Pairing a Phone - No SSP and
Paired Device
When a paired device is on the
infotainment system and SSP is not
supported:
1. Press
{.
2. Touch Settings. 3. Touch Bluetooth, then Device
Management.
4. Touch the desired device to pair. When the Bluetooth
device and infotainment system
are successfully paired,
Z/5
is displayed on the pair device
screen. If no desired device is
available go to Step 5.
5. Touch Search Device to search for the desired device.
6. Touch the desired device to pair on the searched list
screen.
7. Input the Personal Identification Number (PIN)
code (default: 1234) to the
Bluetooth device. When the
Bluetooth device and
infotainment system are
successfully paired,
Z/5is
displayed on the pair device
screen.
. The connected phone is
highlighted by
5.
Page 194 of 417
GMC Canyon/Canyon Denali Owner Manual (GMNA-Localizing-U.S./Canada-
11354423) - 2018 - crc - 10/12/17
Climate Controls 193
Air Delivery Mode Control :PressY,\,[, or-to change the
direction of the airflow. An indicator
light comes on in the selected mode
button.
Y: Air is directed to the instrument
panel outlets.
\: Air is divided between the
instrument panel and floor outlets.
[: Air is directed to the floor
outlets, with some air directed to the
windshield, outboard instrument
panel, and side window outlets.
-: This mode clears the windows
of fog or moisture. Air is directed to
the windshield, with some air
directed to the floor, outboard
instrument panel outlets, and side
window outlets.
0: Press to clear the windshield
of fog or frost more quickly. Air is
directed to the windshield and side
window vents, with some air
directed to the outboard instrument
panel. The system automatically
forces outside air into the vehicle and the air conditioning compressor
will run, unless the outside
temperature is close to freezing.
Do not drive the vehicle until all the
windows are clear.
See
Air Vents 0196.
@:Press to turn on recirculation.
An indicator light comes on. Air is
recirculated to quickly cool the
inside of the vehicle. It can also be
used to help reduce outside air and
odors that enter the vehicle.
8: If equipped, press to turn on
outside air. An indicator light comes
on. Outside air is circulated
throughout the vehicle.
A/C : Press to turn the air
conditioning system on or off. An
indicator light comes on to show
that the air conditioning is enabled.
If the fan is turned off, the air
conditioner will not run. The A/C
light will stay on even if the outside
temperatures are below freezing.
Rear Window Defogger
K: If equipped, press to turn the
rear window defogger on or off. An
indicator light on the button comes
on to show that the rear window
defogger is on.
The rear window defogger only
works when the ignition is on. The
defogger also turns off if the ignition
is turned to off or ACC/
ACCESSORY.
Caution
Using a razor blade or sharp
object to clear the inside rear
window can damage the rear
window defogger. Repairs would
not be covered by the vehicle
warranty. Do not clear the inside
rear window with sharp objects.
Heated Mirrors : If equipped with
heated outside mirrors, the mirrors
heat to help clear fog or frost from
the surface of the mirror when the
rear window defog button is
pressed. See Heated Mirrors 038.
Page 195 of 417

GMC Canyon/Canyon Denali Owner Manual (GMNA-Localizing-U.S./Canada-
11354423) - 2018 - crc - 10/12/17
194 Climate Controls
Automatic Climate Control System
With this system the heating, cooling, and ventilation in the vehicle can be
controlled.
1. Fan Control
2. A/C (Air Conditioning)
3. Air Delivery Mode Controls
4. Defrost
5. Temperature Control
6. AUTO (Automatic Operation)
7. Rear Window Defogger
8. Air Recirculation
9. Power ButtonAutomatic Operation
The system automatically heats or
cools the vehicle to the desired
temperature:
.
Fan Speed
. Air Delivery Mode
. Air Conditioning
. Recirculation When AUTO is lit, all functions
operate automatically. Each function
can also be manually set. Functions
not manually set will continue to be
automatically controlled.
To place the system in full automatic
operation:
1. Press AUTO.
2. Set the temperature. To find your comfort setting,
start with 22 °C (72 °F) and
allow the system time to
stabilize. Then adjust the
temperature as needed for best
comfort.
To improve fuel efficiency and to
cool the vehicle faster, recirculation
may be automatically selected in
warm weather.
The recirculation light will not come
on when automatically controlled.
Press
@to manually select
recirculation; press it again to select
outside air.
Page 196 of 417

GMC Canyon/Canyon Denali Owner Manual (GMNA-Localizing-U.S./Canada-
11354423) - 2018 - crc - 10/12/17
Climate Controls 195
Do not cover the solar sensor on the
top of the instrument panel near the
windshield. This sensor regulates
air temperature based on sun load.
See“Sensors” later in this section.
Manual Operation
O:Press to turn the climate control
system on or off. When the system
is turned off, air will stop flowing into
the cabin. Press
Oagain or adjust
any of the climate controls to turn
the system back on and the airflow
will continue based on the selected
climate control settings.
A: Turn clockwise or
counterclockwise to increase or
decrease the fan speed. There is
about a five second delay when the
fan is turned on. Press the knob to
turn the fan off. Press AUTO to
return to automatic operation.
Temperature Control : Turn the
knob clockwise or counterclockwise
to increase or decrease temperature
setting. Air Delivery Mode Controls :
Press
Y,\,[, or-to change
the direction of the airflow. An
indicator light comes on in the
selected mode button.
Changing the mode cancels the
automatic operation and the system
goes into manual mode.
Press AUTO to return to automatic
operation.
Y: Air is directed to the instrument
panel outlets.
\: Air is divided between the
instrument panel and floor outlets.
[: Air is directed to the floor
outlets, with some to the windshield,
outboard instrument panel outlets,
side window outlets, and second
row floor outlets.
-: This mode clears the windows
of fog or moisture. Air is directed to
the windshield, floor outlets,
outboard instrument panel outlets,
and side window outlets. The
system automatically forces outside
air into the vehicle and the air conditioning compressor will run,
unless the outside temperature is
close to freezing.
0:
Press to clear the windshield
of fog or frost more quickly. Air is
directed to the windshield and the
side window vents, with some air
directed to the outboard instrument
panel outlets. The system
automatically forces outside air into
the vehicle and the air conditioning
compressor will run, unless the
outside temperature is below
freezing.
Do not drive the vehicle until all
windows are clear.
See Air Vents 0196.
A/C : Press to turn the air
conditioning system on or off. An
indicator light comes on to show
that the air conditioning is enabled.
The A/C light will stay on even if the
outside temperatures are below
freezing. If the fan is turned off, the
air conditioner will not run. Press
AUTO to return to automatic
operation.
Page 197 of 417
GMC Canyon/Canyon Denali Owner Manual (GMNA-Localizing-U.S./Canada-
11354423) - 2018 - crc - 10/12/17
196 Climate Controls
@:Press to turn on recirculation.
An indicator light comes on. Air is
recirculated to quickly cool the
inside of the vehicle. It can also be
used to help reduce outside air and
odors that enter the vehicle. The air
conditioning compressor also comes
on when this mode is activated.
Press AUTO to return to automatic
operation.
Auto Defog : The climate control
system may have a sensor to
automatically detect high humidity
inside the vehicle. When high
humidity is detected, the climate
control system may adjust air
delivery modes, outside air supply,
and turn on the air conditioner. If the
climate control system does not
detect possible window fogging, it
returns to normal operation. To turn
Auto Defog off or on, see “Climate
and Air Quality” underVehicle
Personalization 0136.
Rear Window Defogger
The rear window defogger uses a
warming grid to remove fog from the
rear window.
K:Press to turn the rear window
defogger on or off. An indicator light
on the button comes on to show that
the rear window defogger is on.
The rear window defogger only
works when the ignition is on. The
defogger also turns off if the ignition
is turned to off or ACC/
ACCESSORY.
Caution
Using a razor blade or sharp
object to clear the inside rear
window can damage the rear
window defogger. Repairs would
not be covered by the vehicle
warranty. Do not clear the inside
rear window with sharp objects.
Heated Mirrors : If equipped with
heated outside mirrors, the mirrors
heat to help clear fog or frost from
the surface of the mirror when the
rear window defog button is
pressed. See Heated Mirrors 038.
Air Vents
Adjustable air vents are in the
center and on the side of the
instrument panel. Use the sliding
knobs on the air vents to change
the direction of the airflow. Slide the
knob up or down to open or close
off the airflow.
Air vents blow warm air on the side
windows in cold weather. If Floor,
Defog, or Defrost modes are
selected, a small amount of air will
come from the vents close to the
window. If the airflow is shut off
using the sliding knobs, warm air
will be directed to the other
instrument panel vents. This is
normal operation.
Use the sliding knobs to turn vent
airflow on or off based on the mode
selected.
Operation Tips
.
Clear away any ice, snow,
or leaves from air inlets at the
base of the windshield that could
block the flow of air into the
vehicle.
Page 206 of 417
GMC Canyon/Canyon Denali Owner Manual (GMNA-Localizing-U.S./Canada-
11354423) - 2018 - crc - 10/12/17
Driving and Operating 205
{Warning
Heavy braking when going down
a hill can cause your brakes to
overheat and fade. This could
cause loss of control and you or
others could be injured or killed.
Apply the brakes lightly when
descending a hill and use a low
gear to keep vehicle speed under
control.
If the vehicle stalls on a hill: 1. Apply the brakes to stop the vehicle, and then apply the
parking brake.
2. Shift into P (Park) and then restart the engine.
.If driving uphill when the
vehicle stalls, shift to
R (Reverse), release the
parking brake, and back
straight down. .
Never try to turn the vehicle
around. If the hill is steep
enough to stall the vehicle,
it is steep enough to cause
it to roll over.
. If you cannot make it up the
hill, back straight down
the hill.
. Never back down a hill in
N (Neutral) using only the
brake. The vehicle can roll
backward quickly and you
could lose control.
. If driving downhill when the
vehicle stalls, shift to a
lower gear, release the
parking brake, and drive
straight down the hill.
3. If the vehicle cannot be restarted after stalling, set the
parking brake, shift into
P (Park), and turn the
vehicle off.
3.1. Leave the vehicle and
seek help. 3.2. Stay clear of the path the
vehicle would take if it
rolled downhill.
. Avoid turns that take the vehicle
across the incline of the hill.
A hill that can be driven straight
up or down might be too steep to
drive across. Driving across an
incline puts more weight on the
downhill wheels, which could
cause a downhill slide or a
rollover.
. Surface conditions can be a
problem. Loose gravel, muddy
spots, or even wet grass can
cause the tires to slip sideways,
downhill. If the vehicle slips
sideways, it can hit something
that will trip it —a rock, a rut,
etc. —and roll over.
. Hidden obstacles can make the
steepness of the incline more
severe. If a rock is driven across
with the uphill wheels, or if the
downhill wheels drop into a rut
or depression, the vehicle can tilt
even more.
Page 208 of 417
GMC Canyon/Canyon Denali Owner Manual (GMNA-Localizing-U.S./Canada-
11354423) - 2018 - crc - 10/12/17
Driving and Operating 207
and it may take longer to stop. See
“Driving on Wet Roads”later in this
section.
After Off-Road Driving
Remove any brush or debris that
has collected on the underbody or
chassis, or under the hood. These
accumulations can be a fire hazard.
After operation in mud or sand,
have the brake linings cleaned and
checked. These substances can
cause glazing and uneven braking.
Check the body structure, driveline,
steering, suspension, wheels, tires,
and exhaust system for damage and
check the fuel lines and cooling
system for any leakage.
More frequent maintenance service
is required. See the Maintenance
Schedule 0361.
Driving on Wet Roads
Rain and wet roads can reduce
vehicle traction and affect your
ability to stop and accelerate.
Always drive slower in these types of driving conditions and avoid
driving through large puddles and
deep-standing or flowing water.
{Warning
Wet brakes can cause crashes.
They might not work as well in a
quick stop and could cause
pulling to one side. You could
lose control of the vehicle.
After driving through a large
puddle of water or a car/vehicle
wash, lightly apply the brake
pedal until the brakes work
normally.
Flowing or rushing water creates
strong forces. Driving through
flowing water could cause the
vehicle to be carried away. If this
happens, you and other vehicle
occupants could drown. Do not
ignore police warnings and be
very cautious about trying to drive
through flowing water.
Hydroplaning
Hydroplaning is dangerous. Water
can build up under the vehicle's
tires so they actually ride on the
water. This can happen if the road is
wet enough and you are going fast
enough. When the vehicle is
hydroplaning, it has little or no
contact with the road.
There is no hard and fast rule about
hydroplaning. The best advice is to
slow down when the road is wet.
Other Rainy Weather Tips
Besides slowing down, other wet
weather driving tips include:
.
Allow extra following distance.
. Pass with caution.
. Keep windshield wiping
equipment in good shape.
. Keep the windshield washer fluid
reservoir filled.
. Have good tires with proper
tread depth. See Tires0309.
. Turn off cruise control.