wheel GMC CANYON 2021 Get To Know Guide
[x] Cancel search | Manufacturer: GMC, Model Year: 2021, Model line: CANYON, Model: GMC CANYON 2021Pages: 16, PDF Size: 2.35 MB
Page 2 of 16
2
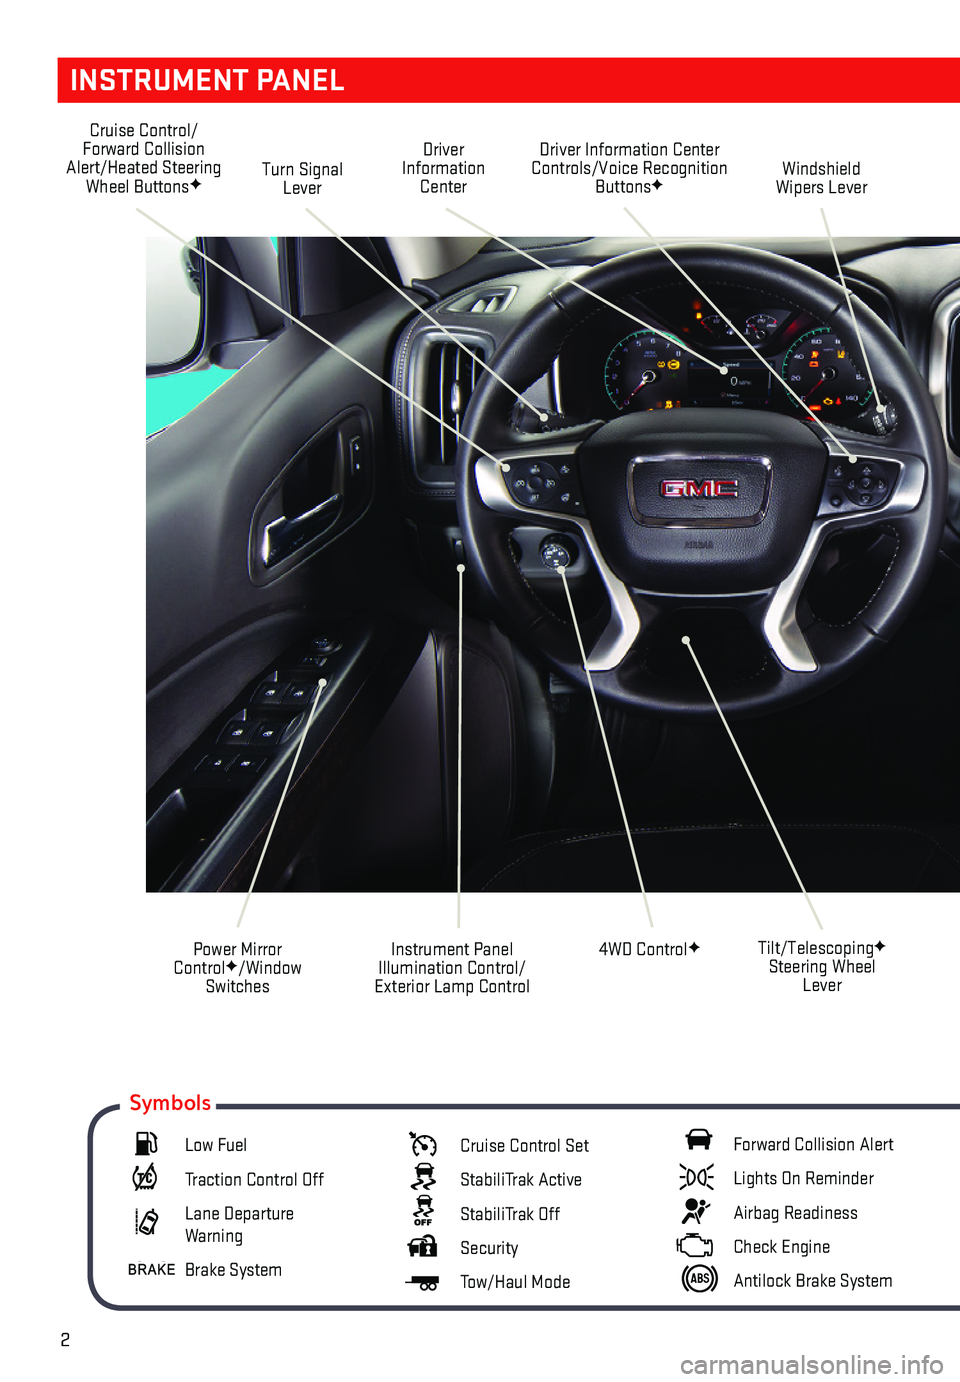
INSTRUMENT PANEL
Cruise Control/Forward Collision Alert/Heated Steering Wheel ButtonsFTurn Signal Lever
Driver Information Center Controls/Voice Recognition ButtonsFWindshield Wipers Lever
4WD ControlF
Driver Information Center
Instrument Panel Illumination Control/ Exterior Lamp Control
Power Mirror ControlF/Window Switches
Tilt/TelescopingF Steering Wheel Lever
Low Fuel
Traction Control Off
Lane Departure Warning
Brake System
Cruise Control Set
StabiliTrak Active
StabiliTrak Off
Security
Tow/Haul Mode
Forward Collision Alert
Lights On Reminder
Airbag Readiness
Check Engine
Antilock Brake System
Symbols
Page 5 of 16
5
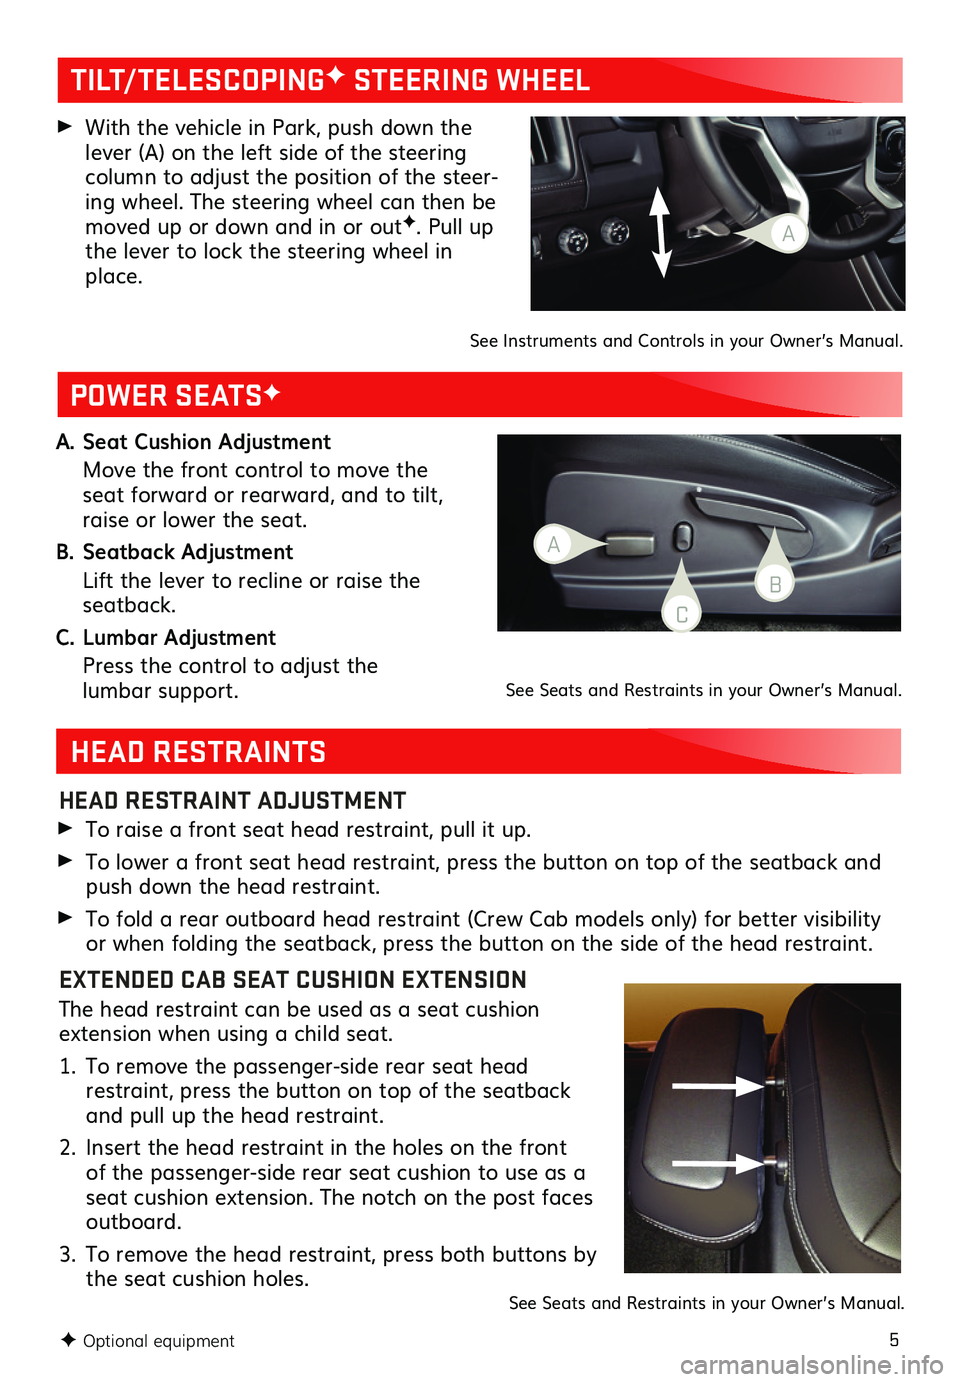
A. Seat Cushion Adjustment
Move the front control to move the seat forward or rearward, and to tilt, raise or lower the seat.
B. Seatback Adjustment
Lift the lever to recline or raise the seatback.
C. Lumbar Adjustment
Press the control to adjust the lumbar support.
HEAD RESTRAINTS
POWER SEATSF
HEAD RESTRAINT ADJUSTMENT
To raise a front seat head restraint, pull it up.
To lower a front seat head restraint, press the button on top of the seatback and push down the head restraint.
To fold a rear outboard head restraint (Crew Cab models only) for better visibility or when folding the seatback, press the button on the side of the head restraint.
EXTENDED CAB SEAT CUSHION EXTENSION
The head restraint can be used as a seat cushion extension when using a child seat.
1. To remove the passenger-side rear seat head restraint, press the button on top of the seatback and pull up the head restraint.
2. Insert the head restraint in the holes on the front of the passenger-side rear seat cushion to use as a seat cushion extension. The notch on the post faces outboard.
3. To remove the head restraint, press both buttons by the seat cushion holes.See Seats and Restraints in your Owner’s Manual.
F Optional equipment
See Seats and Restraints in your Owner’s Manual.
TILT/TELESCOPINGF STEERING WHEEL
With the vehicle in Park, push down the lever (A) on the left side of the steering column to adjust the position of the steer-ing wheel. The steering wheel can then be moved up or down and in or outF. Pull up the lever to lock the steering wheel in place.
A
See Instruments and Controls in your Owner’s Manual.
A
C
B
Page 6 of 16
6
WINDSHIELD WIPERS
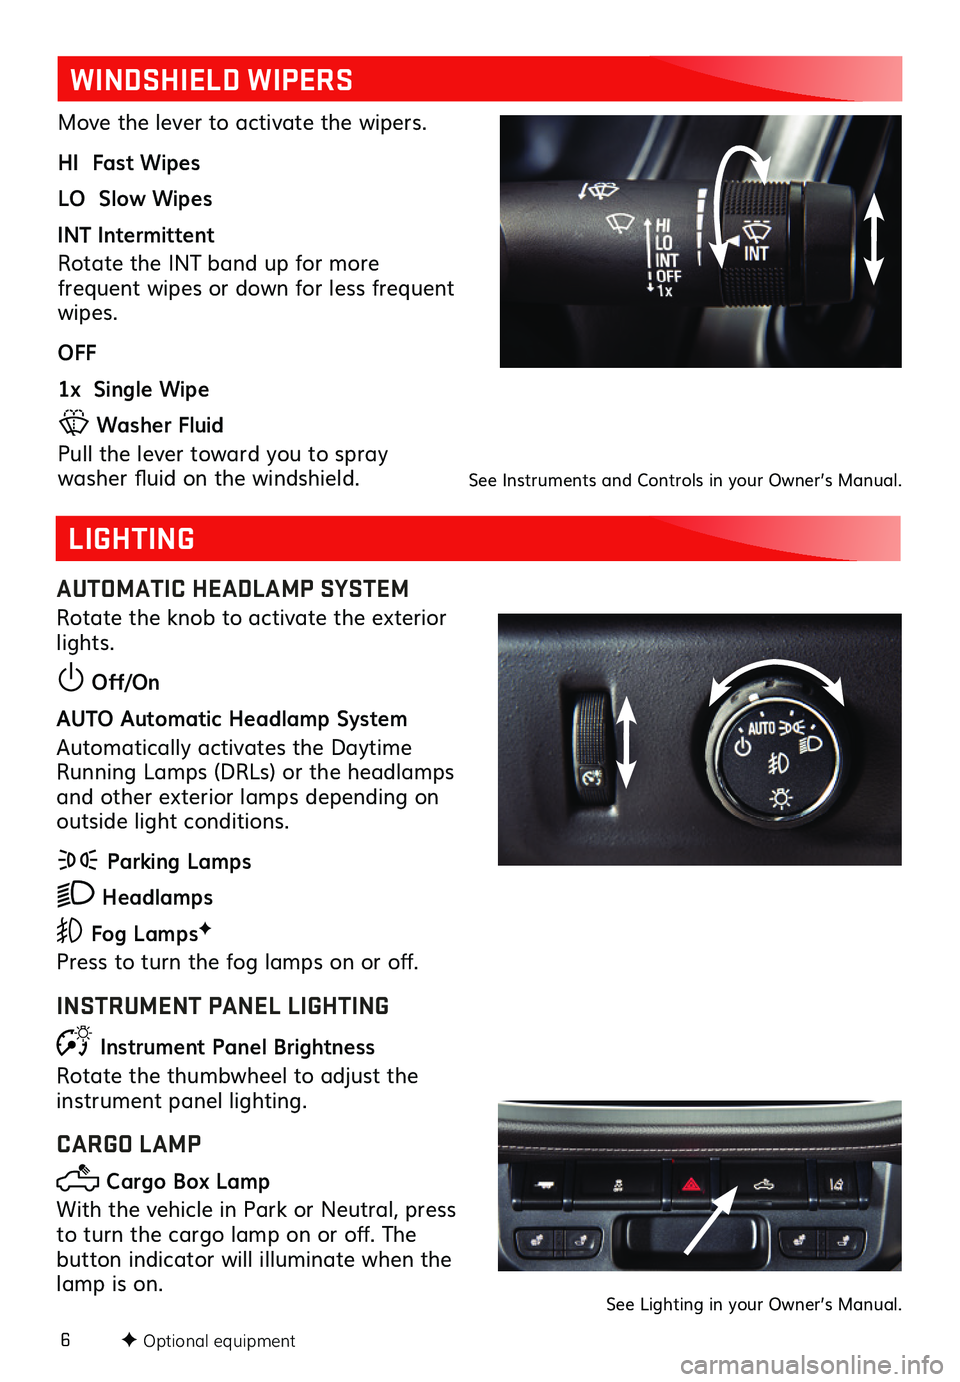
Move the lever to activate the wipers.
HI Fast Wipes
LO Slow Wipes
INT Intermittent
Rotate the INT band up for more
frequent wipes or down for less frequent wipes.
OFF
1x Single Wipe
Washer Fluid
Pull the lever toward you to spray
washer fluid on the windshield.
F Optional equipment
LIGHTING
AUTOMATIC HEADLAMP SYSTEM
Rotate the knob to activate the exterior lights.
Off/On
AUTO Automatic Headlamp System
Automatically activates the Daytime Running Lamps (DRLs) or the headlamps and other exterior lamps depending on outside light conditions.
Parking Lamps
Headlamps
Fog LampsF
Press to turn the fog lamps on or off.
INSTRUMENT PANEL LIGHTING
Instrument Panel Brightness
Rotate the thumbwheel to adjust the
instrument panel lighting.
CARGO LAMP
Cargo Box Lamp
With the vehicle in Park or Neutral, press to turn the cargo lamp on or off. The
button indicator will illuminate when the lamp is on.
See Instruments and Controls in your Owner’s Manual.
See Lighting in your Owner’s Manual.
Page 9 of 16
9
INFOTAINMENT SYSTEM WITH 7-INCH* OR 8-INCH*F
COLOR SCREEN
F Optional equipment *Screen measured diagonally
NATURAL VOICE RECOGNITION
Control the music source and make phone calls hands-free (after pairing your Bluetooth-enabled phone) using the natural voice recognition system.
1. Press the Press to Talk button on the steering wheel.
2. The radio will play a prompt followed by a beep.
3. After the beep, say what you want it to do using natural speech. Examples: “Call Dave” or “Tune to 99.5 FM.” Say “Help” for assistance.
APPS
In-vehicle apps — connecting to music, news, weather, travel information, sports, entertainment and more — are available for download to the infotainment system through the Apps icon on the Home page. Downloading and using the apps requires internet connectivity, and may require a data plan, accessed through the vehicle’s 4G LTE Wi-Fi hotspot, if active, or a mobile device hotspot.
APPLE CARPLAY
Apple CarPlay capability is available through a compatible smartphone using the Apple CarPlay icon on the Home page of the infotainment system. No app is required.
1. Connect your phone by plugging the Lightning cable into a USB data port. Use your device’s factory-provided Lightning cable. Aftermarket cables may not work.
2. The Apple CarPlay icon will illuminate. Touch the icon to have your apps displayed.
Press the Home button to exit Apple CarPlay. To return to the last page viewed in Apple CarPlay, press and hold the Home button.
ANDROID AUTO
Android Auto capability is available through a compatible smartphone using the Android Auto icon on the Home page of the infotainment system.
1. Download the Android Auto app to your phone from the Google Play Store.
2. Connect your phone by plugging the phone USB cable into a USB data port. Use your device’s factory-provided USB cable. Aftermarket cables may not work.
3. The Android Auto icon will illuminate. Touch the icon to have your apps displayed.
Press the Home button to exit Android Auto. To return to the last page viewed in Android Auto, press and hold the Home button.
PORTABLE AUDIO DEVICES
USB ports are located in several locations in the vehicle to connect portable devices.
An iPod®, iPhone®, MP3 Player, a USB flash drive or a USB mass storage device can be connected to the USB port. Search for music on-screen or by voice commands.
Touch Audio and then touch More, if necessary, to select a portable device as the audio source.
See Infotainment System in your Owner’s Manual.
Page 11 of 16
11
AUDIO STEERING WHEEL CONTROLSF
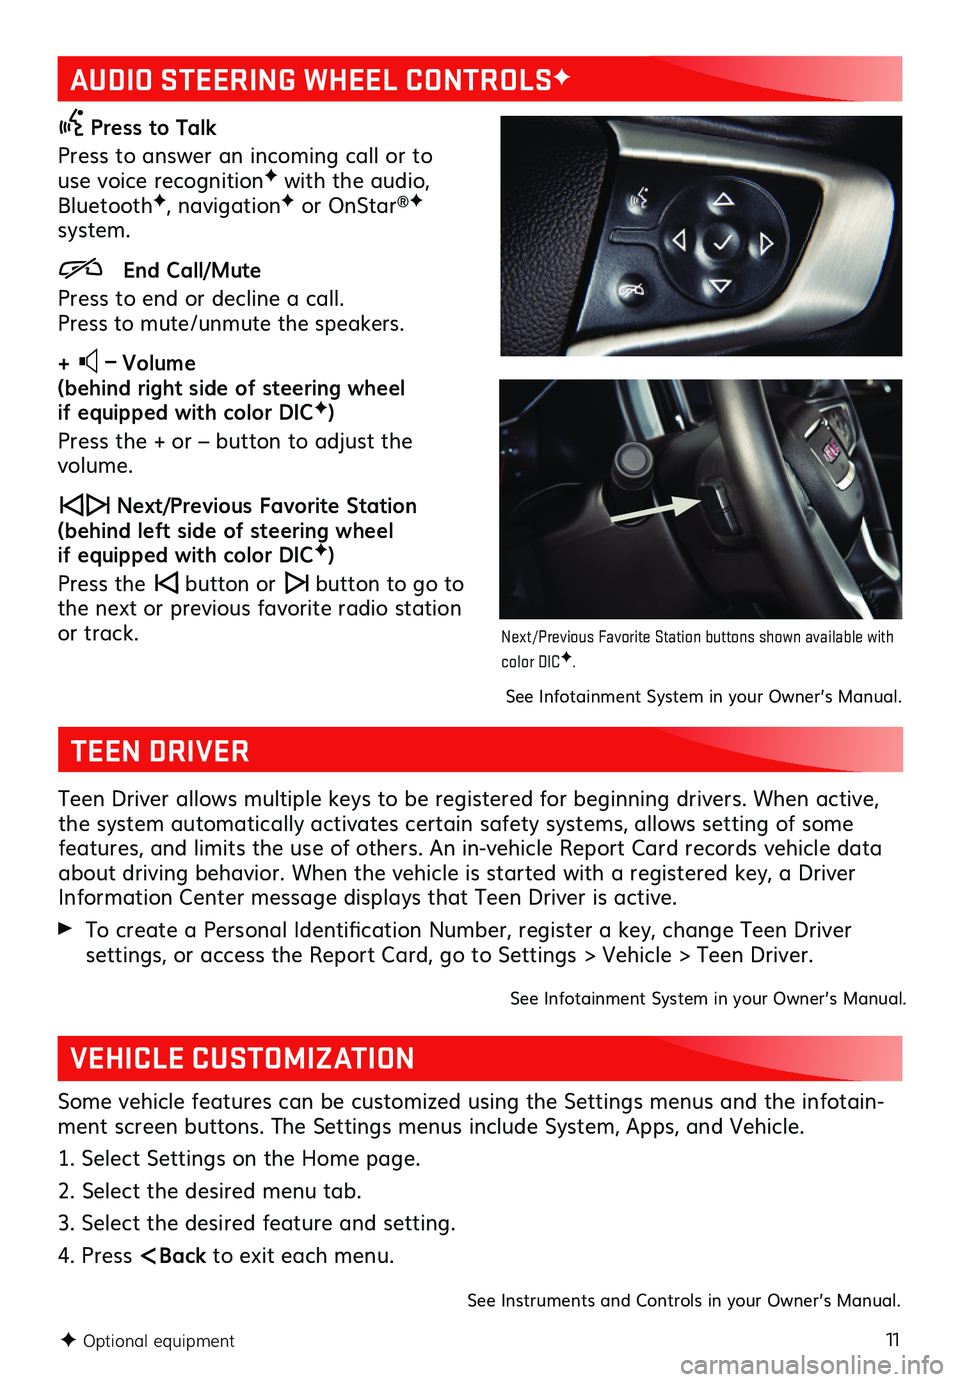
Press to Talk
Press to answer an incoming call or to use voice recognitionF with the audio, BluetoothF, navigationF or OnStar®F system.
End Call/Mute
Press to end or decline a call. Press to mute/unmute the speakers.
+ – Volume (behind right side of steering wheel if equipped with color DICF)
Press the + or – button to adjust the volume.
Next/Previous Favorite Station (behind left side of steering wheel if equipped with color DICF)
Press the button or button to go to the next or previous favorite radio station or track.
F Optional equipment
See Infotainment System in your Owner’s Manual.
TEEN DRIVER
Teen Driver allows multiple keys to be registered for beginning drivers. When active, the system automatically activates certain safety systems, allows setting of some features, and limits the use of others. An in-vehicle Report Card records vehicle data about driving behavior. When the vehicle is started with a registered key, a Driver Information Center message displays that Teen Driver is active.
To create a Personal Identification Number, register a key, change Teen Driver
settings, or access the Report Card, go to Settings > Vehicle > Teen Driver.
See Infotainment System in your Owner’s Manual.
VEHICLE CUSTOMIZATION
Some vehicle features can be customized using the Settings menus and the infotain-ment screen buttons. The Settings menus include System, Apps, and Vehicle.
1. Select Settings on the Home page.
2. Select the desired menu tab.
3. Select the desired feature and setting.
4. Press
Next/Previous Favorite Station buttons shown available with color DICF.
Page 12 of 16
12F Optional equipment
CLIMATE CONTROLS
AUTOMATIC OPERATIONF
1. Press AUTO.
2. Set the temperature.
The system automatically controls the fan speed, air delivery, air conditioning and
recirculation to reach the set temperature. Allow time for the system to reach the desired temperature. If a function is adjusted manually, automatic operation for that function is turned off.
See Climate Controls in your Owner’s Manual.
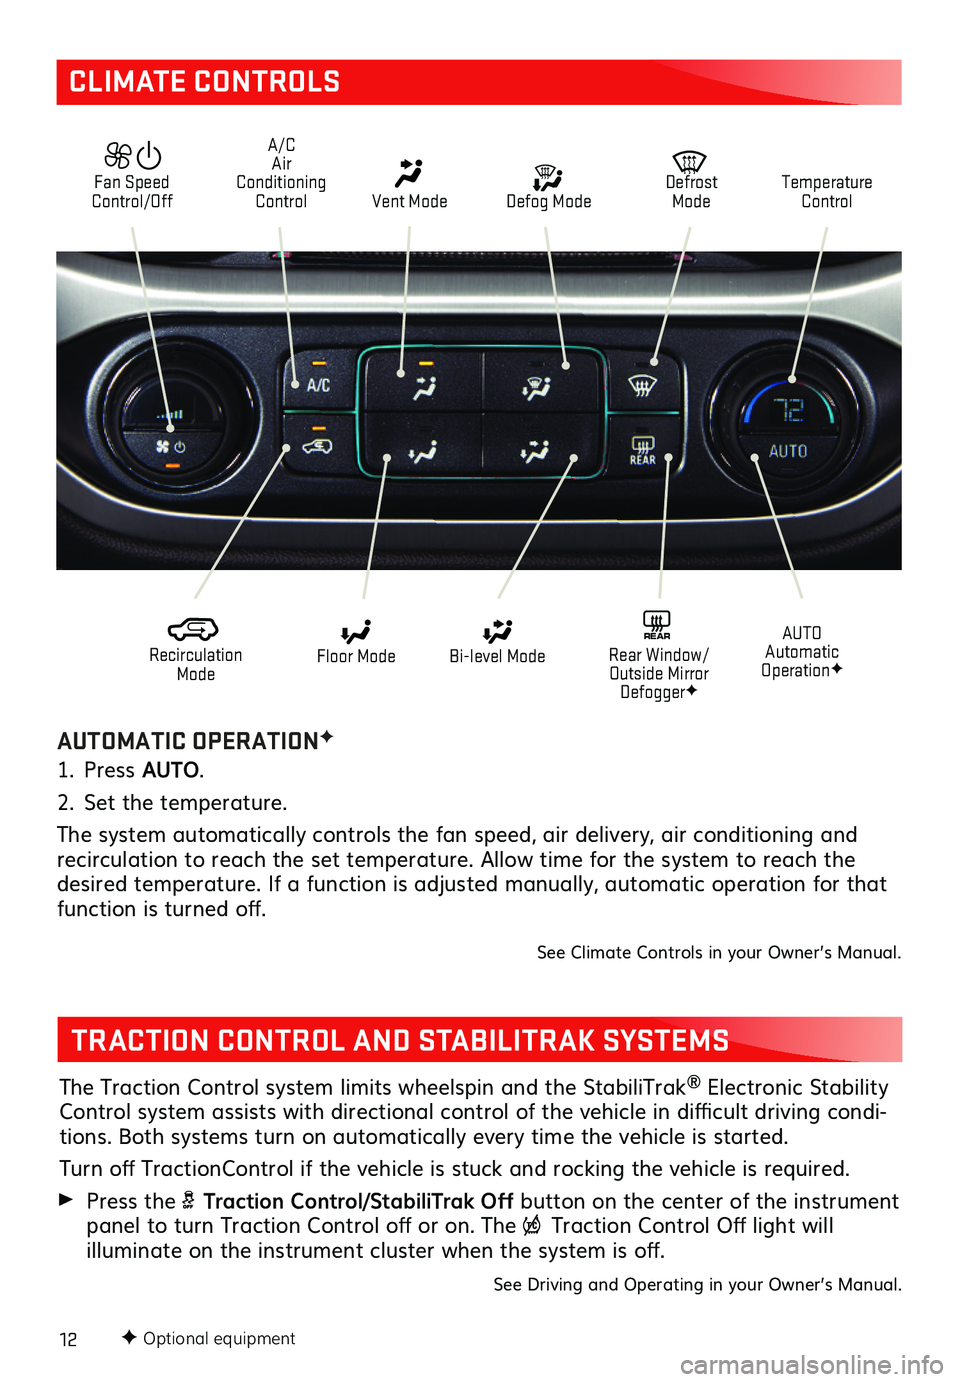
Defog Mode
Defrost ModeTemperature Control
Recirculation Mode
Floor ModeAUTO Automatic OperationF
Bi-level ModeREAR Rear Window/ Outside Mirror DefoggerF
Fan Speed Control/Off Vent Mode
A/C Air Conditioning Control
TRACTION CONTROL AND STABILITRAK SYSTEMS
The Traction Control system limits wheelspin and the StabiliTrak® Electronic Stability Control
system assists with directional control of the vehicle in difficult driving condi-tions. Both systems turn on automatically every time the vehicle is started.
Turn off TractionControl if the vehicle is stuck and rocking the vehicle is required.
Press the Traction Control/StabiliTrak Off button on the center of the instrument panel to turn Traction Control off or on. The Traction Control Off light will
illuminate on the instrument cluster when the
system is off.
See Driving and Operating in your Owner’s Manual.
Page 14 of 16
14
DRIVER ASSISTANCE SYSTEMS
Safety or driver assistance features are no substitute for the driver’s responsibility to operate the vehicle in a safe manner. The driver should remain attentive to traffic, surroundings and road conditions at all times. Read your Owner’s Manual for important feature limitations and information.
FORWARD COLLISION ALERTF – The Vehicle Ahead indicator is green on the instrument cluster when a vehicle is detected and is amber when following a vehicle ahead much too closely. When approaching a detected vehicle directly ahead too rapidly, a red alert flashes on the windshield and rapid beeps sound.
Press the Forward Collision Alert button on the left side of the steering wheel to set the alert
timing to Far, Medium, Near, or Off. The setting is displayed on the Driver Information Center.
LANE DEPARTURE WARNINGF – When crossing a detected lane marking, without using a turn signal in that direction, the system flashes an amber indicator on the instrument cluster and beeps sound on the side of the lane departure direction.
Press the Lane Departure Warning button on the center of the instrument panel to turn the system on or off.
REAR VISION CAMERA – When the vehicle is in Reverse, a view of the area behind the vehicle displays on the infotainment system. Vehicle speed must be below 8 mph.
To turn the guidance lines on or off, touch the Guidance Lines screen button.
REAR PARK ASSISTF – During low-speed parking maneuvers, “distance to closest object” information is provided on the Driver Information Center. When an object is very close, 5 beeps sound.
To turn Rear Park Assist on or off, go to Settings > Vehicle > Collision/Detection Systems. See Driving and Operating in your Owner’s Manual.
F Optional equipment
INTEGRATED TRAILER BRAKE CONTROL (ITBC)F
The ITBC system can be used to adjust the amount of power output, or Trailer Gain, available to the trailer brakes. The control panel is located on the left side of the instrument panel. ITBC information is displayed on the Driver Information Center.
Adjust the Trailer Gain by pressing the +/– adjustment buttons on the control panel.
Squeeze the levers together on the control panel (left lever does not move) to
manually apply the trailer brakes.
See Driving and Operating in your Owner’s Manual.
DIESEL EXHAUST BRAKE (DIESEL MODELS ONLY)
The engine exhaust brake enhances the vehicle brake system by using engine braking and automatically downshifting the transmission, depending on the length of time the brakes are applied, to help slow the vehicle on downhill grades.
Press the Diesel Exhaust Brake button on the center of the instrument panel to turn the system on or off.See your Duramax Diesel Owner’s Manual.
Page 15 of 16
15
HILL DESCENT CONTROLF
FOUR-WHEEL DRIVEF
TIRE PRESSURE MONITORING SYSTEM
Hill Descent Control sets and maintains vehicle speed from 3–19 mph while descend-ing a steep incline in a forward or reverse gear.
1. Press the Hill Descent Control button on the center of the instrument panel. Vehicle speed must be below 37 mph to enable the system. The Hill Descent Control symbol will illuminate on the instrument cluster.
2. Increase or decrease speed by applying the accelerator or brake pedal. The adjust-ed speed becomes the new set speed. The symbol flashes when the system is actively applying the brakes to maintain vehicle speed.
See Driving and Operating in your Owner’s Manual.
The Low Tire Pressure light on the instrument cluster illuminates when one or more of the vehicle’s tires is significantly underinflated. Fill the tires to the proper tire pres-sures listed on the Tire and Loading Information label, located below the driver’s door latch. Current tire pressures can be viewed on the Driver Information Center.
With the ignition On or in Accessory Mode, the Tire Fill Alert will provide visual and audible alerts when inflating a tire to the recommended cold tire pressure (does not apply to spare tire). When the recommended pressure is reached, the horn sounds and the turn signals change from flashing to solid.
See Vehicle Care in your Owner’s Manual.
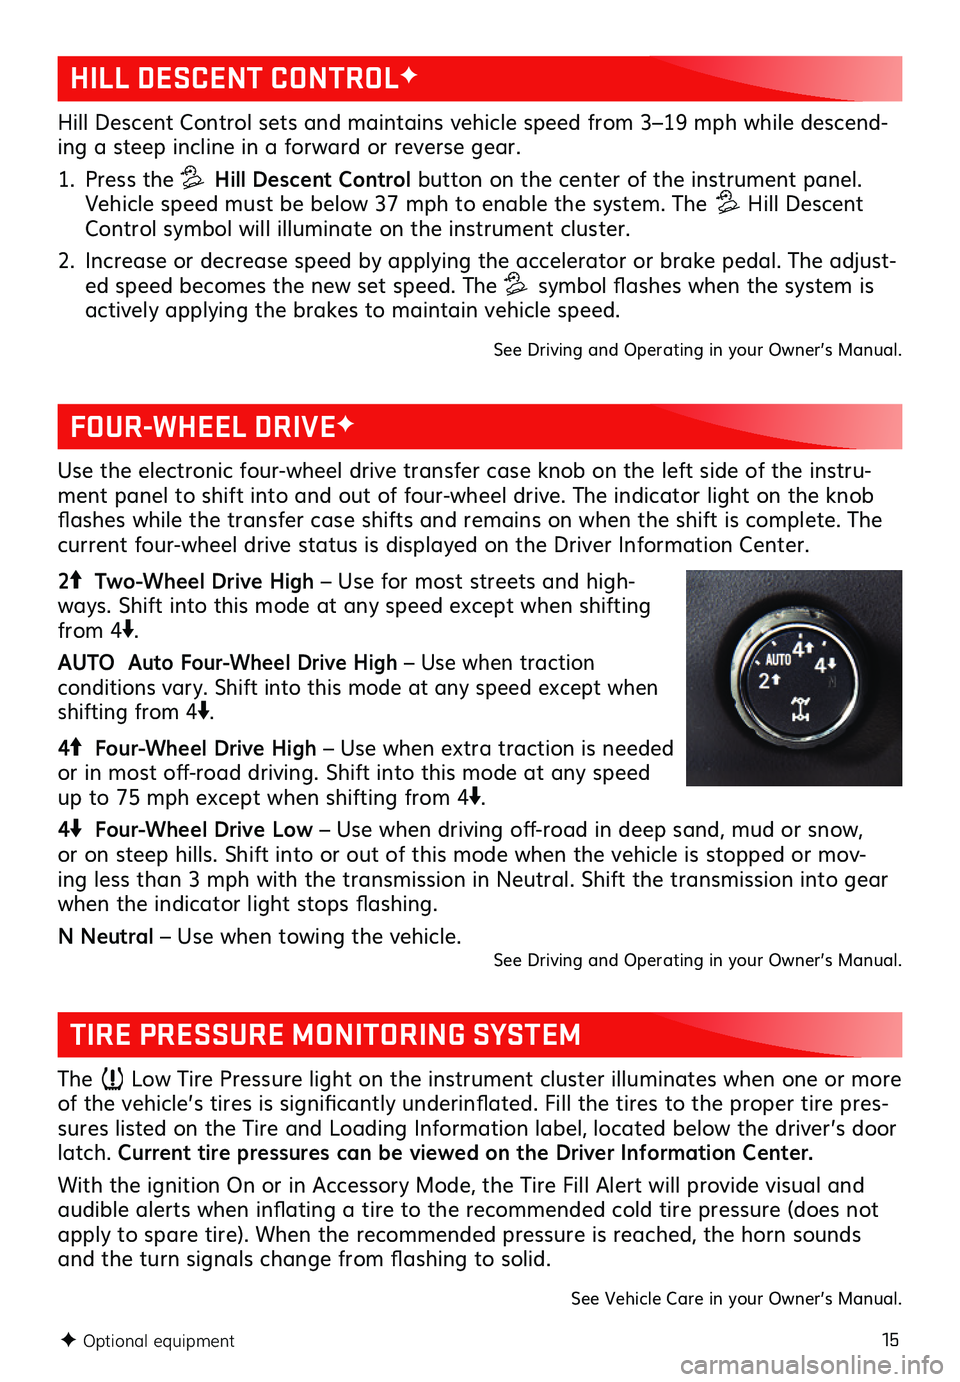
Use the electronic four-wheel drive transfer case knob on the left side of the instru-ment panel to shift into and out of four-wheel drive. The indicator light on the knob flashes while the transfer case shifts and remains on when the shift is complete. The current four-wheel drive status is displayed on the Driver Information Center.
2 Two-Wheel Drive High – Use for most streets and high-ways. Shift into this mode at any speed except when shifting from 4.
AUTO Auto Four-Wheel Drive High – Use when traction
conditions vary. Shift into this mode at any speed except when shifting from 4.
4 Four-Wheel Drive High – Use when extra traction is needed or in most off-road driving. Shift into this mode at any speed up to 75 mph except when shifting from 4.
4 Four-Wheel Drive Low – Use when driving off-road in deep sand, mud or snow, or on steep hills. Shift into or out of this mode when the vehicle is stopped or mov-ing less than 3 mph with the transmission in Neutral. Shift the transmission into gear when the indicator light stops
flashing.
N Neutral – Use when towing the vehicle. See Driving and Operating in your Owner’s Manual.
F Optional equipment