ECO mode GMC CANYON 2022 Owner's Manual
[x] Cancel search | Manufacturer: GMC, Model Year: 2022, Model line: CANYON, Model: GMC CANYON 2022Pages: 361, PDF Size: 6.48 MB
Page 199 of 361
GMC Canyon/Canyon Denali Owner Manual (GMNA-Localizing-U.S./Canada-
15275607) - 2022 - CRC - 11/2/21
Driving and Operating 197
5. Shift the transfer case to 2m.
6. Turn the transfer case knob clockwise to N (Neutral) until it stops and hold it
there until the N (Neutral) light starts
flashing. This will take at least
10 seconds. Then slowly release the knob
to the 4
nposition. The N (Neutral) light
will come on when the transfer case
shift to N (Neutral) is complete.
7. With the engine running, verify that the transfer case is in N (Neutral) by shifting
the transmission to R (Reverse), then to
D (Drive). There should be no movement
of the vehicle while shifting the
transmission.
8. Turn the engine off, and the ignition to ACC/ACCESSORY.
9. Place the transmission shift lever in P (Park). See Recreational Vehicle Towing
0 298.
10. Turn the ignition off.
Shifting Out of N (Neutral)
To shift:1. Set the parking brake and apply the brake pedal.
2. Turn the ignition on with the engine off.
3. Shift the transmission to N (Neutral). 4. Turn the transfer case knob to 2
m.
After the transfer case has shifted out of
N (Neutral), the N (Neutral) light will
go out.
5. Release the parking brake.
Caution
Shifting the transmission into gear before
the requested mode indicator light has
stopped flashing could damage the
transfer case.
6. Start the engine and shift the transmission to the desired gear.
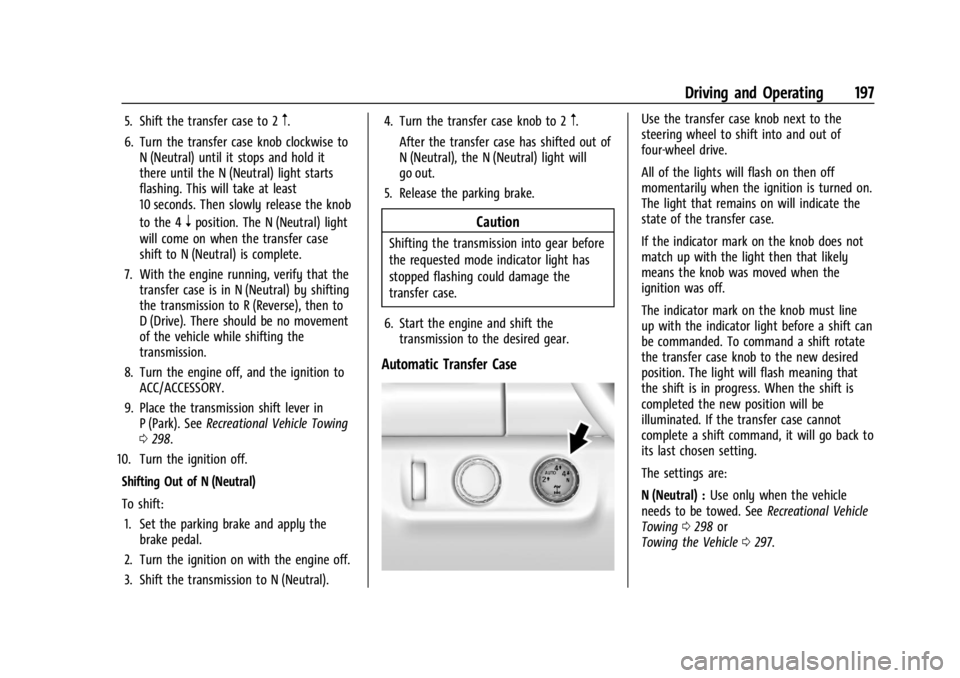
Automatic Transfer Case
Use the transfer case knob next to the
steering wheel to shift into and out of
four-wheel drive.
All of the lights will flash on then off
momentarily when the ignition is turned on.
The light that remains on will indicate the
state of the transfer case.
If the indicator mark on the knob does not
match up with the light then that likely
means the knob was moved when the
ignition was off.
The indicator mark on the knob must line
up with the indicator light before a shift can
be commanded. To command a shift rotate
the transfer case knob to the new desired
position. The light will flash meaning that
the shift is in progress. When the shift is
completed the new position will be
illuminated. If the transfer case cannot
complete a shift command, it will go back to
its last chosen setting.
The settings are:
N (Neutral) : Use only when the vehicle
needs to be towed. See Recreational Vehicle
Towing 0298 or
Towing the Vehicle 0297.
Page 200 of 361
GMC Canyon/Canyon Denali Owner Manual (GMNA-Localizing-U.S./Canada-
15275607) - 2022 - CRC - 11/2/21
198 Driving and Operating
2m(Two-Wheel Drive High) :Use for driving
on most streets and highways. The front
axle is not engaged. This setting provides
the best fuel economy.
AUTO (Automatic Four-Wheel Drive) : Use
when road surface traction conditions are
variable. When driving in AUTO, the front
axle is engaged, and the vehicle's power is
sent to the front and rear wheels
automatically based on driving conditions.
This setting provides slightly lower fuel
economy than 2
m.
Do not use AUTO mode, if equipped, to park
on a steep grade with poor traction such as
ice, snow, mud, or gravel. In AUTO mode
only the rear wheels will hold the vehicle
from sliding when parked. If parking on a
steep grade, use 4
mto keep all four wheels
engaged.
4
m(Four-Wheel Drive High) : This setting
engages the front axle. Use this position
when extra traction is needed, such as when
driving on snowy or icy roads, or when
off-roading. 4
n(Four-Wheel Drive Low) :
This setting
engages the front axle and delivers extra
torque. Choose 4
nwhen driving off-road in
deep sand, deep mud, or deep snow, and
while climbing or descending steep hills.
Shifting into 4
nwill turn Traction Control
and StabiliTrak/ESC off. See Traction Control/
Electronic Stability Control 0201.
Shifting Into 4
mor AUTO
Turn the knob to the 4
mor AUTO position
at any speed, except from 4
n. The indicator
light will flash while shifting and will remain
on when the shift is completed.
Shifting Into 2
m
Turn the knob to 2mat any speed, except
when shifting from 4
n. The indicator light
will flash while shifting and will remain on
when the shift is completed.
Shifting Into 4
n
When 4nis engaged, keep vehicle speed
below 72 km/h (45 mph). To shift into 4
n:
1. The ignition must be on and the vehicle must be stopped or moving less than
5 km/h (3 mph) with the transmission in
N (Neutral). It is best for the vehicle to
be moving 1.6 to 3.2 km/h (1 to 2 mph).
2. Turn the knob to 4
n. Wait for the 4n
indicator light to stop flashing before
shifting the transmission into gear.
Caution
Shifting the transmission into gear before
the requested mode indicator light has
stopped flashing could damage the
transfer case.
If the transmission is in gear and/or moving
more than 5 km/h (3 mph), the 4
nindicator
light will flash for 30 seconds, but will not
complete the shift. After 30 seconds the
transfer case will shift to 4
m. Turn the knob
to 4
mto display the indicator. With the
vehicle moving less than 5 km/h (3 mph),
and the transmission in N (Neutral), attempt
the shift again.
Page 201 of 361
GMC Canyon/Canyon Denali Owner Manual (GMNA-Localizing-U.S./Canada-
15275607) - 2022 - CRC - 11/2/21
Driving and Operating 199
Shifting Out of 4n
To shift:1. The vehicle must be stopped or moving less than 5 km/h (3 mph) with the
transmission in N (Neutral) and the
ignition on. It is best for the vehicle to
be moving 1.6 to 3.2 km/h (1 to 2 mph).
2. Turn the knob to 4
m, AUTO, or 2m. Wait
for the 4
m, AUTO, or 2mindicator light
to stop flashing before shifting the
transmission into gear.
Caution
Shifting the transmission into gear before
the requested mode indicator light has
stopped flashing could damage the
transfer case.
If the transmission is in gear and/or moving
more than 5 km/h (3 mph), the 4
m, AUTO,
or 2
mindicator light will flash for
30 seconds but will not complete the shift.
With the vehicle moving less than 5 km/h
(3 mph), and the transmission in N (Neutral),
attempt the shift again. Shifting Into N (Neutral)
To shift:
1. Park the vehicle on a level surface.
2. Set the parking brake and press and hold the brake pedal. See Parking Brake
0 200.
3. Start the vehicle or turn the ignition on.
4. Shift the transmission to N (Neutral).
5. Shift the transfer case to 2
m.
6. Turn the transfer case knob clockwise to N (Neutral) until it stops and hold it
there until the N (Neutral) light starts
flashing. This will take at least
10 seconds. Then slowly release the knob
to the 4
nposition. The N (Neutral) light
will come on when the transfer case
shift to N (Neutral) is complete.
7. With the engine running, verify that the transfer case is in N (Neutral) by shifting
the transmission to R (Reverse), then
shift the transmission to D (Drive). There
should be no movement of the vehicle
while shifting the transmission.
8. Turn the engine off, and the ignition to ACC/ACCESSORY. 9. Place the transmission shift lever in
P (Park). See Recreational Vehicle Towing
0 298.
10. Turn the ignition to off.
Shifting Out of N (Neutral)
To shift:1. Set the parking brake and apply the brake pedal.
2. Turn the ignition on with the engine off.
3. Shift the transmission to N (Neutral).
4. Turn the transfer case knob to the desired setting.
After the transfer case has shifted out of
N (Neutral), the N (Neutral) light will
go out.
5. Release the parking brake.
6. Start the engine and shift the transmission to the desired gear.
Brakes
Antilock Brake System (ABS)
The Antilock Brake System (ABS) helps
prevent a braking skid and maintain steering
while braking hard.
Page 218 of 361
GMC Canyon/Canyon Denali Owner Manual (GMNA-Localizing-U.S./Canada-
15275607) - 2022 - CRC - 11/2/21
216 Driving and Operating
The following information has many
time-tested, important trailering tips and
safety rules. Many of these are important
for your safety and that of your passengers.
Read this section carefully before pulling a
trailer.
When towing a trailer:
.Become familiar with and follow all state
and local laws that apply to trailer
towing. These requirements vary from
state to state.
.State laws may require the use of
extended side view mirrors. Even if not
required, you should install extended side
view mirrors if your visibility is limited or
restricted while towing.
.Do not tow a trailer during the first
800 km (500 mi) of vehicle use to prevent
damage to the engine, axle, or other
parts.
.It is recommended to perform the first oil
change before heavy towing.
.During the first 800 km (500 mi) of trailer
towing, do not drive over 80 km/h
(50 mph) and do not make starts at full
throttle.
.Vehicles can tow in D (Drive). Tow/Haul
Mode is recommended for heavier trailers.
SeeTow/Haul Mode 0194. If the
transmission downshifts too often, a
lower gear may be selected using Manual
Mode. See Manual Mode 0192.
If equipped, the following driver assistance
features should be turned off when towing
a trailer:
.Adaptive Cruise Control (ACC)
.Super Cruise Control
.Lane Keep Assist (LKA)
.Park Assist
.Reverse Automatic Braking (RAB)
If equipped, the following driver assistance
features should be turned to alert or off
when towing a trailer:
.Automatic Emergency Braking (AEB)
.Intelligent Brake Assist (IBA)
.Front Pedestrian Braking (FPB)
If equipped with Lane Change Alert (LCA),
the LCA detection zones that extend back
from the side of the vehicle do not move
further back when a trailer is towed. Use
caution while changing lanes when towing a
trailer. If equipped with Rear Cross Traffic Alert
(RCTA), use caution while backing up when
towing a trailer, as the RCTA detection zones
that extend out from the back of the vehicle
do not move further back when a trailer is
towed.
{Warning
To prevent serious injury or death from
carbon monoxide (CO), when towing a
trailer:
.Do not drive with the liftgate, trunk/
hatch, or rear-most window open.
.Fully open the air outlets on or under
the instrument panel.
.Adjust the climate control system to a
setting that brings in only outside air.
See
“Climate Control Systems” in the
Index.
For more information about carbon
monoxide, see Engine Exhaust 0189.
Towing a trailer requires experience. The
combination of the vehicle and trailer is
longer and not as responsive as the vehicle
itself. Get used to the handling and braking
of the combination by driving on a level
road surface before driving on public roads.
Page 221 of 361
GMC Canyon/Canyon Denali Owner Manual (GMNA-Localizing-U.S./Canada-
15275607) - 2022 - CRC - 11/2/21
Driving and Operating 219
5. Gradually release the brake pedal toallow the chocks to absorb the load of
the trailer.
6. Reapply the brake pedal. Then apply the parking brake and shift into P (Park).
7. Release the brake pedal.
Pulling the Trailer from the Water
To pull the trailer of the water: 1. Press and hold the brake pedals.
2. Start the engine and shift into gear.
3. Release the parking brake.
4. Let up on the brake pedal.
5. Drive slowly until the tires are clear of the chocks.
6. Stop and have someone pick up and store the chocks.
7. Slowly pull the trailer from the water.
8. Once the vehicle and trailer have been driven from the sloped part of the boat
ramp, the vehicle can be shifted from
four-wheel-drive high. Shift into the drive
mode that is appropriate for the road
conditions.Caution
If the vehicle tires begin to spin and the
vehicle begins to slide toward the water,
remove your foot from the accelerator
pedal and apply the brake pedal. Seek
help to have the vehicle towed up
the ramp.
Maintenance when Trailer Towing
The vehicle needs service more often when
used to tow trailers. See Maintenance
Schedule 0311. It is especially important to
check the automatic transmission fluid,
engine oil, axle lubricant, belts, cooling
system, and brake system before and during
each trip.
Check periodically to see that all nuts and
bolts on the trailer hitch are tight.
Engine Cooling When Trailer Towing
The cooling system may temporarily
overheat during severe operating conditions.
See Engine Overheating 0246.
Trailer Towing
If equipped with a diesel engine, see the
Duramax diesel supplement.
Caution
Towing a trailer improperly can damage
the vehicle and result in costly repairs
not covered by the vehicle warranty. To
tow a trailer correctly, follow the
directions in this section and see your
dealer for important information about
towing a trailer with the vehicle.
Trailering is different than just driving the
vehicle by itself. Trailering means changes in
handling, acceleration, braking, durability,
and fuel economy. Successful, safe trailering
takes correct equipment, and it has to be
used properly.
The following information has many
time-tested, important trailering tips and
safety rules. Many of these are important
for your safety and that of your passengers.
Read this section carefully before pulling a
trailer.
Page 228 of 361
GMC Canyon/Canyon Denali Owner Manual (GMNA-Localizing-U.S./Canada-
15275607) - 2022 - CRC - 11/2/21
226 Driving and Operating
.in stop-and-go traffic.
.in busy parking lots.
Operating the vehicle in Tow/Haul Mode
when lightly loaded or not towing will not
cause damage; however, it is not
recommended and may result in unpleasant
engine and transmission driving
characteristics and reduced fuel economy.
Integrated Trailer Brake Control System
The vehicle may have an Integrated Trailer
Brake Control (ITBC) system for use with
electric trailer brakes or most electric over
hydraulic trailer brake systems. These
instructions apply to both types of electric
trailer brakes.
This symbol is on the Trailer Brake Control
Panel on vehicles with an ITBC system. The
power output to the trailer brakes is
proportional to the amount of vehicle
braking. This available power output to the
trailer brakes can be adjusted to a wide
range of trailering situations. The ITBC system is integrated with the
vehicle’s brake, antilock brake, and
StabiliTrak/Electronic Stability Control (ESC)
systems. In trailering conditions that cause
the vehicle’s antilock brake or StabiliTrak/
ESC systems to activate, power sent to the
trailer's brakes will be automatically
adjusted to minimize trailer wheel lock-up.
This does not imply that the trailer has
StabiliTrak/ESC.
If the vehicle’s brake, anti-lock brake,
or StabiliTrak/ESC systems are not
functioning properly, the ITBC system may
not function fully or at all. Make sure all of
these systems are fully operational to allow
the ITBC system to function properly.
The ITBC system is powered through the
vehicle's electrical system. Turning the
ignition off will also turn off the ITBC
system. The ITBC system is fully functional
only when the ignition is in ON/RUN.{Warning
Connecting a trailer that has an air brake
system may result in reduced or
complete loss of trailer braking, including
increased stopping distance or trailer
instability which could result in serious
(Continued)
Warning (Continued)
injury, death, or property damage. Only
use the ITBC system with electric or
electric over hydraulic trailer brake
systems.
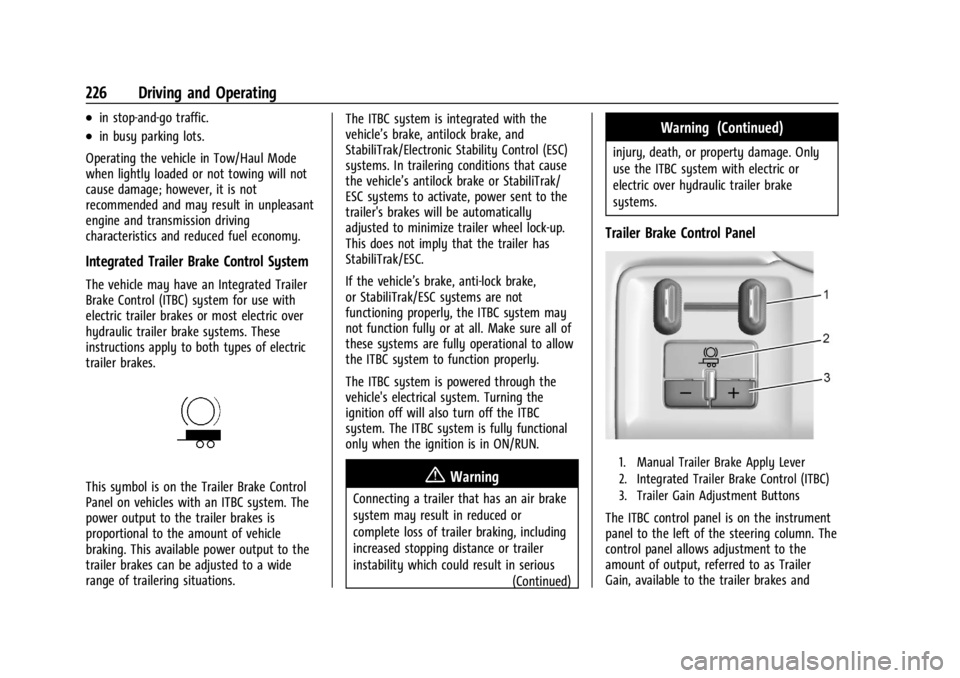
Trailer Brake Control Panel
1. Manual Trailer Brake Apply Lever
2. Integrated Trailer Brake Control (ITBC)
3. Trailer Gain Adjustment Buttons
The ITBC control panel is on the instrument
panel to the left of the steering column. The
control panel allows adjustment to the
amount of output, referred to as Trailer
Gain, available to the trailer brakes and
Page 232 of 361
GMC Canyon/Canyon Denali Owner Manual (GMNA-Localizing-U.S./Canada-
15275607) - 2022 - CRC - 11/2/21
230 Driving and Operating
Warning (Continued)
.Ask the device or trailer manufacturer
if the device has been thoroughly
tested for compatibility with the
make, model, and year of your vehicle
and any optional equipment installed
on your vehicle.
.Before driving, check the trailer brakes
are working properly, if equipped.
Drive the vehicle with the trailer
attached on a level road surface that
is free of traffic at about 32-40 km/h
(20-25 mph) and fully apply the
manual trailer brake apply lever. Also,
check the trailer brake lamps and
other lamps are functioning correctly.
.If the trailer brakes are not operating
properly at any time, or if a DIC
message indicates problems with the
trailer connections or trailer brakes,
carefully pull the vehicle over to the
side of the road when traffic
conditions allow.
Trailer Tires
Special Trailer (ST) tires differ from vehicle
tires. Trailer tires are designed with stiff
sidewalls to help prevent sway and to
support heavy loads. These features can
make it difficult to determine if the trailer
tire pressures are low only based on a visual
inspection.
Always check all trailer tire pressures before
each trip when the tires are cool. Low trailer
tire pressure is a leading cause of trailer tire
blowouts.
Trailer tires deteriorate over time. The trailer
tire sidewall will show the week and year
the tire was manufactured. Many trailer tire
manufacturers recommend replacing tires
more than six years old.
Overloading is another leading cause of
trailer tire blowouts. Never load your trailer
with more weight than the tires are
designed to support. The load rating is
located on the trailer tire sidewall.Always know the maximum speed rating for
the trailer tires before driving. This may be
significantly lower than the vehicle tire
speed rating. The speed rating may be on
the trailer tire sidewall. If the speed rating is
not shown, the default trailer tire speed
rating is 105 km/h (65 mph).
Conversions and Add-Ons
Add-On Electrical Equipment
{Warning
The Data Link Connector (DLC) is used for
vehicle service and Emission Inspection/
Maintenance testing. See
Malfunction
Indicator Lamp (Check Engine Light) 087.
A device connected to the DLC —such as
an aftermarket fleet or driver-behavior
tracking device —may interfere with
vehicle systems. This could affect vehicle
operation and cause a crash. Such devices
may also access information stored in the
vehicle’s systems.
Page 274 of 361
GMC Canyon/Canyon Denali Owner Manual (GMNA-Localizing-U.S./Canada-
15275607) - 2022 - CRC - 11/2/21
272 Vehicle Care
Maximum Loaded Vehicle Weight:The
sum of curb weight, accessory weight,
vehicle capacity weight, and production
options weight.
Normal Occupant Weight
:The number
of occupants a vehicle is designed to
seat multiplied by 68 kg (150 lb). See
Vehicle Load Limits 0178.
Occupant Distribution
:Designated
seating positions.
Outward Facing Sidewall
:The side of
an asymmetrical tire that has a
particular side that faces outward when
mounted on a vehicle. The side of the
tire that contains a whitewall, bears
white lettering, or bears manufacturer,
brand, and/or model name molding
that is higher or deeper than the same
moldings on the other sidewall of
the tire.
Passenger (P-Metric) Tire
:A tire used
on passenger cars and some light duty
trucks and multipurpose vehicles. Recommended Inflation Pressure
:
Vehicle manufacturer's recommended
tire inflation pressure as shown on the
tire placard. See
Tire Pressure0273 and
Vehicle Load Limits 0178.
Radial Ply Tire
:A pneumatic tire in
which the ply cords that extend to the
beads are laid at 90 degrees to the
centerline of the tread.
Rim
:A metal support for a tire and
upon which the tire beads are seated.
Sidewall
:The portion of a tire between
the tread and the bead.
Speed Rating
:An alphanumeric code
assigned to a tire indicating the
maximum speed at which a tire can
operate.
Traction
:The friction between the tire
and the road surface. The amount of
grip provided.
Tread
:The portion of a tire that comes
into contact with the road. Treadwear Indicators
:Narrow bands,
sometimes called wear bars, that show
across the tread of a tire when only
1.6 mm (1/16 in) of tread remains. See
When It Is Time for New Tires 0278.
UTQGS (Uniform Tire Quality Grading
Standards)
:A tire information system
that provides consumers with ratings
for a tire's traction, temperature, and
treadwear. Ratings are determined by
tire manufacturers using government
testing procedures. The ratings are
molded into the sidewall of the tire.
See Uniform Tire Quality Grading 0281.
Vehicle Capacity Weight
:The number
of designated seating positions
multiplied by 68 kg (150 lb) plus the
rated cargo load. See Vehicle Load
Limits 0178.
Vehicle Maximum Load on the Tire
:
Load on an individual tire due to curb
weight, accessory weight, occupant
weight, and cargo weight.
Vehicle Placard
:A label permanently
attached to a vehicle showing the
vehicle capacity weight and the original
Page 295 of 361
GMC Canyon/Canyon Denali Owner Manual (GMNA-Localizing-U.S./Canada-
15275607) - 2022 - CRC - 11/2/21
Vehicle Care 293
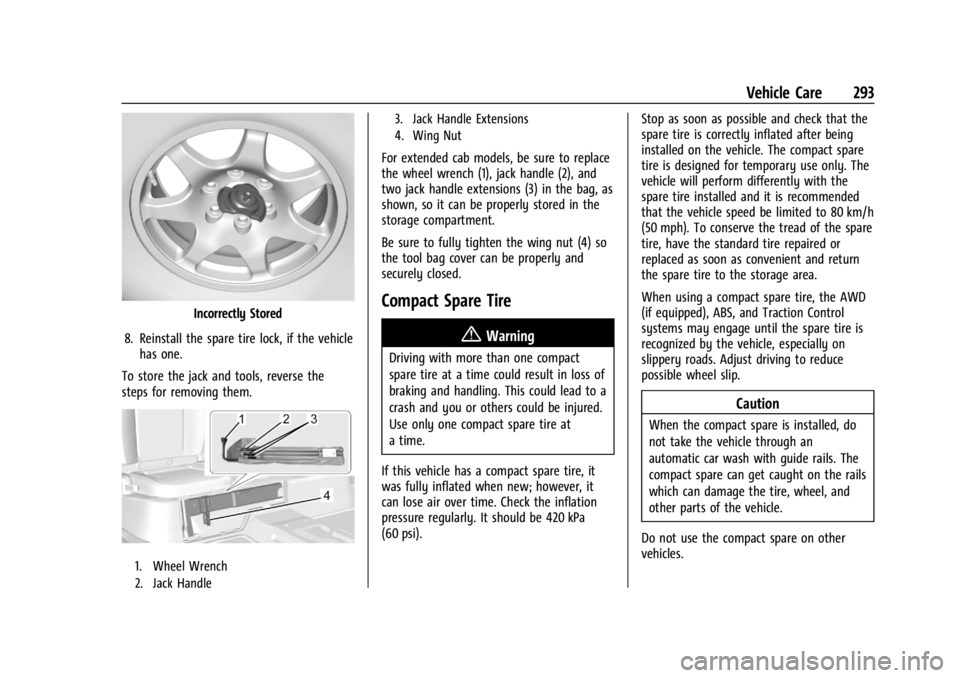
Incorrectly Stored
8. Reinstall the spare tire lock, if the vehicle has one.
To store the jack and tools, reverse the
steps for removing them.
1. Wheel Wrench
2. Jack Handle 3. Jack Handle Extensions
4. Wing Nut
For extended cab models, be sure to replace
the wheel wrench (1), jack handle (2), and
two jack handle extensions (3) in the bag, as
shown, so it can be properly stored in the
storage compartment.
Be sure to fully tighten the wing nut (4) so
the tool bag cover can be properly and
securely closed.
Compact Spare Tire
{Warning
Driving with more than one compact
spare tire at a time could result in loss of
braking and handling. This could lead to a
crash and you or others could be injured.
Use only one compact spare tire at
a time.
If this vehicle has a compact spare tire, it
was fully inflated when new; however, it
can lose air over time. Check the inflation
pressure regularly. It should be 420 kPa
(60 psi). Stop as soon as possible and check that the
spare tire is correctly inflated after being
installed on the vehicle. The compact spare
tire is designed for temporary use only. The
vehicle will perform differently with the
spare tire installed and it is recommended
that the vehicle speed be limited to 80 km/h
(50 mph). To conserve the tread of the spare
tire, have the standard tire repaired or
replaced as soon as convenient and return
the spare tire to the storage area.
When using a compact spare tire, the AWD
(if equipped), ABS, and Traction Control
systems may engage until the spare tire is
recognized by the vehicle, especially on
slippery roads. Adjust driving to reduce
possible wheel slip.
Caution
When the compact spare is installed, do
not take the vehicle through an
automatic car wash with guide rails. The
compact spare can get caught on the rails
which can damage the tire, wheel, and
other parts of the vehicle.
Do not use the compact spare on other
vehicles.
Page 337 of 361
GMC Canyon/Canyon Denali Owner Manual (GMNA-Localizing-U.S./Canada-
15275607) - 2022 - CRC - 11/2/21
Customer Information 335
If the vehicle is leased, the leasing company
may require you to have insurance that
ensures repairs with Genuine GM Original
Equipment Manufacturer (OEM) parts or
Genuine Manufacturer replacement parts.
Read the lease carefully, as you may be
charged at the end of the lease for poor
quality repairs.
If a Crash Occurs
If there has been an injury, call emergency
services for help. Do not leave the scene of
a crash until all matters have been taken
care of. Move the vehicle only if its position
puts you in danger, or you are instructed to
move it by a police officer.
Give only the necessary information to
police and other parties involved in the
crash.
For emergency towing seeRoadside
Assistance Program 0331.
Gather the following information:
.Driver name, address, and telephone
number
.Driver license number
.Owner name, address, and telephone
number
.Vehicle license plate number
.Vehicle make, model, and model year
.Vehicle Identification Number (VIN)
.Insurance company and policy number
.General description of the damage to the
other vehicle
Choose a reputable repair facility that uses
quality replacement parts. See “Collision
Parts” earlier in this section.
If the airbag has inflated, see What Will You
See after an Airbag Inflates? 038.
Managing the Vehicle Damage Repair
Process
In the event that the vehicle requires
damage repairs, GM recommends that you
take an active role in its repair. If you have
a pre-determined repair facility of choice,
take the vehicle there, or have it towed
there. Specify to the facility that any
required replacement collision parts be
original equipment parts, either new
Genuine GM parts or recycled original GM
parts. Remember, recycled parts will not be
covered by the GM vehicle warranty.
Insurance pays the bill for the repair, but
you must live with the repair. Depending on
your policy limits, your insurance company
may initially value the repair using aftermarket parts. Discuss this with the
repair professional, and insist on Genuine
GM parts. Remember, if the vehicle is
leased, you may be obligated to have the
vehicle repaired with Genuine GM parts,
even if your insurance coverage does not
pay the full cost.
If another party's insurance company is
paying for the repairs, you are not obligated
to accept a repair valuation based on that
insurance company's collision policy repair
limits, as you have no contractual limits
with that company. In such cases, you can
have control of the repair and parts choices
as long as the cost stays within reasonable
limits.
Publication Ordering Information
Service Manuals
Service manuals have the diagnosis and
repair information on the engine,
transmission, axle, suspension, brakes,
electrical system, steering system, body, etc.