ECO mode GMC ENVOY 1998 User Guide
[x] Cancel search | Manufacturer: GMC, Model Year: 1998, Model line: ENVOY, Model: GMC ENVOY 1998Pages: 386, PDF Size: 20.33 MB
Page 148 of 386

Playing a Compact Disc
PWR: Press this knob to turn the system on. (Please note
that you can also
turn the system on when you insert a
compact disc into
the player with the ignition on.)
Insert a disc partway
into the slot, label side up. The
player will pull
it in. Wait a few seconds and the disc
should play. The letters
CD and a CD symbol will
appear on
the display. Anytime you are playing a CD,
the letters CD will be next to the CD symbol.
If
the disc comes back out and ERR appears on the
display, it could be that:
You are driving on a very rough road. (The disc
should play when the road gets smoother.)
0 The disc is upside down.
0 It is dirty, scratched or wet.
0 It is very humid. (If so, wait about an hour and
try again.)
0 The disc player is very hot.
Press RECALL
to make ERR go off the display.
PREV (1): Press PREV or the SEEK left arrow to
search for the previous selection. If you hold this button
or press
it more than once, the disc will advance further.
Sound is muted
in this mode.
RDM (2): Press this button to play the tracks on the disc
in random order. While in the RDM mode, RANDOM
appears
on the display. Press RDM again to return to
normal play.
NEXT (3): Press NEXT or the SEEK right arrow to
search for the next selection. If you hold this button or
press it more than once, the disc will advance further.
The next track number will appear on the display. Sound
is muted in this mode.
REV (4): Press and hold REV to return rapidly to a
favorite passage. You will hear the disc selection play at
high speed while you press the REV button. This allows
you to listen and find out when
the disc is at the desired
selection. Release REV to resume playing.
FWD (6): Press and hold this button to advance rapidly
within a track. You will hear the disc selection play at
high speed while
you press the FWD button. This allows
you to listen and find out when the disc is at the desired
selection. Release
FWD to resume playing.
RECALL: Press this button to see what track is playing.
Press
it again within five seconds to see how long the
CD has been playing that track. Elapsed time is
displayed in minutes and tenths of
a second. The track
number will also appear when a new track begins to
play. Press RECALL again to return to the time display.
3-15
I
ProCarManuals.com
Page 149 of 386

AM-FM: While in the CD mode, press this button to
stop playing the CD and play the radio. The
CD symbol
will still display but
the word CD will be replaced with
either
AM, FM1 or FM2. (If the radio is turned off, the
disc stays in the player and will resume playing at the
point where it stopped.)
CD AUX: Press this button if you have a disc loaded in
the CD player and the radio is turned on, to play a
compact disc. Press
AM-F" to return to the radio when
a compact disc is playing. Press CD
AUX to switch
between the compact disc player and console-mounted CD changer if both are loaded. When a disc is playing,
the letters CD and the CD symbol will appear on the
display. (If the radio is turned off, the disc stays in the
player and will resume playing at the point where
it stopped.)
EJECT: Press this button to eject the disc from the
player and play the radio. When the same or a new disc
is inserted, the disc will start playing on track one. If a
compact disc is left sitting in the opening for more than
a few seconds, the player will pull the
CD back in. The
radio will continue playing. When the ignition is off,
press this button to load a CD.
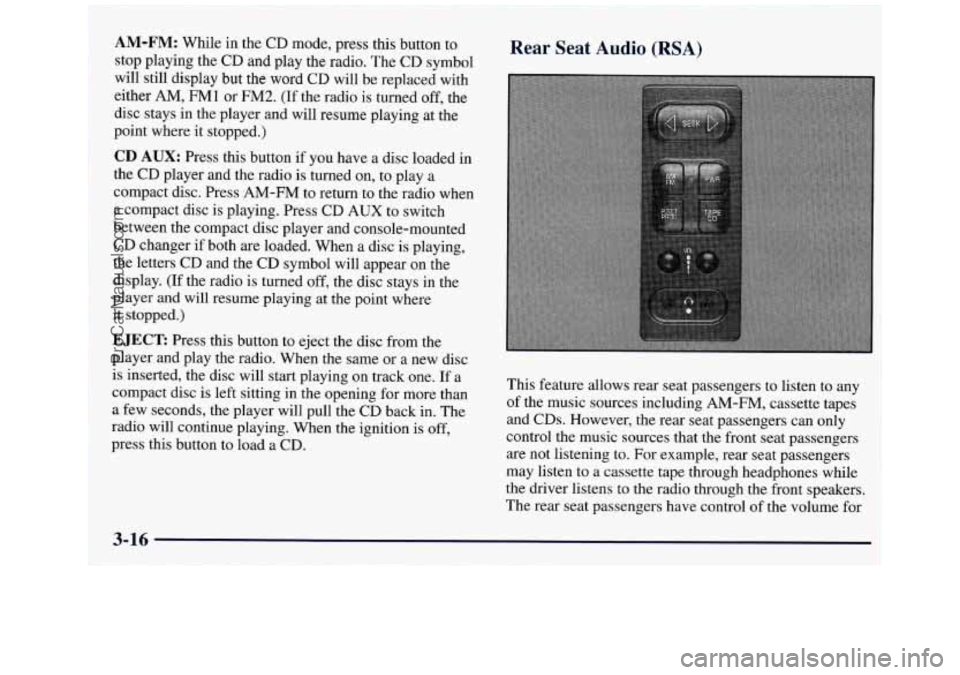
Rear Seat Audio (RSA)
This feature allows rear seat passengers to listen to any
of the music sources including
AM-FM, cassette tapes
and CDs. However, the rear seat passengers can only
control the music sources that the front seat passengers
are not listening to. For example, rear seat passengers
may listen to a cassette tape through headphones while
the driver listens to the radio through the front speakers.
The rear seat passengers have control
of the volume for
3-16
ProCarManuals.com
Page 150 of 386

each set of headphones. Be aware that the front seat
audio controls always override the Rear Seat Audio
(RSA) controls. The rear speakers will be muted when
the RSA power is turned on. You may operate the RSA
functions even when the primary radio power is off.
luote that this feature is intended for rear seat passengers.
The following function is controlled by the primary
radio knob:
PWR-VOL: Push this knob twice to turn RSA off.
The following functions are controlled by the RSA
system buttons:
PWR: Press this button to turn RSA on or off.
VOL: Press this knob lightly so it extends. Turn the
knob to the right to increase volume and to the left to
decrease volume. Push the knob back into its stored
position when you’re not using it. The left
VOL knob
controls
the left headphone and the right VOL knob
controls the right headphone.
AM-FM: Press this button to switch between AM, FMl
and FM2.
If the front passengers are already listening to
AM-FM, the RSA controller will not switch between the
bands and cannot change the frequency.
SEEK: While listening to AM-FM, press the right
arrow
to tune to the next higher station and stay there.
Press the
left arrow to tune to the next lower station and
stay there. The sound will mute while seeking. The
SEEK button is inactive if the AM-FM mode on the
front radio is
in use.
While listening to a cassette tape, press the right arrow
to hear the next selection
on the tape. Press the left
arrow to go back to the previous selection. The
SEEK
button is inactive if the tape mode on the front radio is
in use.
While listening to a CD, press the right arrow to hear the
next selection
on the CD. Press the left arrow to go back
to the start of the current selection (if more than eight
seconds have played). The
SEEK button is inactive if
the CD mode on the front radio
(if equipped) or the CD
changer is
in use.
SCAN: Press and hold SEEK until the radio goes into
SCAN mode. SCAN allows you to listen to stations for
a few seconds. The receiver will continue to scan and
momentarily stop at each station
until you press SEEK
again. The SCAN function is inactive if the AM-FM
mode on the front radio
is in use.
3-17
I
ProCarManuals.com
Page 277 of 386

Some driving conditions or climates may cause a brake
squeal when the brakes are first applied or lightly
applied. This does not mean something is wrong with
your brakes.
Properly torqued wheel nuts are necessary to help
prevent brake pulsation. When tires are rotated, inspect
brake pads for wear and evenly torque
wheel nuts in the
proper sequence to
GM specifications.
Brake linings should always be replaced as complete
axle sets.
See “Brake System Inspection” in Section
7 of this manual
under Part
C “Periodic Maintenance Inspections.”
Brakc Jedal Travel
See your dealer if the brake pedal does not return to
normal height, or if there is a rapid increase in pedal
travel. This could be a sign of brake trouble.
Brake Adjustment
Every time you make a brake stop, your disc brakes
adjust for wear.
Replacing Brake System Parts
The braking system on a modern vehicle is complex.
Its many parts have to be
of top quality and work well
together
if the vehicle is to have really good braking.
Your vehicle was designed and tested with top-quality
GM brake parts. When you replace parts of your braking
system
-- for example, when your brake linings wear
down and
you have to have new ones put in -- be sure
you get new approved GM replacement parts.
If you
don’t, your brakes may
no longer work properly. For
example,
if someone puts in brake linings that are wrong
for your vehicle, the balance between your front and
rear brakes can change
-- for the worse. The braking
performance you’ve come to expect can change in many
other ways if someone puts
in the wrong replacement
brake parts.
Battery
Every new vehicle has an ACDelco Freedom@ battery.
You never have to add water to one of these. When it’s
time for a new battery, we recommend an ACDelco
Freedom battery. Get one that has the replacement
number shown on the original battery’s label.
6-30
ProCarManuals.com
Page 379 of 386

Lamps ........................................ 2-36
Dome
...................................... 2-39
Exterior
.................................... 2-36
Front Reading
........................... 2.39. 2.43
Interior
..................................... 2-39
On Reminder
................................ 2-37
Leaving Your Vehicle
............................. 2-6
Leaving Your Vehicle
with the Engine Running ....... 2-22
Liftgate
........................................ 2-9
Manual Release
.............................. 2- 10
Remote Release .............................. 2- 10
Lighter ....................................... 2-49
Lights Air Bag Readiness
....................... 1-22, 2-63
Anti-Lock Brake System Warning
............ 2-66? 4-7
Brake System Warning
......................... 2-65
Charging System
............................. 2-63
CheckGages
................................ 2-71
Gate Ajar
................................... 2-7 I
LowFuel ................................... 2-72
Safety Belt Reminder
...................... 1-8.2-62
Security Warning
............................. 2-70
Service4WD
................................ 2-71
Service Engine Soon
.......................... 2-67
Loading Your Vehicle
........................... 4-40
Locking Rear Axle
.............................. 2-24
Lockout Prevention
.............................. 2-5
Lockout Switch
................................ 2-29
Locks
......................................... 2-4
Door
........................................ 2-4
Ignition Transmission Check
.................... 7-42
Key Lock Cylinder Service
..................... 7-40 Power Door
.................................. 2-5
Rear Door Security
............................. 2-5
Loss
of Control ................................ 4-13
LowFuelLight
................................ 2-72
Lubricants and Fluids
............................ 7-45
Lubrication Service
. Body ........................ 7-40
Luggagecarrier
................................ 2-48
Lumbar Controls
................................ 1-3
Maintenance Record ........................... 7-47
Maintenance Schedule
............................ 7-1
Owner Checks and Services ..................... 7-39
Periodic Maintenance Inspections
................ 7-43
Recommended Fluids and Lubricants
............. 7-45
Scheduled Maintenance Services
.................. 7-4
Long Trip/Highway
....................... 7-6.
7-27
Short TripKity
............................ 7-5. 7-7
Maintenance. Underbody
......................... 6-52
Malfunction Indicator Lamp ...................... 2-67
Manual Passenger’s Seat
.......................... 1-2
Methanol
...................................... 6-4
Mirrors
....................................... 2-40
Convex Outside
.............................. 2-42
Electrocho~nic Day/Night Inside Rearview
......... 2-40
Heated Outside Rearview
....................... 2-42
Illuminated Visor Vanity
....................... 2-50
Outside
..................................... 2-42
Model Reference
................................. vi
Mountain Roads ................................ 4-34
Multifunction Lever
............................. 2-30
Maintenance When Trailer Towing
................. 4-51
9-6
ProCarManuals.com