headlamp GMC ENVOY 2003 Owner's Guide
[x] Cancel search | Manufacturer: GMC, Model Year: 2003, Model line: ENVOY, Model: GMC ENVOY 2003Pages: 442, PDF Size: 3.1 MB
Page 290 of 442
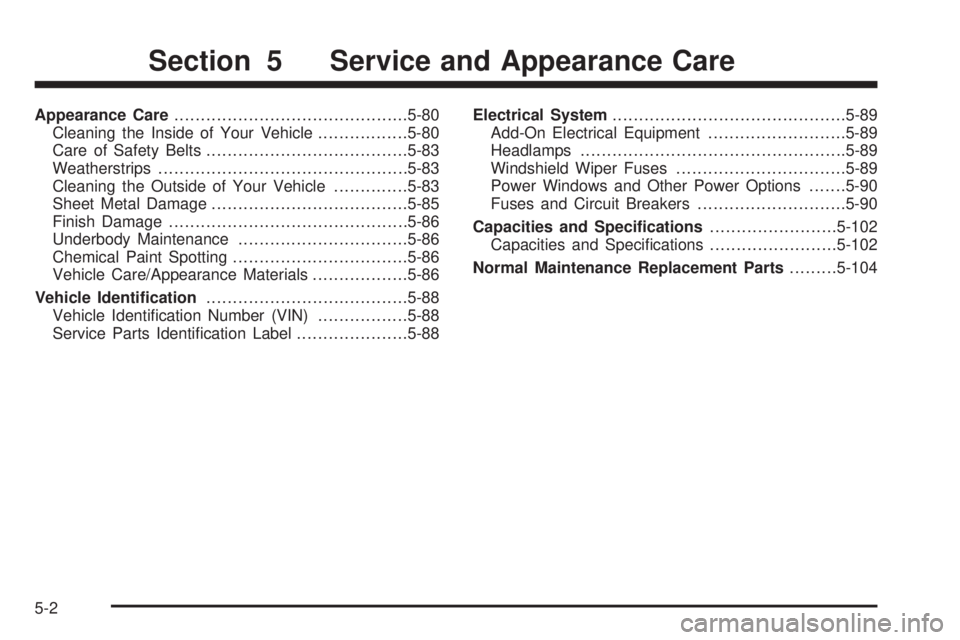
Appearance Care............................................5-80
Cleaning the Inside of Your Vehicle.................5-80
Care of Safety Belts......................................5-83
Weatherstrips...............................................5-83
Cleaning the Outside of Your Vehicle..............5-83
Sheet Metal Damage.....................................5-85
Finish Damage.............................................5-86
Underbody Maintenance................................5-86
Chemical Paint Spotting.................................5-86
Vehicle Care/Appearance Materials..................5-86
Vehicle Identi®cation......................................5-88
Vehicle Identi®cation Number (VIN).................5-88
Service Parts Identi®cation Label.....................5-88Electrical System............................................5-89
Add-On Electrical Equipment..........................5-89
Headlamps..................................................5-89
Windshield Wiper Fuses................................5-89
Power Windows and Other Power Options.......5-90
Fuses and Circuit Breakers............................5-90
Capacities and Speci®cations........................5-102
Capacities and Speci®cations........................5-102
Normal Maintenance Replacement Parts.........5-104
Section 5 Service and Appearance Care
5-2
Page 338 of 442

When the differential is cold, add enough lubricant
to raise the level to 1/2 inch (12 mm) below the ®ller
plug hole.
When the differential is at operating temperature
(warm), add enough lubricant to raise the level to the
bottom of the ®ller plug hole.
What to Use
Refer to the Maintenance Schedule to determine what
kind of lubricant to use. SeePart D: Recommended
Fluids and Lubricants on page 6-18.
Bulb Replacement
For the type of bulbs, seeReplacement Bulbs on
page 5-52.
For any bulb changing procedure not listed in this
section, contact your dealer.
Halogen Bulbs
{CAUTION:
Halogen bulbs have pressurized gas inside
and can burst if you drop or scratch the bulb.
You or others could be injured. Be sure to read
and follow the instructions on the bulb
package.
Headlamps
1. Open the hood.
2. Lift the inner quick release clips.
3. Pull the headlamp assembly away from the vehicle.
4. Remove the cover from the headlamp bulb.
5. Disconnect the wiring harness.
6. Remove the headlamp bulb by turning the socket
counterclockwise.
7. To install the replacement bulb, reverse Steps 1
through 6.
5-50
Page 339 of 442

Front Turn Signal and Sidemarker
Lamps
Follow the same procedure listed for headlamp removal
earlier in this section. Replace the turn signal or
sidemarker bulb instead.
Taillamps and Turn Signal Lamps
1. Open the liftgate.
2. Remove the two
screws from the lamp
assembly.
3. Pull the assembly away from the vehicle.4. Unclip the wiring harness (A) and remove the three
socket retaining screws (B).
5. Remove the socket by releasing the retaining tabs.
6. Holding the socket, pull the bulb to release it
from the socket.
7. Push the new bulb into the socket until it clicks.
8. Reinstall the socket and screws.
9. Reconnect the wiring harness.
10. Reinstall the lamp assembly and tighten the screws.
11. Close the liftgate.
5-51
Page 340 of 442

Replacement Bulbs
Exterior Lamp Bulb Number
Halogen Headlamps
Low Beam 9006 HB4
High Beam 9005 HB3
Front Sidemarker Lamps 194
Front Turn Signal Lamps 3457
Tail and Stoplamps 3057
Rear Turn Signal Lamps 3057
For any bulb not listed here, contact your dealer.
Windshield Wiper Blade
Replacement
Windshield wiper blades should be inspected at least
twice a year for wear or cracking.
Notice:Use care when removing or installing a
blade assembly. Accidental bumping can cause the
arm to fall back and strike the windshield.
1. To remove the old wiper blades, lift the wiper arm
until it locks into a vertical position.A. Blade Assembly
B. Arm Assembly
C. Locking TabD. Blade Pivot
E. Hook Slot
F. Arm Hook
2. Press down on the blade assembly pivot locking
tab. Pull down on the blade assembly to release it
from the wiper arm hook.
3. Remove the insert from the blade assembly. The
insert has two notches at one end that are locked
by the bottom claws of the blade assembly. At
the notched end, pull the insert from the blade
assembly.
5-52
Page 349 of 442
If you need to replace any of your wheels, wheel bolts
or wheel nuts, replace them only with new GM
original equipment parts. This way, you will be sure to
have the right wheel, wheel bolts and wheel nuts
for your vehicle.
{CAUTION:
Using the wrong replacement wheels, wheel
bolts or wheel nuts on your vehicle can be
dangerous. It could affect the braking and
handling of your vehicle, make your tires lose
air and make you lose control. You could have
a collision in which you or others could be
injured. Always use the correct wheel, wheel
bolts and wheel nuts for replacement.
Notice:The wrong wheel can also cause problems
with bearing life, brake cooling, speedometer or
odometer calibration, headlamp aim, bumper height,
vehicle ground clearance and tire or tire chain
clearance to the body and chassis.
See
Changing a Flat Tire on page 5-64for more
information.
Used Replacement Wheels
{CAUTION:
Putting a used wheel on your vehicle is
dangerous. You can't know how it's been used
or how far it's been driven. It could fail
suddenly and cause a crash. If you have to
replace a wheel, use a new GM original
equipment wheel.
5-61
Page 377 of 442
Electrical System
Add-On Electrical Equipment
Notice:Don't add anything electrical to your
vehicle unless you check with your dealer ®rst.
Some electrical equipment can damage your vehicle
and the damage wouldn't be covered by your
warranty. Some add-on electrical equipment can
keep other components from working as they
should.
Your vehicle has an air bag system. Before attempting
to add anything electrical to your vehicle, see
Servicing Your Air Bag-Equipped Vehicle on page 1-60.
Headlamps
The headlamp wiring is protected by four fuses. An
electrical overload will cause a lamp to go on and off. If
this happens, have your headlamp wiring checked
right away.
Windshield Wiper Fuses
The windshield wiper motor is protected by a circuit
breaker and a fuse. If the motor overheats due to heavy
snow or ice, the wiper will stop until the motor cools.
If the overload is caused by some electrical problem, be
sure to get it ®xed.
5-89
Page 381 of 442
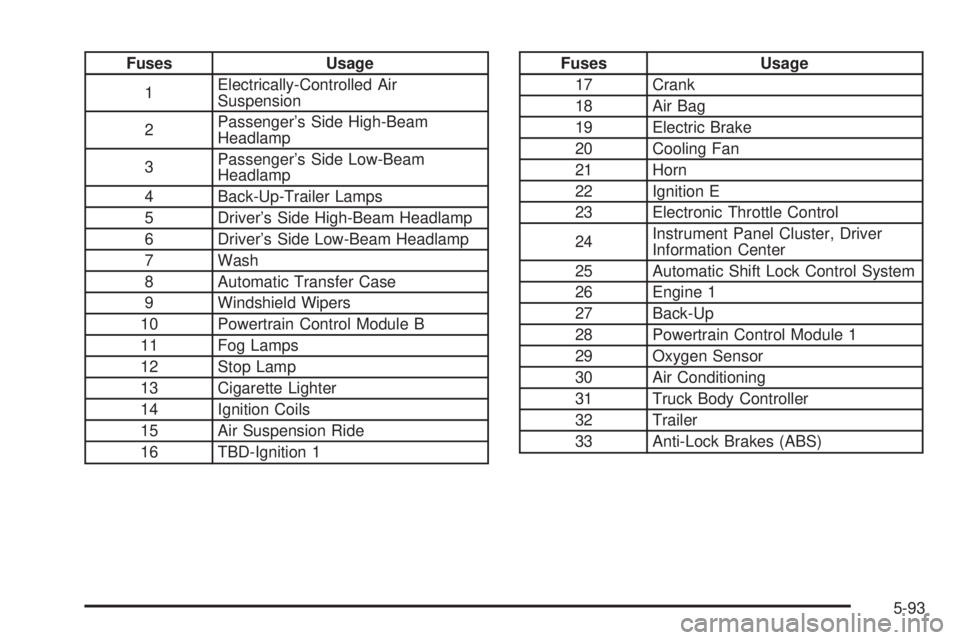
Fuses Usage
1Electrically-Controlled Air
Suspension
2Passenger's Side High-Beam
Headlamp
3Passenger's Side Low-Beam
Headlamp
4 Back-Up-Trailer Lamps
5 Driver's Side High-Beam Headlamp
6 Driver's Side Low-Beam Headlamp
7 Wash
8 Automatic Transfer Case
9 Windshield Wipers
10 Powertrain Control Module B
11 Fog Lamps
12 Stop Lamp
13 Cigarette Lighter
14 Ignition Coils
15 Air Suspension Ride
16 TBD-Ignition 1Fuses Usage
17 Crank
18 Air Bag
19 Electric Brake
20 Cooling Fan
21 Horn
22 Ignition E
23 Electronic Throttle Control
24Instrument Panel Cluster, Driver
Information Center
25 Automatic Shift Lock Control System
26 Engine 1
27 Back-Up
28 Powertrain Control Module 1
29 Oxygen Sensor
30 Air Conditioning
31 Truck Body Controller
32 Trailer
33 Anti-Lock Brakes (ABS)
5-93
Page 382 of 442
Fuses Usage
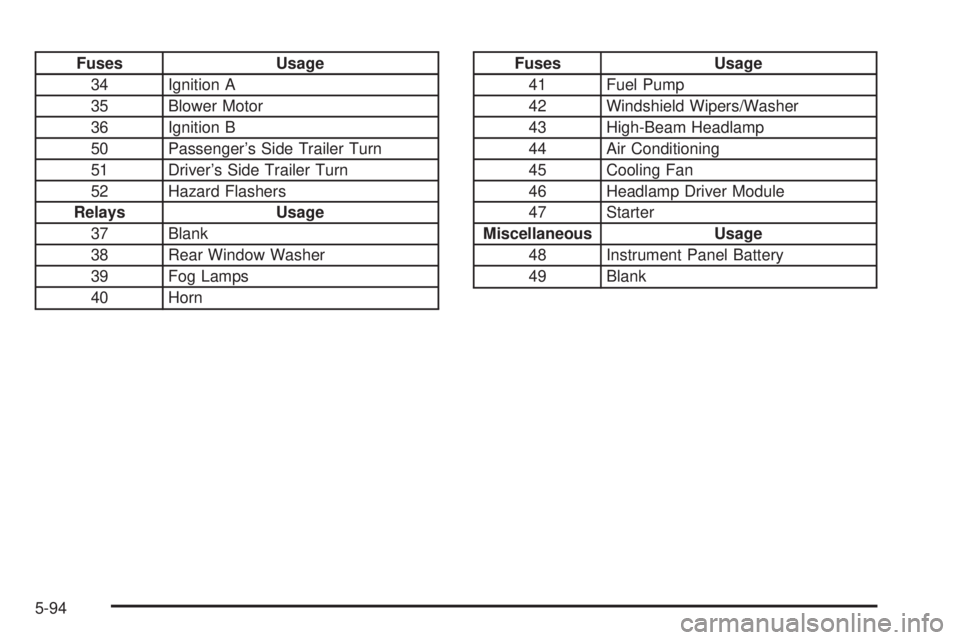
34 Ignition A
35 Blower Motor
36 Ignition B
50 Passenger's Side Trailer Turn
51 Driver's Side Trailer Turn
52 Hazard Flashers
Relays Usage
37 Blank
38 Rear Window Washer
39 Fog Lamps
40 HornFuses Usage
41 Fuel Pump
42 Windshield Wipers/Washer
43 High-Beam Headlamp
44 Air Conditioning
45 Cooling Fan
46 Headlamp Driver Module
47 Starter
Miscellaneous Usage
48 Instrument Panel Battery
49 Blank
5-94
Page 384 of 442
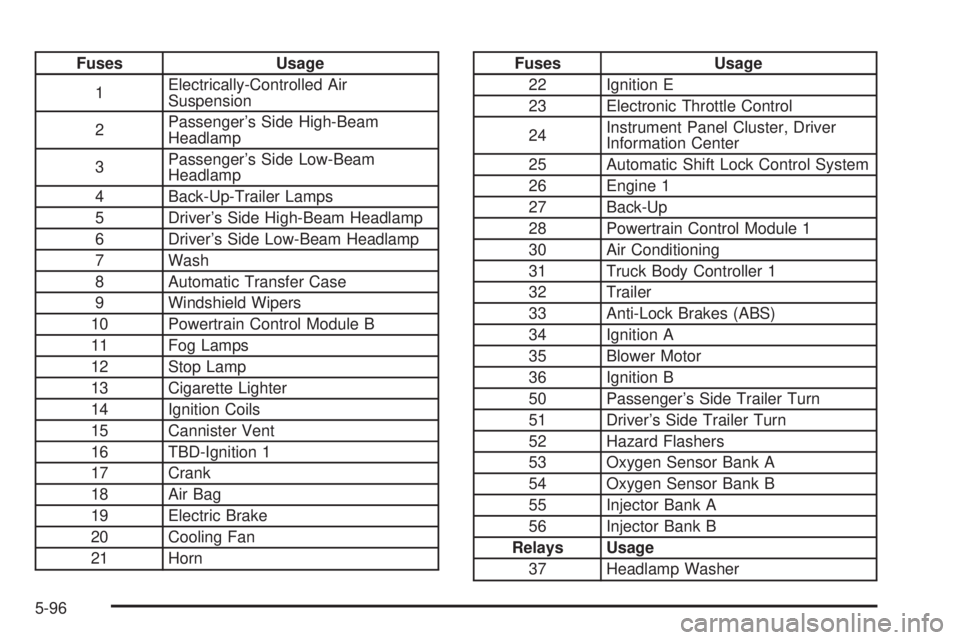
Fuses Usage
1Electrically-Controlled Air
Suspension
2Passenger's Side High-Beam
Headlamp
3Passenger's Side Low-Beam
Headlamp
4 Back-Up-Trailer Lamps
5 Driver's Side High-Beam Headlamp
6 Driver's Side Low-Beam Headlamp
7 Wash
8 Automatic Transfer Case
9 Windshield Wipers
10 Powertrain Control Module B
11 Fog Lamps
12 Stop Lamp
13 Cigarette Lighter
14 Ignition Coils
15 Cannister Vent
16 TBD-Ignition 1
17 Crank
18 Air Bag
19 Electric Brake
20 Cooling Fan
21 HornFuses Usage
22 Ignition E
23 Electronic Throttle Control
24Instrument Panel Cluster, Driver
Information Center
25 Automatic Shift Lock Control System
26 Engine 1
27 Back-Up
28 Powertrain Control Module 1
30 Air Conditioning
31 Truck Body Controller 1
32 Trailer
33 Anti-Lock Brakes (ABS)
34 Ignition A
35 Blower Motor
36 Ignition B
50 Passenger's Side Trailer Turn
51 Driver's Side Trailer Turn
52 Hazard Flashers
53 Oxygen Sensor Bank A
54 Oxygen Sensor Bank B
55 Injector Bank A
56 Injector Bank B
Relays Usage
37 Headlamp Washer
5-96
Page 385 of 442
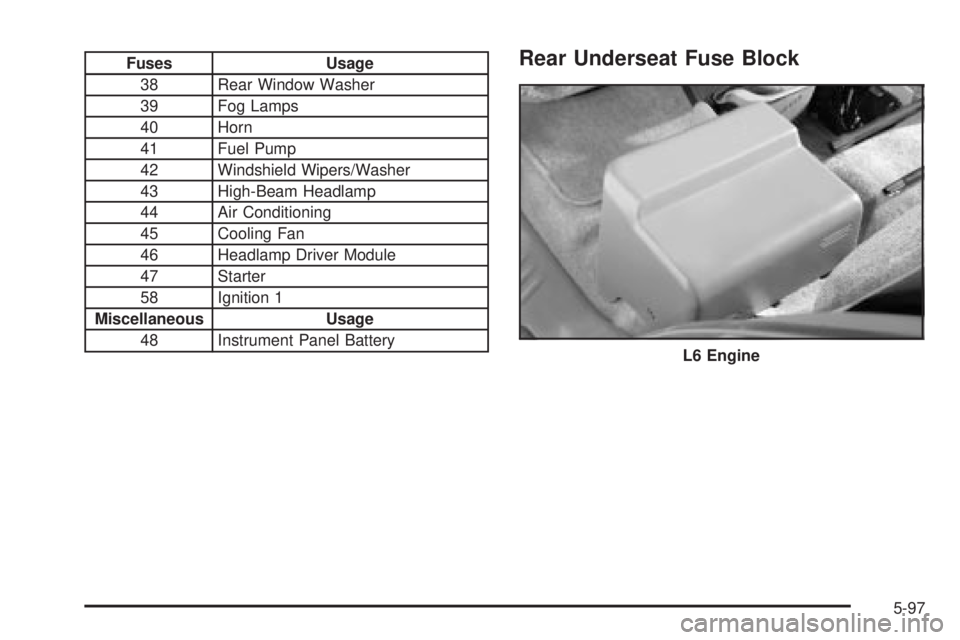
Fuses Usage
38 Rear Window Washer
39 Fog Lamps
40 Horn
41 Fuel Pump
42 Windshield Wipers/Washer
43 High-Beam Headlamp
44 Air Conditioning
45 Cooling Fan
46 Headlamp Driver Module
47 Starter
58 Ignition 1
Miscellaneous Usage
48 Instrument Panel BatteryRear Underseat Fuse Block
L6 Engine
5-97