instrument cluster GMC ENVOY 2004 User Guide
[x] Cancel search | Manufacturer: GMC, Model Year: 2004, Model line: ENVOY, Model: GMC ENVOY 2004Pages: 474, PDF Size: 4.83 MB
Page 172 of 474
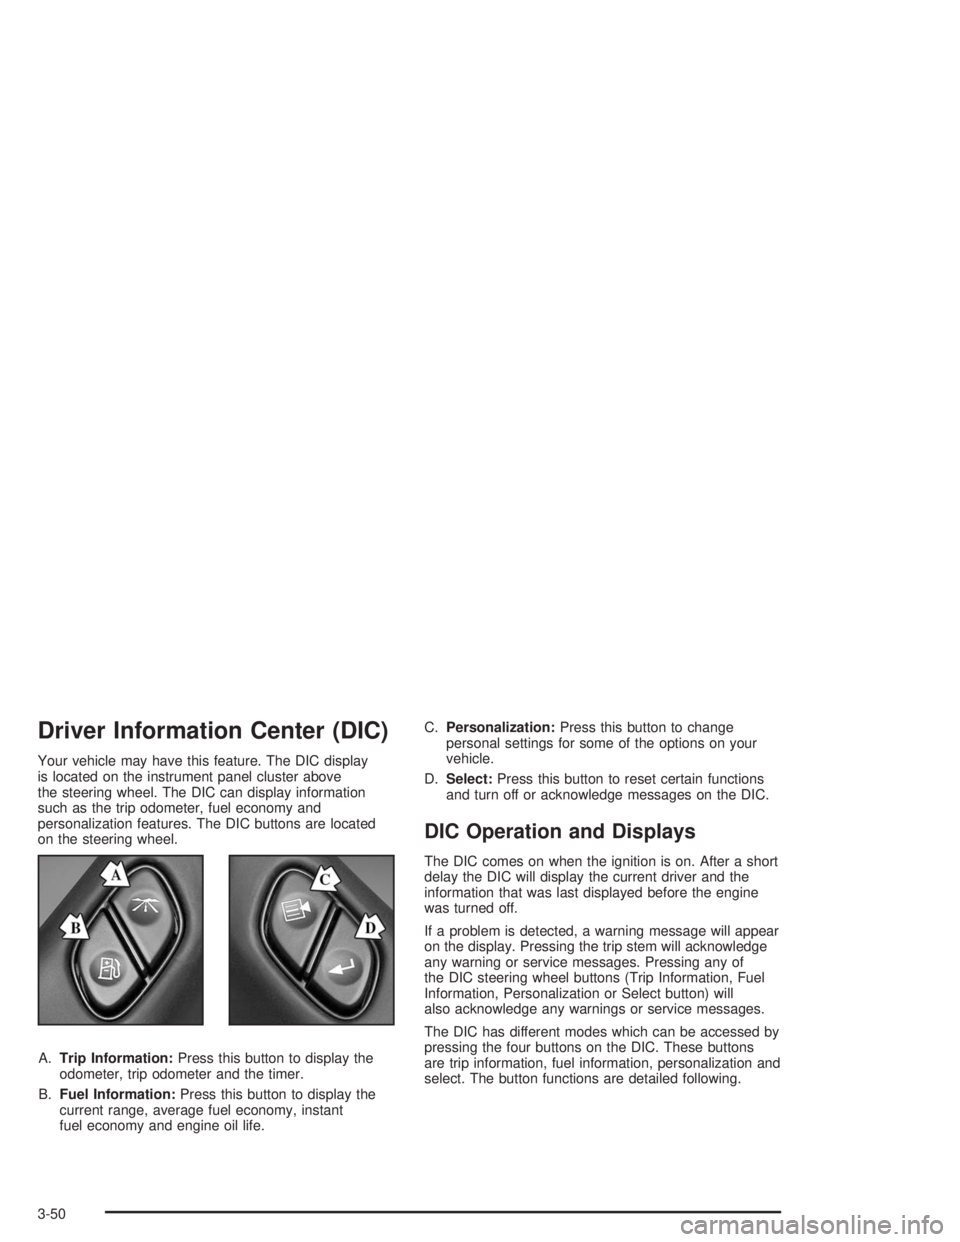
Driver Information Center (DIC)
Your vehicle may have this feature. The DIC display
is located on the instrument panel cluster above
the steering wheel. The DIC can display information
such as the trip odometer, fuel economy and
personalization features. The DIC buttons are located
on the steering wheel.
A.Trip Information:Press this button to display the
odometer, trip odometer and the timer.
B.Fuel Information:Press this button to display the
current range, average fuel economy, instant
fuel economy and engine oil life.C.Personalization:Press this button to change
personal settings for some of the options on your
vehicle.
D.Select:Press this button to reset certain functions
and turn off or acknowledge messages on the DIC.
DIC Operation and Displays
The DIC comes on when the ignition is on. After a short
delay the DIC will display the current driver and the
information that was last displayed before the engine
was turned off.
If a problem is detected, a warning message will appear
on the display. Pressing the trip stem will acknowledge
any warning or service messages. Pressing any of
the DIC steering wheel buttons (Trip Information, Fuel
Information, Personalization or Select button) will
also acknowledge any warnings or service messages.
The DIC has different modes which can be accessed by
pressing the four buttons on the DIC. These buttons
are trip information, fuel information, personalization and
select. The button functions are detailed following.
3-50
Page 173 of 474
Trip Information
Use the trip information button to scroll through the
odometer, TRIP A, TRIP B and TIMER.
Odometer
Press the trip information button until the odometer
appears on the display. This shows the total distance
the vehicle has been driven in either miles or kilometers.
Pressing the reset stem located on the instrument
cluster with the vehicle off will also display the odometer.
Trip A and Trip B
Press the trip information button until TRIP A or TRIP B
is displayed. This shows the current distance traveled
since the last reset for each trip odometer in either miles
or kilometers. Both odometers can be used at the
same time.
Each trip odometer can be reset to zero separately by
pressing select while the desired trip odometer is
displayed. You can also reset the trip odometers with
the reset stem on the cluster. If you press and hold the
reset stem for four seconds, the display will show the
distance traveled since the last ignition cycle.
Timer
The DIC can be used as a stopwatch. Press the select
button while TIMER is displayed to start the timer.
The display will show the amount of time that has
passed since the timer was last reset (not including time
the ignition is off). Time will continue to be counted as
long as the ignition is on, even if another display is being
shown on the DIC. The timer will record up to 99 hours,
59 minutes and 59 seconds (99:59:59) after which
the display will roll back to zero.
To stop the counting of time, press the select button
brie�y while TIMER is displayed.
To reset the timer to zero, press and hold the select
button while TIMER is displayed.
3-51
Page 412 of 474
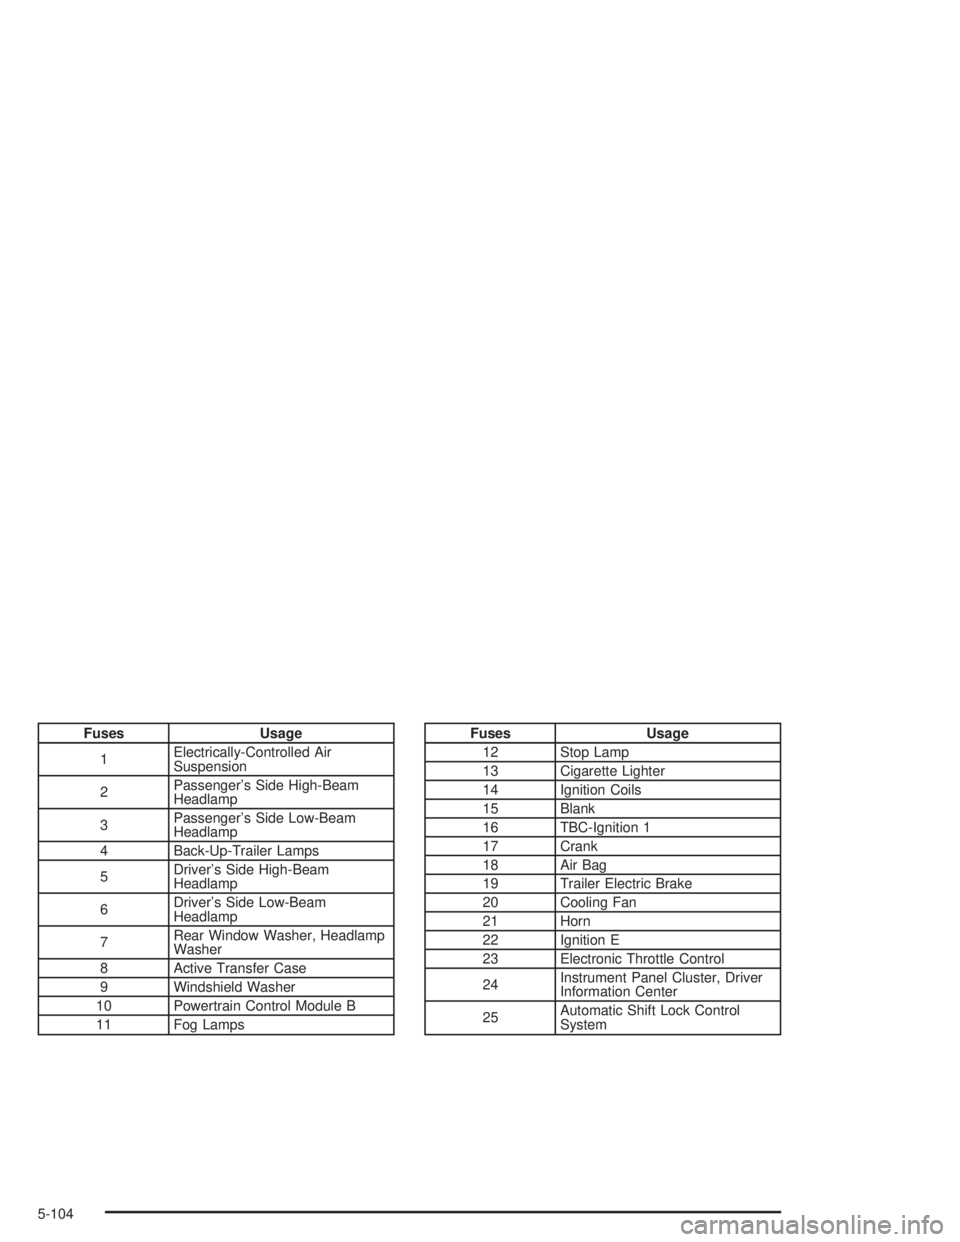
Fuses Usage
1Electrically-Controlled Air
Suspension
2Passenger’s Side High-Beam
Headlamp
3Passenger’s Side Low-Beam
Headlamp
4 Back-Up-Trailer Lamps
5Driver’s Side High-Beam
Headlamp
6Driver’s Side Low-Beam
Headlamp
7Rear Window Washer, Headlamp
Washer
8 Active Transfer Case
9 Windshield Washer
10 Powertrain Control Module B
11 Fog LampsFuses Usage
12 Stop Lamp
13 Cigarette Lighter
14 Ignition Coils
15 Blank
16 TBC-Ignition 1
17 Crank
18 Air Bag
19 Trailer Electric Brake
20 Cooling Fan
21 Horn
22 Ignition E
23 Electronic Throttle Control
24Instrument Panel Cluster, Driver
Information Center
25Automatic Shift Lock Control
System
5-104
Page 415 of 474
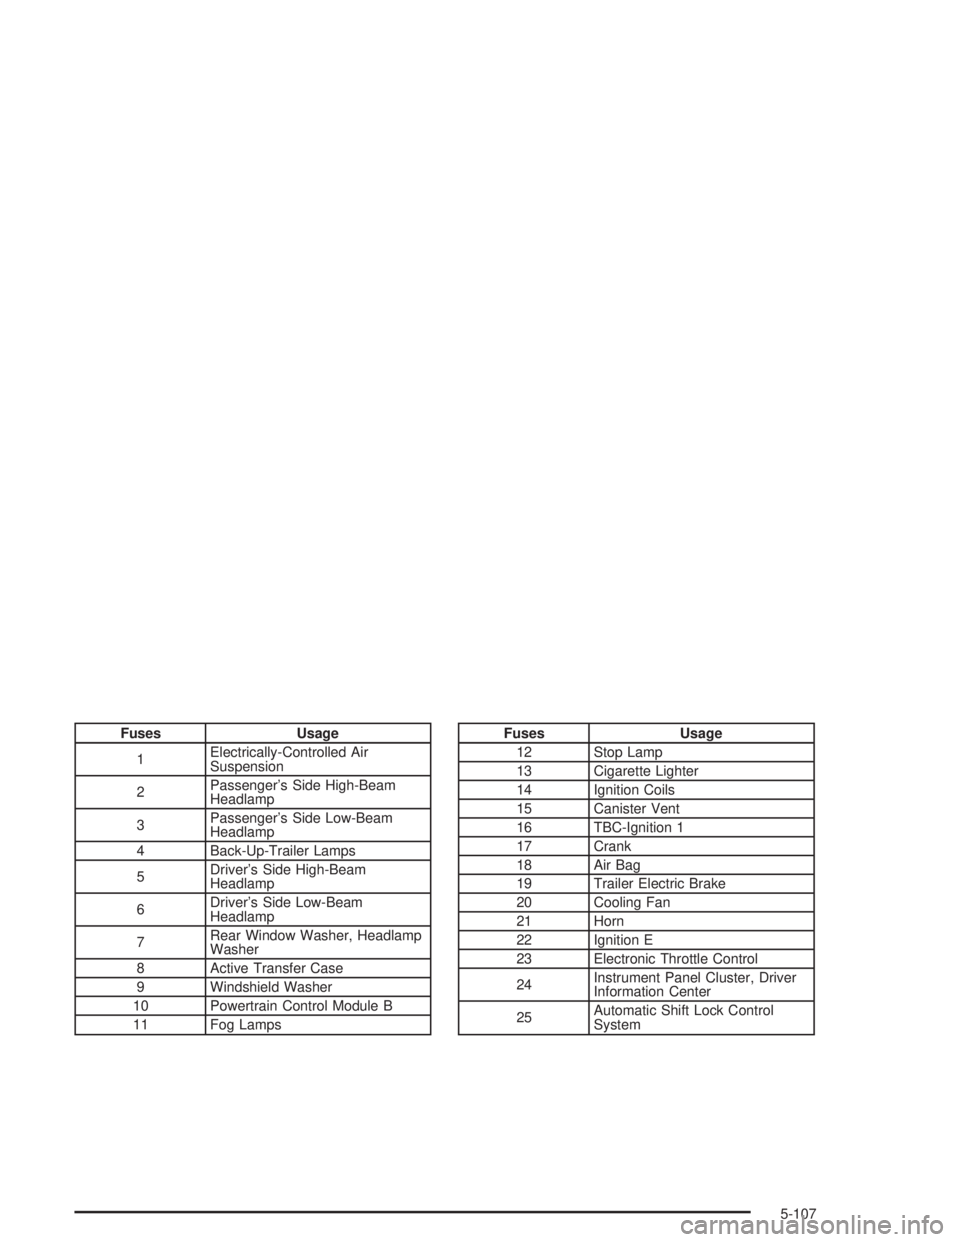
Fuses Usage
1Electrically-Controlled Air
Suspension
2Passenger’s Side High-Beam
Headlamp
3Passenger’s Side Low-Beam
Headlamp
4 Back-Up-Trailer Lamps
5Driver’s Side High-Beam
Headlamp
6Driver’s Side Low-Beam
Headlamp
7Rear Window Washer, Headlamp
Washer
8 Active Transfer Case
9 Windshield Washer
10 Powertrain Control Module B
11 Fog LampsFuses Usage
12 Stop Lamp
13 Cigarette Lighter
14 Ignition Coils
15 Canister Vent
16 TBC-Ignition 1
17 Crank
18 Air Bag
19 Trailer Electric Brake
20 Cooling Fan
21 Horn
22 Ignition E
23 Electronic Throttle Control
24Instrument Panel Cluster, Driver
Information Center
25Automatic Shift Lock Control
System
5-107
Page 464 of 474
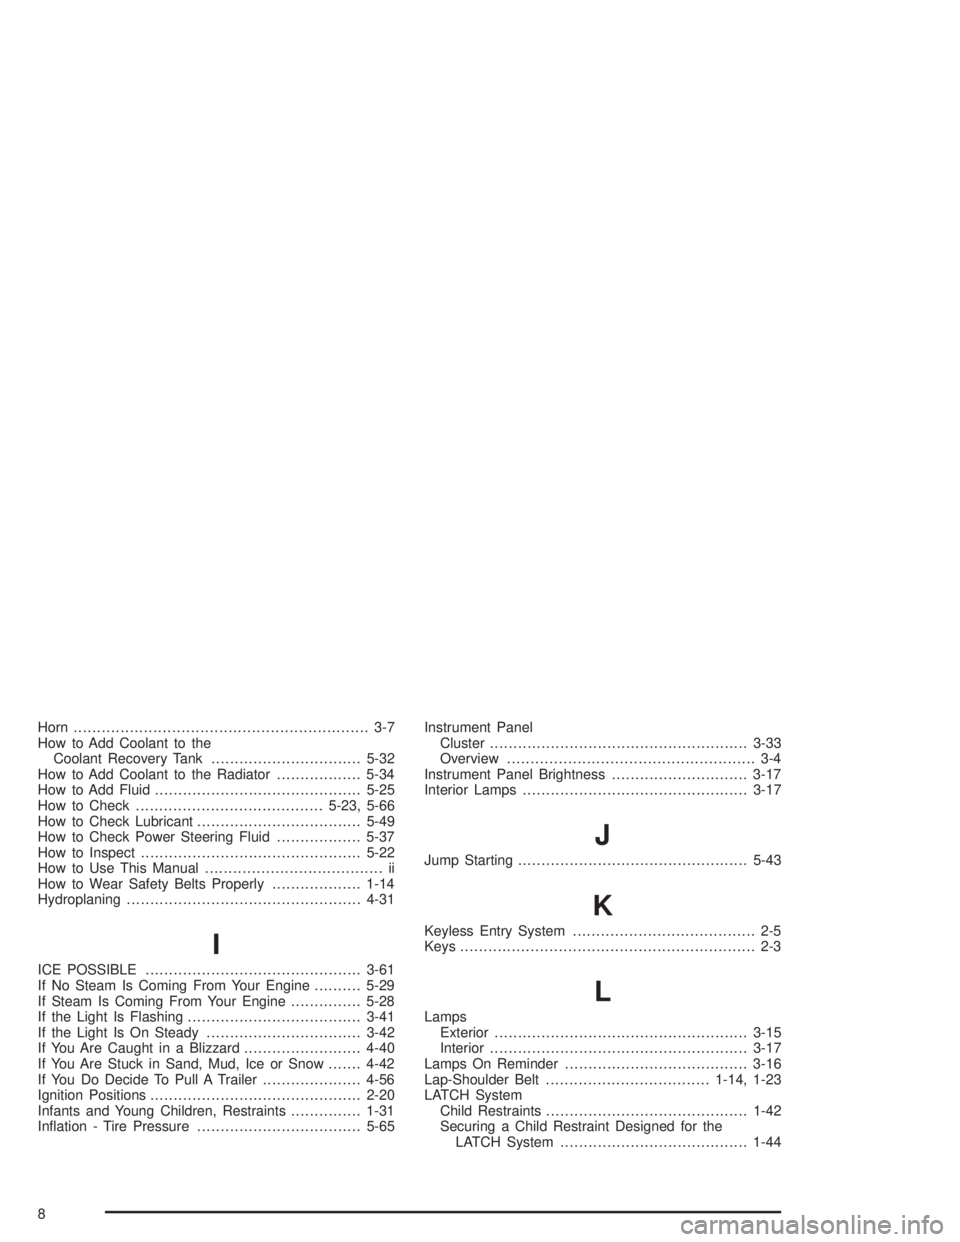
Horn............................................................... 3-7
How to Add Coolant to the
Coolant Recovery Tank................................5-32
How to Add Coolant to the Radiator..................5-34
How to Add Fluid............................................5-25
How to Check........................................5-23, 5-66
How to Check Lubricant...................................5-49
How to Check Power Steering Fluid..................5-37
How to Inspect...............................................5-22
How to Use This Manual...................................... ii
How to Wear Safety Belts Properly...................1-14
Hydroplaning..................................................4-31
I
ICE POSSIBLE..............................................3-61
If No Steam Is Coming From Your Engine..........5-29
If Steam Is Coming From Your Engine...............5-28
If the Light Is Flashing.....................................3-41
If the Light Is On Steady.................................3-42
If You Are Caught in a Blizzard.........................4-40
If You Are Stuck in Sand, Mud, Ice or Snow.......4-42
If You Do Decide To Pull A Trailer.....................4-56
Ignition Positions.............................................2-20
Infants and Young Children, Restraints...............1-31
In�ation - Tire Pressure...................................5-65Instrument Panel
Cluster.......................................................3-33
Overview..................................................... 3-4
Instrument Panel Brightness.............................3-17
Interior Lamps................................................3-17
J
Jump Starting.................................................5-43
K
Keyless Entry System....................................... 2-5
Keys............................................................... 2-3
L
Lamps
Exterior......................................................3-15
Interior.......................................................3-17
Lamps On Reminder.......................................3-16
Lap-Shoulder Belt...................................1-14, 1-23
LATCH System
Child Restraints...........................................1-42
Securing a Child Restraint Designed for the
LATCH System........................................1-44
8