rear view mirror GMC ENVOY 2006 User Guide
[x] Cancel search | Manufacturer: GMC, Model Year: 2006, Model line: ENVOY, Model: GMC ENVOY 2006Pages: 524, PDF Size: 3.36 MB
Page 123 of 524

Cleaning the Mirror
When cleaning the mirror, use a paper towel or similar
material dampened with glass cleaner. Do not spray
glass cleaner directly on the mirror as that may cause
the liquid cleaner to enter the mirror housing.
Automatic Dimming Rearview Mirror
with Compass
Your vehicle may have an automatic-dimming rearview
mirror with a compass.
Mirror Operation
When turned on, this mirror automatically dims to the
proper level to minimize glare from any headlamps
behind you after dark.
O(On/Off): This is the on/off button for the automatic
dimming feature and compass. Press the far left button,
located below the mirror face, for up to three seconds
to turn the feature on and off. A light on the mirror will be
lit while the feature is turned on.
Compass Operation
Press the on/off button once to turn the compass
on or off.
There is a compass display in the window in the upper
right corner of the mirror face. The compass displays
a maximum of two characters. For example, “NE”
is displayed for north-east.
Compass Calibration
Press and hold the on/off button down for nine seconds
to activate the compass calibration mode. CAL will
be displayed in the compass window on the mirror.
The compass can be calibrated by driving the vehicle in
circles at 5 mph (8 km/h) or less until the display
reads a direction.
Compass Variance
Compass variance is the difference between earth’s
magnetic north and true geographic north. The mirror is
set to zone eight upon leaving the factory. It will be
necessary to adjust the compass to compensate for
compass variance if you live outside zone eight. Under
certain circumstances, such as during a long distance
cross-country trip, it will be necessary to adjust for
compass variance. If not adjusted to account for compass
variance, your compass could give false readings.
2-43
Page 124 of 524

To adjust for compass variance, do the following:
1. Find your current location and variance zone
number on the map.
2. Press and hold the on/off button for six seconds.
Release the button when ZONE is displayed. The
number shown is the current zone number.
3. Scroll through the zone numbers that appear in the
compass/temperature window on the mirror by
pressing the on/off button. Once you �nd your
zone number, release the button. After about
four seconds, the mirror will return to the compass
display, and the new zone number will be set.Automatic Dimming Rearview Mirror
with Compass and Temperature
Display
If the vehicle is equipped with an automatic mirror, it
will, when on, automatically dim to the proper level
to minimize glare from lights behind you after dark.
The mirror also includes a display in the upper
right corner of the mirror face. The compass reading
and the outside temperature will both appear in
the display at the same time. The dual display can be
turned on or off by brie�y pressing either the TEMP
or the COMP button.
2-44
Page 128 of 524

Outside Curb View Assist Mirror
If the vehicle has this feature, the passenger’s outside
mirror will adjust to a preset tilt position while the vehicle
is in REVERSE (R) gear. Curb view assist may be
useful when you are parallel parking. The mirror
will return to normal position when the vehicle is shifted
out of REVERSE (R) gear. Automatic mirror movement
in either direction will follow a short delay.
You may be able to turn this feature on or off through
the Driver Information Center (DIC). SeeDIC Vehicle
Customization on page 3-60.
Outside Convex Mirror
{CAUTION:
A convex mirror can make things (like other
vehicles) look farther away than they really are.
If you cut too sharply into the right or left lane,
you could hit a vehicle. Check your inside
mirror or glance over your shoulder before
changing lanes.
The passenger’s outside mirror is convex. A convex
mirror’s surface is curved so more can be seen from the
driver’s seat.
Outside Heated Mirrors
Your vehicle may have this feature. When you operate
the rear window defogger, the defogger also warms
the heated driver’s and passenger’s outside rearview
mirrors to help clear them of ice, snow and
condensation.
2-48
Page 151 of 524

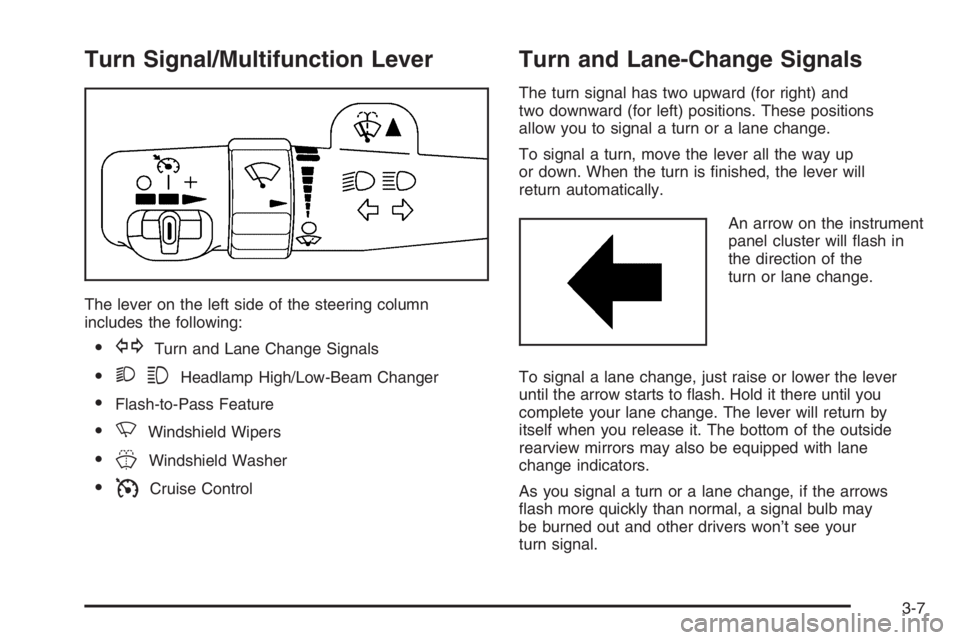
Turn Signal/Multifunction Lever
The lever on the left side of the steering column
includes the following:
GTurn and Lane Change Signals
23Headlamp High/Low-Beam Changer
Flash-to-Pass Feature
NWindshield Wipers
JWindshield Washer
ICruise Control
Turn and Lane-Change Signals
The turn signal has two upward (for right) and
two downward (for left) positions. These positions
allow you to signal a turn or a lane change.
To signal a turn, move the lever all the way up
or down. When the turn is �nished, the lever will
return automatically.
An arrow on the instrument
panel cluster will �ash in
the direction of the
turn or lane change.
To signal a lane change, just raise or lower the lever
until the arrow starts to �ash. Hold it there until you
complete your lane change. The lever will return by
itself when you release it. The bottom of the outside
rearview mirrors may also be equipped with lane
change indicators.
As you signal a turn or a lane change, if the arrows
�ash more quickly than normal, a signal bulb may
be burned out and other drivers won’t see your
turn signal.
3-7
Page 153 of 524

Windshield Wipers
8(Mist):For a single wiping cycle, turn the band to
mist. Hold it there until the wipers start. Then let go. The
wipers will stop after one wipe. If you want more
wipes, hold the band on mist longer.
9(Off):To stop the wipers, move the band to off.
N(Windshield Wipers):Turn the band to control the
windshield wipers.
You can set the wiper speed for a long or short delay
between wipes. This can be very useful in light rain
or snow. Turn the band to choose the delay time. The
closer to the top of the lever, the shorter the delay.
For steady wiping at low speed, turn the band away from
you to the �rst solid band past the delay settings. For
high-speed wiping, turn the band further, to the second
solid band past the delay settings. To stop the wipers,
move the band to off.
Be sure to clear ice and snow from the wiper blades
before using them. If they’re frozen to the windshield,
carefully loosen or thaw them. If your blades do become
worn or damaged, get new blades or blade inserts.
Rainsense™ Wipers
Your vehicle may be equipped with
Rainsense™ windshield wipers. When active, these
wipers are able to detect moisture on the windshield and
automatically turn on the wipers.
The moisture sensor is located next to the inside
rearview mirror and is mounted on the windshield.
To turn on the Rainsense™ feature, the wipers must be
set to one of the �ve delay settings on the multifunction
lever. Each of the �ve settings adjusts the sensitivity
of the rainsensor. For more wipes, select the higher
settings; for fewer wipes, select the lower settings
located closer to off on the multifunction lever.
The rainsensor will automatically control the frequency
of the wipes from off to high speed according to the
weather conditions. The wipers can be left in a
rainsense mode even when it is not raining.
Notice:If you do not turn off the windshield wipers
when driving through an automatic car wash, you
could damage the wipers. Always turn off the
windshield wipers before entering an automatic
car wash.
3-9
Page 180 of 524

Passenger Airbag Status Indicator
Your vehicle has the passenger sensing system,
Your rearview mirror has a passenger airbag status
indicator.
When the ignition key is turned to RUN or START, the
passenger airbag status indicator will light ON and
OFF, or the symbol for on and off, for several seconds
as a system check.Then, after several more seconds, the status indicator
will light either ON or OFF, or either the on or off symbol
to let you know the status of the right front passenger’s
frontal airbag.
If the word ON or the on symbol is lit on the passenger
airbag status indicator, it means that the right front
passenger’s frontal airbag is enabled (may in�ate).
{CAUTION:
If the on indicator comes on when you have a
rear-facing child restraint installed in the right
front passenger’s seat, it means that the
passenger sensing system has not turned off
the passenger’s frontal airbag. A child in a
rear-facing child restraint can be seriously
injured or killed if the right front passenger’s
airbag in�ates. This is because the back of the
rear-facing child restraint would be very close
to the in�ating airbag. Do not use a rear-facing
child restraint in the right front passenger’s
seat if the airbag is turned on. Passenger Airbag Status Indicator – United States
Passenger Airbag Status Indicator – Canada
3-36
Page 199 of 524

CHECK WASHER FLUID
If the washer �uid level is low, this message will appear
on the DIC. Adding washer �uid to the windshield
washer �uid reservoir will clear the message. See
Windshield Washer Fluid on page 5-37. Press the select
button to acknowledge this message and clear it from
the DIC display.
CURB VIEW ACTIVATED
The CURB VIEW ACTIVATED message is displayed
when the passenger outside rearview mirror moves into
the curb view position. SeeOutside Curb View Assist
Mirror on page 2-48for more information.
DRIVER DOOR AJAR
If the driver’s door is not fully closed, this message will
appear on the display and you will hear a chime.
Stop and turn off the vehicle, check the door for
obstacles, and close the door again. Check to see if the
message still appears on the DIC. Press the select
button to acknowledge this message and clear it from
the DIC display.
ENGINE COOLANT HOT/ENGINE
OVERHEATED
Notice:If you drive your vehicle while the engine is
overheating, severe engine damage may occur. If
an overheat warning appears on the instrument
panel cluster and/or DIC, stop the vehicle as soon
as possible. Do not increase the engine speed above
normal idling speed. SeeEngine Overheating on
page 5-28for more information.
If the cooling system temperature gets hot, this message
will appear in the DIC and you will hear a chime. See
Engine Overheating on page 5-28for the proper course
of action. This message will clear when the coolant
temperature drops to a safe operating temperature.
FUEL LEVEL LOW
If the fuel level is low in the vehicle’s gas tank this
message will appear on the DIC and you will hear a
chime. Refuel as soon as possible. Press the select
button to acknowledge this message and clear it from
the DIC display. SeeLow Fuel Warning Light on
page 3-49,Filling the Tank on page 5-8andFuel on
page 5-5for more information.
3-55
Page 320 of 524

Driving at Night
Night driving is more dangerous than day driving.
One reason is that some drivers are likely to be
impaired — by alcohol or drugs, with night vision
problems, or by fatigue.
Here are some tips on night driving.
Drive defensively.
Do not drink and drive.
Adjust the inside rearview mirror to reduce the glare
from headlamps behind you.
Since you cannot see as well, you may need to
slow down and keep more space between you
and other vehicles.
Slow down, especially on higher speed roads. Your
vehicle’s headlamps can light up only so much
road ahead.
In remote areas, watch for animals.
If you are tired, pull off the road in a safe place
and rest.
No one can see as well at night as in the daytime. But
as we get older these differences increase. A
50-year-old driver may require at least twice as much
light to see the same thing at night as a 20-year-old.What you do in the daytime can also affect your night
vision. For example, if you spend the day in bright
sunshine you are wise to wear sunglasses. Your eyes
will have less trouble adjusting to night. But if you
are driving, do not wear sunglasses at night. They may
cut down on glare from headlamps, but they also
make a lot of things invisible.
You can be temporarily blinded by approaching
headlamps. It can take a second or two, or even several
seconds, for your eyes to re-adjust to the dark. When
you are faced with severe glare, as from a driver
who does not lower the high beams, or a vehicle with
misaimed headlamps, slow down a little. Avoid
staring directly into the approaching headlamps.
Keep the windshield and all the glass on your vehicle
clean — inside and out. Glare at night is made much
worse by dirt on the glass. Even the inside of the glass
can build up a �lm caused by dust. Dirty glass makes
lights dazzle and �ash more than clean glass would,
making the pupils of your eyes contract repeatedly.
Remember that the headlamps light up far less of a
roadway when you are in a turn or curve. Keep your eyes
moving; that way, it is easier to pick out dimly lighted
objects. Just as the headlamps should be checked
regularly for proper aim, so should your eyes be
examined regularly. Some drivers suffer from night
blindness — the inability to see in dim light — and are not
even aware of it.
4-32
Page 518 of 524

Locking Rear Axle............................................ 4-9
Lockout Protection..........................................2-12
Locks
Delayed Locking........................................... 2-9
Door ........................................................... 2-8
Lockout Protection.......................................2-12
Power Door .................................................. 2-9
Programmable Automatic Door Locks.............2-10
Rear Door Security Locks.............................2-12
Loss of Control...............................................4-18
Low Fuel Warning Light...................................3-49
Luggage Carrier..............................................2-57
Lumbar
Manual Controls............................................ 1-3
Power Controls............................................. 1-4
MMaintenance Schedule
Additional Required Services........................... 6-6
At Each Fuel Fill........................................... 6-9
At Least Once a Month.................................. 6-9
At Least Once a Year..................................6-10
Introduction.................................................. 6-2
Maintenance Footnotes.................................. 6-7
Maintenance Record....................................6-15
Maintenance Requirements............................. 6-2
Normal Maintenance Replacement Parts.........6-14
Owner Checks and Services........................... 6-9Maintenance Schedule (cont.)
Recommended Fluids and Lubricants.............6-12
Scheduled Maintenance................................. 6-4
Using.......................................................... 6-2
Your Vehicle and the Environment................... 6-2
Malfunction Indicator Light................................3-42
Manual Lumbar Controls.................................... 1-3
Manual Seats................................................... 1-2
Memory Seat.................................................2-62
Message
DIC Warnings and Messages........................3-54
Mirrors
Automatic Dimming Rearview with Compass....2-43
Automatic Dimming Rearview with Compass
and Temperature Display...........................2-44
Automatic Dimming Rearview with OnStar
®
and Compass..........................................2-39
Automatic Dimming Rearview with OnStar®,
Compass and Temperature Display.............2-40
Manual Rearview Mirror................................2-36
Manual Rearview Mirror with OnStar
®.............2-36
Manual Rearview Mirror with OnStar®,
Compass, and Temperature Display............2-37
Outside Convex Mirror.................................2-48
Outside Curb View Assist Mirror....................2-48
Outside Heated Mirrors................................2-48
Outside Manual Mirrors................................2-47
Outside Power Mirrors..................................2-47
MyGMLink.com................................................ 7-3
8
Page 519 of 524

N
Navigation/Radio System, see
Navigation Manual.....................................3-124
New Vehicle Break-In......................................2-19
Normal Maintenance Replacement Parts............6-14
O
Odometer......................................................3-33
Odometer, Trip...............................................3-33
Off-Road Driving.............................................4-19
Off-Road Recovery..........................................4-16
Oil
Change Engine Oil Light...............................3-46
Engine.......................................................5-16
Pressure Gage............................................3-45
Oil, Engine Oil Life System..............................5-20
Older Children, Restraints................................1-32
Online Owner Center........................................ 7-3
OnStar
®System, see OnStar®Manual...............2-49
Other Warning Devices...................................... 3-6
Outlet Adjustment............................................3-27
Outlet(s), Accessory Power...............................3-19
Outside
Convex Mirror.............................................2-48
Curb View Assist Mirror................................2-48
Heated Mirrors............................................2-48Outside (cont.)
Manual Mirrors............................................2-47
Power Mirrors.............................................2-47
Overhead Console..........................................2-56
Owner Checks and Services.............................. 6-9
Owners, Canadian............................................... ii
P
Paint, Damage...............................................5-99
Park (P)
Shifting Into................................................2-32
Shifting Out of............................................2-33
Parking
Brake........................................................2-31
Over Things That Burn.................................2-34
Passenger Airbag Status Indicator.....................3-36
Passenger Sensing System..............................1-67
Passing.........................................................4-16
Passlock
®......................................................2-18
Power
Accessory Outlet(s)......................................3-19
Door Locks.................................................. 2-9
Electrical System.......................................5-102
Lumbar Controls........................................... 1-4
Rear Quarter Windows.................................2-16
Reduced Engine Light..................................3-47
Retained Accessory (RAP)............................2-20
9