display GMC ENVOY 2006 Owner's Guide
[x] Cancel search | Manufacturer: GMC, Model Year: 2006, Model line: ENVOY, Model: GMC ENVOY 2006Pages: 524, PDF Size: 3.36 MB
Page 202 of 524
STABILITRAK ACTIVE
The STABILITRAK ACTIVE message will be displayed
anytime the system activates to maintain vehicle
stability. Any combination of engine speed management,
brake traction control, and stability control will display
the STABILITRAK ACTIVE message on the DIC.
STABILITRAK NOT READY
The STABILITRAK NOT READY message may be
displayed if driving conditions delay system initialization.
This is normal. Once the system initializes, the
STABILITRAK NOT READY message will no longer be
displayed on the DIC.
STABILITRAK OFF
The STABILITRAK OFF message will be displayed
when you press the StabiliTrak®button for more than
�ve seconds or when stability control has been
automatically disabled. The StabiliTrak
®button is
located on the transmission shift handle.To limit wheel spin and realize the full bene�ts of the
stability enhancement system, you should normally
leave StabiliTrak
®on. However, you should turn
StabiliTrak®off if your vehicle gets stuck in sand, mud,
ice, or snow and you want to rock your vehicle to
attempt to free it, or if you are driving in extreme off-road
conditions and require more wheel spin. SeeIf Your
Vehicle is Stuck in Sand, Mud, Ice, or Snow on
page 4-44. To turn the StabiliTrak
®system back on,
press the StabiliTrak®button again.
There are several conditions that can cause this
message to appear.
The message may be displayed if the brake system
warning light is on. SeeBrake System Warning
Light on page 3-39.
The message will be displayed if the vehicle is
shifted into 4LO.
The message will turn off as soon as the conditions that
caused the message to be displayed are no longer
present.
3-58
Page 203 of 524
TIGHTEN FUEL CAP
If the vehicle’s fuel cap is not tightened properly, this
message may appear on the DIC and a chime will
sound. Fully reinstall the fuel cap. SeeFilling the Tank
on page 5-8. The diagnostic system can determine
if the fuel cap has been left off or improperly installed. A
loose or missing fuel cap will allow fuel to evaporate
into the atmosphere. The DIC message will remain on
until the message is cancelled with the return button
on the steering wheel. The DIC message will also
be cancelled if the ignition is turned off.
The DIC message and the Service Engine Soon light
may come on again during a second trip if the fuel cap is
still not tightened properly. SeeMalfunction Indicator
Lamp on page 3-42for more information.
TRACTION CONTROL OFF
The TRACTION CONTROL OFF message will be
displayed when you momentarily press the StabiliTrak®
button located on the transmission shift handle. In
this mode, stability control and the brake-traction control
are functional. Engine speed management will be
modi�ed and the driven wheels can spin more freely.
For more details on this mode, seeStabiliTrak
®System
on page 4-9.
TURN SIGNAL ON
If a turn signal is left on for 3/4 of a mile (1.2 km), this
message will appear on the display and you will hear a
chime. Move the turn signal/multifunction lever to the
off position. Press the select button to acknowledge this
message and clear it from the DIC display.
3-59
Page 204 of 524
DIC Vehicle Customization
Your vehicle may have customization capabilities that
allow you to program some features to one setting
based on your preference. All of the customizable
options listed may not be available on your vehicle. Only
the options available will be displayed on your Driver
Information Center (DIC).
The default settings for the customization features were
set when your vehicle left the factory, but may have
been changed from their default state since then.
To change feature preferences, make sure the ignition
is on and the vehicle is in PARK (P).
Press the customization button to scroll through the
available customizable options.
After pressing the customization button, VEHICLE
SETTINGS will momentarily display before going to a
customization option.
Lock Doors
Press the customization button until LOCK DOORS: IN
GEAR appears in the display. To select your
preference for automatic locking, press the select button
while LOCK DOORS: IN GEAR is displayed on the
DIC. Pressing the select button will scroll through the
following choices:
LOCK DOORS: IN GEAR (default):The doors will lock
when the vehicle is shifted out of PARK (P).
LOCK DOORS: WITH SPEED:The doors will lock
when the vehicle speed is above 8 mph (13 km/h) for
three seconds.
Choose one of the available options and press the
customization button while it is displayed on the DIC to
select it and move on to the next feature. For more
information on automatic door locks, seeProgrammable
Automatic Door Locks on page 2-10.
3-60
Page 205 of 524
Unlock Doors
Press the customization button until UNLOCK DOORS:
IN PARK appears in the display. To select your
preference for automatic unlocking, press the select
button while UNLOCK DOORS: IN PARK is displayed
on the DIC. Pressing the select button will scroll through
the following choices:
UNLOCK DOORS: IN PARK (default):All of the doors
will unlock when the vehicle is shifted into PARK (P).
UNLOCK DRIVER: IN PARK:The driver’s door will be
unlocked when the vehicle is shifted into PARK (P).
UNLOCK DOORS: KEY OUT:All of the doors
will unlock when the key is taken out of the ignition.
UNLOCK DOORS: MANUALLY:The doors will not be
unlocked automatically.
Choose one of the available options and press the
customization button while it is displayed on the DIC to
select it and move on to the next feature. For more
information on automatic door locks, seeProgrammable
Automatic Door Locks on page 2-10.
Lock Feedback
Press the customization button until LOCK FEEDBACK:
BOTH appears in the display. To select your preference
for the feedback you receive when locking the vehicle
with the remote keyless entry transmitter, press the
select button while LOCK FEEDBACK: BOTH is
displayed on the DIC. Pressing the select button will
scroll through the following choices:
LOCK FEEDBACK: BOTH (default):The parking
lamps will �ash each time you press the button with the
lock symbol on the remote keyless entry transmitter
and the horn will chirp the second time you press the
lock button.
LOCK FEEDBACK: OFF:There will be no feedback
when locking the vehicle.
LOCK FEEDBACK: LAMPS:The parking lamps will
�ash each time you press the button with the lock
symbol on the remote keyless entry transmitter.
LOCK FEEDBACK: HORN:The horn will chirp the
second time you press the button with the lock symbol
on the remote keyless entry transmitter.
Choose one of the available options and press the
customization button while it is displayed on the DIC to
select it and move on to the next feature.
3-61
Page 206 of 524
Unlock Feedback
Press the customization button until UNLOCK
FEEDBACK: LAMPS appears in the display. To select
your preference for the feedback you will receive
when unlocking the vehicle with the remote keyless
entry transmitter, press the select button while UNLOCK
FEEDBACK: LAMPS is displayed on the DIC. Pressing
the select button will scroll through the following
choices:
UNLOCK FEEDBACK: LAMPS (default):The parking
lamps will �ash each time you press the button with the
unlock symbol on the remote keyless entry transmitter.
UNLOCK FEEDBACK: HORN:The horn will chirp the
second time you press the button with the unlock
symbol on the remote keyless entry transmitter.
UNLOCK FEEDBACK: BOTH:The parking lamps will
�ash each time you press the button with the unlock
symbol on the remote keyless entry transmitter and the
horn will chirp the second time you press the unlock
button.
UNLOCK FEEDBACK: OFF:There will be no feedback
when unlocking the vehicle.
Choose one of the available options and press the
customization button while it is displayed on the DIC to
select it and move on to the next feature.
Headlamp Delay
Press the customization button until HEADLAMP
DELAY: 10 SEC appears in the display. To select your
preference for how long the headlamps will stay on
when you turn off the vehicle, press the select button
while HEADLAMP DELAY: 10 SEC is displayed on
the DIC. Pressing the select button will scroll through
the following choices:
HEADLAMP DELAY: 10 SEC (default)
HEADLAMP DELAY: 20 SEC
HEADLAMP DELAY: 40 SEC
HEADLAMP DELAY: 1 MIN
HEADLAMP DELAY: 2 MIN
HEADLAMP DELAY: 3 MIN
HEADLAMP DELAY: OFF
The amount of time you choose will be the amount of
time that the headlamps stay on after you turn off
the vehicle. If you choose OFF, the headlamps will turn
off as soon as you turn off the vehicle.
Choose one of the available options and press the
customization button while it is displayed on the DIC to
select it and move on to the next feature.
3-62
Page 207 of 524
Perimeter Lights
Press the customization button until PERIMETER
LIGHTS: ON appears in the display. To select your
preference for perimeter lighting, press the select button
while PERIMETER LIGHTS: ON is displayed on the
DIC. Pressing the select button will scroll through
the following choices:
PERIMETER LIGHTS: ON (default):The headlamps
and back-up lamps will come on for 40 seconds, if
it is dark enough outside, when you unlock the vehicle
with the remote keyless entry transmitter.
PERIMETER LIGHTS: OFF:The perimeter lights will
not come on when you unlock the vehicle with the
remote keyless entry transmitter.
Choose one of the available options and press the
customization button while it is displayed on the DIC to
select it and move on to the next feature.
Easy Exit Seat
Press the customization button until EASY EXIT SEAT:
OFF appears in the display. To select your preference
for seat position exit, press the select button while EASY
EXIT SEAT: OFF is displayed on the DIC. Pressing
the select button will scroll through the following choices:
EASY EXIT SEAT: OFF (default):No seat exit recall
will occur.
EASY EXIT SEAT: ON:The driver’s seat will move to
the exit position when the key is removed from the
ignition.
Choose one of the available options and press the
customization button while it is displayed on the DIC to
select it and move on to the next feature. For more
information on seat position exit, see “Easy Exit Seat”
underMemory Seat on page 2-62.
3-63
Page 208 of 524
Seat Recall
Press the customization button until SEAT RECALL:OFF
appears in the display. To select your preference for
recall of the driver’s memory seat, mirrors, and
adjustable pedals, if equipped, press the select button
while SEAT RECALL:OFF is displayed on the DIC.
Pressing the select button will scroll through the
following choices:
SEAT RECALL: OFF (default):The driver’s memory
seat, mirrors, and adjustable pedals position you
saved will only be recalled when the memory
button 1 or 2 is pressed.
SEAT RECALL: AT KEY IN:The driver’s memory
seat, mirrors, and adjustable pedals position you saved
will be recalled when you put the key in the ignition.
SEAT RECALL: ON REMOTE:The driver’s memory
seat, mirrors, and adjustable pedals position you saved
will be recalled when you unlock the vehicle with the
remote keyless entry transmitter.
Choose one of the available options and press the
customization button while it is displayed on the DIC to
select it and move on to the next feature. For more
information on the memory seat feature, seeMemory
Seat on page 2-62.
Curb View
Press the customization button until CURB VIEW: OFF
appears in the display. To select your preference for
curb view, press the select button while CURB VIEW:
OFF is displayed on the DIC. Pressing the select button
will scroll through the following choices:
CURB VIEW: OFF (default):The passenger’s outside
mirror will not be tilted down when the vehicle is
shifted into REVERSE (R).
CURB VIEW: PASSENGER:The passenger’s outside
mirror will be tilted down when the vehicle is shifted
into REVERSE (R).
When the vehicle is placed in PARK (P) or in any
forward gear, the mirror will return to the normal driving
position, following a short delay.
Choose one of the available options and press the
customization button while it is displayed on the DIC to
select it and move on to the next feature. For more
information on tilt mirror in reverse, seeOutside Curb
View Assist Mirror on page 2-48.
3-64
Page 209 of 524
Alarm Warning
Press the customization button until ALARM WARNING:
BOTH appears in the display. To select your preference
for alarm warning, press the select button while
ALARM WARNING: BOTH is displayed on the DIC.
Pressing the select button will scroll through the
following choices:
ALARM WARNING: BOTH (default):The headlamps
will �ash and the horn will chirp when the alarm is
active.
ALARM WARNING: HORN:The horn will chirp when
the alarm is active.
ALARM WARNING: LAMPS:The headlamps will �ash
when the alarm is active.
ALARM WARNING: OFF:There will be no alarm
warning on activation.
Choose one of the available options and press the
customization button while your choice is displayed on
the DIC to select it and move on to the next feature.
For more information on alarm warning type, see
Content Theft-Deterrent on page 2-17.
Language
Press the customization button until LANGUAGE:
ENGLISH appears in the display. To select your
preference for display language, press the select button
while LANGUAGE: ENGLISH is displayed on the
DIC. Pressing the select button will scroll through the
following languages:
ENGLISH (default)
FRANCAIS (French)
ESPANOL (Spanish)
Choose one of the available options and press the
customization button while it is displayed on the DIC to
select it and move on to the next feature.
If you accidentally choose a language that you do not
want or understand, press and hold the customization
button and the trip information button at the same
time. The DIC will begin scrolling through the languages
in their particular language. English will be in English,
Francais will be in French, and Espanol will be in
Spanish. When you see the language that you would
like, release both buttons. The DIC will then display the
information in the language you chose.
You can also scroll through the different languages
by pressing and holding the trip reset stem for
four seconds, as long as you are in the odometer mode.
3-65
Page 210 of 524
Units
Press the customization button until UNITS: U.S.
(ENGLISH) appears in the display. To select English or
metric, press the select button while UNITS: U.S.
(ENGLISH) is displayed on the DIC. Pressing the select
button will scroll through the following choices:
UNITS: U.S. (ENGLISH) (default)
UNITS: METRIC (km/L)
UNITS: METRIC (L/100 km)
If U.S. (ENGLISH) is chosen, all information will be
displayed in English units. For example, distance will be
displayed in miles (mi) and fuel economy in miles per
gallon (MPG). If METRIC (km/L) is chosen, all
information will be displayed in metric units. For
example, distance will be displayed in kilometers (km)
and fuel economy in kilometers per liter (km/L). If
METRIC (L/100 km) is chosen, all information will be
displayed in metric units. For example, distance will be
displayed in kilometers (km) and fuel economy in
liters per 100 kilometers (L/100 km).
Choose one of the available options and press the
customization button while it is displayed on the DIC to
select it and exit out of the customizable options.
Audio System(s)
Determine which radio your vehicle has and then read the
pages following to familiarize yourself with its features.
Driving without distraction is a necessity for a safer
driving experience. SeeDefensive Driving on page 4-2.
By taking a few moments to read this manual and
get familiar with your vehicle’s audio system, you can
use it with less effort, as well as take advantage of
its features. While your vehicle is parked, set up your
audio system by presetting your favorite radio stations,
setting the tone, and adjusting the speakers. Then,
when driving conditions permit, you can tune to
your favorite stations using the presets and steering
wheel controls if the vehicle has them.
{CAUTION:
This system provides you with a far greater
access to audio stations and song listings.
Giving extended attention to entertainment
tasks while driving can cause a crash and you
or others can be injured or killed. Always keep
your eyes on the road and your mind on the
drive — avoid engaging in extended searching
while driving.
3-66
Page 212 of 524
Setting the Time
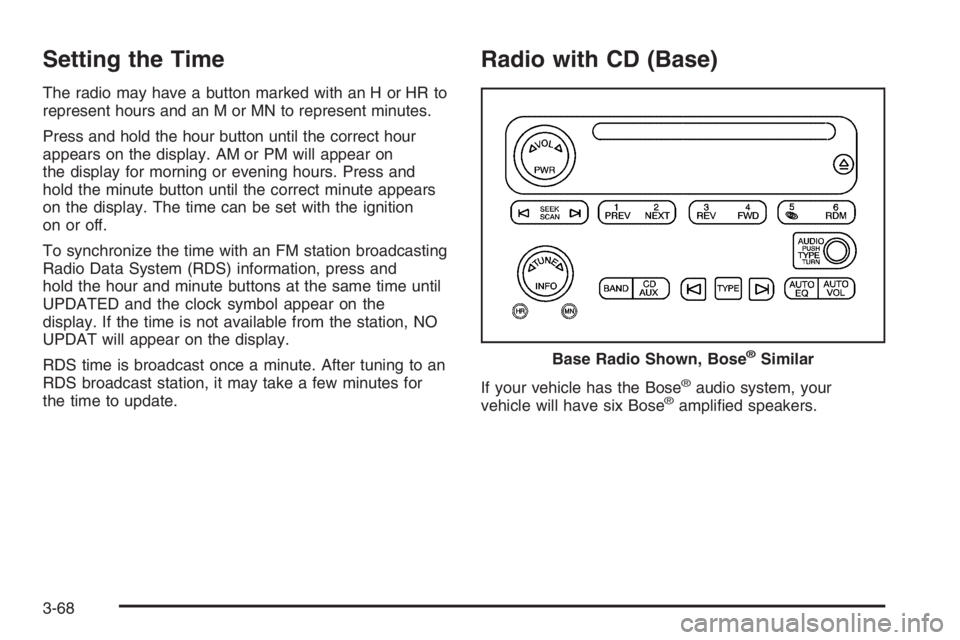
The radio may have a button marked with an H or HR to
represent hours and an M or MN to represent minutes.
Press and hold the hour button until the correct hour
appears on the display. AM or PM will appear on
the display for morning or evening hours. Press and
hold the minute button until the correct minute appears
on the display. The time can be set with the ignition
on or off.
To synchronize the time with an FM station broadcasting
Radio Data System (RDS) information, press and
hold the hour and minute buttons at the same time until
UPDATED and the clock symbol appear on the
display. If the time is not available from the station, NO
UPDAT will appear on the display.
RDS time is broadcast once a minute. After tuning to an
RDS broadcast station, it may take a few minutes for
the time to update.
Radio with CD (Base)
If your vehicle has the Bose®audio system, your
vehicle will have six Bose®ampli�ed speakers. Base Radio Shown, Bose
®Similar
3-68