rear window GMC ENVOY XUV 2004 User Guide
[x] Cancel search | Manufacturer: GMC, Model Year: 2004, Model line: ENVOY XUV, Model: GMC ENVOY XUV 2004Pages: 460, PDF Size: 2.99 MB
Page 119 of 460
Storage Areas
Glove Box
To open your glove box, pull the handle on the front of
the glove box and lower the door.
Overhead Console
The overhead console includes sunglasses storage and
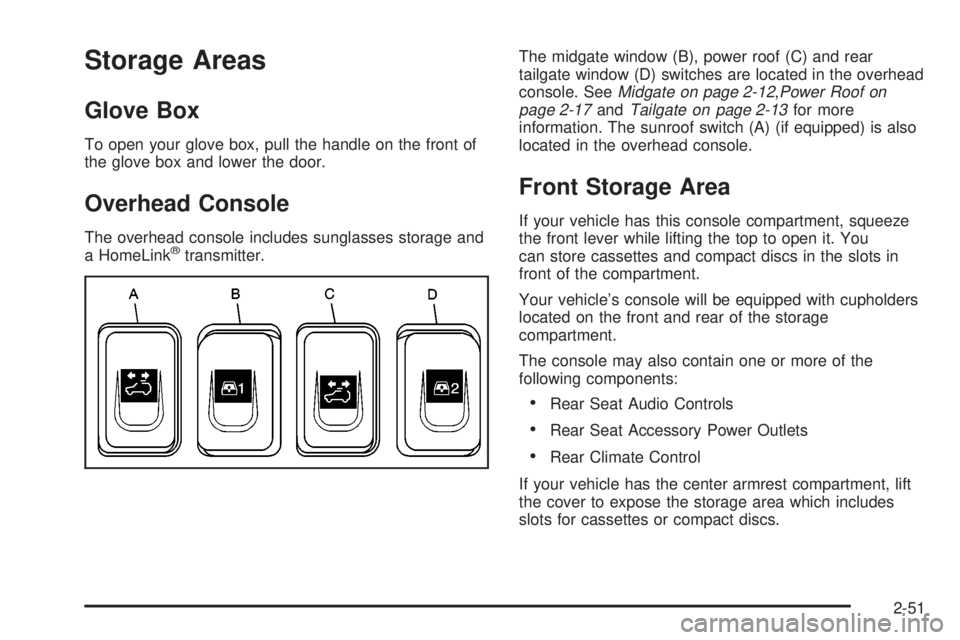
a HomeLinkžtransmitter.The midgate window (B), power roof (C) and rear
tailgate window (D) switches are located in the overhead
console. See
Midgate on page 2-12,Power Roof on
page 2-17andTailgate on page 2-13for more
information. The sunroof switch (A) (if equipped) is also
located in the overhead console.
Front Storage Area
If your vehicle has this console compartment, squeeze
the front lever while lifting the top to open it. You
can store cassettes and compact discs in the slots in
front of the compartment.
Your vehicle's console will be equipped with cupholders
located on the front and rear of the storage
compartment.
The console may also contain one or more of the
following components:
·Rear Seat Audio Controls
·Rear Seat Accessory Power Outlets
·Rear Climate Control
If your vehicle has the center armrest compartment, lift
the cover to expose the storage area which includes
slots for cassettes or compact discs.
2-51
Page 121 of 460

Rear Cargo Mat
If the cargo area is extremely dirty, you can lift up the
cargo ¯oor mat or take the whole mat out and ¯ush the
drains with water.
To lift or remove the rear cargo mat, do the following:
1. Remove the two push pins found in the top surface
of the cargo mat.
2. Push the cargo mat forward as far as it will go.
3. With either a ®nger tip or ¯at tool, lift up on the tab
along the rear of the cargo mat to lift the mat out of
the vehicle.
4. Pull on the cargo mat to remove it from the vehicle.
Install the rear cargo mat by reversing this process.
Cargo Tie Downs
There are four moveable
cargo tie downs that can
be moved up to 12
different locations in the
rear of your vehicle.
They are located on the sides of the vehicle between
the window and the ¯oor.
The tie-downs may be moved from their original
positions by using a 10 mm socket wrench. These allow
you to restrain cargo from sliding around during
normal driving. The other cargo tie-down positions that
are not being used are covered by plastic plugs.
Unscrew these plugs by hand and then reinstall them
into the vacant holes.
There are also four cargo tie-downs located outside the
vehicle in the top of the metal rails that carry the
moveable roof. These allow you to carry tall objects in
the cargo area.
2-53
Page 129 of 460
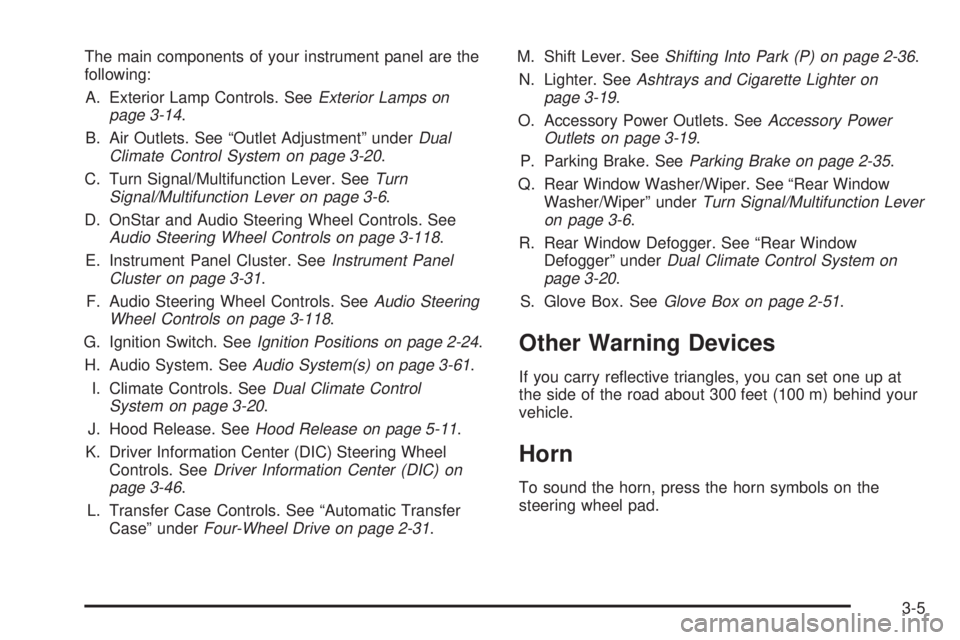
The main components of your instrument panel are the
following:
A. Exterior Lamp Controls. See
Exterior Lamps on
page 3-14.
B. Air Outlets. See ªOutlet Adjustmentº under
Dual
Climate Control System on page 3-20.
C. Turn Signal/Multifunction Lever. See
Turn
Signal/Multifunction Lever on page 3-6.
D. OnStar and Audio Steering Wheel Controls. See
Audio Steering Wheel Controls on page 3-118.
E. Instrument Panel Cluster. See
Instrument Panel
Cluster on page 3-31.
F. Audio Steering Wheel Controls. See
Audio Steering
Wheel Controls on page 3-118.
G. Ignition Switch. See
Ignition Positions on page 2-24.
H. Audio System. See
Audio System(s) on page 3-61.
I. Climate Controls. See
Dual Climate Control
System on page 3-20.
J. Hood Release. See
Hood Release on page 5-11.
K. Driver Information Center (DIC) Steering Wheel
Controls. See
Driver Information Center (DIC) on
page 3-46.
L. Transfer Case Controls. See ªAutomatic Transfer
Caseº under
Four-Wheel Drive on page 2-31.M. Shift Lever. See
Shifting Into Park (P) on page 2-36.
N. Lighter. See
Ashtrays and Cigarette Lighter on
page 3-19.
O. Accessory Power Outlets. See
Accessory Power
Outlets on page 3-19.
P. Parking Brake. See
Parking Brake on page 2-35.
Q. Rear Window Washer/Wiper. See ªRear Window
Washer/Wiperº under
Turn Signal/Multifunction Lever
on page 3-6.
R. Rear Window Defogger. See ªRear Window
Defoggerº under
Dual Climate Control System on
page 3-20.
S. Glove Box. See
Glove Box on page 2-51.
Other Warning Devices
If you carry re¯ective triangles, you can set one up at
the side of the road about 300 feet (100 m) behind your
vehicle.
Horn
To sound the horn, press the horn symbols on the
steering wheel pad.
3-5
Page 133 of 460
RainsenseŸ Wipers
Your vehicle is equipped with RainsenseŸ windshield
wipers. When active, these wipers are able to detect
moisture on the windshield and automatically turn on the
wipers.
The moisture sensor is located next to the inside
rearview mirror and is mounted on the windshield.
To turn on the RainsenseŸ feature, the wipers must be
set to one of the ®ve delay settings on the multifunction
lever. Each of the ®ve settings adjusts the sensitivity
of the rainsensor. For more wipes, select the higher
settings; for fewer wipes, select the lower settings
located closer to off on the multifunction lever.
The rainsensor will automatically control the frequency
of the wipes from off to high speed according to the
weather conditions. The wipers can be left in a
rainsense mode even when it is not raining.
Notice:If you do not turn off the windshield wipers
when driving through an automatic car wash, you
could damage the wipers. Always turn off the
windshield wipers before entering an automatic
car wash.
Windshield Washer
L
(Windshield Washer):To spray washer ¯uid on
the windshield, press the windshield washer paddle.
The wipers will clear the window and then either stop or
return to your preset speed.
{CAUTION:
In freezing weather, do not use your washer
until the windshield is warmed. Otherwise the
washer ¯uid can form ice on the windshield,
blocking your vision.
3-9
Page 134 of 460
Rear Window Washer/Wiper
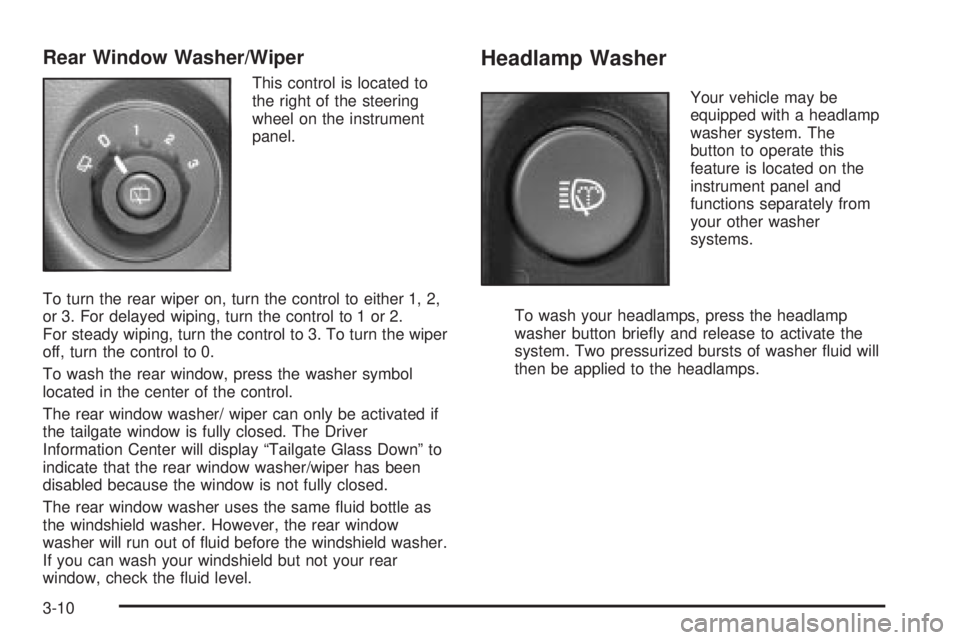
This control is located to
the right of the steering
wheel on the instrument
panel.
To turn the rear wiper on, turn the control to either 1, 2,
or 3. For delayed wiping, turn the control to 1 or 2.
For steady wiping, turn the control to 3. To turn the wiper
off, turn the control to 0.
To wash the rear window, press the washer symbol
located in the center of the control.
The rear window washer/ wiper can only be activated if
the tailgate window is fully closed. The Driver
Information Center will display ªTailgate Glass Downº to
indicate that the rear window washer/wiper has been
disabled because the window is not fully closed.
The rear window washer uses the same ¯uid bottle as
the windshield washer. However, the rear window
washer will run out of ¯uid before the windshield washer.
If you can wash your windshield but not your rear
window, check the ¯uid level.
Headlamp Washer
Your vehicle may be
equipped with a headlamp
washer system. The
button to operate this
feature is located on the
instrument panel and
functions separately from
your other washer
systems.
To wash your headlamps, press the headlamp
washer button brie¯y and release to activate the
system. Two pressurized bursts of washer ¯uid will
then be applied to the headlamps.
3-10
Page 145 of 460
Temperature Control
Driver's Side:The lever on the left side of the climate
control panel is used to raise or lower the temperature
on the driver's side of the vehicle. Slide the lever
up or down to adjust the temperature.
Passenger's Side:The lever on the right side of the
climate control panel is used to raise or lower the
temperature on the passenger's side of the vehicle.
Slide the lever up or down to adjust the temperature.
This lever also adjusts the temperature to the rear seat
outlets.
When the temperature outside is 0ÉF (-18ÉC) or lower,
use the engine coolant heater, if equipped, to provide
warmer air, faster to your vehicle.
#(Air Conditioning):Press this button to turn the
air-conditioning system on or off. When the button
is pressed, an indicator light will come on and the
system will begin to cool and dehumidify the air inside
of your vehicle. You may notice a slight change in
engine performance when the air conditioning
compressor shuts off and turns on again. This is
normal.
Defogging and Defrosting
Fog on the inside of windows is a result of high humidity
(moisture) condensing on the cool window glass. This
can be minimized if the climate control system is
used properly. There are two modes to choose from to
clear fog or frost from your windshield. Use the
defog mode to clear the windows of fog or moisture and
warm the passengers. Use the defrost mode to
remove fog or frost from the windshield more quickly.
Turn the right knob clockwise or counterclockwise
to select one of the following modes:
-(Defog):This mode directs the air to the ¯oor
outlets, windshield and side window outlets. The
recirculation button cannot be selected while in
defog mode.
1(Defrost):This mode directs most of the air to the
windshield and the side window outlets, with only a
little air directed to the ¯oor outlets. The air conditioning
compressor may run to dehumidify the air to prevent
window fogging. The recirculation button cannot
be selected while in defrost mode. Do not drive the
vehicle until all the windows are clear.
3-21
Page 146 of 460
Rear Window Defogger
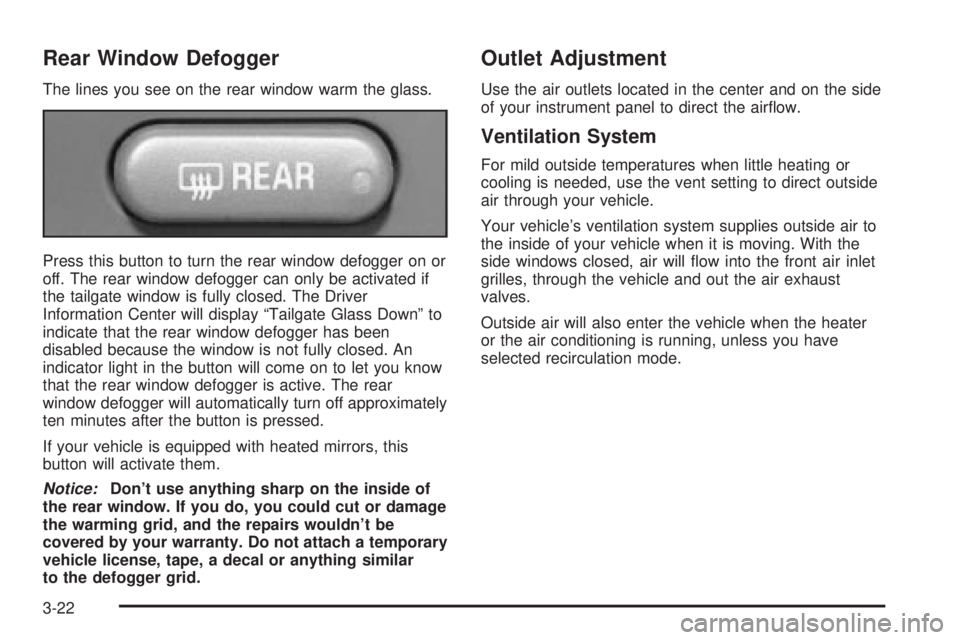
The lines you see on the rear window warm the glass.
Press this button to turn the rear window defogger on or
off. The rear window defogger can only be activated if
the tailgate window is fully closed. The Driver
Information Center will display ªTailgate Glass Downº to
indicate that the rear window defogger has been
disabled because the window is not fully closed. An
indicator light in the button will come on to let you know
that the rear window defogger is active. The rear
window defogger will automatically turn off approximately
ten minutes after the button is pressed.
If your vehicle is equipped with heated mirrors, this
button will activate them.
Notice:Don't use anything sharp on the inside of
the rear window. If you do, you could cut or damage
the warming grid, and the repairs wouldn't be
covered by your warranty. Do not attach a temporary
vehicle license, tape, a decal or anything similar
to the defogger grid.
Outlet Adjustment
Use the air outlets located in the center and on the side
of your instrument panel to direct the air¯ow.
Ventilation System
For mild outside temperatures when little heating or
cooling is needed, use the vent setting to direct outside
air through your vehicle.
Your vehicle's ventilation system supplies outside air to
the inside of your vehicle when it is moving. With the
side windows closed, air will ¯ow into the front air inlet
grilles, through the vehicle and out the air exhaust
valves.
Outside air will also enter the vehicle when the heater
or the air conditioning is running, unless you have
selected recirculation mode.
3-22
Page 150 of 460

You may notice a slight change in engine performance
when the air-conditioning compressor shuts off and
turns on again. This is normal.
A/C OFF (Air Conditioning Off):When you turn the
air conditioning off, the words ªA/C OFFº will appear on
the display. When the air conditioning is selected or
in AUTO mode, the system will run the air conditioning
automatically.
Defogging and Defrosting
Fog on the inside of windows is a result of high humidity
(moisture) condensing on the cool window glass. This
can be minimized if the climate control system is
used properly. You can use either defog or front defrost
to clear fog or frost from your windshield.
-(Defog):Use this setting to clear the windows of fog
or moisture. This setting will deliver air to the ¯oor
and windshield outlets.
0(Front Defrost):Press the front defrost button to
clear the windshield and side windows of frost or
fog quickly. The system will automatically control the fan
speed if you select defrost from AUTO mode. If the
outside temperature is 40ÉF (4ÉC) or warmer, your air
conditioning compressor will automatically run to
help dehumidify the air and dry the windshield. Do not
drive the vehicle until all the windows are clear.
Rear Window Defogger
The rear window defogger uses a warming grid to
remove fog from the rear window.
<(Rear):Press this button to turn the rear window
defogger on or off. The rear window defogger can
only be activated if the tailgate window is fully closed.
The Driver Information Center will display ªTailgate
Glass Downº to indicate that the rear window defogger
has been disabled because the window is not fully
closed.
An indicator light in the button will come on to let you
know that the rear window defogger is activated.
The rear window defogger will turn off approximately
10 minutes after the button is pressed. If you need
additional warming time, press the button again.
Notice:Using a razor blade or sharp object to clear
the inside rear window may damage the rear
window defogger. Repairs would not be covered by
your warranty. Do not clear the inside of the rear
window with sharp objects.
3-26
Page 184 of 460
REAR WIPER OBSTRUCTION
Check the rear wiper. An object is preventing it from
moving to the off position. Tailgate glass operations
cannot be performed if the rear wiper is not in the off
position.
CLOSE THE TAILGATE
The tailgate must be closed to operate the
tailgate glass.
TAILGATE GLASS DOWN
The rear wiper/defog request cannot be performed
because the tailgate glass is down.
TAILGATE OPEN
The tailgate is in drop mode. Operate the vehicle with
caution.
TAILGATE AJAR
The tailgate is ajar and should be closed before moving
the vehicle.
SEE MANUAL ±TAILGATE
Window position needs to be reset. Activate the tailgate
window up switch and continue to hold it for two
seconds after the window is fully closed. Then activate
the tailgate window down switch and continue to
hold it for two seconds after the window is fully open.
If this process does not restore tailgate function,
see your dealer for service.
TIGHTEN FUEL CAP
If the vehicle's fuel cap is not tightened properly, this
message may appear on the DIC and a chime will
sound. Fully reinstall the fuel cap. The diagnostic system
can determine if the fuel cap has been left off or
improperly installed. A loose or missing fuel cap will
allow fuel to evaporate into the atmosphere. The
DIC message will remain on until the message is
cancelled with the return button on the steering wheel.
The DIC message will also be cancelled if the ignition
is turned off.
The DIC message and the Service Engine Soon light
may come on again during a second trip if the fuel cap is
still not tightened properly. See
Malfunction Indicator
Lamp on page 3-38for more information.
3-60
Page 308 of 460
Driving with a Trailer
{CAUTION:
If you have a rear-most window open and you
pull a trailer with your vehicle, carbon
monoxide (CO) could come into your vehicle.
You can not see or smell CO. It can cause
unconsciousness or death. See
Engine
Exhaust on page 2-39
. To maximize your safety
when towing a trailer:
·Have your exhaust system inspected for
leaks, and make necessary repairs before
starting on your trip.
·Keep the rear-most windows closed.
·If exhaust does come into your vehicle
through a window in the rear or another
opening, drive with your front, main
heating or cooling system on and with the
fan on any speed. This will bring fresh,
outside air into your vehicle. Do not use
the climate control setting for maximum air
because it only recirculates the air inside
your vehicle. See
Dual Climate Control
System on page 3-20.Towing a trailer requires a certain amount of experience.
Before setting out for the open road, you'll want to get
to know your rig. Acquaint yourself with the feel of
handling and braking with the added weight of the trailer.
And always keep in mind that the vehicle you are
driving is now a good deal longer and not nearly as
responsive as your vehicle is by itself.
Before you start, check all trailer hitch parts and
attachments, safety chains, electrical connection, lamps,
tires and mirror adjustment. If the trailer has electric
brakes, start your vehicle and trailer moving and then
apply the trailer brake controller by hand to be sure
the brakes are working. This lets you check your
electrical connection at the same time.
During your trip, check occasionally to be sure that the
load is secure, and that the lamps and any trailer
brakes are still working.
4-62