clock GMC ENVOY XUV 2004 Owner's Guide
[x] Cancel search | Manufacturer: GMC, Model Year: 2004, Model line: ENVOY XUV, Model: GMC ENVOY XUV 2004Pages: 460, PDF Size: 2.99 MB
Page 388 of 460

9. Lower the jack by turning the wheel wrench
counterclockwise. Keep lowering the jack until the
spare tire slides off the jack or is hanging by
the cable.
10. Disconnect the jack handle from the jack and
carefully remove the jack. Use one hand to push
against the spare while ®rmly pulling the jack out
from under the spare tire with the other hand.If the spare tire is hanging from the cable, insert the
socket end of the extension connected to the wheel
wrench into the hoist shaft hole in the bumper on an
angle. Turn the wheel wrench counterclockwise to
lower the spare the rest of the way.
11. Tilt the retainer at the end of the cable and pull it
through the wheel opening. Pull the tire out from
under the vehicle.
12. If the cable is hanging under the vehicle, turn the
wheel wrench clockwise to raise the cable back
up.
Have the hoist assembly inspected as soon as you can.
You will not be able to store a spare or ¯at tire using
the hoist assembly until it has been repaired or replaced.
5-76
Page 389 of 460

Removing the Flat Tire and Installing
the Spare Tire
1. Using the wheel wrench, loosen all the wheel nuts.
Don't remove them yet.
2. Turn the jack adjusting knob clockwise by hand to
raise the jack lift head.3. Place the handle, extensions and wheel wrench
onto the jack.
A. Front Frame/
Rear Axle
B. JackC. Handle
D. Extensions
E. Wheel Wrench
FrontRear
5-77
Page 390 of 460

4. Place the jack in the appropriate position nearest
the ¯at tire.
{CAUTION:
Getting under a vehicle when it is jacked up is
dangerous. If the vehicle slips off the jack you
could be badly injured or killed. Never get
under a vehicle when it is supported only
by a jack.
{CAUTION:
Raising your vehicle with the jack improperly
positioned can damage the vehicle and even
make the vehicle fall. To help avoid personal
injury and vehicle damage, be sure to ®t the
jack lift head into the proper location before
raising the vehicle.5. Raise the vehicle by turning the jack handle
clockwise. Raise the vehicle far enough off the
ground so there is enough room for the spare tire
to ®t.
6. Remove all the wheel nuts and take off the ¯at tire.
5-78
Page 392 of 460

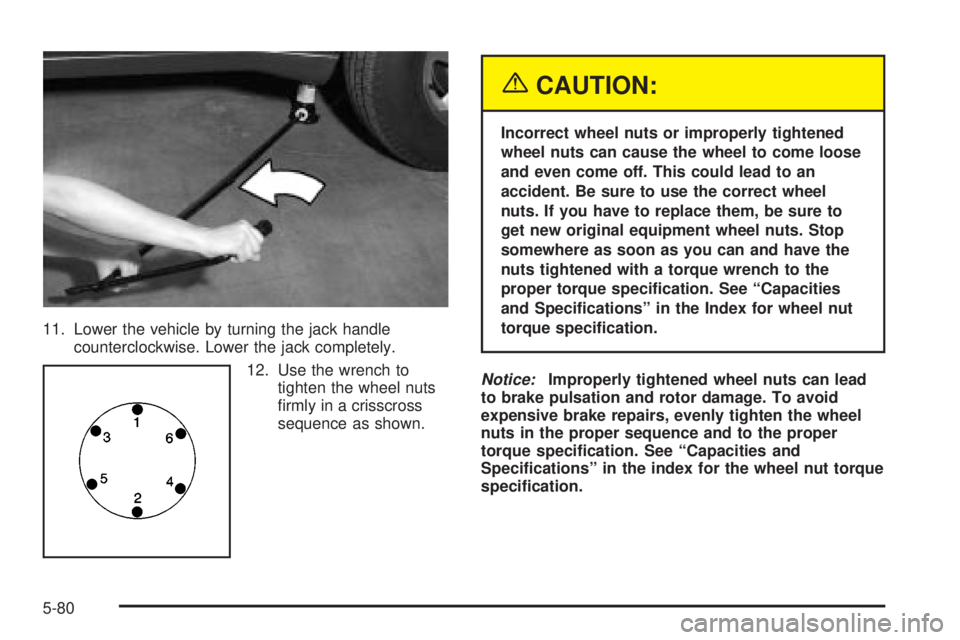
11. Lower the vehicle by turning the jack handle
counterclockwise. Lower the jack completely.
12. Use the wrench to
tighten the wheel nuts
®rmly in a crisscross
sequence as shown.
{CAUTION:
Incorrect wheel nuts or improperly tightened
wheel nuts can cause the wheel to come loose
and even come off. This could lead to an
accident. Be sure to use the correct wheel
nuts. If you have to replace them, be sure to
get new original equipment wheel nuts. Stop
somewhere as soon as you can and have the
nuts tightened with a torque wrench to the
proper torque speci®cation. See ªCapacities
and Speci®cationsº in the Index for wheel nut
torque speci®cation.
Notice:Improperly tightened wheel nuts can lead
to brake pulsation and rotor damage. To avoid
expensive brake repairs, evenly tighten the wheel
nuts in the proper sequence and to the proper
torque speci®cation. See ªCapacities and
Speci®cationsº in the index for the wheel nut torque
speci®cation.
5-80
Page 394 of 460

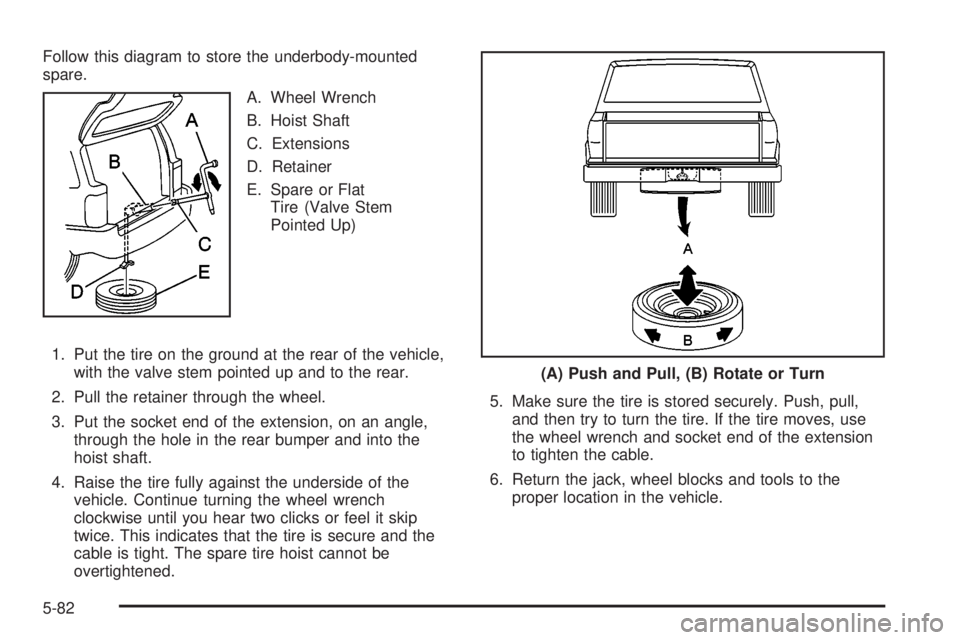
Follow this diagram to store the underbody-mounted
spare.
A. Wheel Wrench
B. Hoist Shaft
C. Extensions
D. Retainer
E. Spare or Flat
Tire (Valve Stem
Pointed Up)
1. Put the tire on the ground at the rear of the vehicle,
with the valve stem pointed up and to the rear.
2. Pull the retainer through the wheel.
3. Put the socket end of the extension, on an angle,
through the hole in the rear bumper and into the
hoist shaft.
4. Raise the tire fully against the underside of the
vehicle. Continue turning the wheel wrench
clockwise until you hear two clicks or feel it skip
twice. This indicates that the tire is secure and the
cable is tight. The spare tire hoist cannot be
overtightened.5. Make sure the tire is stored securely. Push, pull,
and then try to turn the tire. If the tire moves, use
the wheel wrench and socket end of the extension
to tighten the cable.
6. Return the jack, wheel blocks and tools to the
proper location in the vehicle.
(A) Push and Pull, (B) Rotate or Turn
5-82
Page 395 of 460

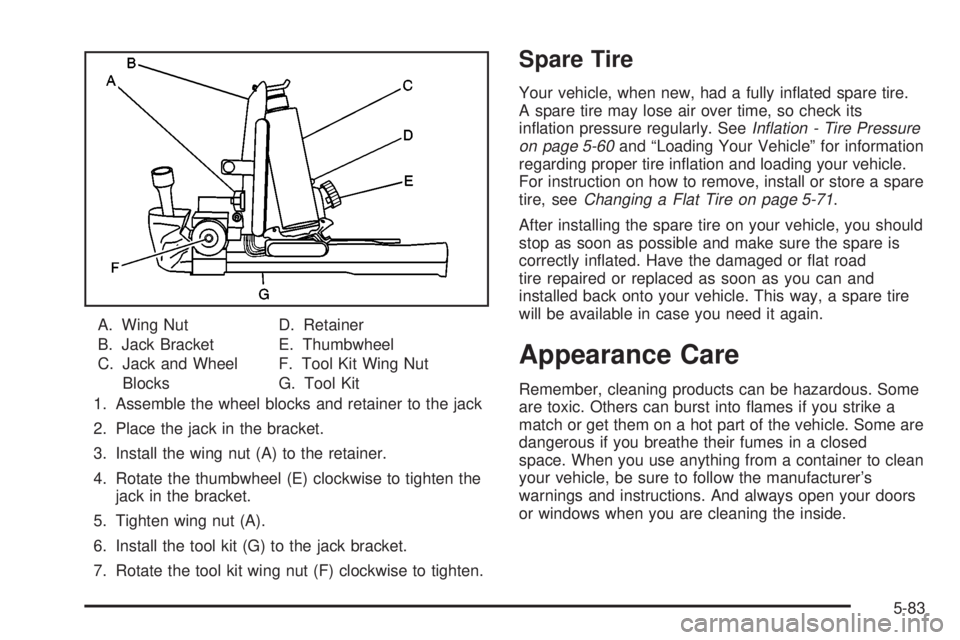
A. Wing Nut
B. Jack Bracket
C. Jack and Wheel
BlocksD. Retainer
E. Thumbwheel
F. Tool Kit Wing Nut
G. Tool Kit
1. Assemble the wheel blocks and retainer to the jack
2. Place the jack in the bracket.
3. Install the wing nut (A) to the retainer.
4. Rotate the thumbwheel (E) clockwise to tighten the
jack in the bracket.
5. Tighten wing nut (A).
6. Install the tool kit (G) to the jack bracket.
7. Rotate the tool kit wing nut (F) clockwise to tighten.
Spare Tire
Your vehicle, when new, had a fully in¯ated spare tire.
A spare tire may lose air over time, so check its
in¯ation pressure regularly. See
In¯ation - Tire Pressure
on page 5-60and ªLoading Your Vehicleº for information
regarding proper tire in¯ation and loading your vehicle.
For instruction on how to remove, install or store a spare
tire, see
Changing a Flat Tire on page 5-71.
After installing the spare tire on your vehicle, you should
stop as soon as possible and make sure the spare is
correctly in¯ated. Have the damaged or ¯at road
tire repaired or replaced as soon as you can and
installed back onto your vehicle. This way, a spare tire
will be available in case you need it again.
Appearance Care
Remember, cleaning products can be hazardous. Some
are toxic. Others can burst into ¯ames if you strike a
match or get them on a hot part of the vehicle. Some are
dangerous if you breathe their fumes in a closed
space. When you use anything from a container to clean
your vehicle, be sure to follow the manufacturer's
warnings and instructions. And always open your doors
or windows when you are cleaning the inside.
5-83