tire pressure GMC ENVOY XUV 2004 Owner's Manual
[x] Cancel search | Manufacturer: GMC, Model Year: 2004, Model line: ENVOY XUV, Model: GMC ENVOY XUV 2004Pages: 460, PDF Size: 2.99 MB
Page 253 of 460

Let us say the road is wet and you are driving safely.
Suddenly, an animal jumps out in front of you. You slam
on the brakes and continue braking. Here is what
happens with ABS:
A computer senses that wheels are slowing down.
If one of the wheels is about to stop rolling, the computer
will separately work the brakes at each front wheel
and at both rear wheels.The anti-lock system can change the brake pressure
faster than any driver could. The computer is
programmed to make the most of available tire and road
conditions. This can help you steer around the obstacle
while braking hard.
As you brake, your computer keeps receiving updates
on wheel speed and controls braking pressure
accordingly.
4-7
Page 277 of 460

Driving too fast through large water puddles or even
going through some car washes can cause problems,
too. The water may affect your brakes. Try to avoid
puddles. But if you can not, try to slow down before you
hit them.
{CAUTION:
Wet brakes can cause accidents. They will not
work as well in a quick stop and may cause
pulling to one side. You could lose control of
the vehicle.
After driving through a large puddle of water
or a car wash, apply your brake pedal lightly
until your brakes work normally.
Hydroplaning
Hydroplaning is dangerous. So much water can build up
under your tires that they can actually ride on the
water. This can happen if the road is wet enough and
you are going fast enough. When your vehicle is
hydroplaning, it has little or no contact with the road.
Hydroplaning does not happen often. But it can if your
tires do not have much tread or if the pressure in
one or more is low. It can happen if a lot of water is
standing on the road. If you can see re¯ections
from trees, telephone poles or other vehicles, and
raindrops ªdimpleº the water's surface, there could be
hydroplaning.
Hydroplaning usually happens at higher speeds. There
just is not a hard and fast rule about hydroplaning.
The best advice is to slow down when it is raining.
4-31
Page 281 of 460
Once you are moving on the freeway, make certain you
allow a reasonable following distance. Expect to
move slightly slower at night.
When you want to leave the freeway, move to the
proper lane well in advance. If you miss your exit, do
not, under any circumstances, stop and back up. Drive
on to the next exit.
The exit ramp can be curved, sometimes quite sharply.
The exit speed is usually posted.
Reduce your speed according to your speedometer, not
to your sense of motion. After driving for any distance
at higher speeds, you may tend to think you are
going slower than you actually are.
Before Leaving on a Long Trip
Make sure you are ready. Try to be well rested. If you
must start when you are not fresh Ð such as after
a day's work Ð do not plan to make too many miles that
®rst part of the journey. Wear comfortable clothing
and shoes you can easily drive in.Is your vehicle ready for a long trip? If you keep it
serviced and maintained, it is ready to go. If it needs
service, have it done before starting out. Of course, you
will ®nd experienced and able service experts in GM
dealerships all across North America. They will be ready
and willing to help if you need it.
Here are some things you can check before a trip:
·Windshield Washer Fluid:Is the reservoir full? Are
all windows clean inside and outside?
·Wiper Blades:Are they in good shape?
·Fuel, Engine Oil, Other Fluids:Have you checked
all levels?
·Lamps:Are they all working? Are the lenses clean?
·Tires:They are vitally important to a safe,
trouble-free trip. Is the tread good enough for
long-distance driving? Are the tires all in¯ated to the
recommended pressure?
·Weather Forecasts:What is the weather outlook
along your route? Should you delay your trip a
short time to avoid a major storm system?
·Maps:Do you have up-to-date maps?
4-35
Page 296 of 460
The Tire and Loading Information label also tells you
the size and recommended in¯ation pressure for
the original equipment tires on your vehicle. For more
information on tires and in¯ation see
Tires on page 5-52andIn¯ation - Tire Pressure on page 5-60.
If your vehicle does not have the Tire and Loading
Information label, the Certi®cation/Tire label shows the
tire size and recommended in¯ation pressures
needed to obtain the Gross Vehicle Weight Rating
(GVWR) and the Gross Axle Weight Rating (GAWR) for
the front and rear axles. See ªCerti®cation/Tire Labelº
later in this section.
Steps for Determining Correct Load Limit
1. Locate the statement ªThe combined weight of
occupants and cargo should never exceed XXX
poundsº on your vehicle placard.
2. Determine the combined weight of the driver and
passengers that will be riding in your vehicle.
3. Subtract the combined weight of the driver and
passengers from XXX kilograms or XXX pounds.4. The resulting ®gure equals the available amount of
cargo and luggage load capacity. For example, if the
ªXXXº amount equals 1400 lbs. and there will be ®ve
150 lb. passengers in your vehicle, the amount of
available cargo and luggage load capacity is 650 lbs.
(1400-750 (5 x 150) = 650 lbs.).
5. Determine the combined weight of luggage and
cargo being loaded on the vehicle. That weight
may not safely exceed the available cargo
and luggage load capacity calculated in Step 4.
6. If your vehicle will be towing a trailer, the load from
your trailer will be transferred to your vehicle.
Consult this manual to determine how this reduces
the available cargo and luggage load capacity of
your vehicle.
See
Towing a Trailer on page 4-56for important
information on towing a trailer, towing safety rules and
trailering tips.
4-50
Page 299 of 460
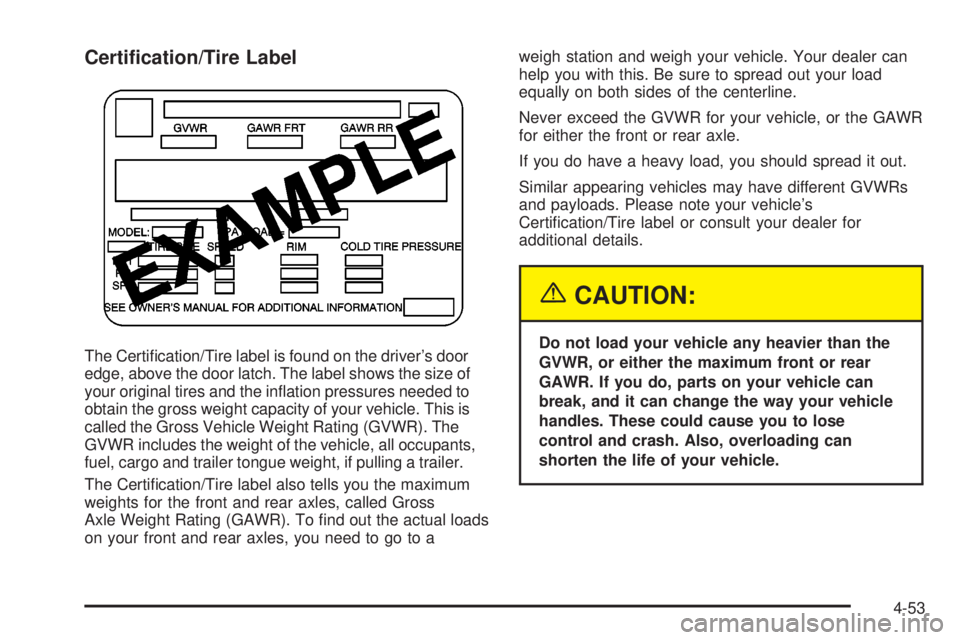
Certi®cation/Tire Label
The Certi®cation/Tire label is found on the driver's door
edge, above the door latch. The label shows the size of
your original tires and the in¯ation pressures needed to
obtain the gross weight capacity of your vehicle. This is
called the Gross Vehicle Weight Rating (GVWR). The
GVWR includes the weight of the vehicle, all occupants,
fuel, cargo and trailer tongue weight, if pulling a trailer.
The Certi®cation/Tire label also tells you the maximum
weights for the front and rear axles, called Gross
Axle Weight Rating (GAWR). To ®nd out the actual loads
on your front and rear axles, you need to go to aweigh station and weigh your vehicle. Your dealer can
help you with this. Be sure to spread out your load
equally on both sides of the centerline.
Never exceed the GVWR for your vehicle, or the GAWR
for either the front or rear axle.
If you do have a heavy load, you should spread it out.
Similar appearing vehicles may have different GVWRs
and payloads. Please note your vehicle's
Certi®cation/Tire label or consult your dealer for
additional details.
{CAUTION:
Do not load your vehicle any heavier than the
GVWR, or either the maximum front or rear
GAWR. If you do, parts on your vehicle can
break, and it can change the way your vehicle
handles. These could cause you to lose
control and crash. Also, overloading can
shorten the life of your vehicle.
4-53
Page 313 of 460
Service............................................................5-3
Doing Your Own Service Work.........................5-3
Adding Equipment to the Outside
of Your Vehicle...........................................5-4
Fuel................................................................5-4
Gasoline Octane............................................5-4
Gasoline Speci®cations....................................5-5
California Fuel...............................................5-5
Additives.......................................................5-6
Fuels in Foreign Countries...............................5-6
Filling Your Tank............................................5-7
Filling a Portable Fuel Container.....................5-10
Checking Things Under the Hood....................5-10
Hood Release..............................................5-11
Engine Compartment Overview.......................5-12
Engine Oil...................................................5-15
Engine Air Cleaner/Filter................................5-20
Automatic Transmission Fluid.........................5-21
Engine Coolant.............................................5-23
Radiator Pressure Cap..................................5-26
Engine Overheating.......................................5-26
Cooling System............................................5-28
Engine Fan Noise.........................................5-34
Power Steering Fluid.....................................5-35
Windshield Washer Fluid................................5-36Brakes........................................................5-37
Battery........................................................5-40
Jump Starting...............................................5-41
Rear Axle.......................................................5-46
Four-Wheel Drive............................................5-46
Front Axle......................................................5-47
Bulb Replacement..........................................5-48
Headlamps..................................................5-48
Taillamps and Turn Signal Lamps...................5-49
Replacement Bulbs.......................................5-50
Windshield Wiper Blade Replacement..............5-50
Tires..............................................................5-52
In¯ation - Tire Pressure.................................5-60
Tire Inspection and Rotation...........................5-61
When It Is Time for New Tires.......................5-63
Buying New Tires.........................................5-64
Uniform Tire Quality Grading..........................5-65
Wheel Alignment and Tire Balance..................5-66
Wheel Replacement......................................5-66
Tire Chains..................................................5-68
Accessory In¯ator.........................................5-68
If a Tire Goes Flat........................................5-70
Changing a Flat Tire.....................................5-71
Spare Tire...................................................5-83
Section 5 Service and Appearance Care
5-1
Page 364 of 460

Backglass Wiper Blade Replacement
SeeWindshield Wiper Blade Replacement on page 5-50for instructions on how to change the backglass wiper
blade. The backglass wiper blade will not lock in a
vertical position like the windshield wiper blade, so care
should be used when pulling it away from the vehicle.
Tires
Your new vehicle comes with high-quality tires made by
a leading tire manufacturer. If you ever have questions
about your tire warranty and where to obtain service,
see your GM Warranty booklet for details. For additional
information refer to the tire manufacturer's booklet
included with your vehicle's Owner's Manual.
{CAUTION:
Poorly maintained and improperly used tires
are dangerous.
·Overloading your tires can cause
overheating as a result of too much
CAUTION: (Continued)
CAUTION: (Continued)
friction. You could have an air-out and a
serious accident. See ªLoading Your
Vehicleº in the Index.
·Underin¯ated tires pose the same danger
as overloaded tires. The resulting accident
could cause serious injury. Check all tires
frequently to maintain the recommended
pressure. Tire pressure should be checked
when your tires are cold.
·Overin¯ated tires are more likely to be
cut, punctured or broken by a sudden
impact Ð such as when you hit a pothole.
Keep tires at the recommended pressure.
·Worn, old tires can cause accidents. If
your tread is badly worn, or if your tires
have been damaged, replace them.
Tire Sidewall Labeling
Useful information about a tire is molded into the
sidewall. The following illustrations are examples of a
typical P-Metric and a LT-Metric tire sidewall.
5-52
Page 366 of 460

(E) Tire Ply Material:The type of cord and number of
plies in the sidewall and under the tread.
(F) Uniform Tire Quality Grading (UTQG):Tire
manufacturers are required to grade tires based on three
performance factors: treadwear, traction and
temperature resistance. For more information, see
Uniform Tire Quality Grading on page 5-65.
(G) Maximum Cold In¯ation Load Limit:Maximum
load that can be carried and the maximum pressure
needed to support that load. For information on
recommended tire pressure see
In¯ation - Tire Pressure
on page 5-60andLoading Your Vehicle on page 4-49.
LT-Metric Tire
5-54
Page 367 of 460
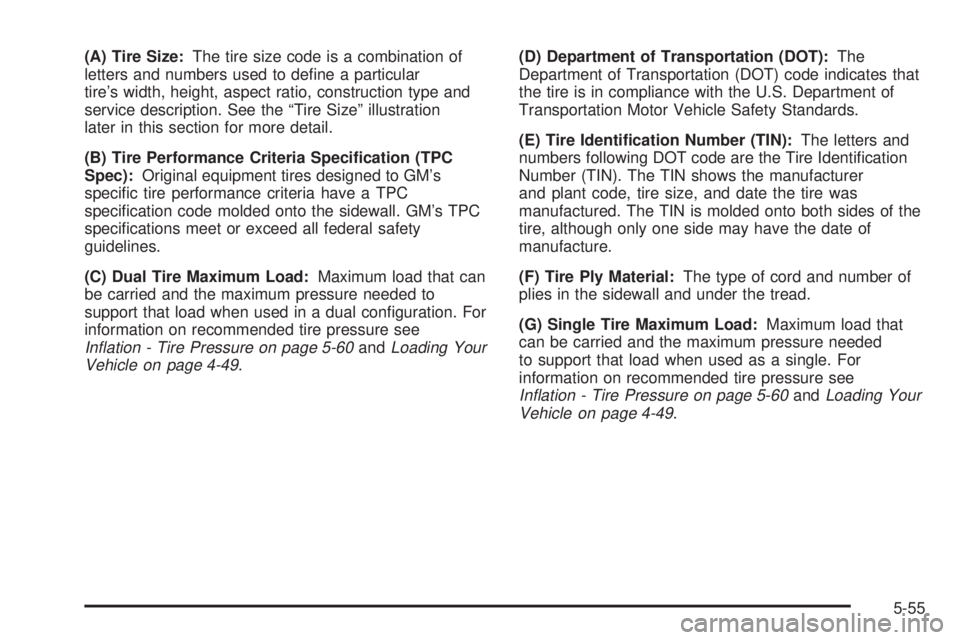
(A) Tire Size:The tire size code is a combination of
letters and numbers used to de®ne a particular
tire's width, height, aspect ratio, construction type and
service description. See the ªTire Sizeº illustration
later in this section for more detail.
(B) Tire Performance Criteria Speci®cation (TPC
Spec):Original equipment tires designed to GM's
speci®c tire performance criteria have a TPC
speci®cation code molded onto the sidewall. GM's TPC
speci®cations meet or exceed all federal safety
guidelines.
(C) Dual Tire Maximum Load:Maximum load that can
be carried and the maximum pressure needed to
support that load when used in a dual con®guration. For
information on recommended tire pressure see
In¯ation - Tire Pressure on page 5-60andLoading Your
Vehicle on page 4-49.(D) Department of Transportation (DOT):The
Department of Transportation (DOT) code indicates that
the tire is in compliance with the U.S. Department of
Transportation Motor Vehicle Safety Standards.
(E) Tire Identi®cation Number (TIN):The letters and
numbers following DOT code are the Tire Identi®cation
Number (TIN). The TIN shows the manufacturer
and plant code, tire size, and date the tire was
manufactured. The TIN is molded onto both sides of the
tire, although only one side may have the date of
manufacture.
(F) Tire Ply Material:The type of cord and number of
plies in the sidewall and under the tread.
(G) Single Tire Maximum Load:Maximum load that
can be carried and the maximum pressure needed
to support that load when used as a single. For
information on recommended tire pressure see
In¯ation - Tire Pressure on page 5-60andLoading Your
Vehicle on page 4-49.
5-55
Page 369 of 460
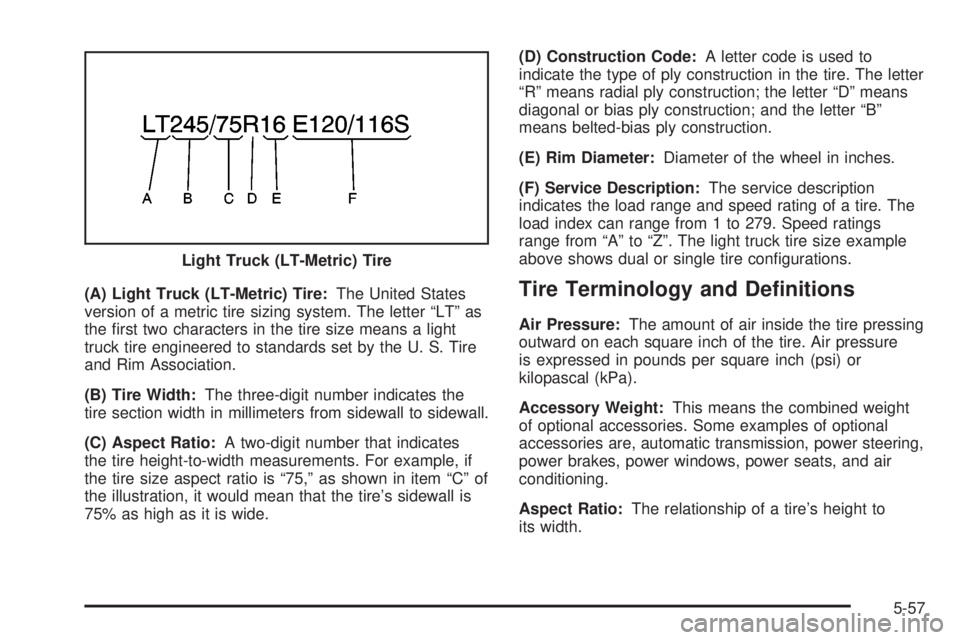
(A) Light Truck (LT-Metric) Tire:The United States
version of a metric tire sizing system. The letter ªLTº as
the ®rst two characters in the tire size means a light
truck tire engineered to standards set by the U. S. Tire
and Rim Association.
(B) Tire Width:The three-digit number indicates the
tire section width in millimeters from sidewall to sidewall.
(C) Aspect Ratio:A two-digit number that indicates
the tire height-to-width measurements. For example, if
the tire size aspect ratio is ª75,º as shown in item ªCº of
the illustration, it would mean that the tire's sidewall is
75% as high as it is wide.(D) Construction Code:A letter code is used to
indicate the type of ply construction in the tire. The letter
ªRº means radial ply construction; the letter ªDº means
diagonal or bias ply construction; and the letter ªBº
means belted-bias ply construction.
(E) Rim Diameter:Diameter of the wheel in inches.
(F) Service Description:The service description
indicates the load range and speed rating of a tire. The
load index can range from 1 to 279. Speed ratings
range from ªAº to ªZº. The light truck tire size example
above shows dual or single tire con®gurations.Tire Terminology and De®nitions
Air Pressure:The amount of air inside the tire pressing
outward on each square inch of the tire. Air pressure
is expressed in pounds per square inch (psi) or
kilopascal (kPa).
Accessory Weight:This means the combined weight
of optional accessories. Some examples of optional
accessories are, automatic transmission, power steering,
power brakes, power windows, power seats, and air
conditioning.
Aspect Ratio:The relationship of a tire's height to
its width. Light Truck (LT-Metric) Tire
5-57