climate control GMC ENVOY XUV 2005 User Guide
[x] Cancel search | Manufacturer: GMC, Model Year: 2005, Model line: ENVOY XUV, Model: GMC ENVOY XUV 2005Pages: 474, PDF Size: 2.67 MB
Page 154 of 474

Defogging and Defrosting
Fog on the inside of windows is a result of high humidity
(moisture) condensing on the cool window glass.
This can be minimized if the climate control system is
used properly. There are two modes to choose from
to clear fog or frost from your windshield. Use the defog
mode to clear the windows of fog or moisture and
warm the passengers. Use the defrost mode to remove
fog or frost from the windshield more quickly.
Turn the right knob clockwise or counterclockwise to
select one of the following modes:
-(Defog):This mode directs the air to the �oor outlets,
windshield and side window outlets. The recirculation
button cannot be selected while in defog mode.
1(Defrost):This mode directs most of the air to the
windshield and the side window outlets, with only a
little air directed to the �oor outlets. The air conditioning
compressor may run to dehumidify the air to prevent
window fogging. The recirculation button cannot
be selected while in defrost mode. Do not drive the
vehicle until all the windows are clear.
Rear Window Defogger
The lines you see on the rear window warm the glass.
<(Rear):Press this button to turn the rear window
defogger on or off. The rear window defogger can
only be activated if the tailgate window is fully closed.
The Driver Information Center will display “Tailgate
Glass Down” to indicate that the rear window defogger
has been disabled because the window is not fully
closed. An indicator light in the button will come on to
let you know that the rear window defogger is active.
The rear window defogger will automatically turn
off approximately ten minutes after the button is pressed.
If your vehicle is equipped with heated mirrors, this
button will activate them.
Notice:Don’t use anything sharp on the inside of
the rear window. If you do, you could cut or damage
the warming grid, and the repairs wouldn’t be
covered by your warranty. Do not attach a temporary
vehicle license, tape, a decal or anything similar
to the defogger grid.
3-22
Page 155 of 474

Dual Automatic Climate Control
System
Your vehicle may have the dual automatic climate
control system. With this system you can control the
heating, cooling and ventilation for your vehicle.
When your vehicle is �rst started and the climate control
system is on, or if the climate control system has
been turned on, the display will show the driver’s
temperature setting for �ve seconds. Then it will show
the outside temperature.
Outside Air Temperature Display
A new outside temperature reading will be displayed if
the vehicle has been off for more than three hours. If the
vehicle has been off for less than three hours, the old
temperature reading may be displayed because
underhood heat is affecting the true outside temperature.
Since underhood heat can also affect the outside
temperature while the engine is running, it may take
several minutes of driving before the display updates to
the actual outside temperature.
9(Off):Press this button to turn off the entire climate
control system. Outside air will still enter the vehicle,
and will be directed to the �oor. Press the AUTO button,
the mode button, the fan arrows, or either temperature
knob to turn the system on.
C(Mode):Press this button to manually select the
air delivery mode to the �oor, instrument panel, or
windshield outlets. The system will stay in the selected
mode until the mode button is pressed again or the
AUTO button is pressed.
3-23
Page 158 of 474

#A/C (Air Conditioning):Press this button to
manually turn the air conditioning system on or off.
When the system is on, the system will automatically
begin to cool and dehumidify the air inside of your
vehicle. The air conditioning symbol will appear on the
display when the air conditioning is on and will turn
off when the air conditioning is off.
If you select turn the air conditioning off while in front
defrost or defog mode, the air conditioning symbol
will turn off, however, the A/C compressor will remain
on to help de-humidify the air inside the vehicle. If one of
the other modes is selected the compressor will then
turn the A/C off until it is selected again or the
AUTO button is pressed.
You may notice a slight change in engine performance
when the air conditioning compressor shuts off and
turns on again. This is normal.Defogging and Defrosting
Fog on the inside of windows is a result of high humidity
(moisture) condensing on the cool window glass.
This can be minimized if the climate control system is
used properly. You can use either defog or front defrost
to clear fog or frost from your windshield.
-(Defog):Use this setting to clear the windows of
fog or moisture. This setting will deliver air to the
�oor and windshield outlets.
0(Defrost):Press the front defrost button to clear
the windshield and side windows of frost or fog quickly.
The system will automatically control the fan speed if
you select defrost from AUTO mode. If the outside
temperature is 40°F (4°C) or warmer, your air
conditioning compressor will automatically run to help
dehumidify the air and dry the windshield. Do not
drive the vehicle until all the windows are clear.
3-26
Page 160 of 474

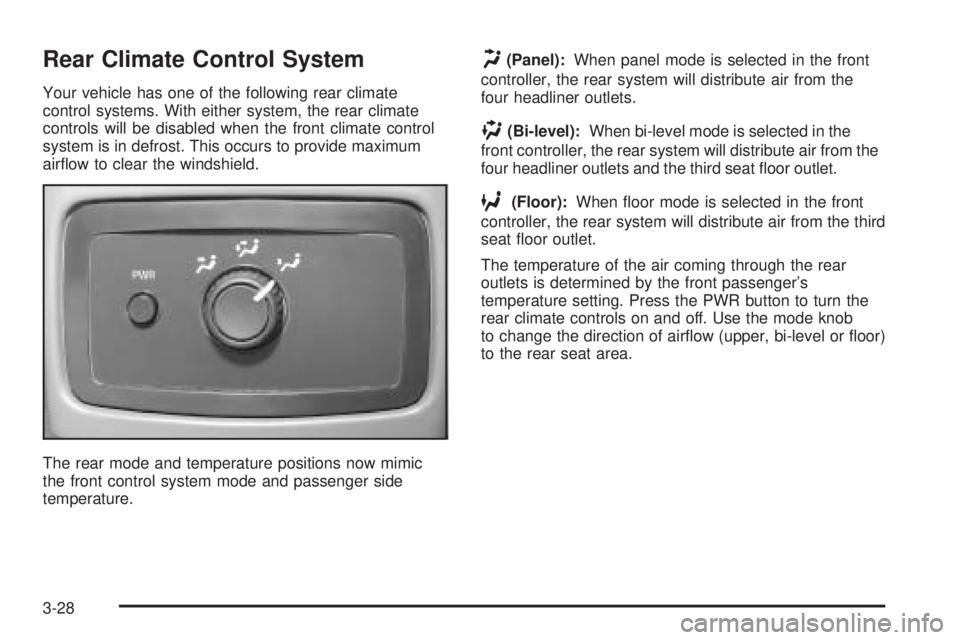
Rear Climate Control System
Your vehicle has one of the following rear climate
control systems. With either system, the rear climate
controls will be disabled when the front climate control
system is in defrost. This occurs to provide maximum
air�ow to clear the windshield.
The rear mode and temperature positions now mimic
the front control system mode and passenger side
temperature.
H(Panel):When panel mode is selected in the front
controller, the rear system will distribute air from the
four headliner outlets.
)(Bi-level):When bi-level mode is selected in the
front controller, the rear system will distribute air from the
four headliner outlets and the third seat �oor outlet.
6(Floor):When �oor mode is selected in the front
controller, the rear system will distribute air from the third
seat �oor outlet.
The temperature of the air coming through the rear
outlets is determined by the front passenger’s
temperature setting. Press the PWR button to turn the
rear climate controls on and off. Use the mode knob
to change the direction of air�ow (upper, bi-level or �oor)
to the rear seat area.
3-28
Page 161 of 474

If your vehicle has the rear seat audio system, the lower
buttons are used to adjust the rear seat climate
control system. The temperature of the air coming
through the rear outlets is determined by the front
passenger’s temperature setting.
z9y(Fan):Press this button to adjust the fan
speed.
z\y(Mode):Press this button to change the
direction of air�ow (panel, bi-level or �oor) to the rear
seat area.
P(On/Off):Press this button to turn the rear climate
controls on or off.
The rear control will only turn on if the front is on and
not in defrost mode.
Outlet Adjustment
Your vehicle may have rear seat outlets that can be
used to adjust the air�ow toward either seating
area, the �oor or upward. Move the control in the center
of each outlet in any direction to direct air�ow.
Climate Controls Personalization
If your vehicle is equipped with the Driver Information
Center (DIC), you can store and recall the climate
control settings for temperature, air delivery mode and
fan speed for two different drivers. The personal
choice settings recalled are determined by the
transmitter used to enter the vehicle. After the button
with the unlock symbol on a remote keyless entry
transmitter is pressed, the climate control will adjust to
the last settings of the identi�ed driver. The settings
can also be changed by pressing one of the memory
buttons (1 or 2) located on the driver’s door.
When adjustments are made, the new settings are
automatically saved for the driver.
3-29
Page 315 of 474

Driving with a Trailer
{CAUTION:
If you have a rear-most window open and you
pull a trailer with your vehicle, carbon monoxide
(CO) could come into your vehicle. You can not
see or smell CO. It can cause unconsciousness
or death. SeeEngine Exhaust on page 2-40.
To maximize your safety when towing a trailer:
Have your exhaust system inspected for
leaks, and make necessary repairs before
starting on your trip.
Keep the rear-most windows closed.
If exhaust does come into your vehicle
through a window in the rear or another
opening, drive with your front, main heating
or cooling system on and with the fan on
any speed. This will bring fresh, outside air
into your vehicle. Do not use the climate
control setting for maximum air because it
only recirculates the air inside your vehicle.
SeeDual Climate Control System on
page 3-20.Towing a trailer requires a certain amount of experience.
Before setting out for the open road, you’ll want to get
to know your rig. Acquaint yourself with the feel of
handling and braking with the added weight of the trailer.
And always keep in mind that the vehicle you are
driving is now a good deal longer and not nearly as
responsive as your vehicle is by itself.
Before you start, check all trailer hitch parts and
attachments, safety chains, electrical connection, lamps,
tires and mirror adjustment. If the trailer has electric
brakes, start your vehicle and trailer moving and then
apply the trailer brake controller by hand to be sure
the brakes are working. This lets you check your
electrical connection at the same time.
During your trip, check occasionally to be sure that the
load is secure, and that the lamps and any trailer
brakes are still working.
4-61
Page 386 of 474

Uniform Tire Quality Grading
Quality grades can be found where applicable on the
tire sidewall between tread shoulder and maximum
section width. For example:
Treadwear 200 Traction AA Temperature A
The following information relates to the system
developed by the United States National Highway
Traffic Safety Administration, which grades tires by
treadwear, traction and temperature performance.
(This applies only to vehicles sold in the United States.)
The grades are molded on the sidewalls of most
passenger car tires. The Uniform Tire Quality Grading
system does not apply to deep tread, winter-type
snow tires, space-saver or temporary use spare tires,
tires with nominal rim diameters of 10 to 12 inches
(25 to 30 cm), or to some limited-production tires.
While the tires available on General Motors passenger
cars and light trucks may vary with respect to these
grades, they must also conform to federal safety
requirements and additional General Motors Tire
Performance Criteria (TPC) standards.
Treadwear
The treadwear grade is a comparative rating based on
the wear rate of the tire when tested under controlled
conditions on a speci�ed government test course.
For example, a tire graded 150 would wear one and
a half (1.5) times as well on the government course as
a tire graded 100. The relative performance of tires
depends upon the actual conditions of their use,
however, and may depart signi�cantly from the norm
due to variations in driving habits, service practices and
differences in road characteristics and climate.
Traction – AA, A, B, C
The traction grades, from highest to lowest, are AA, A,
B, and C. Those grades represent the tire’s ability
to stop on wet pavement as measured under controlled
conditions on speci�ed government test surfaces of
asphalt and concrete. A tire marked C may have poor
traction performance. Warning: The traction grade
assigned to this tire is based on straight-ahead braking
traction tests, and does not include acceleration,
cornering, hydroplaning, or peak traction characteristics.
5-66
Page 463 of 474

Care of (cont.)
Your CD Player.........................................3-121
Your CDs .................................................3-121
Cargo Area, All-Weather..................................2-59
Center Console Storage Area...........................2-59
Chains, Tire...................................................5-69
Charging System Light....................................3-36
Check
Engine Light...............................................3-40
Gages Warning Light...................................3-46
Check Gas Cap Light......................................3-47
Checking Things Under the Hood......................5-10
Chemical Paint Spotting...................................5-93
Child Restraints
Child Restraint Systems...............................1-30
Infants and Young Children...........................1-27
Lower Anchorages and Top Tethers for
Children (LATCH System)..........................1-37
Older Children.............................................1-25
Securing a Child Restraint Designed for
the LATCH System...................................1-39
Securing a Child Restraint in a
Rear Outside Seat Position........................1-39
Securing a Child Restraint in the
Center Seat Position.................................1-41
Securing a Child Restraint in the
Right Front Seat Position..........................1-42Child Restraints (cont.)
Top Strap...................................................1-34
Top Strap Anchor Location............................1-35
Where to Put the Restraint...........................1-33
Chime Level Adjustment.................................3-122
Cigarette Lighter.............................................3-20
Cleaning
Aluminum Wheels........................................5-92
Exterior Lamps/Lenses.................................5-90
Fabric/Carpet..............................................5-86
Finish Care.................................................5-90
Glass Surfaces............................................5-89
Instrument Panel.........................................5-88
Interior Plastic Components...........................5-88
Leather......................................................5-88
Tires..........................................................5-92
Underbody Maintenance...............................5-93
Vinyl..........................................................5-88
Washing Your Vehicle...................................5-90
Weatherstrips..............................................5-89
Windshield, Backglass, and Wiper Blades.......5-91
Climate Control System
Climate Controls Personalization....................3-29
Dual..........................................................3-20
Dual Automatic............................................3-23
Outlet Adjustment........................................3-27
Rear..........................................................3-28
3
Page 465 of 474

Driving (cont.)
Hill and Mountain Roads..............................4-36
In Rain and on Wet Roads...........................4-31
Rocking Your Vehicle to Get it Out.................4-43
Winter........................................................4-38
Dual Automatic Climate Control System.............3-23
Dual Climate Control System............................3-20
E
Electrical System
Add-On Equipment......................................5-96
Engine Compartment Fuse Block...................5-97
Fuses and Circuit Breakers...........................5-97
Headlamps.................................................5-96
Power Windows and Other Power Options......5-96
Rear Underseat Fuse Block.........................5-106
Windshield Wiper Fuses...............................5-96
Engine
Air Cleaner/Filter.........................................5-21
Battery.......................................................5-41
Change Engine Oil Light...............................3-44
Check and Service Engine Soon Light............3-40
Coolant......................................................5-25
Coolant Heater............................................2-27
Coolant Temperature Gage...........................3-39Engine (cont.)
Engine Compartment Overview......................5-12
Exhaust.....................................................2-40
Fan Noise..................................................5-35
Oil .............................................................5-16
Overheating................................................5-28
Reduced Power Light...................................3-45
Starting......................................................2-26
Entry Lighting.................................................3-18
Event Data Recorders (EDR)............................. 7-9
Exit Lighting...................................................3-18
Extender, Safety Belt.......................................1-24
F
Filter
Engine Air Cleaner......................................5-21
Finish Damage...............................................5-93
Fixed Mast Antenna.......................................3-122
Flash-to-Pass................................................... 3-8
Flat Tire........................................................5-71
Flat Tire, Changing.........................................5-72
Flat Tire, Storing.............................................5-83
Fluid
Automatic Transmission................................5-22
Power Steering...........................................5-36
Windshield Washer......................................5-37
5
Page 470 of 474

P
Park (P)
Shifting Into................................................2-37
Shifting Out of............................................2-39
Parking
Brake........................................................2-36
Over Things That Burn.................................2-39
Passenger Airbag Status Indicator.....................3-35
Passenger Sensing System..............................1-56
Passing.........................................................4-13
Passlock
®......................................................2-24
Personalization, Climate Controls......................3-29
Power
Accessory Outlets........................................3-19
Door Locks.................................................. 2-9
Electrical System.........................................5-96
Lumbar Controls........................................... 1-3
Reduced Engine Light..................................3-45
Retained Accessory (RAP)............................2-25
Roof..........................................................2-18
Seat............................................................ 1-2
Steering Fluid.............................................5-36
Windows....................................................2-21
Pretensioners, Safety Belt................................1-24
Programmable Automatic Door Locks.................2-10
Programming the HomeLink
®Transmitter...........2-55
Q
Questions and Answers About Safety Belts.........1-11
R
Radiator Pressure Cap....................................5-28
Radios..........................................................3-63
Care of Your Cassette Tape Player...............3-120
Care of Your CD Player..............................3-121
Care of Your CDs......................................3-121
Navigation/Radio System.............................3-117
Radio with Cassette and CD.........................3-90
Radio with CD....................................3-64, 3-74
Radio with Six-Disc CD..............................3-103
Rear Seat Audio........................................3-117
Setting the Time..........................................3-63
Theft-Deterrent..........................................3-119
Understanding Reception............................3-120
Rainsense™ Wipers.......................................... 3-9
Reading Lamps..............................................3-18
Rear Axle......................................................5-47
Locking......................................................4-10
Rear Climate Control System............................3-28
Rear Door Security Locks................................2-12
Rear Safety Belt Comfort Guides......................1-22
Rear Seat Audio (RSA)..................................3-117
Rear Seat Operation......................................... 1-6
Rear Seat Passengers, Safety Belts..................1-19
10