turn signal GMC ENVOY XUV 2005 Owner's Manual
[x] Cancel search | Manufacturer: GMC, Model Year: 2005, Model line: ENVOY XUV, Model: GMC ENVOY XUV 2005Pages: 474, PDF Size: 2.67 MB
Page 77 of 474

Power Door Locks
The power door lock
switches are located on
the driver’s and front
passenger’s armrests.
Remove the ignition key and press the lock symbol to
lock all of the doors at once. To unlock the doors, press
the other side of the switch.
Delayed Locking
This feature delays the locking of the doors and the
tailgate when using the power lock or the remote keyless
entry system.
The �rst time you attempt to lock the doors with the
driver’s door open, three chimes will signal that delayed
locking is being used. This can be performed by usingeither the power lock switch or the remote keyless entry
transmitter. All doors and the liftgate can be reopened for
up to �ve seconds from the time the last door is closed.
Five seconds after the last door is closed, all the doors
will lock. You can lock the doors immediately by
using the power door lock switch or by pressing the lock
button on the optional remote keyless entry transmitter
a second time.
If the key is inserted in the ignition, this feature will not
lock the doors. The lockout prevention feature will
operate instead.
You can enable or disable the delayed locking feature.
If the feature is disabled, the doors will lock immediately
when a power door lock switch or remote keyless
entry transmitter lock button is pressed.
Programming Delayed Locking
To turn the delayed locking feature on or off, do the
following:
1. Press and hold the power door lock switch on the
driver’s door in the lock position.
2. Press the remote keyless entry transmitter unlock
button twice.
If the delayed locking feature was on, it will now be off.
If the feature was off, it will now be on.
2-9
Page 78 of 474

Programmable Automatic
Door Locks
Your vehicle is equipped with an automatic lock/unlock
feature which enables you to program your vehicle’s
power door locks. You can program this feature through
the Driver Information Center (DIC), or by the following
method. SeeDIC Vehicle Customization on page 3-57.
Programmable Locking Feature
Following are the two locking modes that can be
programmed:
Mode 1:All doors lock when the transmission is shifted
out of PARK (P).
Mode 2:All doors lock when the vehicle speed is
greater than 8 mph (13 km/h).
The automatic door locks were pre-programmed at the
factory to lock all the doors when the transmission
is shifted into gear. The following instructions detail how
to program your door locks differently than the factory
setting. Choose one of the two programming options
listed above before entering the program mode.To enter the program mode, do the following:
1. Begin with the ignition off. Then pull the turn
signal/multifunction lever toward you and hold
it there while you perform the next step.
2. Turn the key to RUN and LOCK twice. Then, with the
key in LOCK, release the turn signal/multifunction
lever. Once you do this, you will hear the lock switch
lock and unlock, the horn will chirp twice, and a
30 second program timer will begin.
3. You are now ready to program the automatic door
locks. Select one of the two programming options
listed above, and press the lock side of the power
door lock switch to cycle through the lock options.
You will have 30 seconds to begin programming.
If you exceed the 30 second limit, the locks will
automatically lock and unlock and the horn will chirp
twice to indicate that you have left the program
mode. If this occurs, repeat the procedure beginning
with Step 1 to re-enter the programming mode.
You can exit the program mode any time by turning the
ignition to RUN. The locks will automatically lock and
unlock and the horn will chirp twice to indicate that you
are leaving the program mode. If the lock/unlock switches
are not pressed while in the programming mode,
the current auto lock/unlock setting will not be modi�ed.
See your dealer for more information.
2-10
Page 79 of 474

Programmable Unlocking Feature
The following is the list of available programming options:
Mode 1:All doors unlock when the transmission is
shifted into PARK (P).
Mode 2:Driver’s door unlocks when the transmission is
shifted into PARK (P).
Mode 3:All doors unlock when the key is removed
from the ignition.
Mode 4:No automatic door unlock.
The automatic door locks were pre-programmed at the
factory to unlock all doors once the transmission is shifted
to PARK (P). The following instructions detail how to
program your door locks differently than the factory
setting. Choose one of the four programming options
listed above before entering the program mode.
To enter the program mode you need to do the
following:
1. Begin with the ignition off. Then pull the turn
signal/multifunction lever toward you and hold
it there while you perform the next step.2. Turn the key to RUN and LOCK twice. Then, with the
key in LOCK, release the turn signal/multifunction
lever. Once you do this, you will hear the lock switch
lock and unlock, the horn will chirp twice, and a
30 second program timer will begin.
3. You are now ready to program the automatic door
locks. Select one of the four programming options
listed above, and press the unlock side of the
power door lock switch to cycle through the
unlocking options. You will have 30 seconds to
begin programming. If you exceed the 30 second
limit, the locks will automatically lock and unlock and
the horn will chirp twice to indicate that you have
left the program mode. If this occurs, repeat the
procedure beginning with Step 1 to re-enter
the programming mode.
You can exit the program mode any time by turning the
ignition to RUN. The locks will automatically lock and
unlock and the horn will chirp twice to indicate that you
are leaving the program mode. If the lock/unlock switches
are not pressed while in the programming mode, the
current auto lock/unlock setting will not be modi�ed.
See your dealer for more information.
2-11
Page 124 of 474
3. Simultaneously press and hold both the desired
button on HomeLink®and the hand-held transmitter
button. Do not release the buttons until Step 4
has been completed.
Some entry gates and garage door openers may
require you to substitute Step 3 with the procedure
noted in “Gate Operator and Canadian
Programming” later in this section.
4. The indicator light will �ash slowly at �rst and then
rapidly after HomeLink
®successfully receives the
frequency signal from the hand-held transmitter.
Release both buttons.
5. Press and hold the newly-trained HomeLink
®button
and observe the indicator light.
If the indicator light stays on constantly, programming
is complete and your device should activate when the
HomeLink
®button is pressed and released.
To program the remaining two HomeLink®buttons,
begin with Step 2 under “Programming HomeLink®.”
Do not repeat Step 1 as this will erase all of the
programmed channels.
If the indicator light blinks rapidly for two seconds
and then turns to a constant light, continue with
Steps 6 through 8 following to complete the
programming of a rolling-code equipped device
(most commonly, a garage door opener).6. Locate in the garage, the garage door opener
receiver (motor-head unit). Locate the “Learn” or
“Smart” button. This can usually be found where
the hanging antenna wire is attached to the
motor-head unit.
7. Firmly press and release the “Learn” or “Smart”
button. The name and color of the button may
vary by manufacturer.
You will have 30 seconds to start Step 8.
8. Return to the vehicle. Firmly press and hold the
programmed HomeLink
®button for two seconds,
then release. Repeat the press/hold/release
sequence a second time, and depending on the
brand of the garage door opener (or other rolling
code device), repeat this sequence a third time
to complete the programming.
HomeLink
®should now activate your rolling-code
equipped device.
To program the remaining two HomeLink
®buttons,
begin with Step 2 of “Programming HomeLink®.”
You do not want to repeat Step 1, as this will erase all
previous programming.
2-56
Page 133 of 474
Instrument Panel Overview...............................3-4
Hazard Warning Flashers................................3-6
Other Warning Devices...................................3-6
Horn.............................................................3-6
Tilt Wheel.....................................................3-6
Turn Signal/Multifunction Lever.........................3-7
Turn and Lane-Change Signals........................3-7
Headlamp High/Low-Beam Changer..................3-8
Flash-to-Pass.................................................3-8
Windshield Wipers..........................................3-9
Rainsense™ Wipers.......................................3-9
Windshield Washer.......................................3-10
Headlamp Washer........................................3-11
Cruise Control..............................................3-12
Headlamps..................................................3-15
Daytime Running Lamps (DRL).......................3-16
Automatic Headlamp System..........................3-16
Fog Lamps..................................................3-17
Instrument Panel Brightness...........................3-17
Dome Lamps...............................................3-17
Dome Lamp Override....................................3-18
Entry Lighting...............................................3-18
Exit Lighting.................................................3-18
Reading Lamps............................................3-18
Battery Run-Down Protection..........................3-19
Accessory Power Outlets...............................3-19
Ashtrays and Cigarette Lighter........................3-20Climate Controls............................................3-20
Dual Climate Control System..........................3-20
Dual Automatic Climate Control System...........3-23
Outlet Adjustment.........................................3-27
Rear Climate Control System.........................3-28
Climate Controls Personalization.....................3-29
Warning Lights, Gages, and Indicators............3-30
Instrument Panel Cluster................................3-31
Speedometer and Odometer...........................3-32
Trip Odometer..............................................3-32
Tachometer.................................................3-32
Safety Belt Reminder Light.............................3-33
Passenger Safety Belt Reminder Light.............3-33
Airbag Readiness Light..................................3-34
Passenger Airbag Status Indicator...................3-35
Charging System Light..................................3-36
Voltmeter Gage............................................3-37
Brake System Warning Light..........................3-38
Anti-Lock Brake System Warning Light.............3-39
Engine Coolant Temperature Gage..................3-39
Malfunction Indicator Lamp.............................3-40
Oil Pressure Gage........................................3-43
Change Engine Oil Light................................3-44
Security Light...............................................3-44
Cruise Control Light......................................3-45
Reduced Engine Power Light.........................3-45
Section 3 Instrument Panel
3-1
Page 137 of 474
The main components of your instrument panel are the following:
A. Exterior Lamp Control. SeeHeadlamps on page 3-15.
Dome Lamp Override Button. SeeDome Lamp
Override on page 3-18. Instrument Panel Brightness
Control. SeeInstrument Panel Brightness on
page 3-17. Fog Lamp Button (If Equipped).
SeeFog Lamps on page 3-17.
B. Air Outlets. SeeOutlet Adjustment on page 3-27.
C. Turn Signal/Multifunction Lever. SeeTurn
Signal/Multifunction Lever on page 3-7.
D. OnStar and Audio Steering Wheel Controls.
SeeAudio Steering Wheel Controls on page 3-119.
E. Instrument Panel Cluster. SeeInstrument Panel
Cluster on page 3-31.
F. Audio Steering Wheel Controls. SeeAudio Steering
Wheel Controls on page 3-119.
G. Ignition Switch. SeeIgnition Positions on page 2-25.
H. Audio System. SeeAudio System(s) on page 3-63.
I. Climate Controls. SeeDual Climate Control
System on page 3-20.
J. Hood Release. SeeHood Release on page 5-11.K. Driver Information Center (DIC) Steering Wheel
Controls. SeeDriver Information Center (DIC)
on page 3-48.
L. Transfer Case Controls. See “Automatic Transfer
Case” underFour-Wheel Drive on page 2-32.
Traction Assist Button. SeeTraction Assist System
(TAS) on page 4-9.
M. Shift Lever. SeeShifting Into Park (P) on page 2-37.
N. Lighter. SeeAshtrays and Cigarette Lighter on
page 3-20.
O. Accessory Power Outlets. SeeAccessory Power
Outlets on page 3-19.
P. Parking Brake. SeeParking Brake on page 2-36.
Q. Rear Window Washer/Wiper. See “Rear Window
Washer/Wiper” underWindshield Washer on
page 3-10.
R. Rear Window Defogger. See “Rear Window
Defogger” underDual Climate Control System on
page 3-20andDual Automatic Climate Control
System on page 3-23.
S. Glove Box. SeeGlove Box on page 2-58.
3-5
Page 138 of 474
Hazard Warning Flashers
Your hazard warning �ashers let you warn others.
They also let police know you have a problem. Your
front and rear turn signal lamps will �ash on and off.
The hazard warning
�asher button is
located on top of the
steering column.
Your hazard warning �ashers work no matter what
position your key is in, and even if the key is not in
the ignition.
Press the button to make the front and rear turn signal
lamps �ash on and off. Press the button again to
turn the �ashers off.
When the hazard warning �ashers are on, your turn
signals will not work.
Other Warning Devices
If you carry re�ective triangles, you can set them up at
the side of the road about 300 feet (100 m) behind
your vehicle.
Horn
To sound the horn, press the horn symbols on the
steering wheel pad.
Tilt Wheel
You should adjust the
steering wheel before you
drive. The tilt lever is
located to the left of the
steering column, under the
turn signal lever.
You can raise it to the highest level to give your legs
more room when you enter and exit the vehicle.
To tilt the wheel, hold the steering wheel and pull the
lever toward you. Move the steering wheel to a
comfortable level, then release the lever to lock the
wheel in place.
3-6
Page 139 of 474
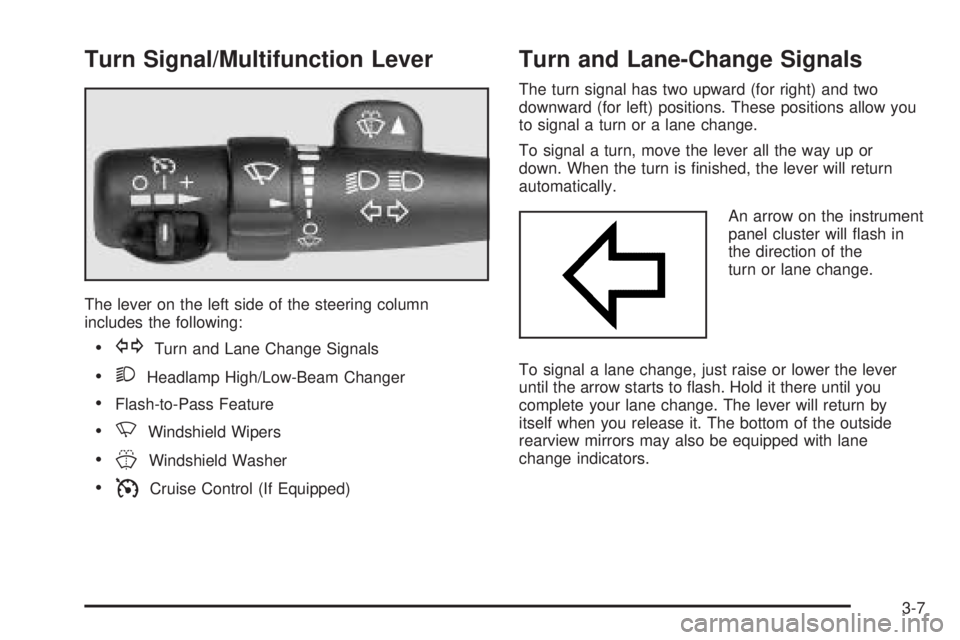
Turn Signal/Multifunction Lever
The lever on the left side of the steering column
includes the following:
GTurn and Lane Change Signals
2Headlamp High/Low-Beam Changer
Flash-to-Pass Feature
NWindshield Wipers
JWindshield Washer
ICruise Control (If Equipped)
Turn and Lane-Change Signals
The turn signal has two upward (for right) and two
downward (for left) positions. These positions allow you
to signal a turn or a lane change.
To signal a turn, move the lever all the way up or
down. When the turn is �nished, the lever will return
automatically.
An arrow on the instrument
panel cluster will �ash in
the direction of the
turn or lane change.
To signal a lane change, just raise or lower the lever
until the arrow starts to �ash. Hold it there until you
complete your lane change. The lever will return by
itself when you release it. The bottom of the outside
rearview mirrors may also be equipped with lane
change indicators.
3-7
Page 140 of 474
As you signal a turn or a lane change, if the arrows
�ash more quickly than normal, a signal bulb may
be burned out and other drivers won’t see your turn
signal.
If a bulb is burned out, replace it to help avoid an
accident. If the arrows don’t go on at all when you signal
a turn, check the fuse. SeeFuses and Circuit Breakers
on page 5-97and check for burned-out bulbs.
If you have a trailer towing option with added wiring for
the trailer lamps, a different turn signal �asher is
used. With this �asher installed, the signal indicator will
�ash even if a turn signal bulb is burned out. Check
the front and rear turn signal lamps regularly to make
sure they are working.
Turn Signal On Chime
If your turn signal is left on for more than 3/4 of a mile
(1.2 km), a chime will sound at each �ash of the
turn signal. To turn off the chime, move the turn signal
lever to the off position.
Headlamp High/Low-Beam Changer
To change the headlamps from low to high beam,
push the lever toward the instrument panel. To return to
low-beam headlamps, pull the multifunction lever
toward you. Then release it.
When the high beams are
on, this indicator light on
the instrument panel
cluster will also be on.
Flash-to-Pass
This feature lets you use your high-beam headlamps to
signal a driver in front of you that you want to pass.
It works even if your headlamps are in the automatic
position.
To use it, pull the turn signal lever toward you, then
release it.
If your headlamps are in the automatic position or on
low beam, your high-beam headlamps will turn on.
They’ll stay on as long as you hold the lever toward you.
The high-beam indicator on the instrument panel
cluster will come on. Release the lever to return to
normal operation.
3-8
Page 144 of 474

Cruise Control
If your vehicle has cruise
control, the controls are
located on the end of
the turn signal/multifunction
lever.
R(On):Move the switch to this position to turn the
cruise control system on.
S(Resume/Accelerate):Move the switch to this
position to resume a set speed or to accelerate.
T(Set):Press this button, located at the end of
the lever, to set a speed.
9(Off):This position turns the cruise control system
off and cancels memory of a set speed.With cruise control, you can maintain a speed of about
25 mph (40 km/h) or more without keeping your foot
on the accelerator. This can really help on long
trips. Cruise control does not work at speeds below
about 25 mph (40 km/h).
If you apply your brakes, the cruise control will shut off.
{CAUTION:
Cruise control can be dangerous where you
cannot drive safely at a steady speed. So, do
not use your cruise control on winding roads
or in heavy traffic.
Cruise control can be dangerous on slippery
roads. On such roads, fast changes in tire
traction can cause needless wheel spinning,
and you could lose control. Do not use cruise
control on slippery roads.
3-12