CD player GMC JIMMY 1997 Owner's Manual
[x] Cancel search | Manufacturer: GMC, Model Year: 1997, Model line: JIMMY, Model: GMC JIMMY 1997Pages: 410, PDF Size: 20.03 MB
Page 144 of 410
Section 3 Comfort Controls and Audio Systems
In this section, you'll find out how to operate the comfort control and audio systems offered with your vehicle. Be
sure to read about the particular systems supplied with your vehicle.
3-2
3-2
3-3
3-3
3-4
3
-5
3-5
3-6
3 -6
3-6
3 -6
Comfort Controls
Climate Control System
Air Conditioning
Heating
Ventilation System
Defogging and Defrosting
Rear Window Defogger (Option)
Audio Systems
Setting the Clock
Setting the Clock for AM-FM Stereo
with Compact Disc Player and Automatic
Tone Control AM-FM Stereo 3-8
3- 10
3-13
3-17
3- 19
3- 19
3-20
3-2 1
3-2 1
AM-FM Stereo with Cassette Tape Player
(If Equipped)
AM-FM Stereo with Cassette Tape Player
and Equalizer
(If Equipped)
AM-FM Stereo
with Compact Disc Player
and Automatic Tone Control
(If Equipped)
Theft-Deterrent Feature
Understanding Radio Reception
Tips About Your Audio System
Care
of Your Cassette Tape Player
Care
of Your Compact Discs
Fixed Mast Antenna
3-1
Page 149 of 410
Audio Systems
Your Delco@ audio system has been designed to operate
easily and give years of listening pleasure. You will get
the most enjoyment out
of it if you acquaint yourself
with it first. Find out what your Delco system can do
and how to operate all its controls, to be sure you're
went into it.
c eetting the most out of the advanced engineering that
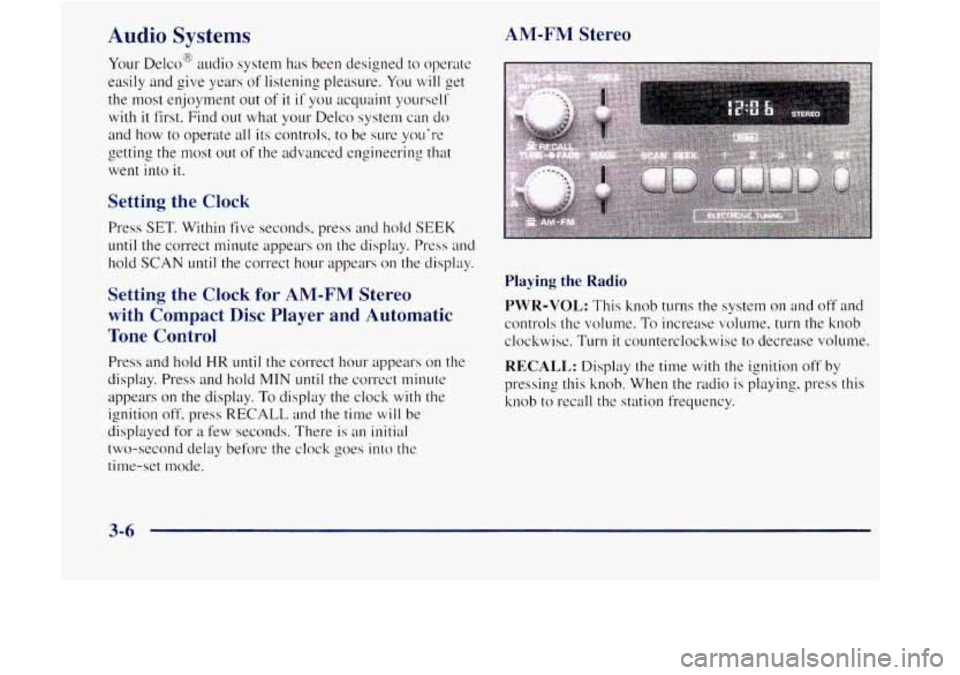
Setting the Clock
Press SET. Within five seconds, press and hold SEEK
until the correct minute appears on the display. Press and
hold
SCAN until the correct hour appears on the display.
Setting the Clock for AM-FM Stereo
with Compact
Disc Player and Automatic
Tone Control
Press and hold HR until the correct hour appears on the
display. Press and hold
MIN lmtil the correct minute
appears
on the display. To display the clock with the
ignition
off, press RECALL and the time will be
displayed for a few seconds. There is an initial
two-second delay before the clock goes
into the
time-set mode.
AM-FM Stereo
Playing the Radio
PWR-VOL: This knob turns the system on and off and
controls the volume. To increase volume,
turn the knob
clockwise. Turn
it counterclockwise to decrease volume.
RECALL: Display the time with the ignition off by
pressing this knob. When the radio is playing, press this
knob to recall the station frequency.
Page 151 of 410
AM-FM Stereo with Cassette Tape Player Finding a Station
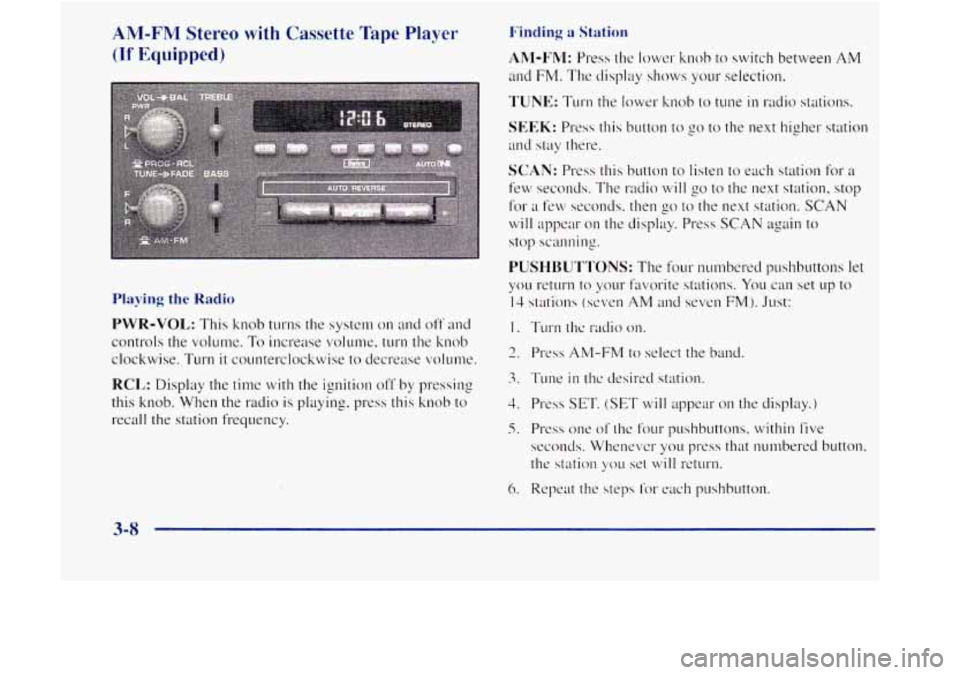
(If Equipped) Ahl-I~n'I: Press the lower knob to switch between AM
ancl FM. The display shows your selection.
TUNE: TLII-11 the lower knob to tune in radio stations.
SEEK: Press this button to go to the next higher station
and stay there.
SCAN: Press this button to listen to each station for a
few seconds. The radio will go to the next station, stop
for
a few seconds. then go to the next station. SCAN
will ~1ppear 011 the display. Press SCAN again to
stop scanning.
PUSHBUTTONS: The four nllmbered pushbuttons let
Playing the Radio
PWR-VOL: This knob turns the system on and off and
controls the volume. To increase volume. turn the knob
clockwise. Turn it counterclockwise to decrease c.olulne.
RCL: Display the time with the ignition off by ~mxing
this knob. When the
radio is playing, press this knob to
recall the station frequency.
2. Press AM-FM to select the band.
3. Tune in thc desired station.
4. Press SET. (SET will appear on the display.)
5. Press one of the four pushbuttons. within five
seconds. Whenevcr you press that numbered button.
the station
SOLI set will return.
3-8
Page 152 of 410
In addition to the four stations already set, up to three
more stations may be preset on each band by pressing
two adjoining buttons at the same time. Just:
1. Tune in the desired station.
2. Press SET. (SET will appear on the display.)
3. Press two adjoining pushbuttons at the same time,
within five seconds. Whenever you press the same
two buttons, the station you set will return.
4. Repeat the steps for each pair of pushbuttons.
Setting the Tone
BASS:
Slide this lever up or down to increase Or
decrease bass.
TREBLE: Slide this lever up or down to increase or
decrease treble.
If a station is weak or noisy, you may
want to decrease the treble.
Adjusting the Speakers
BAL:
Turn the control behind the upper knob to move
the sound to the left or right speakers. The middle
position balances the sound between the speakers.
FADE: Turn the control behind the lower knob to move
the sound to the front or rear speakers. The middle
position balances the sound between the speakers.
Playing a Cassette Tape
Your tape player is built to work best with tapes that are
30 to 45 minutes long on each side. Tapes longer than
that
are so thin they may not work well in this player.
Once the tape is playing, use the
PWR-VOL, BAL and
FADE knobs just as you do for the radio. A lighted
arrow will be displayed to show tape play direction.
FORWARD: Press the arrow button in the direction that
the lighted arrow points to advance quickly to another
part of the tape. Press STOP-EJECT lightly to stop
forwarding and play the tape.
REVERSE: Press the arrow button in the opposite
direction that the lighted
arrow points to reverse quickly
to another part of the tape. Press STOP-EJECT lightly
to stop reversing and play the tape.
PROG: Press this knob to go from one side of the tape
to the other.
STOP-EJECT: Press this button to remove the tape or
stop playing the tape in order to play the radio. If you
leave a cassette tape in the player while listening to the
radio, it may become warm.
Page 153 of 410

AM-FM Stereo with Cassette Tape Player
and Equalizer (If Equipped)
SEEK: Press [his hutton to QO to the next higher station
and stay therc.
3-10
Page 155 of 410

Playing a Cassette Tape
Your tape player is built to work best with tapes that are
30 to 45 minutes long 011 each sicic. Tapes longer than
that are
so thin they may not work well in this player.
Once the
tape is playing. LLS~ the PWR-VOL. BAL and
FADE knobs just as you do for the radio. A lightecl
arrow will he displayed to show tape play direction.
REVERSE: Press the mow button in the opposite
direction that the lighted arrow points to reversc cl~~ickly
to another part
of the tape. Press STOP-EJECT lightly
to
stop reversing and play the tapc.
FORWARD: Press the ;wow button in the direction that
the lighted arrow points to udvance quickly to another
part of the tape. Press
STOP-EJECT lightly to stop
forwarding and play the tape.
SEARCH: Press this button to the recessed position.
Press the lighted
LII-~OW to skip to the next selection. Prcss
the opposite direction ILI-I-ow that is not lighted to replay
the current selection or skip to the previous selection.
3- 12
Page 156 of 410

AM-FM Stereo with Compact Disc Player
and Automatic Tone Control
(If Equipped)
3-13
Page 159 of 410

If the disc comes back out and ERR appears on the
display.
it could be that:
You are driving on a very rough road. (The disc
should play when the road gets srnoother.)
The disc is upside down.
It is dirty. scrutchect or wet.
0 It is very humid. (If so, wait about an hour and try
again.)
The disc player is very hot.
Press RECALL to make ERR
go off the display.
PREV (1): Press PREV or the SEEK left arrow to
search for the previous selection. If you hold this button
or press
it more than once, the disc will advunce further.
Sound is muted
in this mode.
RDM (2): Press this button to play the tracks on the disc
in random: rather than sequential, order. While in the
RDM mode, RANDOM appears on the display. Press
RDM again to return to normal play.
NEXT (3): Press NEXT or the SEEK right arrow to
search for the next selection. If you hold this button or
press
it more than once, the disc will advance further.
The next track number
will appear on the display. Sound
is muted in Illis mode.
REV (4): Press and hold REV to return rapidly to a
favorite passage. You will hear- the disc selection play at
high speed while
you press the REV button. This allows
you
to listen and I'ind out when the disc is at the desired
selection. Release REV
to resume playing.
FWD (.6): Press and hold this button to advance rapidly
within ;I track. You will hear the disc selection play at
high speed while you press the
FWD button. This allows
you to listen and find out when the disc is at the desired
selection. Release
FWD to resume playing.
AM-FM: While in the CD Inode, press this button to
stop playing the CD and play the radio. The CD symbol
will still display but the word CD will be replaced with
either AM. FM I or FM2. (If the radio is turned off, the
disc stays in the player and will resume playing at the
point where it stopped.)
RECALL: Press this button to see what track is playing.
Press
it again within five seconds to see how long the
CD has been playing that track. Elapsed time is
displayed in minutes and tenths of a second. The track
number
will also appear when a new track begins to
play. Press RECALL again to return to the time display.
3-16
Page 160 of 410
CD AUX: To switch between the player and the radio
when a disc is playing, press the
AM-FM button. To
return to the player, press CD AUX. When a disc is
playing, the letters CD and the
CD symbol will appear
on the display. (If the radio is turned off, the disc stays
in the player and will resume playing at the point where
it stopped.)
EJECT: Press this button to eject the disc from the
player and play the radio.
When the same or a new disc
is inserted, the disc will
start playing on track one. If a compact disc is left
sitting in the opening for more than a few seconds,
the
player will pull the CD back in. The radio will continue
playing. When the ignition is
off, press this button to
load a
CD. If you leave a compact disc in the player
while listening to the radio, it may become warm.
Theft-Deterrent Feature
THEFTLOCK" is designed to discourage theft of your
radio. It works by using a secret code to disable all radio
functions whenever battery power is removed.
The THEFTLOCK feature for the radio may be used or
ignored.
If ignored, the system plays normally and the
radio is not protected by the feature. If THEFTLOCK
is
activated, your radio will not operate if stolen.
When
THEFTLOCK is activated, the radio will display
LOC to indicate a locked condition anytime battery
power is removed. If your battery loses power for any
reason, you must unlock the radio with the secret code
before it will operate.
Activating the Theft-Deterrent Feature
The instructions which follow explain how to enter your
secret code to activate the THEFTLOCK system. It is
recommended that
you read through all nine steps
before starting the procedure.
NOTE: If you allow more than
15 seconds to elapse
between any steps, the radio automatically reverts to
time and you must start the procedure over at Step
4.
3-17
Page 163 of 410

To help avoid hearing loss or damage:
Ad-just the volume control to the lowest setting.
I NOTICE:
~
Before you add any sound equipment to your
vehicle
-- like a tape player, CB radio, mobile
telephone or two-way radio
-- be sure you can add
what you want.
If’ you can, it’s very important to do
1 it properly. Added sound equipment may interfere
’ with the operation of your vehicle’s engine, Delco
radio or other systems, and even damage them.
Your vehicle’s systems may interfere with the
operation of sound equipment that has been
added improperly.
So, before adding sound equipment, check with
your dealer and be sure to check Federal rules
covering mobile radio and telephone units.