ECU GMC JIMMY 2005 Owner's Guide
[x] Cancel search | Manufacturer: GMC, Model Year: 2005, Model line: JIMMY, Model: GMC JIMMY 2005Pages: 432, PDF Size: 2.65 MB
Page 118 of 432

You can adjust the crossrails to handle loads of various
sizes. Just loosen the slider knobs at each end of
the crossrail and move them to where you want them.
Make sure both sides of the crossrails are even,
then tighten the slider knobs.
Be sure the cargo is properly loaded. Follow these
guidelines:
Carrying small, heavy loads on the roof is not
recommended.
Secure the load using the tie downs at both ends of
the crossrails. When loading cargo directly on the
roof panel, use the crossrails to keep the load from
shifting.
If you need to carry long items, move the crossrails
as far apart as possible. Tie the load to the tie
downs provided. Also tie the load to the bumpers.
Do not tie the load so tightly that the crossrails
or side rails are damaged.
Notice:Loading cargo on the luggage carrier that
weighs more than 200 lbs (91 kg) or hangs over
the rear or sides of the vehicle may damage your
vehicle. Load cargo so that it rests on the slats
as far forward as possible and against the side rails,
making sure to fasten it securely.Don’t exceed the maximum vehicle capacity when
loading your vehicle. For more information on vehicle
capacity and loading seeLoading Your Vehicle on
page 4-44.
To prevent damage or loss of cargo as you’re driving,
check now and then to make sure the luggage
carrier and cargo are still securely fastened.
Rear Storage Area
You may store items in the cargo area of your vehicle.
Convenience Net
You may have a convenience net in the rear of your
vehicle to help keep small items, like gloves and
light clothing, in place during sharp turns or quick stops
and starts.
The net is not designed to retain these items during
off-road use. The net is not for larger, heavier items.
Attach the upper loops to the retainers on both sides of
the tailgate opening. The label should be in the upper
passenger’s side corner, visible from the rear of
the vehicle. Attach the lower hooks to the rear cargo
tie-downs on the �oor.
2-54
Page 119 of 432

Cargo Tie Downs
There are three cargo tie
downs in the rear of your
vehicle that allow you
to strap in cargo and keep
it from moving.
Rear Convenience System
{CAUTION:
If any removable convenience item is not
secured properly, it can move around in a
collision or sudden stop. People in the vehicle
could be injured. Be sure to secure any such
item properly.
If your vehicle has the convenience system, it is located
in the rear of your vehicle. It provides a place to store
loose items in your vehicle.
2-55
Page 125 of 432
Instrument Panel Overview...............................3-4
Hazard Warning Flashers................................3-6
Other Warning Devices...................................3-6
Horn.............................................................3-6
Tilt Wheel.....................................................3-6
Turn Signal/Multifunction Lever.........................3-7
Turn and Lane-Change Signals........................3-8
Headlamp High/Low-Beam Changer..................3-9
Flash-to-Pass.................................................3-9
Windshield Wipers..........................................3-9
Cruise Control..............................................3-11
Exterior Lamps.............................................3-14
Headlamps on Reminder................................3-15
Daytime Running Lamps (DRL).......................3-15
Automatic Headlamp System..........................3-16
Fog Lamps..................................................3-17
Instrument Panel Brightness...........................3-18
Dome Lamps...............................................3-18
Entry Lighting...............................................3-18
Exit Lighting.................................................3-18
Front Reading Lamps....................................3-19
Map Lamps.................................................3-19
Battery Run-Down Protection..........................3-19
Ashtrays and Cigarette Lighter........................3-19Climate Controls............................................3-20
Climate Control System.................................3-20
Outlet Adjustment.........................................3-22
Warning Lights, Gages, and Indicators............3-23
Instrument Panel Cluster................................3-24
Speedometer and Odometer...........................3-26
Trip Odometer..............................................3-26
Tachometer.................................................3-26
Safety Belt Reminder Light.............................3-26
Airbag Readiness Light..................................3-27
Charging System Light..................................3-28
Voltmeter Gage............................................3-28
Up-Shift Light...............................................3-29
Brake System Warning Light..........................3-29
Anti-Lock Brake System Warning Light.............3-30
Engine Coolant Temperature Gage..................3-31
Malfunction Indicator Lamp.............................3-31
Oil Pressure Gage........................................3-34
Security Light...............................................3-35
Highbeam On Light.......................................3-35
Service Four-Wheel Drive Warning Light..........3-36
Tow/Haul Mode Light....................................3-36
Check Gages Warning Light...........................3-37
Gate Ajar Light.............................................3-37
Fuel Gage...................................................3-38
Low Fuel Warning Light.................................3-38
Section 3 Instrument Panel
3-1
Page 159 of 432
Security Light
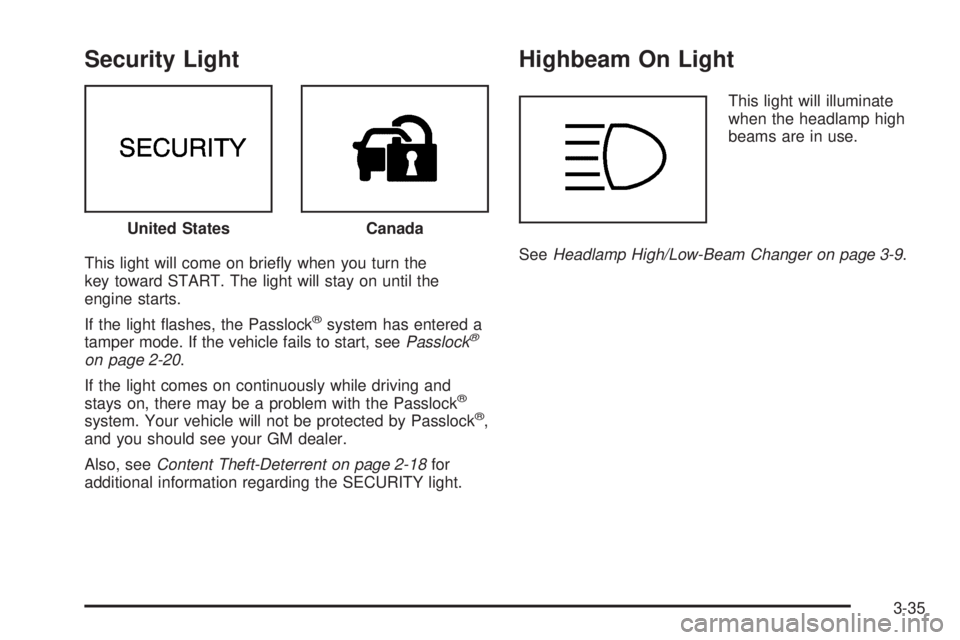
This light will come on brie�y when you turn the
key toward START. The light will stay on until the
engine starts.
If the light �ashes, the Passlock
®system has entered a
tamper mode. If the vehicle fails to start, seePasslock®
on page 2-20.
If the light comes on continuously while driving and
stays on, there may be a problem with the Passlock
®
system. Your vehicle will not be protected by Passlock®,
and you should see your GM dealer.
Also, seeContent Theft-Deterrent on page 2-18for
additional information regarding the SECURITY light.
Highbeam On Light
This light will illuminate
when the headlamp high
beams are in use.
SeeHeadlamp High/Low-Beam Changer on page 3-9. United States
Canada
3-35
Page 185 of 432
XM™ Radio Messages (cont’d)
Radio Display
MessageCondition Action Required
No Info Category Name not
availableNo category information is available at this time on this
channel. The system is working properly.
No Info No Text/Informational
message availableNo text or informational messages are available at this
time on this channel. The system is working properly.
Not Found No channel available for
the chosen categoryThere are no channels available for the selected category.
The system is working properly.
XM Locked Theft lock active The XM™ receiver in the vehicle may have previously
been in another vehicle. For security purposes, XM™
receivers cannot be swapped between vehicles. If this
message is received after having your vehicle serviced,
check with your GM dealer.
Radio ID Radio ID label
(channel 0)If tuned to channel 0, this message will alternate with the
XM™ Radio 8 digit radio ID label. This label is needed to
activate the service.
Unknown Radio ID not known
(should only be if
hardware failure)If this message is received when tuned to channel 0, there
may be a receiver fault. Consult with your GM dealer.
Chk XMRcvr Hardware failure If this message does not clear within a short period of time,
the receiver may have a fault. Consult with your GM
dealer.
3-61
Page 219 of 432
Before You Go Off-Roading
There are some things to do before you go out. For
example, be sure to have all necessary maintenance
and service work done. Check to make sure all
underbody shields, if so equipped, are properly attached.
Be sure you read all the information about your
four-wheel-drive vehicle in this manual. Is there enough
fuel? Is the spare tire fully in�ated? Are the �uid
levels up where they should be? What are the local
laws that apply to off-roading where you will be driving?
If you do not know, you should check with law
enforcement people in the area. Will you be on
someone’s private land? If so, be sure to get the
necessary permission.
Loading Your Vehicle for Off-Road
Driving
There are some important things to remember about
how to load your vehicle.
The heaviest things should be on the load �oor and
forward of your rear axle. Put heavier items as far
forward as you can.
Be sure the load is secured properly, so driving on
the off-road terrain does not toss things around.
{CAUTION:
Cargo on the load �oor piled higher than
the seatbacks can be thrown forward
during a sudden stop. You or your
passengers could be injured. Keep cargo
below the top of the seatbacks.
Unsecured cargo on the load �oor can be
tossed about when driving over rough
terrain. You or your passengers can be
struck by �ying objects. Secure the cargo
properly.
Heavy loads on the roof raise the vehicle’s
center of gravity, making it more likely to
roll over. You can be seriously or fatally
injured if the vehicle rolls over. Put heavy
loads inside the cargo area, not on the
roof. Keep cargo in the cargo area as far
forward and low as possible.
You will �nd other important information in this manual.
SeeLoading Your Vehicle on page 4-44,Luggage
Carrier on page 2-53andTires on page 5-53.
4-15
Page 242 of 432

Winter Driving
Here are some tips for winter driving:
Have your vehicle in good shape for winter.
You may want to put winter emergency supplies in
your vehicle.Also seeTires on page 5-53.
Include an ice scraper, a small brush or broom, a
supply of windshield washer �uid, a rag, some winter
outer clothing, a small shovel, a �ashlight, a red
cloth, and re�ective warning triangles. And, if you will be
driving under severe conditions, include a small bag
of sand, a piece of old carpet or a couple of burlap bags
to help provide traction. Be sure you properly secure
these items in your vehicle.
Driving on Snow or Ice
Most of the time, those places where your tires meet
the road probably have good traction.
However, if there is snow or ice between your tires and
the road, you can have a very slippery situation. You
will have a lot less traction, or grip, and will need to be
very careful.
4-38
Page 253 of 432
{CAUTION:
Things you put inside your vehicle can strike
and injure people in a sudden stop or turn, or
in a crash.
Put things in the cargo area of your
vehicle. Try to spread the weight evenly.
Never stack heavier things, like suitcases,
inside the vehicle so that some of them
are above the tops of the seats.
Do not leave an unsecured child restraint
in your vehicle.
When you carry something inside the
vehicle, secure it whenever you can.
Do not leave a seat folded down unless
you need to.
There’s also important loading information for off-road
driving in this manual. See“Loading Your Vehicle
for Off-Road Driving”underOff-Road Driving with Your
Four-Wheel-Drive Vehicle on page 4-14.
Add-On Equipment
When you carry removable items, you may need to put
a limit on how many people you carry inside your
vehicle. Be sure to weigh your vehicle before you buy
and install the new equipment.
Notice:Overloading your vehicle may cause
damage. Repairs would not be covered by your
warranty. Do not overload your vehicle.
Towing
Towing Your Vehicle
Consult your dealer or a professional towing service if
you need to have your disabled vehicle towed. See
Roadside Assistance Program on page 7-5.
If you want to tow your vehicle behind another vehicle
for recreational purposes (such as behind a motorhome),
see “Recreational Vehicle Towing” following.
4-49
Page 254 of 432

Recreational Vehicle Towing
Recreational vehicle towing means towing your vehicle
behind another vehicle – such as behind a motorhome.
The two most common types of recreational vehicle
towing are known as “dinghy towing” (towing your vehicle
with all four wheels on the ground) and “dolly towing”
(towing your vehicle with two wheels on the ground and
two wheels up on a device known as a “dolly”).
With the proper preparation and equipment, many
vehicles can be towed in these ways. SeeDinghy
TowingandDolly Towing,following.
Here are some important things to consider before you
do recreational vehicle towing:
What’s the towing capacity of the towing vehicle?
Be sure you read the tow vehicle manufacturer’s
recommendations.
How far will you tow? Some vehicles have
restrictions on how far and how long they can tow.
Do you have the proper towing equipment?
See your dealer or trailering professional for
additional advice and equipment recommendations.
Is your vehicle ready to be towed? Just as you
would prepare your vehicle for a long trip, you’ll
want to make sure your vehicle is prepared to be
towed. SeeBefore Leaving on a Long Trip on
page 4-34.
Dinghy Towing
(Vehicles with the Automatic
Transfer Case)
If your vehicle is equipped with an automatic transfer
case with a NEUTRAL position, you can dinghy tow
your vehicle. To dinghy tow your vehicle, use the
following steps:
1. Firmly set the parking brake.
2. Place the transmission in PARK (P).
3. Securely attach the vehicle being towed to the tow
vehicle.
4-50
Page 257 of 432

Dolly Towing
(Vehicles with Automatic Transfer Case)
If your vehicle has an automatic transfer case, your
vehicle can be dolly towed.
1. Follow the dolly manufacturer’s instructions to attach
and secure the vehicle being towed to the dolly and
then the loaded dolly to the tow vehicle.
2. Firmly set the parking brake.
3. Put an automatic or a manual transmission in
NEUTRAL (N).
{CAUTION:
Shifting a four-wheel-drive vehicle’s transfer
case into NEUTRAL can cause your vehicle to
roll even if the transmission is in Park (P) for an
automatic transmission, or if your vehicle is in
gear, for a manual transmission. You or others
could be injured. Make sure the parking brake is
�rmly set before you shift the transfer case
to NEUTRAL.4. Shift the transfer case to 2HI. SeeFour-Wheel
Drive on page 2-30for how to shift the
transfer case.
5. Release the parking brake only after the vehicle
being towed is �rmly attached to the towing vehicle.
Notice:Do not exceed the posted speed limit when
towing your vehicle. If you do, your vehicle could
be badly damaged.
Notice:If you tow your vehicle from the front for
more than 50 miles (80 km) on a dolly, you could
damage it. Never dolly tow your vehicle from
the front more than 50 miles (80 km).
6. Turn the ignition to OFF. To prevent your battery
from draining while towing, remove the RDO BATT
and CLSTR fuses from the instrument panel fuse
block. Be sure to replace the fuse when you reach
your destination SeeInstrument Panel Fuse Block on
page 5-91.
4-53