brake fluid GMC JIMMY 2005 Owner's Manual
[x] Cancel search | Manufacturer: GMC, Model Year: 2005, Model line: JIMMY, Model: GMC JIMMY 2005Pages: 432, PDF Size: 2.65 MB
Page 273 of 432
Service............................................................5-3
Doing Your Own Service Work.........................5-4
Adding Equipment to the Outside of
Your Vehicle..............................................5-5
Fuel................................................................5-5
Gasoline Octane............................................5-5
Gasoline Speci�cations....................................5-5
California Fuel...............................................5-6
Additives.......................................................5-6
Fuels in Foreign Countries...............................5-7
Filling Your Tank............................................5-8
Filling a Portable Fuel Container.....................5-10
Checking Things Under the Hood....................5-10
Hood Release..............................................5-11
Engine Compartment Overview.......................5-12
Engine Oil...................................................5-13
Engine Air Cleaner/Filter................................5-17
Automatic Transmission Fluid.........................5-19
Manual Transmission Fluid.............................5-22
Hydraulic Clutch...........................................5-23
Engine Coolant.............................................5-24
Radiator Pressure Cap..................................5-26
Engine Overheating.......................................5-26
Cooling System............................................5-28
Engine Fan Noise.........................................5-33
Power Steering Fluid.....................................5-34Windshield Washer Fluid................................5-34
Brakes........................................................5-35
Battery........................................................5-38
Jump Starting...............................................5-39
Rear Axle.......................................................5-43
Four-Wheel Drive............................................5-44
Front Axle......................................................5-45
Bulb Replacement..........................................5-45
Halogen Bulbs..............................................5-46
Headlamps..................................................5-46
One-Piece Front Turn Signal Lamps................5-48
Two-Piece Front Turn Signal Lamps................5-49
Taillamps.....................................................5-50
Replacement Bulbs.......................................5-50
Windshield Wiper Blade Replacement..............5-51
Tires..............................................................5-53
Tire Sidewall Labelling...................................5-54
Tire Terminology and De�nitions.....................5-56
In�ation - Tire Pressure.................................5-59
Tire Inspection and Rotation...........................5-60
When It Is Time for New Tires.......................5-61
Buying New Tires.........................................5-62
Uniform Tire Quality Grading..........................5-63
Wheel Alignment and Tire Balance..................5-64
Wheel Replacement......................................5-64
Section 5 Service and Appearance Care
5-1
Page 285 of 432
A. Battery. SeeBattery on page 5-38.
B. Coolant Recovery Tank. SeeEngine Coolant on
page 5-24.
C. Engine Oil Dipstick. See “Checking Engine Oil”
underEngine Oil on page 5-13.
D. Engine Oil Fill Cap. See “When to Add Engine Oil”
underEngine Oil on page 5-13.
E. Automatic Transmission Fluid Dipstick (If Equipped).
See “Checking the Fluid Level” underAutomatic
Transmission Fluid on page 5-19.
F. Power Steering Fluid Reservoir. SeePower Steering
Fluid on page 5-34.
G. Brake Master Cylinder Reservoir. See “Brake Fluid”
underBrakes on page 5-35.
H. Engine Air Cleaner/Filter. SeeEngine Air
Cleaner/Filter on page 5-17.
I. Clutch Master Cylinder Reservoir. SeeHydraulic
Clutch on page 5-23.
J. Engine Compartment Fuse Block. SeeEngine
Compartment Fuse Block on page 5-92.
K. Windshield Washer Fluid Reservoir. See “Adding
Washer Fluid” underWindshield Washer Fluid
on page 5-34.Engine Oil
Checking Engine Oil
It is a good idea to check your engine oil every time you
get fuel. In order to get an accurate reading, the oil
must be warm and the vehicle must be on level ground.
The engine oil dipstick handle is a yellow loop. See
Engine Compartment Overview on page 5-12for
the location of the engine oil dipstick.
1. Turn off the engine and give the oil several minutes
to drain back into the oil pan. If you do not do this,
the oil dipstick might not show the actual level.
2. Pull out the dipstick and clean it with a paper towel
or cloth, then push it back in all the way. Remove it
again, keeping the tip down, and check the level.
5-13
Page 292 of 432

Get the vehicle warmed up by driving about 15 miles
(24 km) when outside temperatures are above 50°F
(10°C). If it is colder than 50°F (10°C), drive the vehicle
in THIRD (3) until the engine temperature gage
moves and then remains steady for 10 minutes.
A cold �uid check can be made after the vehicle has
been sitting for eight hours or more with the engine off,
but this is used only as a reference. Let the engine
run at idle for �ve minutes if outside temperatures are
50°F (10°C) or more. If it is colder than 50°F (10°C), you
may have to idle the engine longer. Should the �uid
level be low during this cold check, you must check the
�uid hot before adding �uid. Checking the �uid hot
will give you a more accurate reading of the �uid level.
Checking the Fluid Level
Prepare your vehicle as follows:
Park your vehicle on a level place. Keep the engine
running.
With the parking brake applied, place the shift lever
in PARK (P).
With your foot on the brake pedal, move the shift
lever through each gear range, pausing for about
three seconds in each range. Then, position the shift
lever in PARK (P).
Let the engine run at idle for three minutes or more.Then, without shutting off the engine, follow
these steps:
The transmission
dipstick handle has
this symbol on it.
The transmission dipstick is located near the center of
the engine compartment. SeeEngine Compartment
Overview on page 5-12for more information on location.
1. Flip the handle up and then pull out the dipstick
and wipe it with a clean rag or paper towel.
2. Push it back in all the way, wait three seconds and
then pull it back out again.
3. For an accurate reading, when checking the �uid
level, keep the tip of the dipstick pointed down to
avoid the �uid traveling up the dipstick.
5-20
Page 307 of 432

Adding Washer Fluid
Open the cap with the
washer symbol on it. Add
washer �uid until the
tank is full. SeeEngine
Compartment Overview on
page 5-12for reservoir
location.
Notice:
When using concentrated washer �uid,
follow the manufacturer’s instructions for
adding water.
Do not mix water with ready-to-use washer �uid.
Water can cause the solution to freeze and
damage your washer �uid tank and other parts
of the washer system. Also, water does not
clean as well as washer �uid.
Fill your washer �uid tank only three-quarters
full when it is very cold. This allows for
expansion if freezing occurs, which could
damage the tank if it is completely full.
Do not use engine coolant (antifreeze) in your
windshield washer. It can damage your washer
system and paint.
Brakes
Brake Fluid
Your brake master cylinder
reservoir is �lled with
DOT-3 brake �uid. See
Engine Compartment
Overview on page 5-12for
the location of the
reservoir.
There are only two reasons why the brake �uid level in
the reservoir might go down. The �rst is that the
brake �uid goes down to an acceptable level during
normal brake lining wear. When new linings are put in,
the �uid level goes back up. The other reason is
that �uid is leaking out of the brake system. If it is, you
should have your brake system �xed, since a leak
means that sooner or later your brakes will not work
well, or will not work at all.
5-35
Page 308 of 432

So, it is not a good idea to top off your brake �uid.
Adding brake �uid will not correct a leak. If you add �uid
when your linings are worn, then you will have too
much �uid when you get new brake linings. You should
add or remove brake �uid, as necessary, only when
work is done on the brake hydraulic system.
{CAUTION:
If you have too much brake �uid, it can spill on
the engine. The �uid will burn if the engine is
hot enough. You or others could be burned,
and your vehicle could be damaged. Add brake
�uid only when work is done on the brake
hydraulic system. See “Checking Brake Fluid”
in this section.
Refer to the Maintenance Schedule to determine when
to check your brake �uid. SeePart C: Periodic
Maintenance Inspections on page 6-31.
Checking Brake Fluid
You can check the brake �uid without taking off the cap.
Look at the brake �uid
reservoir. The �uid level
should be above MIN. If it
is not, have your brake
system checked to
see if there is a leak.
After work is done on the brake hydraulic system,
make sure the level is above the MIN but not over the
MAX mark.
What to Add
When you do need brake �uid, use only DOT-3 brake
�uid. Use new brake �uid from a sealed container
only. SeePart D: Recommended Fluids and Lubricants
on page 6-33.
5-36
Page 369 of 432
Maintenance Schedule......................................6-2
Introduction...................................................6-2
Maintenance Requirements..............................6-2
Your Vehicle and the Environment....................6-2
How This Section is Organized.........................6-3
Part A: Scheduled Maintenance Services...........6-4
Using Your Maintenance Schedule....................6-4
Selecting the Right Schedule...........................6-5
Short Trip/City Scheduled Maintenance..............6-6
Long Trip/Highway Scheduled Maintenance......6-18
Part B: Owner Checks and Services................6-26
At Each Fuel Fill..........................................6-26
At Least Once a Month.................................6-26
At Least Twice a Year...................................6-27
At Least Once a Year...................................6-28Part C: Periodic Maintenance Inspections.........6-31
Steering, Suspension and Front Drive
Axle Boot and Seal Inspection....................6-31
Exhaust System Inspection............................6-31
Fuel System Inspection..................................6-31
Engine Cooling System Inspection...................6-31
Throttle System Inspection.............................6-32
Transfer Case and Front Axle (Four-Wheel
Drive) Inspection.......................................6-32
Brake System Inspection................................6-32
Part D: Recommended Fluids and Lubricants. . . .6-33
Normal Maintenance Replacement Parts..........6-35
Part E: Maintenance Record...........................6-36
Section 6 Maintenance Schedule
6-1
Page 375 of 432
Footnotes
†The U.S. Environmental Protection Agency or the
California Air Resources Board has determined that the
failure to perform this maintenance item will not nullify
the emission warranty or limit recall liability prior to
the completion of the vehicle’s useful life. We, however,
urge that all recommended maintenance services be
performed at the indicated intervals and the
maintenance be recorded.
#Lubricate the front suspension, ball joints, steering
linkage, parking brake cable guides, propshaft splines,
universal joints and brake pedal springs.
+A good time to check your brakes is during tire
rotation. See Brake System Inspection on page 6-32.
**Drive axle service. See Part D: Recommended Fluids
and Lubricants on page 6-33for proper lubricant to use:
Check �uid level and add �uid as needed. If driving in
dusty areas or when towing a trailer, drain �uid and
re�ll every 15,000 miles (25 000 km).
If your vehicle has a locking differential, drain �uid
and re�ll at �rst engine oil change.
More frequent lubrication may be required for
heavy-duty or off-road use.
3,000 Miles (5 000 km)
❑Change engine oil and �lter (or every 3 months,
whichever occurs �rst).An Emission Control Service.
❑Lubricate chassis components (or every 3 months,
whichever occurs �rst).(See footnote #.)
❑Check rear/front axle �uid level and add �uid as
needed. Check constant velocity joints and axle seals
for leaking.(See footnote **.)
6,000 Miles (10 000 km)
❑Change engine oil and �lter (or every 3 months,
whichever occurs �rst).An Emission Control Service.
❑Lubricate chassis components (or every 3 months,
whichever occurs �rst).(See footnote #.)
❑Check rear/front axle �uid level and add �uid as
needed. Check constant velocity joints and axle seals
for leaking.(See footnote **.)
❑Rotate tires. SeeTire Inspection and Rotation on
page 5-60for proper rotation pattern and additional
information.(See footnote +.)
6-7
Page 386 of 432
Long Trip/Highway Scheduled
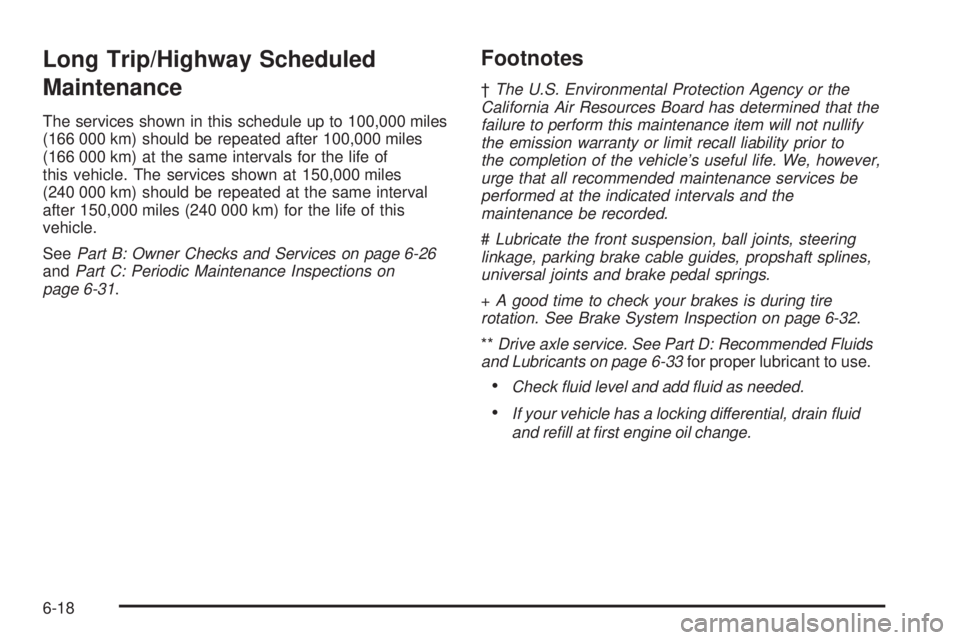
Maintenance
The services shown in this schedule up to 100,000 miles
(166 000 km) should be repeated after 100,000 miles
(166 000 km) at the same intervals for the life of
this vehicle. The services shown at 150,000 miles
(240 000 km) should be repeated at the same interval
after 150,000 miles (240 000 km) for the life of this
vehicle.
SeePart B: Owner Checks and Services on page 6-26
andPart C: Periodic Maintenance Inspections on
page 6-31.
Footnotes
†The U.S. Environmental Protection Agency or the
California Air Resources Board has determined that the
failure to perform this maintenance item will not nullify
the emission warranty or limit recall liability prior to
the completion of the vehicle’s useful life. We, however,
urge that all recommended maintenance services be
performed at the indicated intervals and the
maintenance be recorded.
#Lubricate the front suspension, ball joints, steering
linkage, parking brake cable guides, propshaft splines,
universal joints and brake pedal springs.
+A good time to check your brakes is during tire
rotation. See Brake System Inspection on page 6-32.
**Drive axle service. See Part D: Recommended Fluids
and Lubricants on page 6-33for proper lubricant to use.
Check �uid level and add �uid as needed.
If your vehicle has a locking differential, drain �uid
and re�ll at �rst engine oil change.
6-18
Page 401 of 432
Part D: Recommended Fluids and
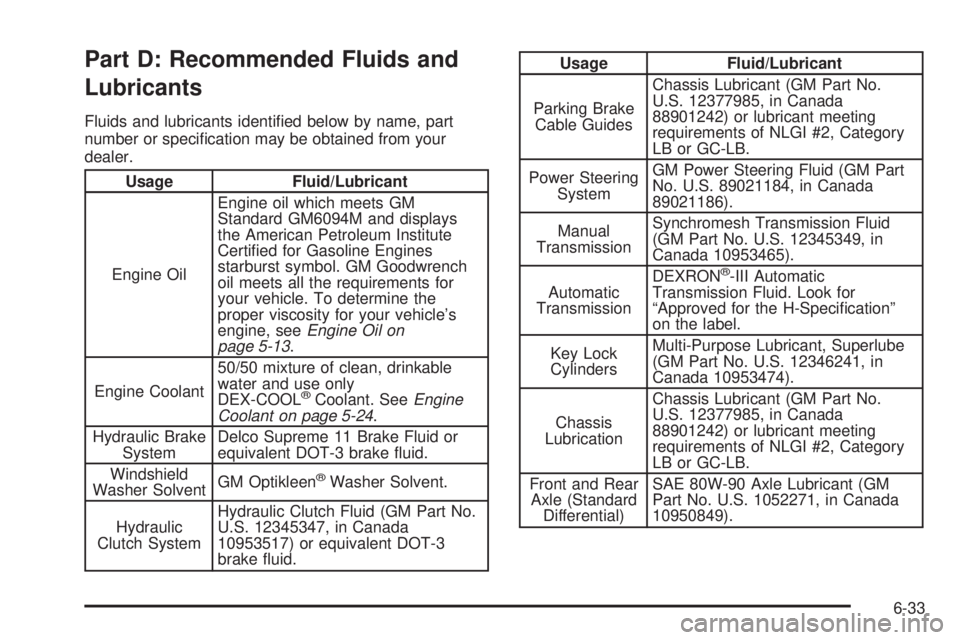
Lubricants
Fluids and lubricants identi�ed below by name, part
number or speci�cation may be obtained from your
dealer.
Usage Fluid/Lubricant
Engine OilEngine oil which meets GM
Standard GM6094M and displays
the American Petroleum Institute
Certi�ed for Gasoline Engines
starburst symbol. GM Goodwrench
oil meets all the requirements for
your vehicle. To determine the
proper viscosity for your vehicle’s
engine, seeEngine Oil on
page 5-13.
Engine Coolant50/50 mixture of clean, drinkable
water and use only
DEX-COOL
®Coolant. SeeEngine
Coolant on page 5-24.
Hydraulic Brake
SystemDelco Supreme 11 Brake Fluid or
equivalent DOT-3 brake �uid.
Windshield
Washer SolventGM Optikleen
®Washer Solvent.
Hydraulic
Clutch SystemHydraulic Clutch Fluid (GM Part No.
U.S. 12345347, in Canada
10953517) or equivalent DOT-3
brake �uid.
Usage Fluid/Lubricant
Parking Brake
Cable GuidesChassis Lubricant (GM Part No.
U.S. 12377985, in Canada
88901242) or lubricant meeting
requirements of NLGI #2, Category
LB or GC-LB.
Power Steering
SystemGM Power Steering Fluid (GM Part
No. U.S. 89021184, in Canada
89021186).
Manual
TransmissionSynchromesh Transmission Fluid
(GM Part No. U.S. 12345349, in
Canada 10953465).
Automatic
TransmissionDEXRON
®-III Automatic
Transmission Fluid. Look for
“Approved for the H-Speci�cation”
on the label.
Key Lock
CylindersMulti-Purpose Lubricant, Superlube
(GM Part No. U.S. 12346241, in
Canada 10953474).
Chassis
LubricationChassis Lubricant (GM Part No.
U.S. 12377985, in Canada
88901242) or lubricant meeting
requirements of NLGI #2, Category
LB or GC-LB.
Front and Rear
Axle (Standard
Differential)SAE 80W-90 Axle Lubricant (GM
Part No. U.S. 1052271, in Canada
10950849).
6-33
Page 420 of 432

Audio System(s) (cont.)
Setting the Time for Radios without Radio
Data Systems (RDS)................................3-42
Theft-Deterrent Feature................................3-77
Understanding Radio Reception.....................3-78
Automatic Headlamp System............................3-16
Automatic Transmission
Fluid..........................................................5-19
Operation...................................................2-25
B
Battery..........................................................5-38
Run-Down Protection...................................3-19
Before Leaving on a Long Trip.........................4-34
Brake
Anti-Lock Brake System (ABS)........................ 4-8
Emergencies................................................ 4-9
Parking......................................................2-36
System Inspection.......................................6-32
System Warning Light..................................3-29
Brakes..........................................................5-35
Braking........................................................... 4-7
Braking in Emergencies..................................... 4-9
Break-In, New Vehicle.....................................2-20
Bulb Replacement...........................................5-45
Halogen Bulbs............................................5-46
Headlamps.................................................5-46
One-Piece Front Turn Signal Lamps...............5-48Bulb Replacement (cont.)
Replacement Bulbs......................................5-50
Taillamps....................................................5-50
Two-Piece Front Turn Signal Lamps...............5-49
Buying New Tires...........................................5-62
C
California Fuel.................................................. 5-6
Canadian Owners................................................ ii
Capacities and Speci�cations............................5-95
Carbon Monoxide...................2-12, 2-40, 4-38, 4-57
Care of
Safety Belts................................................5-84
Your Cassette Tape Player............................3-78
Your CD Player...........................................3-79
Your CDs ...................................................3-79
Cargo Tie Downs............................................2-55
Center Front Passenger Position, Safety Belts....1-21
Center Rear Passenger Position, Safety Belts.....1-25
Center Seat Positions, Child Restraints..............1-49
Chains, Tire...................................................5-66
Charging System Light....................................3-28
Check
Engine Light...............................................3-31
Gages Warning Light...................................3-37
Checking Things Under the Hood......................5-10
Chemical Paint Spotting...................................5-87
2