radio controls GMC JIMMY 2005 Owner's Manual
[x] Cancel search | Manufacturer: GMC, Model Year: 2005, Model line: JIMMY, Model: GMC JIMMY 2005Pages: 432, PDF Size: 2.65 MB
Page 165 of 432
Trip Computer
Once in the TRIP mode, press the ON/OFF button to
display the following trip functions:
AVG ECON (Average Economy):The average fuel
economy since the last reset is displayed.
INST ECON (Instantaneous Economy):Instantaneous
fuel economy for the last second of driving is displayed.
RANGE:The display indicates the estimated distance
that can be travelled with the remaining fuel in the tank,
based on the fuel economy for the last few hours of
driving.
FUEL USED:The fuel used since the last reset is
displayed.
AVG SPEED (Average Speed):The average speed
since the last reset is displayed.
Resetting the Trip Computer
To reset the trip computer, press the ON/OFF and
US/MET buttons simultaneously for at least
two seconds. All functions will be displayed brie�y once
the system is reset. Reset can only be performed in
the AVG ECON, FUEL USED and AVG SPEED modes.
All three modes are reset at the same time.
Audio System(s)
Notice:Before adding any sound equipment to
your vehicle, like a tape player, CB radio, mobile
telephone, or two-way radio, make sure that it can
be added by checking with your dealer. Also,
check federal rules covering mobile radio and
telephone units. If sound equipment can be added,
it is very important to do it properly. Added
sound equipment may interfere with the operation
of your vehicle’s engine, radio, or other systems,
and even damage them. Your vehicle’s systems may
interfere with the operation of sound equipment
that has been added improperly.
Figure out which audio system is in your vehicle, �nd
out what your audio system can do, and how to operate
all of its controls.
Your vehicle has a feature called Retained Accessory
Power (RAP). With RAP, the audio system can be
played even after the ignition is turned off. SeeRetained
Accessory Power (RAP) on page 2-23for more
information.
3-41
Page 168 of 432
Setting Preset Stations
Up to 18 stations (six FM1, six FM2, and six AM) can be
programmed on the six numbered pushbuttons, by
performing the following steps:
1. Turn the radio on.
2. Press AM FM to select FM1, FM2, or AM.
3. Tune in the desired station.
4. Press and hold one of the six numbered
pushbuttons until you hear a beep. Whenever that
numbered pushbutton is pressed, the station
that was set will return.
5. Repeat the steps for each pushbutton.
Setting the Tone (Bass/Treble)
AUDIO:To adjust bass and treble, press and release
AUDIO until BAS or TRE appears on the display.
Then press and hold the up or the down arrow to
increase or to decrease. If a station is weak or noisy,
decrease the treble.
To adjust bass or treble to the middle position, select
BAS or TRE. Then press and hold AUDIO for more than
two seconds until you hear a beep. B and a zero or T
and a zero will appear on the display.
To adjust both tone controls and both speaker controls
to the middle position, �rst end out of audio mode
by pressing another button, causing the radio to perform
that function or by waiting �ve seconds for the display
to return to time of day. Then press and hold AUDIO for
more than two seconds until you hear a beep. CEN
will appear on the display.
3-44
Page 169 of 432
Adjusting the Speakers (Balance/Fade)
AUDIO:To adjust the balance between the right
and the left speakers, press and release AUDIO until
BAL appears on the display. Then press and hold the up
or the down arrow to move the sound toward the right
or the left speakers.
To adjust the fade between the front and the rear
speakers, press and release AUDIO until FAD appears
on the display. Then press and hold the up or the
down arrow to move the sound toward the front or the
rear speakers.
To adjust balance or fade to the middle position, select
BAL or FAD. Then press and hold AUDIO for more
than two seconds until you hear a beep. L (balance) and
a zero or F and a zero will appear on the display.
To adjust both tone controls and both speaker controls
to the middle position, �rst end out of audio mode
by pressing another button, causing the radio to perform
that function or by waiting �ve seconds for the display
to return to time of day. Then press and hold AUDIO for
more than two seconds until you hear a beep. CEN
will appear on the display.
Fade may not be available if the vehicle is a regular
cab model.
Radio Messages
CAL (Calibrated):The audio system has been
calibrated for your vehicle from the factory. If CAL
appears on the display it means that the radio has not
been con�gured properly for your vehicle and must
be returned to your GM dealer for service.
LOC (Locked):This message is displayed when the
THEFTLOCK
®system has locked up. Take the vehicle
to your GM dealer for service.
If any error occurs repeatedly or if an error cannot be
corrected, contact your GM dealer.
3-45
Page 172 of 432

Setting the Tone (Bass/Treble)
AUDIO:Push and release the AUDIO knob until BASS
or TREB appears on the display. Turn the knob to
increase or to decrease. The display will show the bass
or treble level. If a station is weak or noisy, decrease
the treble.
To adjust the bass and treble to the middle position,
push and hold the AUDIO knob. The radio will produce
one beep and adjust the display level to the middle
position.
To adjust all tone and speaker controls to the middle
position, push and hold the AUDIO knob when no tone
or speaker control is displayed. ALL will appear on
the display, you will hear a beep, and the display level
will be adjusted to the middle position.
AUTO EQ (Automatic Equalization):Press this button
to select customized equalization settings designed
for country/western, jazz, talk, pop, rock, and classical.
Selecting CUSTOM or changing bass or treble,
returns the EQ to the manual bass and treble settings.
The radio will save separate AUTO EQ settings for
each preset and source.
Adjusting the Speakers (Balance/Fade)
AUDIO:To adjust the balance between the right
and the left speakers, push and release the AUDIO
knob until BAL appears on the display. Turn the knob to
move the sound toward the right or the left speakers.
To adjust the fade between the front and the rear
speakers, push and release the AUDIO knob until FADE
appears on the display. Turn the knob to move the
sound toward the front or the rear speakers.
To adjust the balance and fade to the middle position,
push the AUDIO knob, then push it again and hold
it until the radio produces one beep. The balance and
fade will be adjusted to the middle position and the
display will show the speaker balance.
To adjust all tone and speaker controls to the middle
position, push and hold the AUDIO knob when no tone
or speaker control is displayed. ALL CENTERED will
appear on the display, you will hear a beep, and
the display level will be adjusted to the middle position.
3-48
Page 181 of 432
To adjust all tone and speaker controls to the middle
position, push and hold the AUDIO knob when no tone
or speaker control is displayed. ALL CENTERED will
appear on the display, you will hear a beep, and
the display level will be adjusted to the middle position.
AUTO EQ (Automatic Equalization):Press this
button to select customized equalization settings
designed for country/western, jazz, talk, pop, rock, and
classical. Selecting CUSTOM or changing bass or
treble, returns the EQ to the manual bass and treble
settings.
The radio will save separate AUTO EQ settings for each
preset and source.
Adjusting the Speakers (Balance/Fade)
AUDIO:To adjust the balance between the right
and the left speakers, push and release the AUDIO
knob until BAL appears on the display. Turn the knob to
move the sound toward the right or the left speakers.
To adjust the fade between the front and the rear
speakers, push and release the AUDIO knob until FADE
appears on the display. Turn the knob to move the
sound toward the front or the rear speakers.To adjust the balance and fade to the middle position,
push the AUDIO knob, then push it again and hold
it until the radio produces one beep. The balance and
fade will be adjusted to the middle position and the
display will show the speaker balance.
To adjust all tone and speaker controls to the middle
position, push and hold the AUDIO knob when no tone
or speaker control is displayed. ALL CENTERED will
appear on the display, you will hear a beep, and
the display level will be adjusted to the middle position.
Finding a Program Type (PTY)
Station (RDS and XM™)
To select and �nd a desired PTY perform the following:
1. Press the TYPE button to activate program type
select mode. TYPE and a PTY will appear on the
display.
2. Turn the TYPE knob or press and release the
TYPE button to select a PTY.
3. Once the desired PTY is displayed, press and
release either the TYPE or the SEEK arrows to
select and to take you to the PTY’s �rst station.
3-57
Page 186 of 432
Playing a Cassette Tape
The tape player is built to work best with tapes that are
up to 30 to 45 minutes long on each side. Tapes
longer than that are so thin they may not work well in
this player. The longer side with the tape visible should
face to the right. If you hear nothing or hear a garbled
sound, the tape may not be in squarely. Press the eject
button to remove the tape and start over.
If the ignition and radio are off, press the eject button or
the INFO knob to insert and to begin play of a tape.
If the ignition is on and the radio is off, the tape can be
inserted and will begin playing.
While the tape is playing, use the VOL, AUDIO, and
SEEK controls just as you do for the radio. The cassette
tape symbol will appear on the display and an arrow
showing which side of the tape is playing. The tape
player will play the other side of the tape when it
reaches the end.
Cassette tape adapter kits for portable CD players will
work in the cassette tape player. See “CD Adapter Kits”
later for more information.
The tape bias is set automatically when a metal or
chrome tape is inserted.
If an error appears on the display, see “Cassette Tape
Messages” later in this section.1 PREV (Previous):The tape must have at least
three seconds of silence between each selection for
previous to work. Press this pushbutton to go to
the previous selection on the tape if the current selection
has been playing for less than three seconds. If
pressed when the current selection has been playing
from three to 13 seconds, it will go to the beginning
of the previous selection or the beginning of the current
selection, depending on the position on the tape. If
pressed when the current selection has been playing for
more than 13 seconds, it will go to the beginning of
the current selection.
SEEK and a negative number will appear on the display
while the cassette player is in the previous mode.
Pressing this pushbutton multiple times will increase the
number of selections to be searched back, up to−9.
2 NEXT:The tape must have at least three seconds of
silence between each selection for next to work.
Press this pushbutton to go to the next selection on the
tape. Pressing this pushbutton multiple times, in next
mode, will increase the number of selections to be
searched forward. SEEK and a positive number
will appear on the display.
3-62
Page 193 of 432

Setting the Tone (Bass/Treble)
AUDIO:Push and release the AUDIO knob until BASS,
MID, or TREB appears on the display. Turn the knob
to increase or to decrease. The display will show
the bass, midrange, or treble level. If a station is weak
or noisy, decrease the treble.
To adjust the bass, midrange, and treble to the middle
position, push and hold the AUDIO knob. The radio
will produce one beep and adjust the display level to the
middle position.
To adjust all tone and speaker controls to the middle
position, push and hold the AUDIO knob when no tone
or speaker controls are displayed. ALL CENTERED
will appear on the display and you will hear a beep.
AUTO EQ (Automatic Equalization):Press this button
to select customized equalization settings designed
for country/western, jazz, talk, pop, rock, and classical.
To return to the manual mode, press the AUTO EQ
button until CUSTOM appears on the display. Then
manually adjust the bass, midrange, and treble using the
AUDIO knob.
Adjusting the Speakers (Balance/Fade)
AUDIO:To adjust the balance between the right
and the left speakers, push and release the AUDIO
knob until BAL appears on the display. Turn the knob to
move the sound toward the right or the left speakers.
To adjust the fade between the front and rear speakers,
push and release the AUDIO knob until FAD appears
on the display. Turn the knob to move the sound toward
the front or the rear speakers.
To adjust the balance and fade to the middle position,
push and hold the AUDIO knob. The radio will produce
one beep and adjust the display level to the middle
position.
To adjust all tone and speaker controls to the middle
position, push and hold the AUDIO knob when no tone
or speaker controls are displayed. ALL CENTERED
will appear on the display and you will hear a beep.
3-69
Page 364 of 432
Fuse Usage
6 Steering Wheel Radio Controls
7Headlamps Switch, Body Control
Module, Headlamp Relay
8Courtesy Lamps, Battery Run-Down
Protection
9Heating, Ventilation, Air Cooling
Control Head (Manual)
10 Turn Signal
11 Cluster, Engine Control Module
12 Interior Lights
13 Auxiliary Power
14 Power Locks Motor
154WD Switch, Engine Controls (VCM,
PCM, Transmission)
16 Supplemental In�atable Restraint
17 Front Wiper
18 Steering Wheel Radio Controls
19 Radio, Battery
20 Ampli�er
21Heating, Ventilation, Air Cooling
(Manual), Heating,Ventilation, Air
Cooling (Automatic), Heating,
Ventilation, Air Cooling Sensors
(Automatic)
22 Anti-Lock BrakesFuse Usage
23 Rear Wiper
24 Radio, Ignition
Engine Compartment Fuse Block
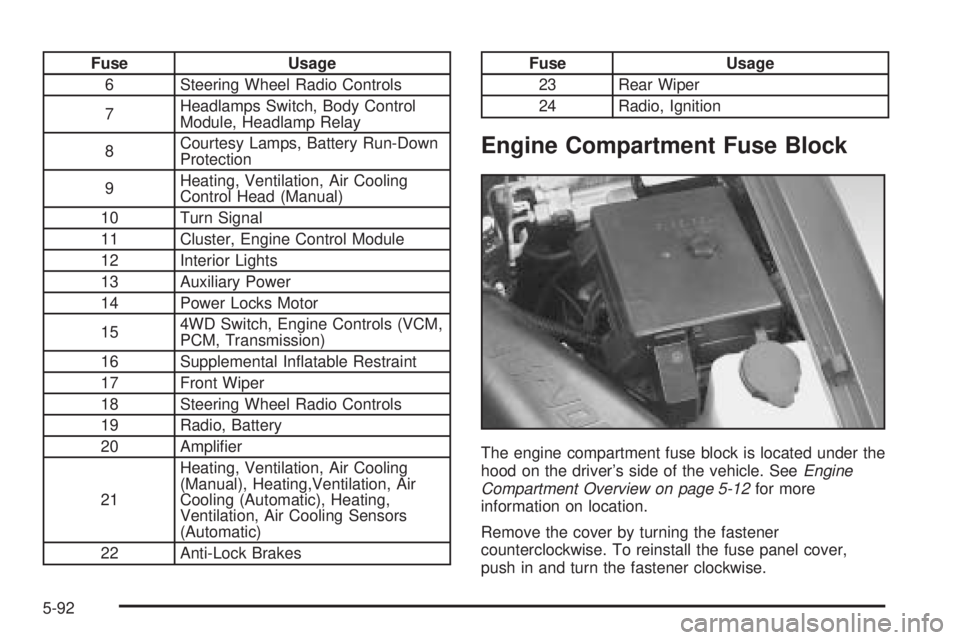
The engine compartment fuse block is located under the
hood on the driver’s side of the vehicle. SeeEngine
Compartment Overview on page 5-12for more
information on location.
Remove the cover by turning the fastener
counterclockwise. To reinstall the fuse panel cover,
push in and turn the fastener clockwise.
5-92
Page 427 of 432

Outside (cont.)
Heated Mirrors............................................2-44
Manual Mirror.............................................2-43
Power Mirrors.............................................2-43
Overhead Console..........................................2-49
Owners, Canadian............................................... ii
P
Park (P)
Shifting Into................................................2-37
Shifting Out of............................................2-39
Parking
Brake........................................................2-36
Over Things That Burn.................................2-40
Parking Your Vehicle.......................................2-39
Part A - Scheduled Maintenance Services............ 6-4
Part B - Owner Checks and Services................6-26
Part C - Periodic Maintenance Inspections..........6-31
Part D - Recommended Fluids and Lubricants....6-33
Part E - Maintenance Record...........................6-36
Passing.........................................................4-12
Passlock
®......................................................2-20
Power
Door Locks.................................................. 2-9
Electrical System.........................................5-90
Lumbar Controls........................................... 1-3
Retained Accessory (RAP)............................2-23
Seat............................................................ 1-3Power (cont.)
Steering Fluid.............................................5-34
Windows....................................................2-17
Programmable Automatic Door Locks.................. 2-9
Programming the HomeLink
®Transmitter...........2-46
Q
Questions and Answers About Safety Belts.........1-12
R
Radiator Pressure Cap....................................5-26
Radios..........................................................3-41
AM-FM Radio.............................................3-43
Care of Your Cassette Tape Player................3-78
Care of Your CD Player...............................3-79
Care of Your CDs........................................3-79
Radio with Cassette and CD.........................3-54
Radio with CD............................................3-46
Radio with Six-Disc CD................................3-67
Setting the Time for Radios with Radio
Data Systems (RDS)................................3-42
Setting the Time for Radios without
Radio Data Systems (RDS).......................3-42
Theft-Deterrent............................................3-77
Understanding Reception..............................3-78
Rear Axle......................................................5-43
Rear Door Security Locks................................2-11
9