transmission GMC SAVANA 2006 Owner's Guide
[x] Cancel search | Manufacturer: GMC, Model Year: 2006, Model line: SAVANA, Model: GMC SAVANA 2006Pages: 394, PDF Size: 2.56 MB
Page 267 of 394
Automatic Transmission Fluid
When to Check and Change Automatic
Transmission Fluid
A good time to check your automatic transmission fluid
level is when the engine oil is changed.
Change the fluid and filter at the intervals listed in
Additional Required Services (Gasoline Engine) on
page 6-6, and be sure to use the transmission fluid listed
inRecommended Fluids and Lubricants (Gasoline
Engine) on page 6-13.
How to Check Automatic Transmission
Fluid
Because this operation can be a little difficult, you may
choose to have this done at the dealership service
department.
If you do it yourself, be sure to follow all the instructions
here, or you could get a false reading on the dipstick.
Notice:Too much or too little uid can damage
your transmission. Too much can mean that some
of the uid could come out and fall on hot engine
part or exhaust system parts, starting a re.
Too little uid could cause the transmission to
overheat. Be sure to get an accurate reading if you
check your transmission uid.Wait at least 30 minutes before checking the
transmission fluid level if you have been driving:
•When outside temperatures are above 90°F (32°C).
•At high speed for quite a while.
•In heavy traffic — especially in hot weather.
•While pulling a trailer.
To get the right reading, the fluid should be at normal
operating temperature, which is 180°F to 200°F
(82°C to 93°C).
Get the vehicle warmed up by driving about 15 miles
(24 km) when outside temperatures are above 50°F
(10°C). If it is colder than 50°F (10°C), drive the vehicle
in DRIVE (D) until the engine temperature gage
moves and then remains steady for 10 minutes.
A cold fluid check can be made after the vehicle has
been sitting for eight hours or more with the engine off,
but this is used only as a reference. Let the engine
run at idle for five minutes if outside temperatures are
50°F (10°C) or more. If it is colder than 50°F (10°C), you
may have to idle the engine longer. Should the fluid
level be low during this cold check, you must check the
fluid hot before adding fluid. Checking the fluid hot
will give you a more accurate reading of the fluid level.
5-19
Page 268 of 394
Checking the Fluid Level
Prepare your vehicle as follows:
1. Park your vehicle on a level place. Keep the engine
running.
2. With the parking brake applied, place the shift lever
in PARK (P).
3. With your foot on the brake pedal, move the shift
lever through each gear range, pausing for about
three seconds in each range. Then, position
the shift lever in PARK (P).
4. Let the engine run at idle for three minutes or more.
Then, without shutting off the engine, follow these steps:
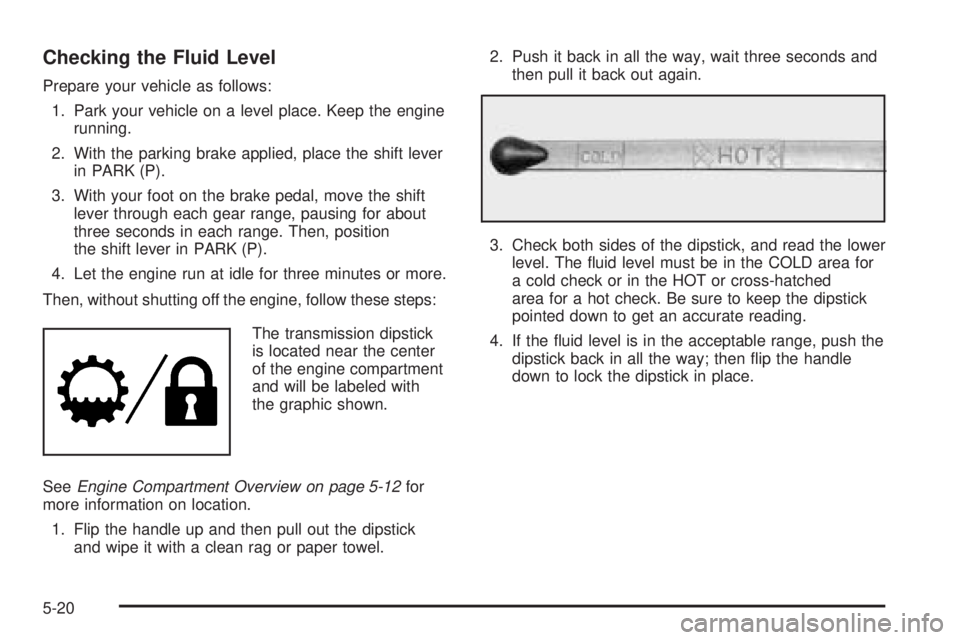
The transmission dipstick
is located near the center
of the engine compartment
and will be labeled with
the graphic shown.
SeeEngine Compartment Overview on page 5-12for
more information on location.
1. Flip the handle up and then pull out the dipstick
and wipe it with a clean rag or paper towel.2. Push it back in all the way, wait three seconds and
then pull it back out again.
3. Check both sides of the dipstick, and read the lower
level. The fluid level must be in the COLD area for
a cold check or in the HOT or cross-hatched
area for a hot check. Be sure to keep the dipstick
pointed down to get an accurate reading.
4. If the fluid level is in the acceptable range, push the
dipstick back in all the way; then flip the handle
down to lock the dipstick in place.
5-20
Page 269 of 394
How to Add Automatic Transmission
Fluid
Refer to the Maintenance Schedule to determine what
kind of transmission fluid to use. SeeRecommended
Fluids and Lubricants (Gasoline Engine) on page 6-13.
Using a funnel, add fluid down the transmission
dipstick tube only after checking the transmission fluid
while it is hot. A cold check is used only as a reference.
If the fluid level is low, add only enough of the proper
fluid to bring the level up to the HOT area for a hot
check. It does not take much fluid, generally less than
one pint (0.5 L). Do not overfill.
Notice:Use of the incorrect automatic transmission
uid may damage your vehicle, and the damages
may not be covered by your warranty. Always
use the automatic transmission uid listed in
Recommended Fluids and Lubricants (Gasoline
Engine) on page 6-13.
•After adding fluid, recheck the fluid level as
described under “How to Check Automatic
Transmission Fluid,” earlier in this section.
•When the correct fluid level is obtained, push the
dipstick back in all the way; then flip the handle
down to lock the dipstick in place.
Engine Coolant
The cooling system in your vehicle is filled with
DEX-COOL®engine coolant. This coolant is designed
to remain in your vehicle for five years or 150,000 miles
(240 000 km), whichever occurs first, if you add only
DEX-COOL
®extended life coolant.
The following explains your cooling system and how to
add coolant when it is low. If you have a problem
with engine overheating, seeEngine Overheating on
page 5-24.
A 50/50 mixture of clean, drinkable water and
DEX-COOL
®coolant will:
•Give freezing protection down to−34°F (−37°C).
•Give boiling protection up to 265°F (129°C).
•Protect against rust and corrosion.
•Help keep the proper engine temperature.
•Let the warning lights and gages work as
they should.
Notice:Using coolant other than DEX-COOL
®may
cause premature engine, heater core, radiator
and fuel operated heater (FOH) corrosion. In
addition, the engine coolant may require changing
sooner, at 30,000 miles (50 000 km) or 24 months,
whichever occurs rst. Any repairs would not
be covered by your warranty. Always use
DEX-COOL
®(silicate-free) coolant in your vehicle.
5-21
Page 280 of 394
Engine Fan Noise
Your vehicle has a clutched engine cooling fan. When
the clutch is engaged, the fan spins faster to provide
more air to cool the engine. In most everyday driving
conditions, the fan is spinning slower and the clutch is
not fully engaged. This improves fuel economy and
reduces fan noise. Under heavy vehicle loading, trailer
towing, and/or high outside temperatures, the fan
speed increases as the clutch more fully engages, so
you may hear an increase in fan noise. This is
normal and should not be mistaken as the transmission
slipping or making extra shifts. It is merely the cooling
system functioning properly. The fan will slow down
when additional cooling is not required and the clutch
partially disengages.
You may also hear this fan noise when you start the
engine. It will go away as the fan clutch partially
disengages.
Power Steering Fluid
The power steering fluid
reservoir is located in the
engine compartment
on the driver’s side of the
vehicle. SeeEngine
Compartment Overview on
page 5-12for reservoir
location.
5-32
Page 287 of 394
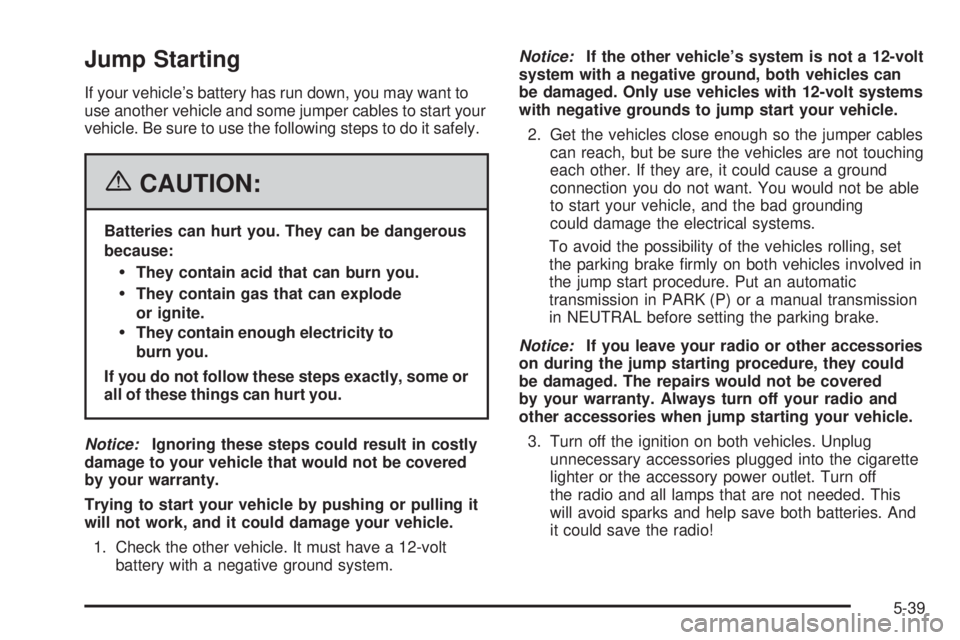
Jump Starting
If your vehicle’s battery has run down, you may want to
use another vehicle and some jumper cables to start your
vehicle. Be sure to use the following steps to do it safely.
{CAUTION:
Batteries can hurt you. They can be dangerous
because:
They contain acid that can burn you.
They contain gas that can explode
or ignite.
They contain enough electricity to
burn you.
If you do not follow these steps exactly, some or
all of these things can hurt you.
Notice:Ignoring these steps could result in costly
damage to your vehicle that would not be covered
by your warranty.
Trying to start your vehicle by pushing or pulling it
will not work, and it could damage your vehicle.
1. Check the other vehicle. It must have a 12-volt
battery with a negative ground system.Notice:If the other vehicle’s system is not a 12-volt
system with a negative ground, both vehicles can
be damaged. Only use vehicles with 12-volt systems
with negative grounds to jump start your vehicle.
2. Get the vehicles close enough so the jumper cables
can reach, but be sure the vehicles are not touching
each other. If they are, it could cause a ground
connection you do not want. You would not be able
to start your vehicle, and the bad grounding
could damage the electrical systems.
To avoid the possibility of the vehicles rolling, set
the parking brake firmly on both vehicles involved in
the jump start procedure. Put an automatic
transmission in PARK (P) or a manual transmission
in NEUTRAL before setting the parking brake.
Notice:If you leave your radio or other accessories
on during the jump starting procedure, they could
be damaged. The repairs would not be covered
by your warranty. Always turn off your radio and
other accessories when jump starting your vehicle.
3. Turn off the ignition on both vehicles. Unplug
unnecessary accessories plugged into the cigarette
lighter or the accessory power outlet. Turn off
the radio and all lamps that are not needed. This
will avoid sparks and help save both batteries. And
it could save the radio!
5-39
Page 304 of 394
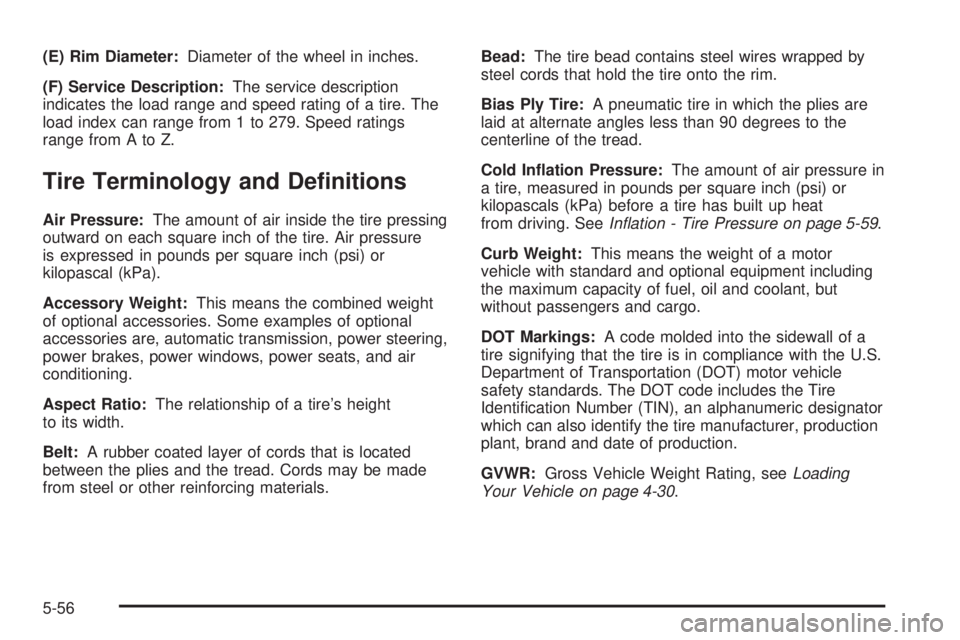
(E) Rim Diameter:Diameter of the wheel in inches.
(F) Service Description:The service description
indicates the load range and speed rating of a tire. The
load index can range from 1 to 279. Speed ratings
range from A to Z.
Tire Terminology and Denitions
Air Pressure:The amount of air inside the tire pressing
outward on each square inch of the tire. Air pressure
is expressed in pounds per square inch (psi) or
kilopascal (kPa).
Accessory Weight:This means the combined weight
of optional accessories. Some examples of optional
accessories are, automatic transmission, power steering,
power brakes, power windows, power seats, and air
conditioning.
Aspect Ratio:The relationship of a tire’s height
to its width.
Belt:A rubber coated layer of cords that is located
between the plies and the tread. Cords may be made
from steel or other reinforcing materials.Bead:The tire bead contains steel wires wrapped by
steel cords that hold the tire onto the rim.
Bias Ply Tire:A pneumatic tire in which the plies are
laid at alternate angles less than 90 degrees to the
centerline of the tread.
Cold Ination Pressure:The amount of air pressure in
a tire, measured in pounds per square inch (psi) or
kilopascals (kPa) before a tire has built up heat
from driving. SeeInation - Tire Pressure on page 5-59.
Curb Weight:This means the weight of a motor
vehicle with standard and optional equipment including
the maximum capacity of fuel, oil and coolant, but
without passengers and cargo.
DOT Markings:A code molded into the sidewall of a
tire signifying that the tire is in compliance with the U.S.
Department of Transportation (DOT) motor vehicle
safety standards. The DOT code includes the Tire
Identification Number (TIN), an alphanumeric designator
which can also identify the tire manufacturer, production
plant, brand and date of production.
GVWR:Gross Vehicle Weight Rating, seeLoading
Your Vehicle on page 4-30.
5-56
Page 343 of 394

Relays Usage
23 Window Residual Accessory Power
24 Auxiliary
25 Right Rear Defogger
26 Courtesy Lamp
27 Cargo Unlock
28 Driver Unlock
29 Park Lamp
30 Door Locks
31 Passenger Unlock
Circuit Breaker Usage
34 Power Window
Engine Compartment Fuse Block
The fuse block is located in the engine compartment on
the driver’s side of the vehicle.
Fuse Usage
1 Radio Battery
2Powertrain Control Module Battery
(Gas), FOH, Engine Control Module,
Transmission Control Module
Battery (Diesel)
3 Left Rear Turn Lamp
4 Right Rear Turn Lamp
5-95
Page 344 of 394
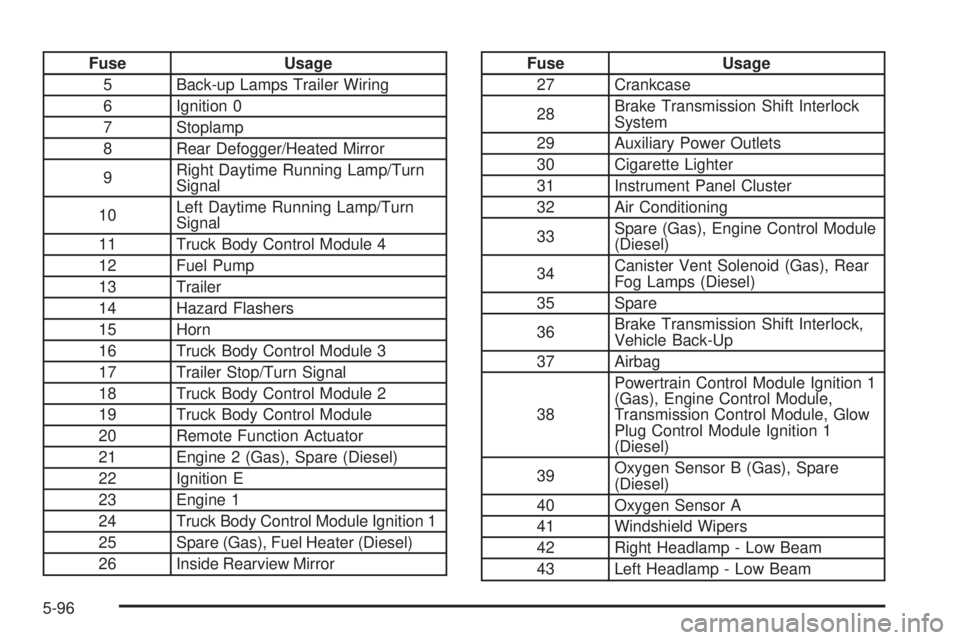
Fuse Usage
5 Back-up Lamps Trailer Wiring
6 Ignition 0
7 Stoplamp
8 Rear Defogger/Heated Mirror
9Right Daytime Running Lamp/Turn
Signal
10Left Daytime Running Lamp/Turn
Signal
11 Truck Body Control Module 4
12 Fuel Pump
13 Trailer
14 Hazard Flashers
15 Horn
16 Truck Body Control Module 3
17 Trailer Stop/Turn Signal
18 Truck Body Control Module 2
19 Truck Body Control Module
20 Remote Function Actuator
21 Engine 2 (Gas), Spare (Diesel)
22 Ignition E
23 Engine 1
24 Truck Body Control Module Ignition 1
25 Spare (Gas), Fuel Heater (Diesel)
26 Inside Rearview MirrorFuse Usage
27 Crankcase
28Brake Transmission Shift Interlock
System
29 Auxiliary Power Outlets
30 Cigarette Lighter
31 Instrument Panel Cluster
32 Air Conditioning
33Spare (Gas), Engine Control Module
(Diesel)
34Canister Vent Solenoid (Gas), Rear
Fog Lamps (Diesel)
35 Spare
36Brake Transmission Shift Interlock,
Vehicle Back-Up
37 Airbag
38Powertrain Control Module Ignition 1
(Gas), Engine Control Module,
Transmission Control Module, Glow
Plug Control Module Ignition 1
(Diesel)
39Oxygen Sensor B (Gas), Spare
(Diesel)
40 Oxygen Sensor A
41 Windshield Wipers
42 Right Headlamp - Low Beam
43 Left Headlamp - Low Beam
5-96
Page 345 of 394
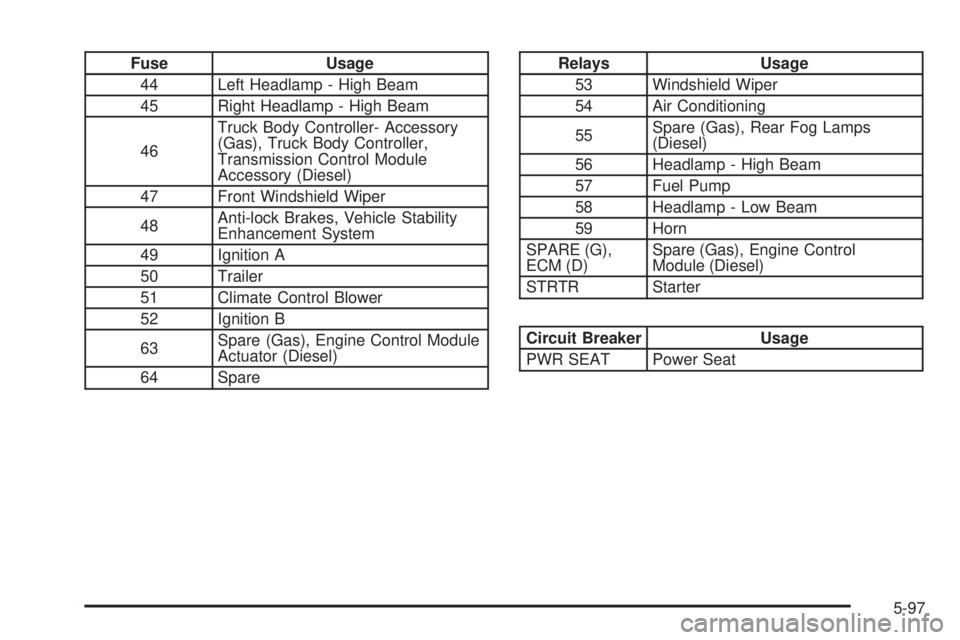
Fuse Usage
44 Left Headlamp - High Beam
45 Right Headlamp - High Beam
46Truck Body Controller- Accessory
(Gas), Truck Body Controller,
Transmission Control Module
Accessory (Diesel)
47 Front Windshield Wiper
48Anti-lock Brakes, Vehicle Stability
Enhancement System
49 Ignition A
50 Trailer
51 Climate Control Blower
52 Ignition B
63Spare (Gas), Engine Control Module
Actuator (Diesel)
64 SpareRelays Usage
53 Windshield Wiper
54 Air Conditioning
55Spare (Gas), Rear Fog Lamps
(Diesel)
56 Headlamp - High Beam
57 Fuel Pump
58 Headlamp - Low Beam
59 Horn
SPARE (G),
ECM (D)Spare (Gas), Engine Control
Module (Diesel)
STRTR Starter
Circuit Breaker Usage
PWR SEAT Power Seat
5-97
Page 347 of 394
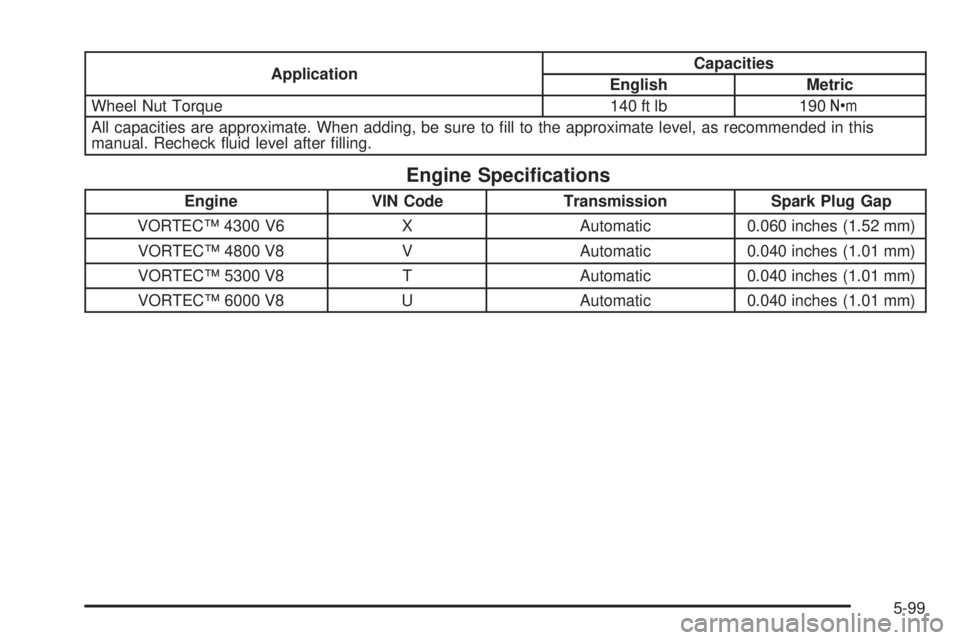
ApplicationCapacities
English Metric
Wheel Nut Torque 140 ft lb 190Y
All capacities are approximate. When adding, be sure to fill to the approximate level, as recommended in this
manual. Recheck fluid level after filling.
Engine Specications
Engine VIN Code Transmission Spark Plug Gap
VORTEC™ 4300 V6 X Automatic 0.060 inches (1.52 mm)
VORTEC™ 4800 V8 V Automatic 0.040 inches (1.01 mm)
VORTEC™ 5300 V8 T Automatic 0.040 inches (1.01 mm)
VORTEC™ 6000 V8 U Automatic 0.040 inches (1.01 mm)
5-99