mirror GMC SIERRA 1500 2009 Owner's Manual
[x] Cancel search | Manufacturer: GMC, Model Year: 2009, Model line: SIERRA 1500, Model: GMC SIERRA 1500 2009Pages: 602, PDF Size: 3.22 MB
Page 195 of 602
6(Delay):Turn the band to adjust the delay time.
The delay between wiping cycles becomes shorter as
the band is moved to the top of the lever. This can
be very useful in light rain or snow.
6(Low Speed):For steady wiping at low speed.
?(High Speed):For high-speed wiping.
Clear ice and snow from the wiper blades before using
them. If they are frozen to the windshield, gently
loosen or thaw them. Damaged wiper blades may not
clear the windshield well, making it harder to see
and drive safely. If the blades do become damaged,
install new blades or blade inserts. For more information,
seeWindshield Wiper Blade Replacement on page 5-66.
Heavy snow or ice can overload the wiper motor. A
circuit breaker will stop the motor until it cools down.
Clear away snow or ice to prevent an overload.
Rainsense™ II Wipers
For vehicles with Rainsense™ II windshield wipers, the
moisture sensor is located next to the inside rearview
mirror and is mounted on the windshield. When active,
these sensors are able to detect moisture on the
windshield and automatically turn on the wipers.
To turn on the Rainsense feature, the wipers must be set
to one of the ve delay settings on the multifunction lever.
Each of the ve settings adjusts the sensitivity of the
sensor.
Since different drivers have different setting preferences,
it is recommended that the mid-range setting (position 3)
be used initially. For more wipes, select the higher
settings; for fewer wipes, select the lower settings located
closer to the off position on the multifunction lever.
The sensor will automatically control the frequency of
the wipes from the off setting to the high speed setting
according to the weather conditions. The wipers can be
left in a rainsense mode even when it is not raining.
When Rainsense is active, the headlamps will turn on
automatically if the exterior lamp control is in the AUTO
position and the wipers are active.
Notice:Going through an automatic car wash with
the wipers on can damage them. Turn the wipers
off when going through an automatic car wash.
3-11
Page 215 of 602
@(Recirculation):Press to turn the recirculation
mode on. An indicator light comes on to show that the
recirculation is on.
This mode recirculates and helps to quickly cool the air
inside the vehicle. It can be used to help prevent outside
air and odors from entering the vehicle.
The recirculation mode cannot be used with oor, defog,
or defrost modes. If recirculation is selected with one of
those modes, the indicator light ashes three times and
then turns off. The air conditioning compressor also
comes on when this mode is activated. While in
recirculation mode the windows may fog when the
weather is cold and damp. To clear the fog, select either
the defog or defrost mode and increase the fan speed.
The recirculation mode can be turned off by pressing the
outside air button, or by turning off the ignition.
;(Outside Air):Press to turn the outside air mode on.
An indicator light on the button comes on to show that
outside is on. When selected, air from outside the vehicle
circulates throughout the vehicle. The outside air mode
can be used with all modes, but it cannot be used with the
recirculation mode.
Rear Window Defogger
The rear window defogger uses a warming grid to
remove fog from the rear window.
<(Rear Window Defogger):For vehicles with
this feature, press to turn the defogger on or off.
It automatically turns off several minutes after it has
been activated. The defogger can also be turned off by
turning the engine off. Do not drive the vehicle until all
the windows are clear.
Notice:Do not use a razor blade or sharp object to
clear the inside rear window. Do not adhere anything
to the defogger grid lines in the rear glass. These
actions may damage the rear defogger. Repairs
would not be covered by your warranty.
Heated Mirrors:For vehicles with heated outside
rearview mirrors, the mirrors heat to help clear fog or frost
from the surface of the mirror when the rear window
defog button is pressed. SeeOutside Power Mirrors on
page 2-58.
3-31
Page 265 of 602
PARK TILT MIRRORS
If your vehicle has this feature, it allows you to select
whether or not the outside mirror(s) will automatically tilt
down when the vehicle is shifted into R (Reverse). See
Outside Power Foldaway Mirrors on page 2-59for more
information.
Press the customization button until PARK TILT
MIRRORS appears on the DIC display. Press the
set/reset button once to access the settings for
this feature. Then press the customization button to
scroll through the following settings:
OFF (default):Neither outside mirror will be tilted down
when the vehicle is shifted into R (Reverse).
DRIVER MIRROR:The driver’s outside mirror will be
tilted down when the vehicle is shifted into R (Reverse).
PASSENGER MIRROR:The passenger’s outside
mirror will be tilted down when the vehicle is shifted into
R (Reverse).
BOTH MIRRORS:The driver’s and passenger’s outside
mirrors will be tilted down when the vehicle is shifted
into R (Reverse).
NO CHANGE:No change will be made to this feature.
The current setting will remain.
To select a setting, press the set/reset button while the
desired setting is displayed on the DIC.
EASY EXIT RECALL
If your vehicle has this feature, it allows you to select
your preference for the automatic easy exit seat feature.
SeeMemory Seat, Mirrors, and Pedals on page 1-8
for more information.
Press the customization button until EASY EXIT RECALL
appears on the DIC display. Press the set/reset button
once to access the settings for this feature. Then press
the customization button to scroll through the following
settings:
DOOR BUTTON ONLY:No automatic seat exit recall
will occur. The recall will only occur after pressing
the easy exit seat button.
BUTTON & KEY OUT (default):If the features are
enabled through the EASY EXIT SETUP menu, the
driver’s seat will move back when the key is removed
from the ignition or after pressing the easy exit seat
button.
The automatic easy exit seat movement will only occur
one time after the key is removed from the ignition. If the
automatic movement has already occurred, and you put
the key back in the ignition and remove it again, the seat
will stay in the original exit position, unless a memory
recall took place prior to removing the key again.
NO CHANGE:No change will be made to this feature.
The current setting will remain.
To select a setting, press the set/reset button while the
desired setting is displayed on the DIC.
3-81
Page 266 of 602
EASY EXIT SETUP
If your vehicle has this feature, it allows you to select
which areas will recall with the automatic easy exit seat
feature. It also allows you to turn off the automatic easy
exit feature. SeeMemory Seat, Mirrors, and Pedals on
page 1-8and “EASY EXIT RECALL” earlier for more
information.
Press the customization button until EASY EXIT SETUP
appears on the DIC display. Press the set/reset button
once to access the settings for this feature. Then press
the menu up/down button to scroll through the following
settings:
OFF:No automatic seat exit will recall.
SEAT ONLY (Default):The driver’s seat will recall.
NO CHANGE:No change will be made to this feature.
The current setting will remain.
To select a setting, press the set/reset button while the
desired setting is displayed on the DIC.
MEMORY SEAT RECALL
If your vehicle has this feature, it allows you to select
your preference for the remote memory seat recall
feature. SeeMemory Seat, Mirrors, and Pedals
on page 1-8for more information.
Press the customization button until MEMORY SEAT
RECALL appears on the DIC display. Press the set/reset
button once to access the settings for this feature.
Then press the customization button to scroll through
the following settings:
OFF (default):No remote memory seat recall will occur.
ON:The driver’s seat and, on some vehicles, the outside
mirrors will automatically move to the stored driving
position when the unlock button on the Remote Keyless
Entry (RKE) transmitter is pressed. On some vehicles
with the adjustable throttle and brake pedal feature, the
pedals will also automatically move. See “Relearn
Remote Key” underDIC Operation and Displays (With
DIC Buttons) on page 3-53orDIC Operation and
Displays (Without DIC Buttons) on page 3-59for
more information on matching transmitters to driver
ID numbers.
NO CHANGE:No change will be made to this feature.
The current setting will remain.
To select a setting, press the set/reset button while the
desired setting is displayed on the DIC.
3-82
Page 338 of 602
Skidding
In a skid, a driver can lose control of the vehicle.
Defensive drivers avoid most skids by taking reasonable
care suited to existing conditions, and by not overdriving
those conditions. But skids are always possible.
The three types of skids correspond to the vehicle’s three
control systems. In the braking skid, the wheels are not
rolling. In the steering or cornering skid, too much speed
or steering in a curve causes tires to slip and lose
cornering force. And in the acceleration skid, too much
throttle causes the driving wheels to spin.
Remember: StabiliTrak
®helps avoid only the
acceleration skid. SeeStabiliTrak®System on page 4-6.
If the StabiliTrak®System is off, then an acceleration
skid is best handled by easing your foot off the
accelerator pedal.
If the vehicle starts to slide, ease your foot off the
accelerator pedal and quickly steer the way you want
the vehicle to go. If you start steering quickly enough,
the vehicle may straighten out. Always be ready for
a second skid if it occurs.Of course, traction is reduced when water, snow, ice,
gravel, or other material is on the road. For safety, slow
down and adjust your driving to these conditions. It is
important to slow down on slippery surfaces because
stopping distance will be longer and vehicle control more
limited.
While driving on a surface with reduced traction, try
your best to avoid sudden steering, acceleration, or
braking, including reducing vehicle speed by shifting
to a lower gear. Any sudden changes could cause the
tires to slide. You may not realize the surface is slippery
until the vehicle is skidding. Learn to recognize warning
clues — such as enough water, ice, or packed snow on
the road to make a mirrored surface — and slow down
when you have any doubt.
Remember: Any Antilock Brake System (ABS) helps
avoid only the braking skid.
4-12
Page 352 of 602
Driving at Night
Night driving is more dangerous than day driving
because some drivers are likely to be impaired — by
alcohol or drugs, with night vision problems, or by
fatigue.
Night driving tips include:
Drive defensively.
Do not drink and drive.
Reduce headlamp glare by adjusting the inside
rearview mirror.
Slow down and keep more space between you and
other vehicles because headlamps can only light up
so much road ahead.
Watch for animals.
When tired, pull off the road.
Do not wear sunglasses.
Avoid staring directly into approaching headlamps.
Keep the windshield and all glass on your vehicle
clean — inside and out.
Keep your eyes moving, especially during turns
or curves.
No one can see as well at night as in the daytime.
But, as we get older, these differences increase.
A 50-year-old driver might need at least twice as much
light to see the same thing at night as a 20-year-old.
4-26
Page 354 of 602
Before Leaving on a Long Trip
To prepare your vehicle for a long trip, consider having
it serviced by your dealer/retailer before departing.
Things to check on your own include:
Windshield Washer Fluid:Reservoir full? Windows
clean — inside and outside?
Wiper Blades:In good shape?
Fuel, Engine Oil, Other Fluids:All levels checked?
Lamps:Do they all work and are lenses clean?
Tires:Are treads good? Are tires inated to
recommended pressure?
Weather and Maps:Safe to travel? Have
up-to-date maps?
Highway Hypnosis
Always be alert and pay attention to your surroundings
while driving. If you become tired or sleepy, nd a
safe place to park your vehicle and rest.
Other driving tips include:
Keep the vehicle well ventilated.
Keep interior temperature cool.
Keep your eyes moving — scan the road ahead
and to the sides.
Check the rearview mirror and vehicle instruments
often.
Hill and Mountain Roads
Driving on steep hills or through mountains is different
than driving on at or rolling terrain. Tips for driving
in these conditions include:
Keep the vehicle serviced and in good shape.
Check all uid levels and brakes, tires, cooling
system, and transmission.
Going down steep or long hills, shift to a
lower gear.
4-28
Page 356 of 602
Winter Driving
Driving on Snow or Ice
Drive carefully when there is snow or ice between the
tires and the road, creating less traction or grip. Wet ice
can occur at about 32°F (0°C) when freezing rain
begins to fall, resulting in even less traction. Avoid
driving on wet ice or in freezing rain until roads can be
treated with salt or sand.
Drive with caution, whatever the condition. Accelerate
gently so traction is not lost. Accelerating too quickly
causes the wheels to spin and makes the surface under
the tires slick, so there is even less traction.
Try not to break the fragile traction. If you accelerate too
fast, the drive wheels will spin and polish the surface
under the tires even more.
TheStabiliTrak
®System on page 4-6improves the
ability to accelerate on slippery roads, but slow down
and adjust your driving to the road conditions. When
driving through deep snow, turn off the traction control
part of the StabiliTrak
®System to help maintain
vehicle motion at lower speeds.TheAntilock Brake System (ABS) on page 4-5improves
vehicle stability during hard stops on a slippery roads,
but apply the brakes sooner than when on dry
pavement.
Allow greater following distance on any slippery road
and watch for slippery spots. Icy patches can occur on
otherwise clear roads in shaded areas. The surface
of a curve or an overpass can remain icy when the
surrounding roads are clear. Avoid sudden steering
maneuvers and braking while on ice.
Turn off cruise control, if equipped, on slippery surfaces.
Blizzard Conditions
Being stuck in snow can be in a serious situation. Stay
with the vehicle unless there is help nearby. If possible,
use theRoadside Assistance Program on page 7-7.
To get help and keep everyone in the vehicle safe:
Turn on theHazard Warning Flashers on page 3-8.
Tie a red cloth to an outside mirror.
4-30
Page 403 of 602
Driving with a Trailer
{CAUTION:
When towing a trailer, exhaust gases may collect
at the rear of the vehicle and enter if the liftgate,
trunk/hatch, or rear-most window is open.
Engine exhaust contains carbon monoxide (CO)
which cannot be seen or smelled. It can cause
unconsciousness and even death.
To maximize safety when towing a trailer:
Have the exhaust system inspected for leaks
and make necessary repairs before starting
a trip.
Never drive with the liftgate, trunk/hatch, or
rear-most window open.
Fully open the air outlets on or under the
instrument panel.
Adjust the Climate Control system to a setting
that brings in only outside air and set the fan
speed to the highest setting. See Climate
Control System in the Index.
For more information about carbon monoxide, see
Engine Exhaust on page 2-55.Towing a trailer requires a certain amount of experience.
Get to know the rig before setting out for the open
road. Get acquainted with the feel of handling and
braking with the added weight of the trailer. And always
keep in mind that the vehicle you are driving is now
longer and not as responsive as the vehicle is by itself.
Before starting, check all trailer hitch parts and
attachments, safety chains, electrical connectors, lamps,
tires and mirror adjustments. If the trailer has electric
brakes, start the vehicle and trailer moving and
then apply the trailer brake controller by hand to be sure
the brakes are working. This checks the electrical
connection at the same time.
During the trip, check occasionally to be sure that the
load is secure, and that the lamps and any trailer brakes
are still working.
While towing a trailer or when exposed to long periods
of sunshine, the oor of the truck bed may become
very warm. Avoid putting items in the truck bed
that might be affected by high ambient temperatures.
4-77
Page 535 of 602
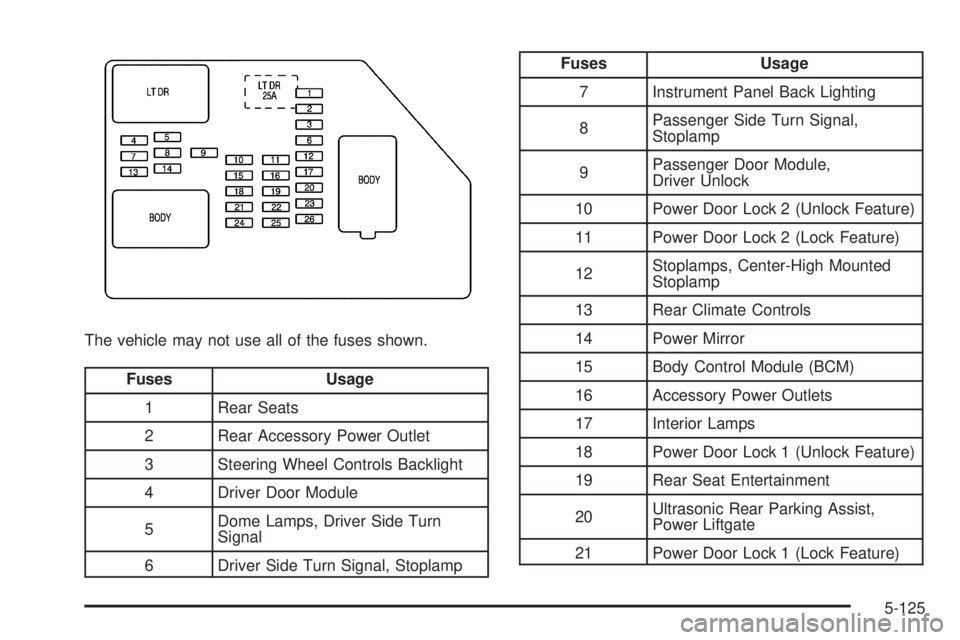
The vehicle may not use all of the fuses shown.
Fuses Usage
1 Rear Seats
2 Rear Accessory Power Outlet
3 Steering Wheel Controls Backlight
4 Driver Door Module
5Dome Lamps, Driver Side Turn
Signal
6 Driver Side Turn Signal, Stoplamp
Fuses Usage
7 Instrument Panel Back Lighting
8Passenger Side Turn Signal,
Stoplamp
9Passenger Door Module,
Driver Unlock
10 Power Door Lock 2 (Unlock Feature)
11 Power Door Lock 2 (Lock Feature)
12Stoplamps, Center-High Mounted
Stoplamp
13 Rear Climate Controls
14 Power Mirror
15 Body Control Module (BCM)
16 Accessory Power Outlets
17 Interior Lamps
18 Power Door Lock 1 (Unlock Feature)
19 Rear Seat Entertainment
20Ultrasonic Rear Parking Assist,
Power Liftgate
21 Power Door Lock 1 (Lock Feature)
5-125