locks GMC SIERRA 1500 2013 User Guide
[x] Cancel search | Manufacturer: GMC, Model Year: 2013, Model line: SIERRA 1500, Model: GMC SIERRA 1500 2013Pages: 534, PDF Size: 7.85 MB
Page 75 of 534
Black plate (13,1)GMC Sierra Owner Manual - 2013 - crc - 8/14/12
Seats and Restraints 3-13
.Wear the shoulder belt over the
shoulder and across the chest.
These parts of the body are best
able to take belt restraining
forces. The shoulder belt locks if
there is a sudden stop or crash.
{WARNING
You can be seriously injured,
or even killed, by not wearing
your safety belt properly.
.Never allow the lap or
shoulder belt to become
loose or twisted.
.Never wear the shoulder belt
under both arms or behind
your back.
.Never route the lap or
shoulder belt over an
armrest.
Lap-Shoulder Belt
If the vehicle is a regular cab, then
all seating positions in the vehicle
have a lap-shoulder belt. If the
vehicle is a crew or extended cab,
then all seating positions in the
vehicle have a lap-shoulder belt
except for the center front
passenger position (if equipped),
which has a lap belt. SeeLap Belt
(Crew and Extended Cab) on
page 3‑18 for more information.
The following instructions explain
how to wear a lap-shoulder belt
properly.
1. Adjust the seat, if the seat is adjustable, so you can sit up
straight. To see how, see “Seats”
in the Index. 2. Pick up the latch plate and pull
the belt across you. Do not let it
get twisted.
The lap-shoulder belt may lock if
you pull the belt across you very
quickly. If this happens, let the
belt go back slightly to unlock it.
Then pull the belt across you
more slowly.
If the shoulder portion of a
passenger belt is pulled out all
the way, the child restraint
locking feature may be engaged.
If this happens, let the belt go
back all the way and start again.
Engaging the child restraint
locking feature may affect the
passenger sensing system,
if equipped. See Passenger
Sensing System on page 3‑31
for more information.
Page 177 of 534
Black plate (47,1)GMC Sierra Owner Manual - 2013 - crc - 8/14/12
Instruments and Controls 5-47
To change customization
preferences, use the following
procedure.
Entering the Feature
Settings Menu
1. Turn the ignition on and placethe vehicle in P (Park).
To avoid excessive drain on the
battery, turn the headlamps off.
2. Press the customization button to scroll through the available
customizable options.
Feature Settings Menu Items
The following customization features
allow you to program settings to the
vehicle:
DISPLAY IN ENGLISH
This feature will only display if a
language other than English has
been set. This feature allows you to
change the language in which the
DIC messages appear to English. Press the customization button until
the PRESS
VTO DISPLAY IN
ENGLISH screen appears on the
DIC display. Press the set/reset
button once to display all DIC
messages in English.
DISPLAY LANGUAGE
This feature allows you to select the
language in which the DIC
messages will appear.
Press the customization button until
the DISPLAY LANGUAGE screen
appears on the DIC display. Press
the set/reset button once to access
the settings for this feature. Then
press the customization button to
scroll through the following settings:
ENGLISH (default): All messages
will appear in English.
FRANCAIS: All messages will
appear in French.
ESPANOL: All messages will
appear in Spanish. NO CHANGE:
No change will be
made to this feature. The current
setting will remain.
To select a setting, press the set/
reset button while the desired
setting is displayed on the DIC.
You can also change the language
by pressing the trip odometer reset
stem. See “Language” underDriver
Information Center (DIC) on
page 5‑28 for more information.
AUTO DOOR LOCK
This feature allows you to select
when the vehicle's doors will
automatically lock. See Automatic
Door Locks on page 2‑7 for more
information.
Page 178 of 534
Black plate (48,1)GMC Sierra Owner Manual - 2013 - crc - 8/14/12
5-48 Instruments and Controls
Press the customization button until
AUTO DOOR LOCK appears on the
DIC display. Press the set/reset
button once to access the settings
for this feature. Then press the
customization button to scroll
through the following settings:
SHIFT OUT OF PARK (default):
The doors will automatically lock
when the vehicle is shifted out of
P (Park).
AT VEHICLE SPEED:The doors
will automatically lock when the
vehicle speed is above 13 km/h
(8 mph) for three seconds.
NO CHANGE: No change will be
made to this feature. The current
setting will remain.
To select a setting, press the set/
reset button while the desired
setting is displayed on the DIC. AUTO DOOR UNLOCK
This feature allows you to turn off
the automatic door unlocking
feature. It also allows you to select
which doors and when the doors will
automatically unlock. See
Automatic
Door Locks on page 2‑7 for more
information.
Press the customization button until
AUTO DOOR UNLOCK appears on
the DIC display. Press the set/reset
button once to access the settings
for this feature. Then press the
customization button to scroll
through the following settings:
OFF: None of the doors will
automatically unlock.
DRIVER AT KEY OUT: Only the
driver door will unlock when the key
is taken out of the ignition.
DRIVER IN PARK: Only the driver
door will unlock when the vehicle is
shifted into P (Park). ALL AT KEY OUT:
All of the doors
will unlock when the key is taken
out of the ignition.
ALL IN PARK (default): All of the
doors will unlock when the vehicle is
shifted into P (Park).
NO CHANGE: No change will be
made to this feature. The current
setting will remain.
To select a setting, press the set/
reset button while the desired
setting is displayed on the DIC.
REMOTE DOOR LOCK
This feature allows you to select the
type of feedback received when
locking the vehicle with the Remote
Keyless Entry (RKE) transmitter.
You will not receive feedback when
locking the vehicle with the RKE
transmitter if the doors are open.
See Remote Keyless Entry (RKE)
System Operation on page 2‑2 for
more information.
Page 179 of 534
Black plate (49,1)GMC Sierra Owner Manual - 2013 - crc - 8/14/12
Instruments and Controls 5-49
Press the customization button until
REMOTE DOOR LOCK appears on
the DIC display. Press the set/reset
button once to access the settings
for this feature. Then press the
customization button to scroll
through the following settings:
OFF:There will be no feedback
when you press the lock button on
the RKE transmitter.
LIGHTS ONLY: The exterior lamps
will flash when you press the lock
button on the RKE transmitter.
HORN ONLY: The horn will sound
on the second press of the lock
button on the RKE transmitter.
HORN & LIGHTS (default): The
exterior lamps will flash when you
press the lock button on the RKE
transmitter, and the horn will sound
when the lock button is pressed
again within five seconds of the
previous command.
NO CHANGE: No change will be
made to this feature. The current
setting will remain. To select a setting, press the set/
reset button while the desired
setting is displayed on the DIC.
REMOTE DOOR UNLOCK
This feature allows you to select the
type of feedback received when
unlocking the vehicle with the
Remote Keyless Entry (RKE)
transmitter. You will not receive
feedback when unlocking the
vehicle with the RKE transmitter if
the doors are open. See
Remote
Keyless Entry (RKE) System
Operation on page 2‑2 for more
information.
Press the customization button until
REMOTE DOOR UNLOCK appears
on the DIC display. Press the set/
reset button once to access the
settings for this feature. Then press
the customization button to scroll
through the following settings:
LIGHTS OFF: The exterior lamps
will not flash when you press the
unlock button on the RKE
transmitter. LIGHTS ON (default):
The exterior
lamps will flash when you press the
unlock button on the RKE
transmitter.
NO CHANGE: No change will be
made to this feature. The current
setting will remain.
To select a setting, press the set/
reset button while the desired
setting is displayed on the DIC.
DELAY DOOR LOCK
On vehicles with a crew cab, this
feature turns the delayed door locks
on or off. When locking the doors
with the power door lock switch and
a door is open, this feature will
delay locking the doors until
five seconds after the last door is
closed. You will hear three chimes
to signal that the delayed locking
feature is in use. The key must be
out of the ignition for this feature to
work. You can temporarily override
delayed locking by pressing the
power door lock switch twice. See
Delayed Locking on page 2‑7 for
more information.
Page 290 of 534
Black plate (24,1)GMC Sierra Owner Manual - 2013 - crc - 8/14/12
9-24 Driving and Operating
Ignition Positions
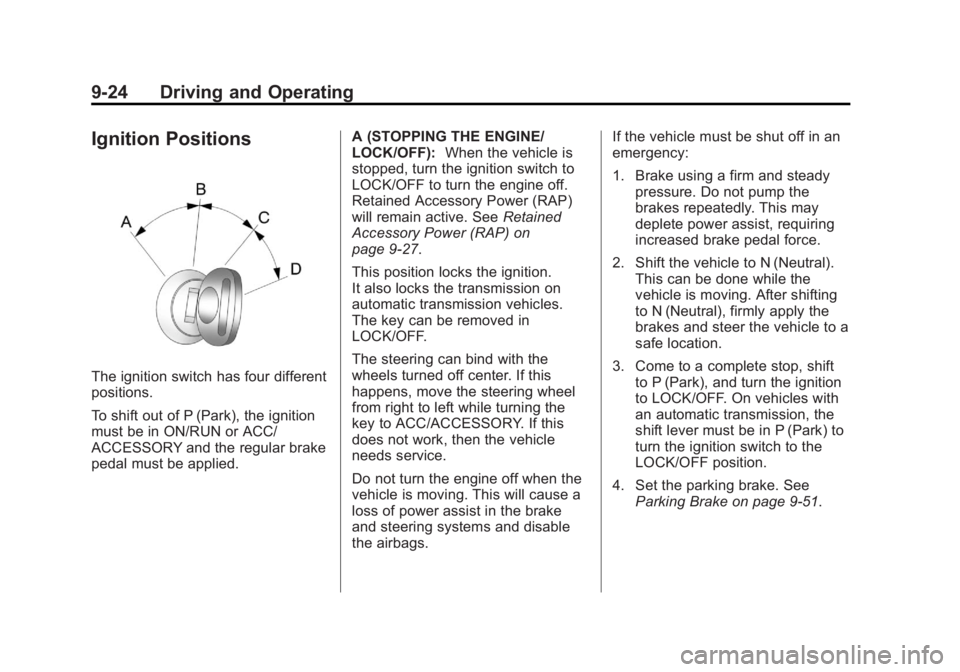
The ignition switch has four different
positions.
To shift out of P (Park), the ignition
must be in ON/RUN or ACC/
ACCESSORY and the regular brake
pedal must be applied.A (STOPPING THE ENGINE/
LOCK/OFF):
When the vehicle is
stopped, turn the ignition switch to
LOCK/OFF to turn the engine off.
Retained Accessory Power (RAP)
will remain active. See Retained
Accessory Power (RAP) on
page 9‑27.
This position locks the ignition.
It also locks the transmission on
automatic transmission vehicles.
The key can be removed in
LOCK/OFF.
The steering can bind with the
wheels turned off center. If this
happens, move the steering wheel
from right to left while turning the
key to ACC/ACCESSORY. If this
does not work, then the vehicle
needs service.
Do not turn the engine off when the
vehicle is moving. This will cause a
loss of power assist in the brake
and steering systems and disable
the airbags. If the vehicle must be shut off in an
emergency:
1. Brake using a firm and steady
pressure. Do not pump the
brakes repeatedly. This may
deplete power assist, requiring
increased brake pedal force.
2. Shift the vehicle to N (Neutral). This can be done while the
vehicle is moving. After shifting
to N (Neutral), firmly apply the
brakes and steer the vehicle to a
safe location.
3. Come to a complete stop, shift to P (Park), and turn the ignition
to LOCK/OFF. On vehicles with
an automatic transmission, the
shift lever must be in P (Park) to
turn the ignition switch to the
LOCK/OFF position.
4. Set the parking brake. See Parking Brake on page 9‑51.
Page 298 of 534
Black plate (32,1)GMC Sierra Owner Manual - 2013 - crc - 8/14/12
9-32 Driving and Operating
Running the Vehicle
While Parked
It is better not to park with the
engine running.
If the vehicle is left with the engine
running, follow the proper steps to
be sure the vehicle will not move.
SeeShifting Into Park on page 9‑28
and Engine Exhaust on page 9‑31.
If parking on a hill and pulling a
trailer, see Driving Characteristics
and Towing Tips on page 9‑71.
Automatic
Transmission
If the vehicle is a hybrid, see the
hybrid supplement for more
information.
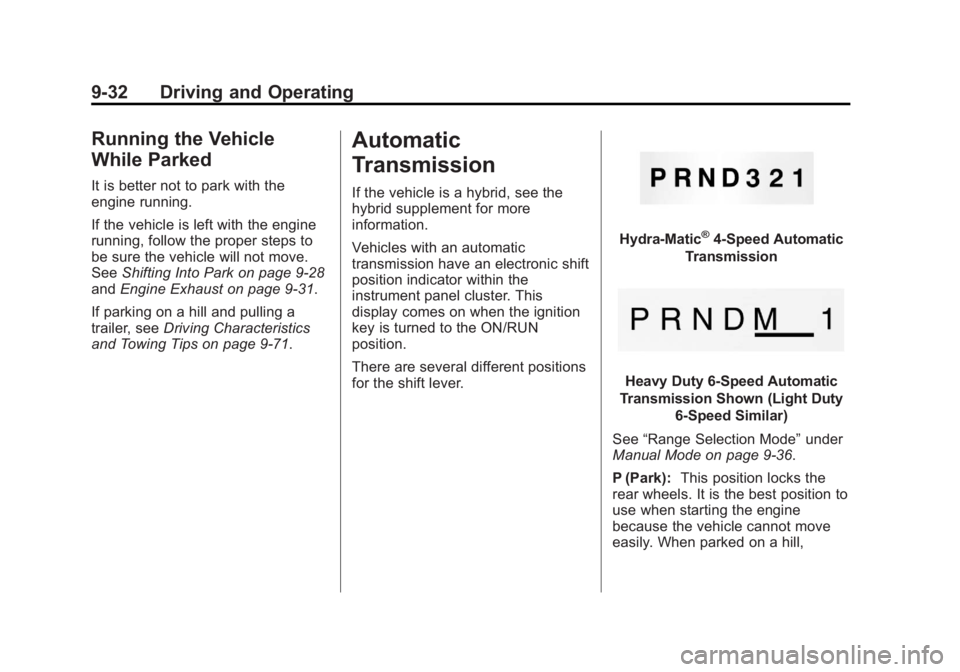
Vehicles with an automatic
transmission have an electronic shift
position indicator within the
instrument panel cluster. This
display comes on when the ignition
key is turned to the ON/RUN
position.
There are several different positions
for the shift lever.
Hydra-Matic®4-Speed Automatic
Transmission
Heavy Duty 6-Speed Automatic
Transmission Shown (Light Duty 6-Speed Similar)
See “Range Selection Mode” under
Manual Mode on page 9‑36.
P (Park): This position locks the
rear wheels. It is the best position to
use when starting the engine
because the vehicle cannot move
easily. When parked on a hill,
Page 364 of 534
Black plate (98,1)GMC Sierra Owner Manual - 2013 - crc - 8/14/12
9-98 Driving and Operating
Trailer Gain Adjustment Procedure
Trailer Gain should be set for a
specific trailering condition and must
be adjusted any time vehicle
loading, trailer loading, or road
surface conditions change.
Setting the Trailer Gain properly is
needed for the best trailer stopping
performance. A trailer that is
over-gained may result in locked
trailer brakes. A trailer that is
under-gained may result in not
enough trailer braking. Both of these
conditions may result in poorer
stopping and stability of the vehicle
and trailer.
Use the following procedure to
correctly adjust Trailer Gain for each
towing condition:
1. Make sure the trailer brakes arein proper working condition.
2. Connect a properly loaded trailer to the vehicle and make all
necessary mechanical and electrical connections. See
Vehicle Load Limits on
page 9‑15
for more information.
3. After the electrical connection is made to a trailer equipped with
electric brakes:
.A TRAILER CONNECTED
message will be briefly
displayed on the DIC.
.The Trailer Brake Display
Page will appear on the
DIC showing TRAILER
GAIN and TRAILER
OUTPUT.
.In the Trailer Output display
on the DIC, “- - - - - -”will
disappear if there is no
error present. Connecting a
trailer without electric
brakes will not clear the six
dashed lines.
4. Adjust the Trailer Gain by using the gain adjustment (+ / -)
buttons on the Trailer Brake
Control Panel. 5. Drive the vehicle with the trailer
attached on a level road surface
representative of the towing
condition and free of traffic at
about 32 to 40 km/h (20 to
25 mph) and fully apply the
Manual Trailer Brake Apply
Lever.
Adjusting trailer gain at speeds
lower than 32 to 40 km/h (20 to
25 mph) may result in an
incorrect gain setting.
6. Adjust the Trailer Gain to just below the point of trailer wheel
lock-up, indicated by trailer
wheel squeal or tire smoke when
a trailer wheel locks.
Trailer wheel lock-up may not
occur if towing a heavily loaded
trailer. In this case, adjust the
Trailer Gain to the highest
allowable setting for the towing
condition.
Page 442 of 534
Black plate (72,1)GMC Sierra Owner Manual - 2013 - crc - 8/14/12
10-72 Vehicle Care
WARNING (Continued)
6. Place wheel blocks on bothsides of the tire at the
opposite corner of the tire
being changed.
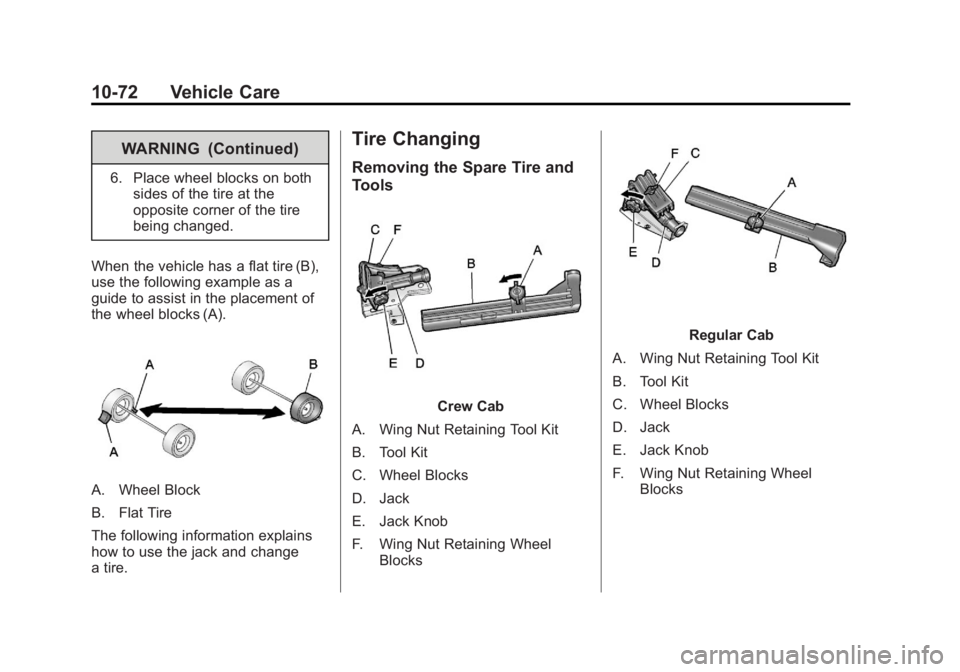
When the vehicle has a flat tire (B),
use the following example as a
guide to assist in the placement of
the wheel blocks (A).
A. Wheel Block
B. Flat Tire
The following information explains
how to use the jack and change
a tire.
Tire Changing
Removing the Spare Tire and
Tools
Crew Cab
A. Wing Nut Retaining Tool Kit
B. Tool Kit
C. Wheel Blocks
D. Jack
E. Jack Knob
F. Wing Nut Retaining Wheel Blocks
Regular Cab
A. Wing Nut Retaining Tool Kit
B. Tool Kit
C. Wheel Blocks
D. Jack
E. Jack Knob
F. Wing Nut Retaining Wheel Blocks
Page 443 of 534
Black plate (73,1)GMC Sierra Owner Manual - 2013 - crc - 8/14/12
Vehicle Care 10-73
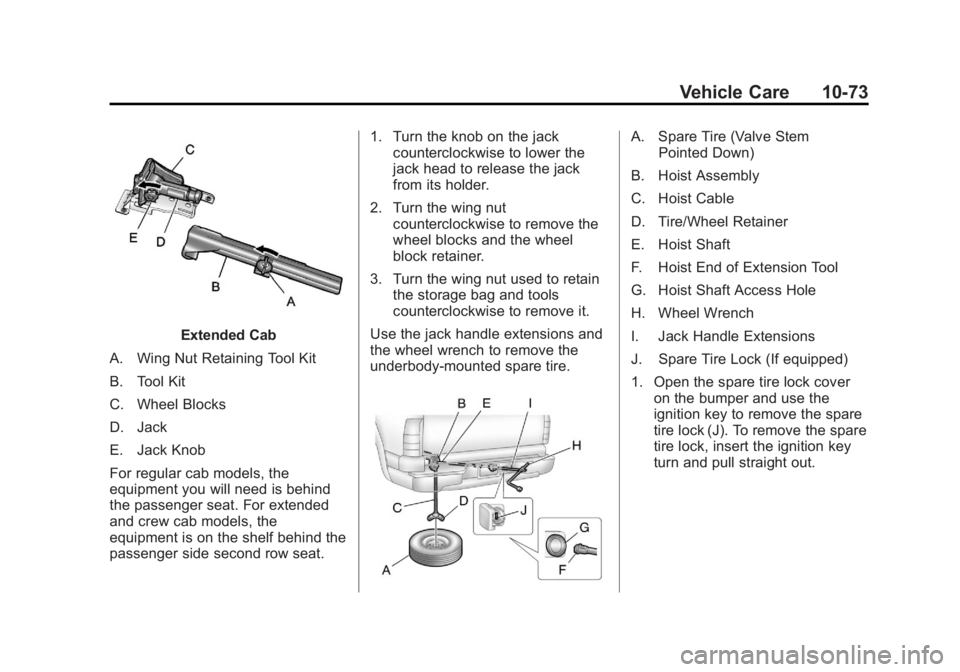
Extended Cab
A. Wing Nut Retaining Tool Kit
B. Tool Kit
C. Wheel Blocks
D. Jack
E. Jack Knob
For regular cab models, the
equipment you will need is behind
the passenger seat. For extended
and crew cab models, the
equipment is on the shelf behind the
passenger side second row seat. 1. Turn the knob on the jack
counterclockwise to lower the
jack head to release the jack
from its holder.
2. Turn the wing nut counterclockwise to remove the
wheel blocks and the wheel
block retainer.
3. Turn the wing nut used to retain the storage bag and tools
counterclockwise to remove it.
Use the jack handle extensions and
the wheel wrench to remove the
underbody-mounted spare tire.
A. Spare Tire (Valve Stem Pointed Down)
B. Hoist Assembly
C. Hoist Cable
D. Tire/Wheel Retainer
E. Hoist Shaft
F. Hoist End of Extension Tool
G. Hoist Shaft Access Hole
H. Wheel Wrench
I. Jack Handle Extensions
J. Spare Tire Lock (If equipped)
1. Open the spare tire lock cover on the bumper and use the
ignition key to remove the spare
tire lock (J). To remove the spare
tire lock, insert the ignition key
turn and pull straight out.
Page 445 of 534

Black plate (75,1)GMC Sierra Owner Manual - 2013 - crc - 8/14/12
Vehicle Care 10-75
A. Jack
B. Wheel Blocks
C. Jack Handle
D. Jack Handle Extension
E. Wheel Wrench
The tools you will be using include
the jack (A), the wheel blocks (B),
the jack handle (C), the jack handle
extensions (D), and the wheel
wrench (E).
1. Do a safety check beforeproceeding. See If a Tire Goes
Flat on page 10‑70 for more
information.2. If the vehicle has wheel nut
caps, loosen them by turning the
wheel wrench counterclockwise.
If the vehicle has a center cap
with wheel nut caps, the wheel
nut caps are designed to stay
with the center cap after they are
loosened. Remove the entire
center cap.
If the wheel has a smooth center
cap, place the chisel end of the
wheel wrench in the slot on the
wheel, and gently pry it out.