change wheel GMC SIERRA 1500 2013 Owners Manual
[x] Cancel search | Manufacturer: GMC, Model Year: 2013, Model line: SIERRA 1500, Model: GMC SIERRA 1500 2013Pages: 534, PDF Size: 7.85 MB
Page 5 of 534
Black plate (5,1)GMC Sierra Owner Manual - 2013 - crc - 8/14/12
Introduction v
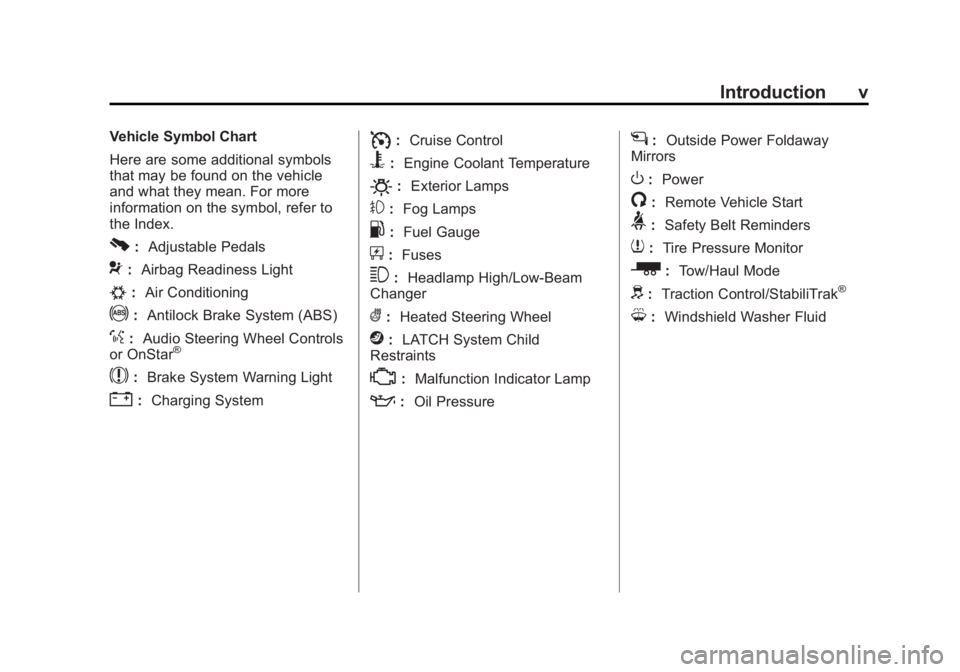
Vehicle Symbol Chart
Here are some additional symbols
that may be found on the vehicle
and what they mean. For more
information on the symbol, refer to
the Index.
0:Adjustable Pedals
9:Airbag Readiness Light
#:Air Conditioning
!:Antilock Brake System (ABS)
%:Audio Steering Wheel Controls
or OnStar®
$: Brake System Warning Light
":Charging System
I:Cruise Control
B: Engine Coolant Temperature
O:Exterior Lamps
#:Fog Lamps
.: Fuel Gauge
+:Fuses
3: Headlamp High/Low-Beam
Changer
(: Heated Steering Wheel
j:LATCH System Child
Restraints
*: Malfunction Indicator Lamp
::Oil Pressure
g:Outside Power Foldaway
Mirrors
O: Power
/:Remote Vehicle Start
>:Safety Belt Reminders
7:Tire Pressure Monitor
_: Tow/Haul Mode
d:Traction Control/StabiliTrak®
M:Windshield Washer Fluid
Page 9 of 534
Black plate (3,1)GMC Sierra Owner Manual - 2013 - crc - 8/14/12
In Brief 1-3
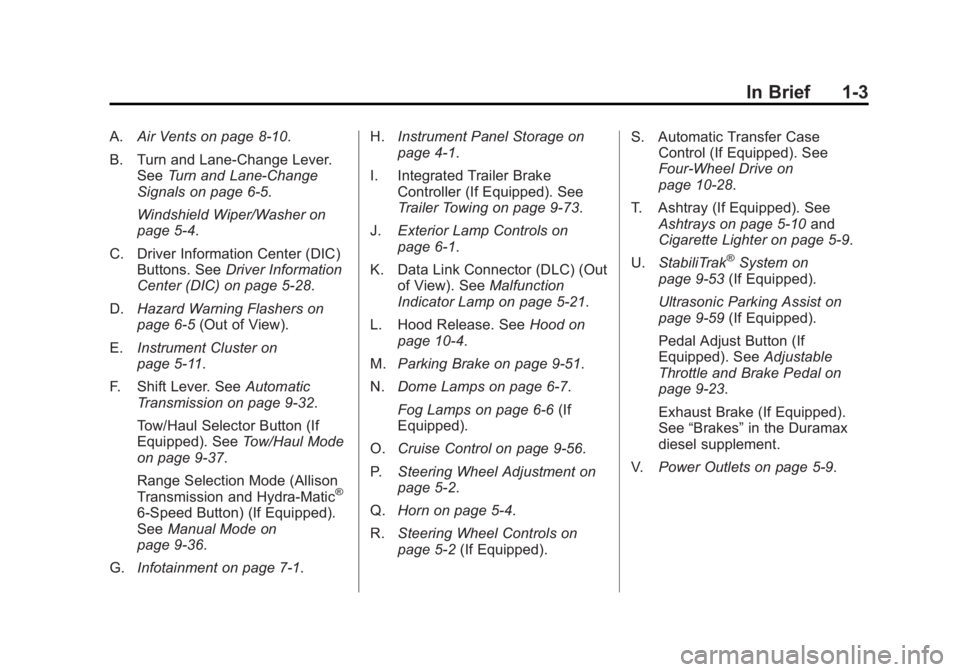
A.Air Vents on page 8‑10.
B. Turn and Lane‐Change Lever. See Turn and Lane-Change
Signals on page 6‑5.
Windshield Wiper/Washer on
page 5‑4.
C. Driver Information Center (DIC) Buttons. See Driver Information
Center (DIC) on page 5‑28.
D. Hazard Warning Flashers on
page 6‑5 (Out of View).
E. Instrument Cluster on
page 5‑11.
F. Shift Lever. See Automatic
Transmission on page 9‑32.
Tow/Haul Selector Button (If
Equipped). See Tow/Haul Mode
on page 9‑37.
Range Selection Mode (Allison
Transmission and Hydra-Matic
®
6‐Speed Button) (If Equipped).
See Manual Mode on
page 9‑36.
G. Infotainment on page 7‑1. H.
Instrument Panel Storage on
page 4‑1.
I. Integrated Trailer Brake Controller (If Equipped). See
Trailer Towing on page 9‑73.
J. Exterior Lamp Controls on
page 6‑1.
K. Data Link Connector (DLC) (Out of View). See Malfunction
Indicator Lamp on page 5‑21.
L. Hood Release. See Hood on
page 10‑4.
M. Parking Brake on page 9‑51.
N. Dome Lamps on page 6‑7.
Fog Lamps on page 6‑6 (If
Equipped).
O. Cruise Control on page 9‑56.
P. Steering Wheel Adjustment on
page 5‑2.
Q. Horn on page 5‑4.
R. Steering Wheel Controls on
page 5‑2 (If Equipped). S. Automatic Transfer Case
Control (If Equipped). See
Four-Wheel Drive on
page 10‑28.
T. Ashtray (If Equipped). See Ashtrays on page 5‑10 and
Cigarette Lighter on page 5‑9.
U. StabiliTrak
®System on
page 9‑53 (If Equipped).
Ultrasonic Parking Assist on
page 9‑59 (If Equipped).
Pedal Adjust Button (If
Equipped). See Adjustable
Throttle and Brake Pedal on
page 9‑23.
Exhaust Brake (If Equipped).
See “Brakes” in the Duramax
diesel supplement.
V. Power Outlets on page 5‑9.
Page 12 of 534
Black plate (6,1)GMC Sierra Owner Manual - 2013 - crc - 8/14/12
1-6 In Brief
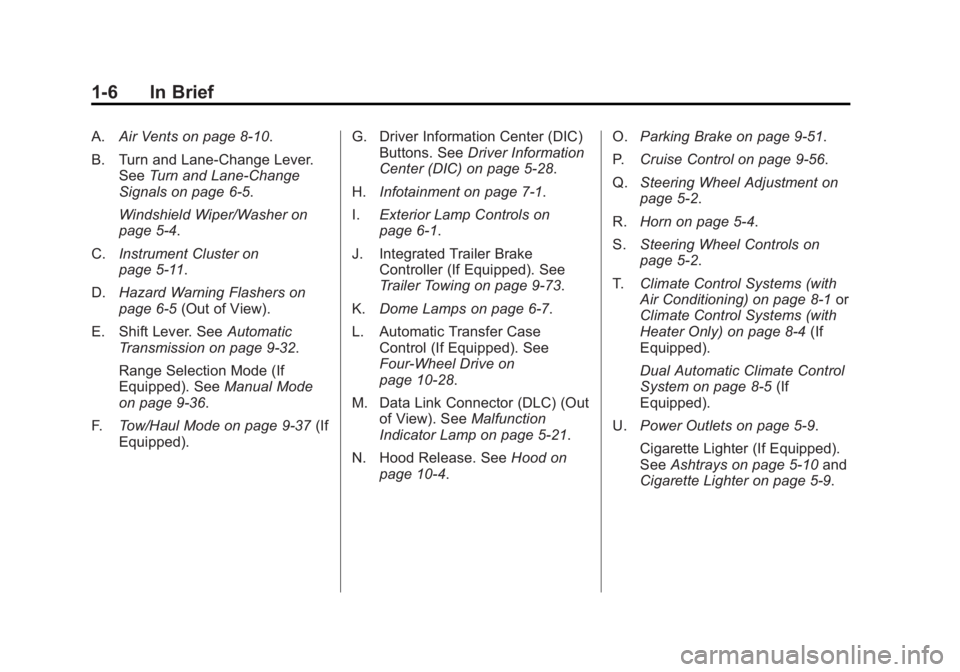
A.Air Vents on page 8‑10.
B. Turn and Lane‐Change Lever. See Turn and Lane-Change
Signals on page 6‑5.
Windshield Wiper/Washer on
page 5‑4.
C. Instrument Cluster on
page 5‑11.
D. Hazard Warning Flashers on
page 6‑5 (Out of View).
E. Shift Lever. See Automatic
Transmission on page 9‑32.
Range Selection Mode (If
Equipped). See Manual Mode
on page 9‑36.
F. Tow/Haul Mode on page 9‑37 (If
Equipped). G. Driver Information Center (DIC)
Buttons. See Driver Information
Center (DIC) on page 5‑28.
H. Infotainment on page 7‑1.
I. Exterior Lamp Controls on
page 6‑1.
J. Integrated Trailer Brake Controller (If Equipped). See
Trailer Towing on page 9‑73.
K. Dome Lamps on page 6‑7.
L. Automatic Transfer Case Control (If Equipped). See
Four-Wheel Drive on
page 10‑28.
M. Data Link Connector (DLC) (Out of View). See Malfunction
Indicator Lamp on page 5‑21.
N. Hood Release. See Hood on
page 10‑4. O.
Parking Brake on page 9‑51.
P. Cruise Control on page 9‑56.
Q. Steering Wheel Adjustment on
page 5‑2.
R. Horn on page 5‑4.
S. Steering Wheel Controls on
page 5‑2.
T. Climate Control Systems (with
Air Conditioning) on page 8‑1 or
Climate Control Systems (with
Heater Only) on page 8‑4 (If
Equipped).
Dual Automatic Climate Control
System on page 8‑5 (If
Equipped).
U. Power Outlets on page 5‑9.
Cigarette Lighter (If Equipped).
See Ashtrays on page 5‑10 and
Cigarette Lighter on page 5‑9.
Page 23 of 534
Black plate (17,1)GMC Sierra Owner Manual - 2013 - crc - 8/14/12
In Brief 1-17
To adjust the steering wheel:
1. Hold the steering wheel and pullthe lever.
2. Move the steering wheel up or down.
3. Release the lever to lock the wheel in place.
Do not adjust the steering wheel
while driving.
Throttle and Brake Pedal
Adjustment
On vehicles with this feature, you
can change the position of the
throttle and brake pedals.
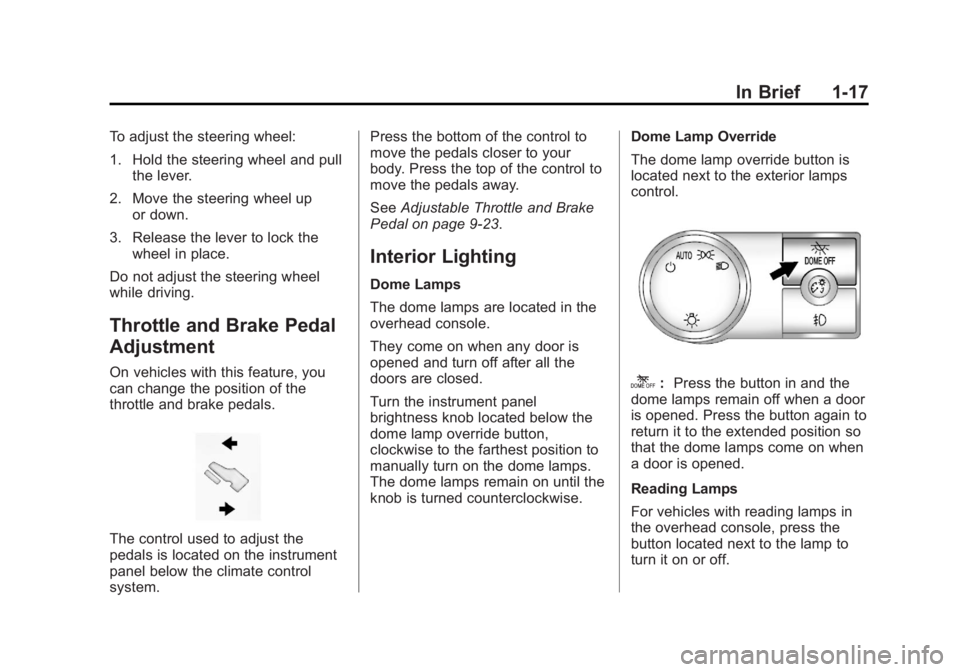
The control used to adjust the
pedals is located on the instrument
panel below the climate control
system. Press the bottom of the control to
move the pedals closer to your
body. Press the top of the control to
move the pedals away.
See
Adjustable Throttle and Brake
Pedal on page 9‑23.
Interior Lighting
Dome Lamps
The dome lamps are located in the
overhead console.
They come on when any door is
opened and turn off after all the
doors are closed.
Turn the instrument panel
brightness knob located below the
dome lamp override button,
clockwise to the farthest position to
manually turn on the dome lamps.
The dome lamps remain on until the
knob is turned counterclockwise. Dome Lamp Override
The dome lamp override button is
located next to the exterior lamps
control.
k:
Press the button in and the
dome lamps remain off when a door
is opened. Press the button again to
return it to the extended position so
that the dome lamps come on when
a door is opened.
Reading Lamps
For vehicles with reading lamps in
the overhead console, press the
button located next to the lamp to
turn it on or off.
Page 24 of 534
Black plate (18,1)GMC Sierra Owner Manual - 2013 - crc - 8/14/12
1-18 In Brief
The vehicle may also have reading
lamps in other locations. The lamps
are fixed and cannot be adjusted.
For more information about interior
lamps, see:
.Dome Lamps on page 6‑7.
.Reading Lamps on page 6‑8.
.Instrument Panel Illumination
Control on page 6‑7.
Exterior Lighting
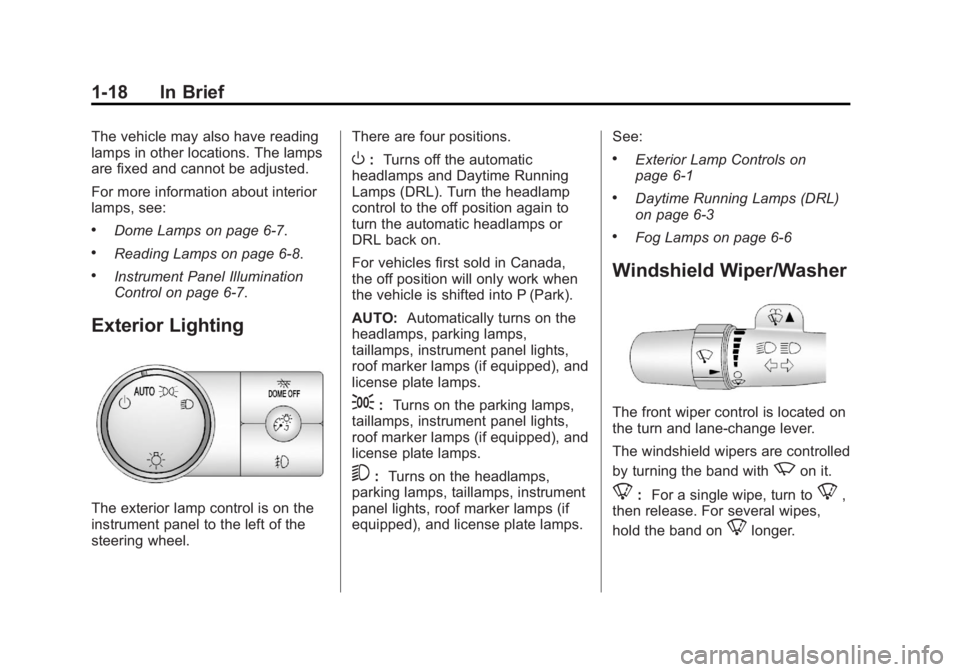
The exterior lamp control is on the
instrument panel to the left of the
steering wheel.There are four positions.
O:
Turns off the automatic
headlamps and Daytime Running
Lamps (DRL). Turn the headlamp
control to the off position again to
turn the automatic headlamps or
DRL back on.
For vehicles first sold in Canada,
the off position will only work when
the vehicle is shifted into P (Park).
AUTO: Automatically turns on the
headlamps, parking lamps,
taillamps, instrument panel lights,
roof marker lamps (if equipped), and
license plate lamps.
;: Turns on the parking lamps,
taillamps, instrument panel lights,
roof marker lamps (if equipped), and
license plate lamps.
5: Turns on the headlamps,
parking lamps, taillamps, instrument
panel lights, roof marker lamps (if
equipped), and license plate lamps. See:
.Exterior Lamp Controls on
page 6‑1
.Daytime Running Lamps (DRL)
on page 6‑3
.Fog Lamps on page 6‑6
Windshield Wiper/Washer
The front wiper control is located on
the turn and lane-change lever.
The windshield wipers are controlled
by turning the band with
zon it.
8:
For a single wipe, turn to8,
then release. For several wipes,
hold the band on
8longer.
Page 97 of 534
Black plate (35,1)GMC Sierra Owner Manual - 2013 - crc - 8/14/12
Seats and Restraints 3-35
operates. We recommend that you
not use seat covers or other
aftermarket equipment except when
approved by GM for your specific
vehicle. SeeAdding Equipment to
the Airbag-Equipped Vehicle on
page 3‑35 for more information
about modifications that can affect
how the system operates.
The on indicator may be lit if an
object, such as a briefcase,
handbag, grocery bag, laptop or
other electronic device, is put on an
unoccupied seat. If this is not
desired, remove the object from
the seat.
{WARNING
Stowing of articles under the
passenger seat or between the
passenger seat cushion and
seatback may interfere with the
proper operation of the passenger
sensing system.
Servicing the
Airbag-Equipped Vehicle
Airbags affect how the vehicle
should be serviced. There are parts
of the airbag system in several
places around the vehicle. Your
dealer and the service manual have
information about servicing the
vehicle and the airbag system. To
purchase a service manual, see
Service Publications Ordering
Information on page 13‑16.
{WARNING
For up to 10 seconds after the
vehicle is turned off and the
battery is disconnected, an airbag
can still inflate during improper
service. You can be injured if you
are close to an airbag when it
inflates. Avoid yellow connectors.
(Continued)
WARNING (Continued)
They are probably part of the
airbag system. Be sure to follow
proper service procedures, and
make sure the person performing
work for you is qualified to do so.
Adding Equipment to the
Airbag-Equipped Vehicle
Q: Is there anything I might addto or change about the vehicle
that could keep the airbags
from working properly?
A: Yes. If you add things that
change your vehicle's frame,
bumper system, height, front end
or side sheet metal, they may
keep the airbag system from
working properly. Changing or
moving any parts of the front
seats, safety belts, the airbag
sensing and diagnostic module,
steering wheel, instrument
panel, roof-rail airbag modules,
Page 98 of 534
Black plate (36,1)GMC Sierra Owner Manual - 2013 - crc - 8/14/12
3-36 Seats and Restraints
ceiling headliner or pillar garnish
trim, overhead console, front
sensors, side impact sensors,
or airbag wiring can affect the
operation of the airbag system.
In addition, the vehicle may have
a passenger sensing system for
the right front passenger's
position, which includes sensors
that are part of the passenger's
seat. The passenger sensing
system may not operate properly
if the original seat trim is
replaced with non-GM covers,
upholstery or trim, or with GM
covers, upholstery or trim
designed for a different vehicle.
Any object, such as an
aftermarket seat heater or a
comfort enhancing pad or
device, installed under or on top
of the seat fabric, could also
interfere with the operation of
the passenger sensing system.This could either prevent proper
deployment of the passenger
airbag(s) or prevent the
passenger sensing system from
properly turning off the
passenger airbag(s). See
Passenger Sensing System on
page 3‑31.
If you have any questions about
this, you should contact
Customer Assistance before you
modify your vehicle. The phone
numbers and addresses for
Customer Assistance are in
Step Two of the Customer
Satisfaction Procedure in this
manual. See
Customer
Satisfaction Procedure (U.S. and
Canada) on page 13‑2 or
Customer Satisfaction
Procedure (Mexico) on
page 13‑4.
If the vehicle has rollover
roof-rail airbags, see Different
Size Tires and Wheels on
page 10‑66 for additional
important information. Q: What if I added a snow plow?
Will it keep the airbags from
working properly?
A: We have designed our airbag
systems to work properly under
a wide range of conditions,
including snow plowing with
vehicles that have the optional
Snow Plow Prep Package
(RPO VYU). But do not change
or defeat the snow plow's
“tripping mechanism.” If you do,
it can damage your snow plow
and your vehicle, and it may
cause an airbag inflation.
Q: Because I have a disability, I have to get my vehicle
modified. How can I find out
whether this will affect my
airbag system?
A: If you have questions, call
Customer Assistance. The
phone numbers and addresses
for Customer Assistance are in
Step Two of the Customer
Page 134 of 534
Black plate (4,1)GMC Sierra Owner Manual - 2013 - crc - 8/14/12
5-4 Instruments and Controls
3. Press and release¨to move up
one track within the selected
category.
b/g(Mute/Push to Talk): Press
to silence the vehicle speakers only.
Press again to turn the sound on.
For vehicles with Bluetooth or
OnStar systems, press and hold for
longer than two seconds to interact
with those systems. See Bluetooth
on page 7‑49 andOnStar Overview
on page 14‑1 for more information.
SRCE (Source/Voice
Recognition): Press to switch
between the radio and CD, and for
equipped vehicles, the DVD, front
auxiliary, and rear auxiliary.
For vehicles with the navigation
system, press and hold this button
for longer than one second to
initiate voice recognition. See “Voice
Recognition” in the Navigation
System manual for more
information.
¨(Seek): Press to go to the next
radio station while in AM, FM,
or SiriusXM
®.
For vehicles with or without a
navigation system:
Press
¨to go to the next track or
chapter while sourced to the CD or
DVD slot.
Press
¨to select a track or a folder
when navigating folders on an iPod
or USB device.
For vehicles with a navigation
system:
1. Press and hold
¨until a beep is
heard, to place the radio into
SCAN mode. A station will play
for five seconds before moving
to the next station.
2. To stop the SCAN function, press
¨again.
While listening to a CD/DVD, press
and hold
¨to quickly move forward
through the tracks. Release to stop
on the desired track. +
e:
Press to increase volume.
−
e: Press to decrease volume.
Horn
To sound the horn, press the center
pad on the steering wheel.
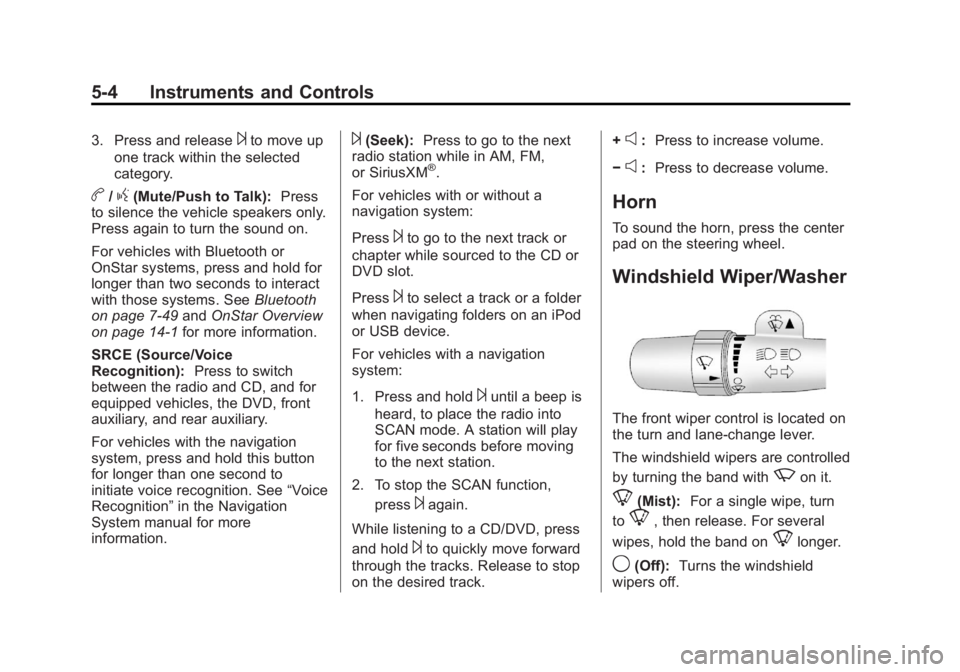
Windshield Wiper/Washer
The front wiper control is located on
the turn and lane-change lever.
The windshield wipers are controlled
by turning the band with
zon it.
8(Mist): For a single wipe, turn
to
8, then release. For several
wipes, hold the band on
8longer.
9(Off): Turns the windshield
wipers off.
Page 191 of 534
Black plate (1,1)GMC Sierra Owner Manual - 2013 - crc - 8/14/12
Lighting 6-1
Lighting
Exterior Lighting
Exterior Lamp Controls . . . . . . . . 6-1
Exterior Lamps OffReminder . . . . . . . . . . . . . . . . . . . . 6-2
Headlamp High/Low-Beam Changer . . . . . . . . . . . . . . . . . . . . . 6-2
Flash-to-Pass . . . . . . . . . . . . . . . . . 6-3
Daytime Running Lamps (DRL) . . . . . . . . . . . . . . . . 6-3
Automatic Headlamp System . . . . . . . . . . . . . . . . . . . . . . 6-3
Hazard Warning Flashers . . . . . 6-5
Turn and Lane-Change Signals . . . . . . . . . . . . . . . . . . . . . . 6-5
Fog Lamps . . . . . . . . . . . . . . . . . . . . 6-6
Auxiliary Roof-Mounted Lamp . . . . . . . . . 6-6
Interior Lighting
Instrument Panel IlluminationControl . . . . . . . . . . . . . . . . . . . . . . 6-7
Cargo Lamp . . . . . . . . . . . . . . . . . . 6-7
Dome Lamps . . . . . . . . . . . . . . . . . 6-7
Reading Lamps . . . . . . . . . . . . . . . 6-8
Lighting Features
Entry Lighting . . . . . . . . . . . . . . . . . 6-8
Exit Lighting . . . . . . . . . . . . . . . . . . . 6-8
Battery Load Management . . . . 6-9
Battery Power Protection . . . . . . 6-9
Exterior Lighting
Exterior Lamp Controls
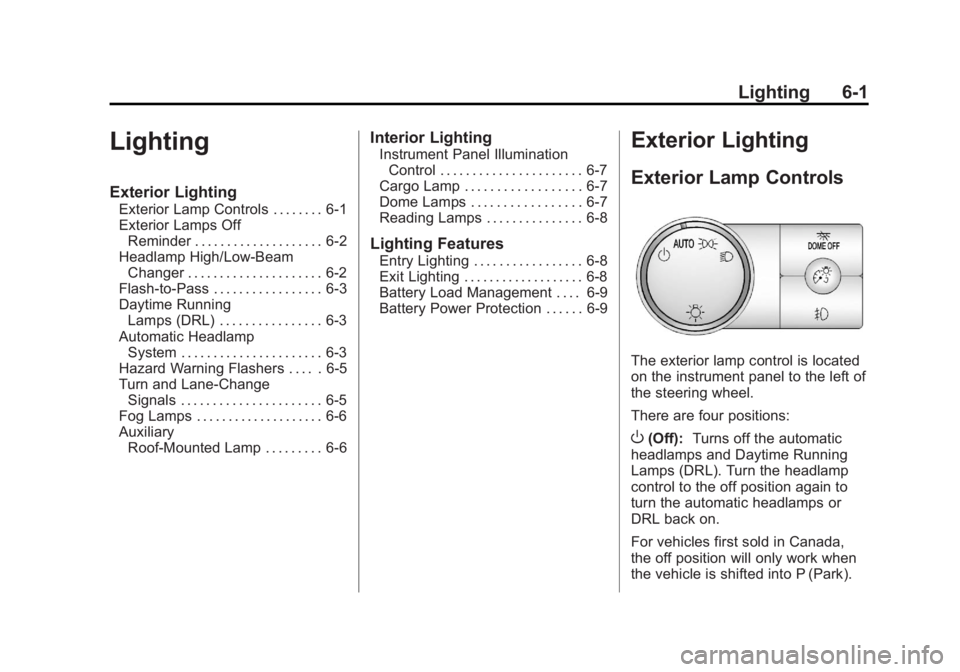
The exterior lamp control is located
on the instrument panel to the left of
the steering wheel.
There are four positions:
O(Off): Turns off the automatic
headlamps and Daytime Running
Lamps (DRL). Turn the headlamp
control to the off position again to
turn the automatic headlamps or
DRL back on.
For vehicles first sold in Canada,
the off position will only work when
the vehicle is shifted into P (Park).
Page 250 of 534
Black plate (50,1)GMC Sierra Owner Manual - 2013 - crc - 8/14/12
7-50 Infotainment System
When to Speak:A short tone
sounds after the system responds
indicating when it is waiting for a
voice command. Wait until the tone
and then speak.
How to Speak: Speak clearly in a
calm and natural voice.
Audio System
When using the in-vehicle Bluetooth
system, sound comes through the
vehicle's front audio system
speakers and overrides the audio
system. Use the audio system
volume knob, during a call, to
change the volume level. The
adjusted volume level remains in
memory for later calls. To prevent
missed calls, a minimum volume
level is used if the volume is turned
down too low.
Bluetooth Controls
Use the buttons on the steering
wheel to operate the in-vehicle
Bluetooth system. See Steering
Wheel Controls on page 5‑2.
b/g(Push to Talk): Press to
answer incoming calls, confirm
system information, and start
speech recognition.
c/x(End): Press to end a call,
reject a call, or cancel an operation.
Pairing
A Bluetooth-enabled cell phone
must be paired to the Bluetooth
system and then connected to the
vehicle before it can be used. See
the cell phone manufacturer's user
guide for Bluetooth functions before
pairing the cell phone. If a Bluetooth
phone is not connected, calls will be
made using OnStar Hands-Free
Calling, if equipped. See OnStar
Overview on page 14‑1.
Pairing Information
.A Bluetooth phone with MP3
capability cannot be paired to
the vehicle as a phone and an
MP3 player at the same time.
.Up to five cell phones can be
paired to the Bluetooth system.
.The pairing process is disabled
when the vehicle is moving.
.Pairing only needs to be
completed once, unless the
pairing information on the cell
phone changes or the cell phone
is deleted from the system.
.Only one paired cell phone can
be connected to the Bluetooth
system at a time.
.If multiple paired cell phones are
within range of the system, the
system connects to the first
available paired cell phone in the
order that they were first paired
to the system. To connect to a
different paired phone, see
“Connecting to a Different
Phone” later in this section.
Pairing a Phone
1. Press and hold
b/gfor
two seconds.
2. Say “Bluetooth.” This command
can be skipped.