torque GMC SIERRA 1500 2017 Owners Manual
[x] Cancel search | Manufacturer: GMC, Model Year: 2017, Model line: SIERRA 1500, Model: GMC SIERRA 1500 2017Pages: 494, PDF Size: 7.66 MB
Page 266 of 494
GMC Sierra/Sierra Denali Owner Manual (GMNA-Localizing-U.S./Canada/
Mexico-9955992) - 2017 - crc - 5/3/16
Driving and Operating 265
parking brake is firmly set before
you leave it. After you move the shift
lever into P (Park), hold the regular
brake pedal down. Then, see if you
can move the shift lever away from
P (Park) without first pulling it toward
you. If you can, it means that the
shift lever was not fully locked into
P (Park).
Torque Lock
If you are parking on a hill and you
do not shift the transmission into
P (Park) properly, the weight of the
vehicle may put too much force on
the parking pawl in the
transmission. You may find it difficult
to pull the shift lever out of P (Park).
This is called torque lock. To
prevent torque lock, set the parking
brake and then shift into P (Park)
properly before you leave the driver
seat. To find out how, seeShifting
Into Park 0264.
When you are ready to drive, move
the shift lever out of P (Park) before
you release the parking brake.
If torque lock does occur, you may
need to have another vehicle push
yours a little uphill to take some of the pressure from the parking pawl
in the transmission. You will then be
able to pull the shift lever out of
P (Park).
Shifting out of Park
This vehicle is equipped with an
electronic shift lock release system.
The shift lock release is
designed to:
.
Prevent ignition key removal
unless the shift lever is in
P (Park).
. Prevent movement of the shift
lever out of P (Park), unless the
ignition is in ON/RUN and the
regular brake pedal is applied.
The shift lock release is always
functional except in the case of an
uncharged or low voltage (less than
9 volt) battery.
If the vehicle has an uncharged
battery or a battery with low voltage,
try charging or jump starting the
battery. See Jump Starting - North
America 0418. To shift out of P (Park):
1. Apply the brake pedal.
2. Move the shift lever to the desired position.
If you still are unable to shift out of
P (Park): 1. Ease the pressure on the shift lever.
2. While holding down the brake pedal, press the shift lever all
the way into P (Park).
3. Move the shift lever to the desired position.
If you are still having a problem
shifting, then have the vehicle
serviced soon.
This vehicle may have the Safety
Belt Assurance System, which may
prevent the vehicle from shifting out
of P (Park). See Safety Belt
Messages 0150.
Page 269 of 494
GMC Sierra/Sierra Denali Owner Manual (GMNA-Localizing-U.S./Canada/
Mexico-9955992) - 2017 - crc - 5/3/16
268 Driving and Operating
effort to shift out of P (Park). See
“Torque Lock”underShifting Into
Park 0264.
{Warning
It is dangerous to get out of the
vehicle if the shift lever is not fully
in P (Park) with the parking brake
firmly set. The vehicle can roll.
Do not leave the vehicle when the
engine is running. If you have left
the engine running, the vehicle
can move suddenly. You or others
could be injured. To be sure the
vehicle will not move, even when
you are on fairly level ground,
always set the parking brake and
move the shift lever to P (Park).
See Shifting Into Park 0264 and
Driving Characteristics and
Towing Tips 0304.
{Warning
If you have four-wheel drive, the
vehicle will be free to roll —even
if the shift lever is in P (Park) —if
the transfer case is in N (Neutral).
So, be sure the transfer case is in
a drive gear, Two-Wheel Drive
High or Four-Wheel Drive High or
Four-Wheel Drive Low —not in
N (Neutral). See Shifting Into
Park 0264.
R : Use this gear to back up.
Caution
Shifting to R (Reverse) while the
vehicle is moving forward could
damage the transmission. The
repairs would not be covered by
the vehicle warranty. Shift to
R (Reverse) only after the vehicle
is stopped. To rock the vehicle back and forth to
get out of snow, ice, or sand without
damaging the transmission, see
If
the Vehicle Is Stuck 0249.
N : In this position, the engine does
not connect with the wheels. To
restart when you are already
moving, use N (Neutral) only. Also,
use N (Neutral) when the vehicle is
being towed.
{Warning
Shifting into a drive gear while the
engine is running at high speed is
dangerous. Unless your foot is
firmly on the brake pedal, the
vehicle could move very rapidly.
You could lose control and hit
people or objects. Do not shift
into a drive gear while the engine
is running at high speed.
Page 274 of 494
GMC Sierra/Sierra Denali Owner Manual (GMNA-Localizing-U.S./Canada/
Mexico-9955992) - 2017 - crc - 5/3/16
Driving and Operating 273
as with ice or snow. While the
vehicle is at a stop, select L2 using
Range Selection Mode. This will
limit torque to the wheels and help
to prevent the tires from spinning.
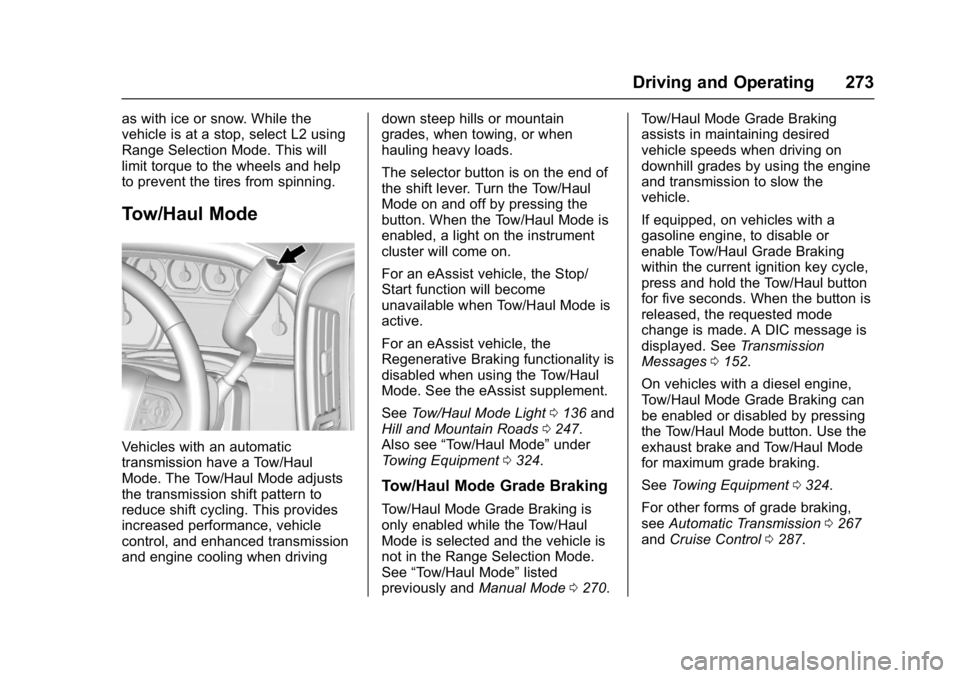
Tow/Haul Mode
Vehicles with an automatic
transmission have a Tow/Haul
Mode. The Tow/Haul Mode adjusts
the transmission shift pattern to
reduce shift cycling. This provides
increased performance, vehicle
control, and enhanced transmission
and engine cooling when drivingdown steep hills or mountain
grades, when towing, or when
hauling heavy loads.
The selector button is on the end of
the shift lever. Turn the Tow/Haul
Mode on and off by pressing the
button. When the Tow/Haul Mode is
enabled, a light on the instrument
cluster will come on.
For an eAssist vehicle, the Stop/
Start function will become
unavailable when Tow/Haul Mode is
active.
For an eAssist vehicle, the
Regenerative Braking functionality is
disabled when using the Tow/Haul
Mode. See the eAssist supplement.
See
Tow/Haul Mode Light 0136 and
Hill and Mountain Roads 0247.
Also see “Tow/Haul Mode” under
Towing Equipment 0324.
Tow/Haul Mode Grade Braking
Tow/Haul Mode Grade Braking is
only enabled while the Tow/Haul
Mode is selected and the vehicle is
not in the Range Selection Mode.
See “Tow/Haul Mode” listed
previously and Manual Mode0270. Tow/Haul Mode Grade Braking
assists in maintaining desired
vehicle speeds when driving on
downhill grades by using the engine
and transmission to slow the
vehicle.
If equipped, on vehicles with a
gasoline engine, to disable or
enable Tow/Haul Grade Braking
within the current ignition key cycle,
press and hold the Tow/Haul button
for five seconds. When the button is
released, the requested mode
change is made. A DIC message is
displayed. See
Transmission
Messages 0152.
On vehicles with a diesel engine,
Tow/Haul Mode Grade Braking can
be enabled or disabled by pressing
the Tow/Haul Mode button. Use the
exhaust brake and Tow/Haul Mode
for maximum grade braking.
See Towing Equipment 0324.
For other forms of grade braking,
see Automatic Transmission 0267
and Cruise Control 0287.
Page 276 of 494
GMC Sierra/Sierra Denali Owner Manual (GMNA-Localizing-U.S./Canada/
Mexico-9955992) - 2017 - crc - 5/3/16
Driving and Operating 275
N (Neutral) :Use only when the
vehicle needs to be towed. See
Recreational Vehicle Towing 0423
or Towing the Vehicle 0422.
2
m(Two-Wheel Drive High) : Use
this setting for driving on most
streets and highways. The front axle
is not engaged. This setting
provides the best fuel economy.
4
n(Four-Wheel Drive Low) : This
setting also engages the front axle
and delivers extra torque. Choose 4
nif driving off-road in deep sand,
deep mud, or deep snow, and while
climbing or descending steep hills.
When engaged, keep vehicle speed
below 72 km/h (45 mph).
4
m(Four-Wheel Drive High) : Use
this setting when extra traction is
needed. The front axle engages and
helps when driving on snowy or icy
roads, when off-roading, or when
plowing snow.
The vehicle can be shifted between
2
mand 4mwhile the vehicle is
moving. In extremely cold weather,
it may be necessary to stop or slow the vehicle to shift into 4
m.
Using the Manual Transfer Case
. Use quick motions to shift into or
out of 4
nor N (Neutral).
. Shifting may be harder when the
vehicle is cold, but will return to
normal once warmed up.
. Four-wheel drive reduces fuel
economy.
Shifting from 2
mto 4m
. Shifts can be made at any
vehicle speed.
. Shift in one continuous motion.
. Shifting while the vehicle is in
motion may require that
moderate force be applied to the
shift lever before 4
mcan be
engaged, especially in cold
weather.
. In extremely cold weather, it may
be necessary to slow or stop the
vehicle to shift.
. While in 4
m, the vehicle can be
driven at any posted legal speed
limit. Shifting In or Out of 4
n
Caution
Shifting the transfer case into 4n
while moving at speeds faster
than 5 km/h (3 mph) may cause
premature wear to the transfer
case, and may cause the gears to
grind.
1. If possible, shift with the vehicle moving 5 km/h (3 mph)
or less.
2. Shift the transmission into N (Neutral).
3. Shift the transfer case shift lever in one continuous motion.
4. Shifting with the vehicle at a stop may be more difficult. It is
possible that the shift will not
complete and the transfer case
will remain in N (Neutral). This
is normal. To complete the
shift, with the engine running,
shift the transmission to
Page 277 of 494
GMC Sierra/Sierra Denali Owner Manual (GMNA-Localizing-U.S./Canada/
Mexico-9955992) - 2017 - crc - 5/3/16
276 Driving and Operating
D (Drive) and back to
N (Neutral), and reattempt the
transfer case shift.
Shifting In or Out of N (Neutral) 1. Have the engine running.
2. Set the parking brake. Press and hold the brake pedal. See
Parking Brake 0282.
3. Place the transmission into N (Neutral).
4. Shift the transfer case lever in one continuous motion into or
out of N (Neutral).
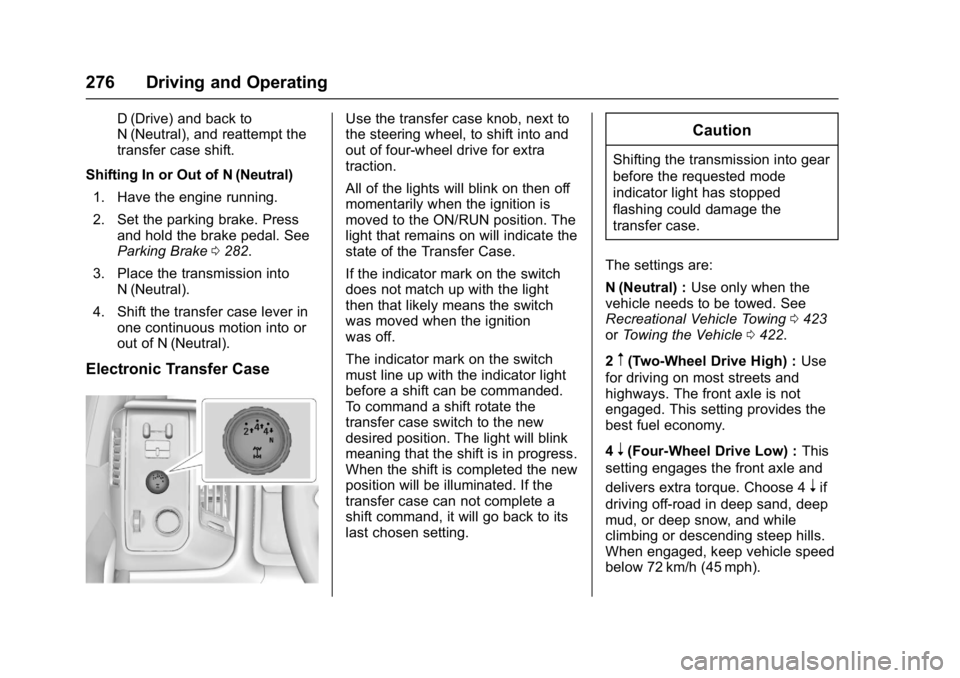
Electronic Transfer Case
Use the transfer case knob, next to
the steering wheel, to shift into and
out of four-wheel drive for extra
traction.
All of the lights will blink on then off
momentarily when the ignition is
moved to the ON/RUN position. The
light that remains on will indicate the
state of the Transfer Case.
If the indicator mark on the switch
does not match up with the light
then that likely means the switch
was moved when the ignition
was off.
The indicator mark on the switch
must line up with the indicator light
before a shift can be commanded.
To command a shift rotate the
transfer case switch to the new
desired position. The light will blink
meaning that the shift is in progress.
When the shift is completed the new
position will be illuminated. If the
transfer case can not complete a
shift command, it will go back to its
last chosen setting.Caution
Shifting the transmission into gear
before the requested mode
indicator light has stopped
flashing could damage the
transfer case.
The settings are:
N (Neutral) : Use only when the
vehicle needs to be towed. See
Recreational Vehicle Towing 0423
or Towing the Vehicle 0422.
2
m(Two-Wheel Drive High) : Use
for driving on most streets and
highways. The front axle is not
engaged. This setting provides the
best fuel economy.
4
n(Four-Wheel Drive Low) : This
setting engages the front axle and
delivers extra torque. Choose 4
nif
driving off-road in deep sand, deep
mud, or deep snow, and while
climbing or descending steep hills.
When engaged, keep vehicle speed
below 72 km/h (45 mph).
Page 280 of 494
GMC Sierra/Sierra Denali Owner Manual (GMNA-Localizing-U.S./Canada/
Mexico-9955992) - 2017 - crc - 5/3/16
Driving and Operating 279
If the indicator mark on the switch
does not match up with the light
then that likely means the switch
was moved when the ignition
was off.
The indicator mark on the switch
must line up with the indicator light
before a shift can be commanded.
To command a shift rotate the
transfer case switch to the new
desired position. The light will blink
meaning that the shift is in progress.
When the shift is completed the new
position will be illuminated. If the
transfer case can not complete a
shift command, it will go back to its
last chosen setting.
The settings are:
N (Neutral) :Use only when the
vehicle needs to be towed. See
Recreational Vehicle Towing 0423
or Towing the Vehicle 0422.
2
m(Two-Wheel Drive High) : Use
for driving on most streets and
highways. The front axle is not
engaged. This setting provides the
best fuel economy. AUTO (Automatic Four-Wheel
Drive) :
Use when road surface
traction conditions are variable.
When driving in AUTO, the front
axle is engaged, and the vehicle's
power is sent to the front and rear
wheels automatically based on
driving conditions. This setting
provides slightly lower fuel economy
than 2
m.
Do not use AUTO mode,
if equipped, to park on a steep
grade with poor traction such as ice,
snow, mud, or gravel. In AUTO
mode only the rear wheels will hold
the vehicle from sliding when
parked. If parking on a steep grade,
use 4
mto keep all four wheels
engaged.
4
m(Four-Wheel Drive High) : Use
this position when extra traction is
needed, such as when driving on
snowy or icy roads, when
off-roading, or when plowing snow.
4
n(Four-Wheel Drive Low) : This
setting engages the front axle and
delivers extra torque. Choose 4
n
when driving off-road in deep sand,
deep mud, or deep snow, and while
climbing or descending steep hills.
Shifting into 4
nwill turn Traction
Control and StabiliTrak off. See
Traction Control/Electronic Stability
Control 0284.
Shifting Into 4
mor AUTO
Turn the knob to the 4
mor AUTO
position at any speed, except from 4
n. The indicator light will flash while
shifting and will remain on when the
shift is completed.
Shifting Into 2
m
Turn the knob to 2mat any speed,
except when shifting from 4
n. The
indicator light will flash while shifting
and will remain on when the shift is
completed.
Shifting Into 4
n
When 4nis engaged, keep vehicle
speed below 72 km/h (45 mph).
Page 334 of 494
GMC Sierra/Sierra Denali Owner Manual (GMNA-Localizing-U.S./Canada/
Mexico-9955992) - 2017 - crc - 5/3/16
Driving and Operating 333
A GM dealer may be able to
diagnose and repair problems with
the trailer. However, any diagnosis
and repair of the trailer is not
covered under the vehicle warranty.
Contact your trailer dealer for
assistance with trailer repairs and
trailer warranty information.
Trailer Sway
Control (TSC)
Vehicles with StabiliTrak have a
Trailer Sway Control (TSC) feature.
Trailer sway is unintended
side-to-side motion of a trailer while
being towed. If the vehicle is towing
a trailer and the TSC detects that
sway is increasing, the vehicle
brakes are selectively applied at
each wheel, to help reduce
excessive trailer sway. If the vehicle
is equipped with the Integrated
Trailer Brake Control (ITBC) system,
and the trailer has the electric
actuated brake system, StabiliTrak
may also apply the trailer brakes.
If TSC is enabled, the Traction
Control System (TCS)/StabiliTrak
warning light will flash on theinstrument cluster. Vehicle speed
must be reduced. If trailer sway
continues, StabiliTrak can reduce
engine torque to help slow the
vehicle. See
Traction Control/
Electronic Stability Control 0284.
{Warning
Even if the vehicle is equipped
with TSC, trailer sway could result
in loss of control and the vehicle
could crash. If excessive trailer
sway is detected, slow down to a
safe speed. Check the trailer and
vehicle to help correct possible
causes. These could include an
improperly or overloaded trailer,
unrestrained cargo, improper
trailer hitch configuration,
excessive vehicle-trailer speed,
or improperly inflated or incorrect
vehicle or trailer tires. See Towing
Equipment 0324 for trailer ratings
and hitch setup
recommendations. Adding non-dealer accessories can
affect the vehicle performance. See
Accessories and
Modifications
0341.
Page 366 of 494
GMC Sierra/Sierra Denali Owner Manual (GMNA-Localizing-U.S./Canada/
Mexico-9955992) - 2017 - crc - 5/3/16
Vehicle Care 365
Caution
Continuing to drive with worn-out
brake pads could result in costly
brake repair.
Some driving conditions or climates
can cause a brake squeal when the
brakes are first applied or lightly
applied. This does not mean
something is wrong with the brakes.
Properly torqued wheel nuts are
necessary to help prevent brake
pulsation. When tires are rotated,
inspect brake pads for wear and
evenly tighten wheel nuts in the
proper sequence to torque
specifications in Capacities and
Specifications 0453.
Brake linings should always be
replaced as complete axle sets.
Brake Pedal Travel
See your dealer if the brake pedal
does not return to normal height,
or if there is a rapid increase in
pedal travel. This could be a sign
that brake service may be required.
Replacing Brake System Parts
Always replace brake system parts
with new, approved replacement
parts. If this is not done, the brakes
may not work properly. The braking
performance expected can change
in many other ways if the wrong
replacement brake parts are
installed or parts are improperly
installed.
Brake Fluid
The brake master cylinder reservoir
is filled with DOT 3 brake fluid. See
Engine Compartment Overview
0 343 for the location of the
reservoir. There are only two reasons why the
brake fluid level in the reservoir may
go down:
.
Normal brake lining wear. When
new linings are installed, the
fluid level goes back up.
. A fluid leak in the brake
hydraulic system. Have the
brake hydraulic system fixed.
With a leak, the brakes will not
work well.
Always clean the brake fluid
reservoir cap and the area around
the cap before removing it.
Do not top off the brake fluid.
Adding fluid does not correct a leak.
If fluid is added when the linings are
worn, there will be too much fluid
when new brake linings are
installed. Add or remove fluid, as
necessary, only when work is done
on the brake hydraulic system.
Page 399 of 494
GMC Sierra/Sierra Denali Owner Manual (GMNA-Localizing-U.S./Canada/
Mexico-9955992) - 2017 - crc - 5/3/16
398 Vehicle Care
.The tire has a bump, bulge,
or split.
.The tire has a puncture, cut,
or other damage that cannot
be repaired well because of
the size or location of the
damage.
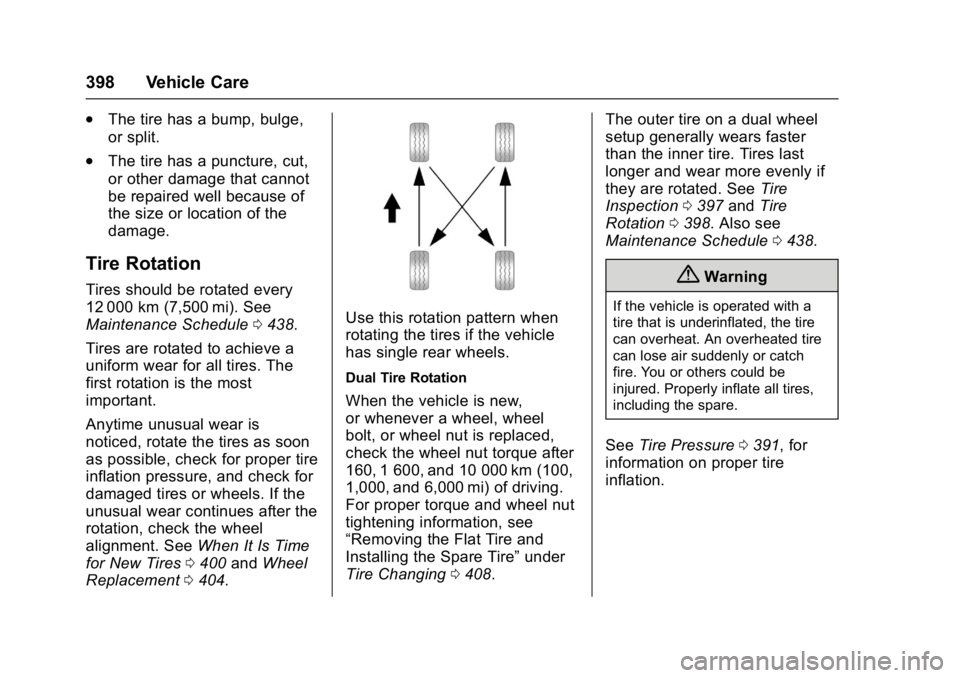
Tire Rotation
Tires should be rotated every
12 000 km (7,500 mi). See
Maintenance Schedule0438.
Tires are rotated to achieve a
uniform wear for all tires. The
first rotation is the most
important.
Anytime unusual wear is
noticed, rotate the tires as soon
as possible, check for proper tire
inflation pressure, and check for
damaged tires or wheels. If the
unusual wear continues after the
rotation, check the wheel
alignment. See When It Is Time
for New Tires 0400 andWheel
Replacement 0404.
Use this rotation pattern when
rotating the tires if the vehicle
has single rear wheels.
Dual Tire Rotation
When the vehicle is new,
or whenever a wheel, wheel
bolt, or wheel nut is replaced,
check the wheel nut torque after
160, 1 600, and 10 000 km (100,
1,000, and 6,000 mi) of driving.
For proper torque and wheel nut
tightening information, see
“Removing the Flat Tire and
Installing the Spare Tire” under
Tire Changing 0408. The outer tire on a dual wheel
setup generally wears faster
than the inner tire. Tires last
longer and wear more evenly if
they are rotated. See
Tire
Inspection 0397 and Tire
Rotation 0398. Also see
Maintenance Schedule 0438.
{Warning
If the vehicle is operated with a
tire that is underinflated, the tire
can overheat. An overheated tire
can lose air suddenly or catch
fire. You or others could be
injured. Properly inflate all tires,
including the spare.
See Tire Pressure 0391, for
information on proper tire
inflation.
Page 400 of 494
GMC Sierra/Sierra Denali Owner Manual (GMNA-Localizing-U.S./Canada/
Mexico-9955992) - 2017 - crc - 5/3/16
Vehicle Care 399
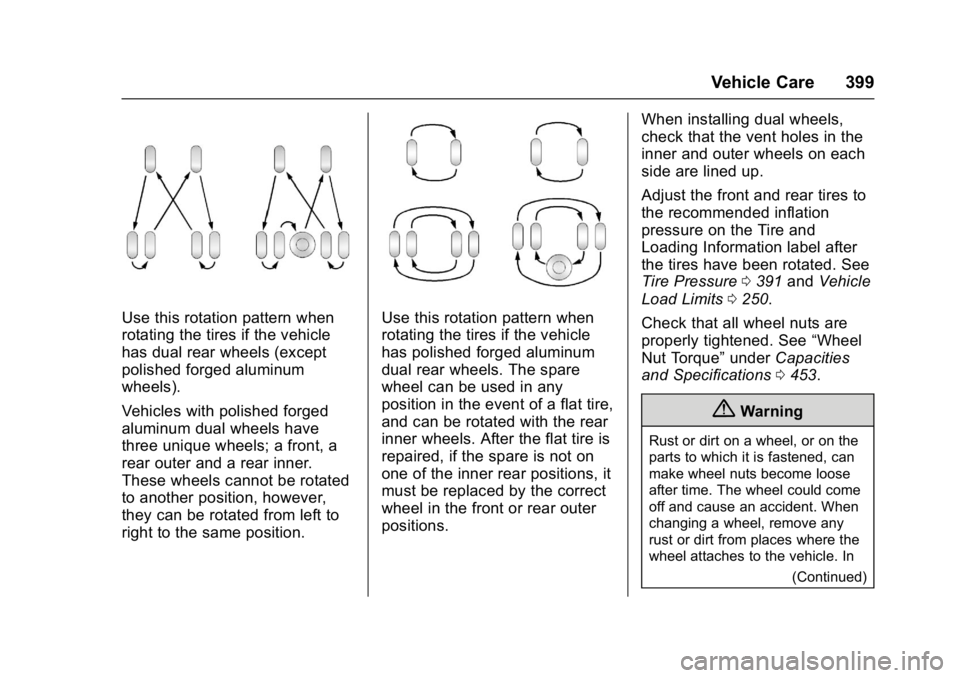
Use this rotation pattern when
rotating the tires if the vehicle
has dual rear wheels (except
polished forged aluminum
wheels).
Vehicles with polished forged
aluminum dual wheels have
three unique wheels; a front, a
rear outer and a rear inner.
These wheels cannot be rotated
to another position, however,
they can be rotated from left to
right to the same position.Use this rotation pattern when
rotating the tires if the vehicle
has polished forged aluminum
dual rear wheels. The spare
wheel can be used in any
position in the event of a flat tire,
and can be rotated with the rear
inner wheels. After the flat tire is
repaired, if the spare is not on
one of the inner rear positions, it
must be replaced by the correct
wheel in the front or rear outer
positions.When installing dual wheels,
check that the vent holes in the
inner and outer wheels on each
side are lined up.
Adjust the front and rear tires to
the recommended inflation
pressure on the Tire and
Loading Information label after
the tires have been rotated. See
Tire Pressure
0391 and Vehicle
Load Limits 0250.
Check that all wheel nuts are
properly tightened. See “Wheel
Nut Torque” underCapacities
and Specifications 0453.
{Warning
Rust or dirt on a wheel, or on the
parts to which it is fastened, can
make wheel nuts become loose
after time. The wheel could come
off and cause an accident. When
changing a wheel, remove any
rust or dirt from places where the
wheel attaches to the vehicle. In
(Continued)