four wheel drive GMC SIERRA 2003 Owner's Manual
[x] Cancel search | Manufacturer: GMC, Model Year: 2003, Model line: SIERRA, Model: GMC SIERRA 2003Pages: 408, PDF Size: 2.58 MB
Page 99 of 408

On cold days, approximately 32°F(0°C) or colder, your
transmission is designed to shift differently until the
engine reaches normal operating temperature. This is
intended to improve heater performance.
Tow/Haul Mode
Your vehicle may be equipped with a tow/haul mode.
The switch is located on the end of the column shift
lever. You can use this feature to assist when towing or
hauling a heavy load.When tow/haul is activated
the tow/haul symbol will
illuminate on the
instrument panel cluster.
SeeTow/Haul Modeunder
Towing a Trailer on
page 4-53for more
information.
All-Wheel Drive
With this feature, engine power is sent to all four wheels
all the time.
This is like four-wheel drive, but there is no separate
lever or switch to engage or disengage the front axle.
It is fully automatic, and adjusts itself as needed for road
conditions.
2-21
2003 - Sierra Denali
Page 101 of 408
Shifting Into Park (P)
{CAUTION:
It can be dangerous to get out of your vehicle
if the shift lever is not fully in PARK (P) with
the parking brakefirmly set. Your vehicle can
roll. If you have left the engine running, the
vehicle can move suddenly. You or others
could be injured. To be sure your vehicle won’t
move, even when you’re on fairly level ground,
use the steps that follow. With four-wheel
drive, if your transfer case is in NEUTRAL,
your vehicle will be free to roll, even if your
shift lever is in PARK (P). So, be sure the
transfer case is in a drive gear—not in
NEUTRAL. If you’re pulling a trailer, see
“Towing a Trailer”in the Index.1. Hold the brake pedal down with your right foot and
set the parking brake.
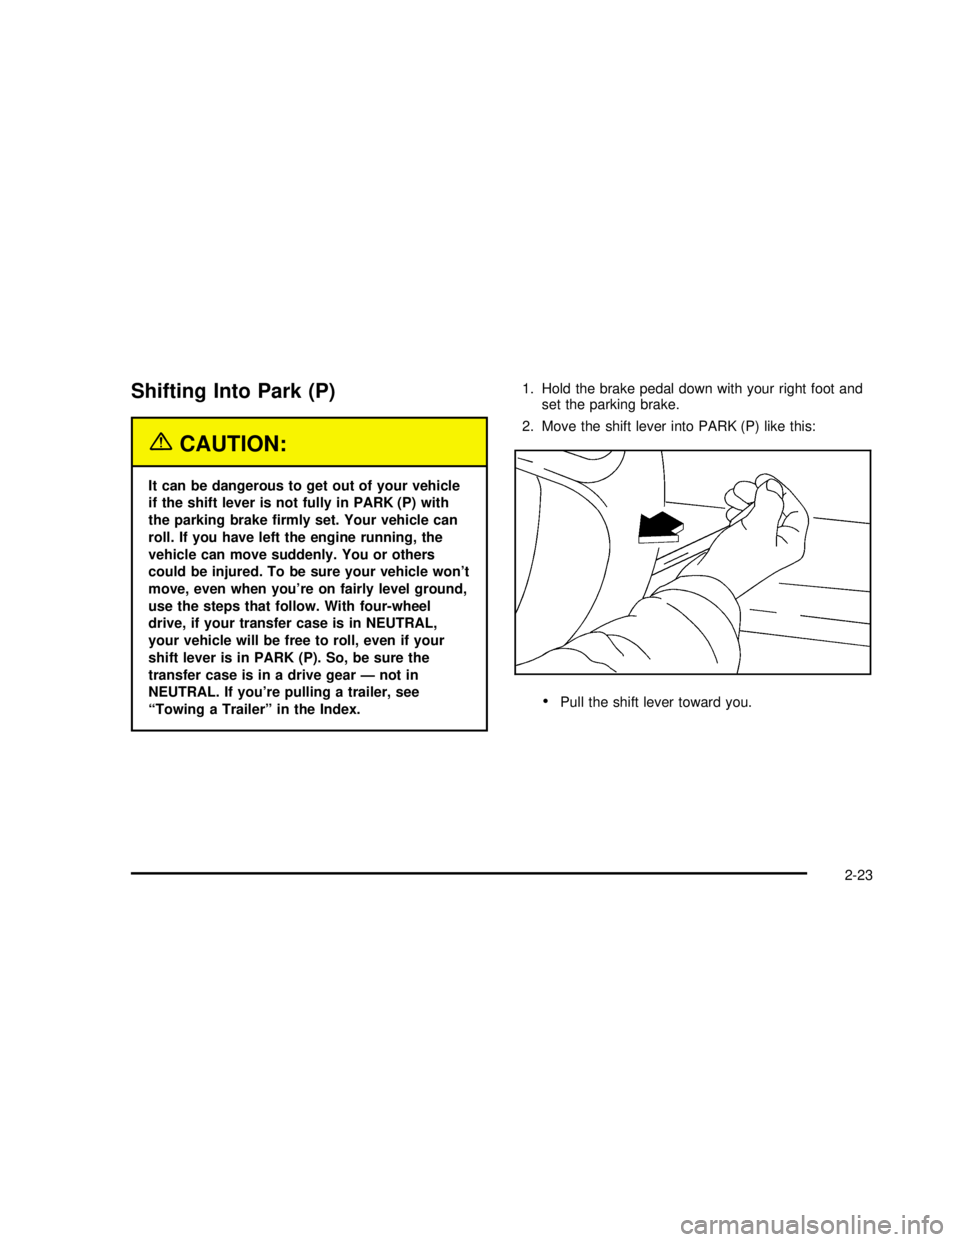
2. Move the shift lever into PARK (P) like this:
Pull the shift lever toward you.
2-23
2003 - Sierra Denali
Page 162 of 408
Driver Information Center (DIC)
The DIC display is located on the instrument panel
cluster above the steering wheel. The DIC can display
information such as the trip odometer, fuel economy and
personalization features.
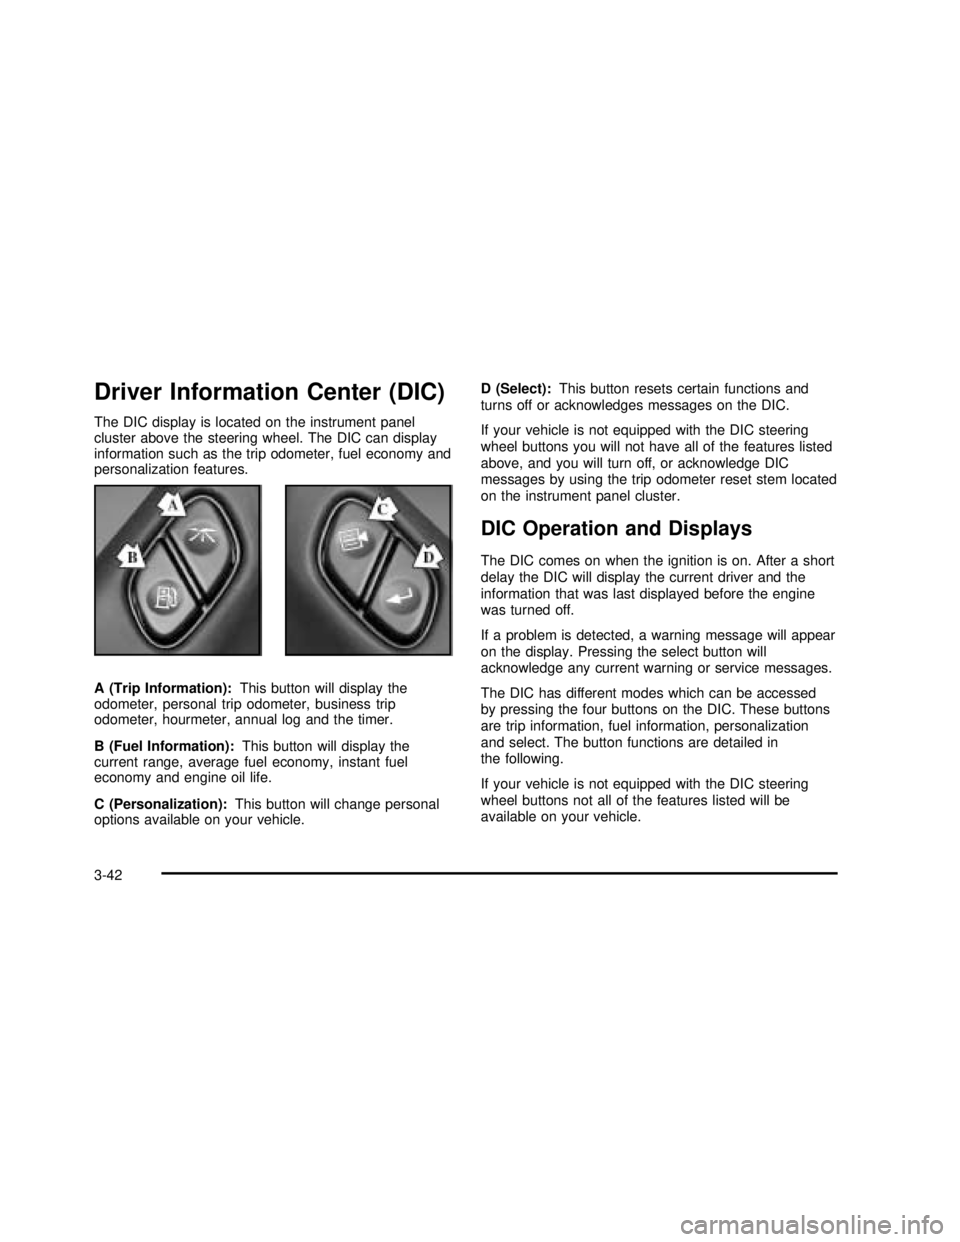
A (Trip Information):This button will display the
odometer, personal trip odometer, business trip
odometer, hourmeter, annual log and the timer.
B (Fuel Information):This button will display the
current range, average fuel economy, instant fuel
economy and engine oil life.
C (Personalization):This button will change personal
options available on your vehicle.D (Select):This button resets certain functions and
turns off or acknowledges messages on the DIC.
If your vehicle is not equipped with the DIC steering
wheel buttons you will not have all of the features listed
above, and you will turn off, or acknowledge DIC
messages by using the trip odometer reset stem located
on the instrument panel cluster.
DIC Operation and Displays
The DIC comes on when the ignition is on. After a short
delay the DIC will display the current driver and the
information that was last displayed before the engine
was turned off.
If a problem is detected, a warning message will appear
on the display. Pressing the select button will
acknowledge any current warning or service messages.
The DIC has different modes which can be accessed
by pressing the four buttons on the DIC. These buttons
are trip information, fuel information, personalization
and select. The button functions are detailed in
the following.
If your vehicle is not equipped with the DIC steering
wheel buttons not all of the features listed will be
available on your vehicle.
3-42
2003 - Sierra Denali
Page 164 of 408

You can also reset the PERSONAL: XX MI, or
BUSINESS: XX MI, while they are displayed by pressing
the reset stem on the cluster. If you press and hold
the reset stem or select button for four seconds,
the display will show the distance traveled since the last
ignition cycle for the personal or business trip.
Odometer
Press the trip information button, or the trip odometer
reset step, until SEASON ODOMETER appears on
the display. This shows the total distance the vehicle has
been driven in either miles or kilometers. Pressing the
reset stem located on the instrument cluster with
the vehicle off will also display the season odometer.
Hourmeter
Press the trip button to scroll to the hourmeter. The
hourmeter shows the total number of hours the engine
has run. Pressing the reset stem on the instrument
cluster will also display the hourmeter after the season
odometer is displayed.
Annual Log
Press the trip button, or the reset stem on the instrument
panel cluster, to scroll to the annual log. The annual
log shows the mileage accumulated since it was
last reset. To reset the annual log, press and hold the
select button, or the trip odometer reset stem for
approximately two seconds.
Timer
The DIC can be used as a stopwatch. Press the select
button, or the trip odometer reset stem, while TIMER
is displayed to start the timer. The display will show the
amount of time that has passed since the timer was
last reset (not including time the ignition is off). Time will
continue to be counted as long as the ignition is on,
even if another display is being shown on the DIC. The
timer will record up to 99 hours, 59 minutes and
59 seconds (99:59:59) after which the display will roll
back to zero.
To stop the counting of time, press the select button
briefly while TIMER is displayed.
To reset the timer to zero, press and hold the select
button, or the trip odometer reset stem, while TIMER is
displayed.
Fuel Information Button
Use the fuel information button to scroll through the
range, average fuel economy, instant fuel economy and
the GM Oil Life System™.
If your vehicle is not equipped with the DIC steering
wheel control buttons you will not be able to display the
fuel information.
3-44
2003 - Sierra Denali
Page 174 of 408

SERVICE 4WD
If a problem occurs with the four wheel drive system,
this message will appear on the DIC. If this message
appears, stop as soon as possible and turn off the
vehicle. Restart the vehicle and check for the message
on the DIC display. If the message is still displayed,
or appears again when you begin driving, the four wheel
drive system needs service.
SERVICE AIR SUSPENSION
If a problem occurs with the suspension system, this
message will appear on the DIC. If this message
appears, stop as soon as possible and turn off the
vehicle. Restart the vehicle and check for the message
on the DIC display. If the message is still displayed,
or appears again when you begin driving, the air
suspension system needs service.
TURN SIGNAL ON
If a turn signal is left on for 3/4 of a mile (1.2 km), this
message will appear on the display and you will
hear a chime. Move the turn signal/multifunction lever to
the off position. Pressing the select button will
acknowledge this message and clear it from the DIC
display.
CARGO LAMP ON
If the cargo lamp is on, this message will appear on the
DIC and you will hear a chime. Turn off the vehicle
and check the liftgate. Restart the vehicle and check for
the message on the DIC display. Pressing the select
button will acknowledge this message and clear it from
the DIC display.
FUEL LEVEL LOW
If the fuel level is low, this message will appear on the
DIC and you will hear a chime. Refuel as soon as
possible. Pressing the select button will acknowledge
this message and clear it from the DIC display.
CHECK OIL LEVEL
If the oil level in the vehicle is low, this message will
appear on the DIC. Check and oil level and correct it as
necessary. You may need to let the vehicle cool or
warm up and cycle the ignition to be sure this message
will clear. Once the problem is corrected, pressing
the select button will clear this message from the DIC
display.
CHECK WASHER FLUID
If the washerfluid level is low, this message will appear
on the DIC. Adding washerfluid will clear the message.
Pressing the select button will acknowledge this
message and clear it from the DIC display.
3-54
2003 - Sierra Denali
Page 245 of 408

Recreational Vehicle Towing
Recreational vehicle towing means towing your vehicle
behind another vehicle—such as behind a motorhome.
The two most common types of recreational vehicle
towing are known as“dinghy towing”(towing your
vehicle with all four wheels on the ground) and“dolly
towing”(towing your vehicle with two wheels on
the ground and two wheels up on a device known as
a“dolly”).
Your vehicle was not designed to be towed with any of
its wheels on the ground. If your vehicle must be
towed, seeTowing Your Vehicle on page 4-46.
Notice:Towing an all-wheel-drive vehicle with all
four wheels on the ground, or even with only two of
its wheels on the ground, will damage drivetrain
components. Don’t tow an all-wheel-drive vehicle if
any of its wheels will be on the ground.
Loading Your Vehicle
The Certi�cation/Tire label is found on the rear edge of
the driver’s door.
The label shows the size of your original tires and the
in�ation pressures needed to obtain the gross weight
capacity of your vehicle. This is called the GVWR (Gross
Vehicle Weight Rating). The GVWR includes the
weight of the vehicle, all occupants, fuel and cargo.
4-47
2003 - Sierra Denali
Page 247 of 408
{CAUTION:
Things you put inside your vehicle can strike
and injure people in a sudden stop or turn, or
in a crash.
Put things in the trunk of your vehicle. In a
trunk, put them as far forward as you can.
Try to spread the weight evenly.
Never stack heavier things, like suitcases,
inside the vehicle so that some of them
are above the tops of the seats.
Don’t leave an unsecured child restraint in
your vehicle.
When you carry something inside the
vehicle, secure it whenever you can.
There’s also important loading information for off-road
driving in this manual. See“Loading Your Vehicle
for Off-Road Driving“underOperating Your
All-Wheel-Drive Vehicle Off Paved Roads on page 4-18.
Payload
Payload capacity is the maximum load capacity that
your vehicle can carry. Be sure to include the weight of
the occupants as part of your load. If you added any
accessories or equipment after your vehicle leftthe factory, remember to subtract the weight of these
things from the payload. Your dealer can help you
with this.
Remember not to exceed the Gross Axle Weight Rating
(GAWR) of the front or rear axle.
Two-Tiered Loading
By positioning four 2”x6”wooden planks across the
width of the pickup box, you can create an upper
load platform. The planks must be inserted in the pickup
box depressions. The length of the planks must allow
for at least a 3/4 inch (2 cm) bearing surface on
each end of the plank.
When using this upper load platform, be sure the load is
securely tied down to prevent it from shifting. The
load’s center of gravity should be positioned in a zone
over the rear axle. The zone is located in the area
between the front of each wheel well and the rear of
each wheel well. The center of gravity height must not
extend above the top of the pickup box�areboard.
Any load that extends beyond the vehicle’s taillamp area
must be properly marked according to local laws and
regulations.
Remember not to exceed the Gross Axle Weight Rating
(GAWR) of the front or rear axle.
4-49
2003 - Sierra Denali
Page 298 of 408
•If you spill brakefluid on your vehicle’s painted
surfaces, the paintfinish can be damaged. Be
careful not to spill brakefluid on your vehicle.
If you do, wash it off immediately. See
“Appearance Care”in the Index.
Brake Wear
Your vehicle has four-wheel disc brakes.
Disc brake pads have built-in wear indicators that make
a high-pitched warning sound when the brake pads
are worn and new pads are needed. The sound
may come and go or be heard all the time your vehicle
is moving (except when you are pushing on the
brake pedalfirmly).
{CAUTION:
The brake wear warning sound means that
soon your brakes won’t work well. That could
lead to an accident. When you hear the brake
wear warning sound, have your vehicle
serviced.
Notice:Continuing to drive with worn-out brake
pads could result in costly brake repair.Some driving conditions or climates may cause a brake
squeal when the brakes arefirst applied or lightly
applied. This does not mean something is wrong with
your brakes.
Properly torqued wheel nuts are necessary to help
prevent brake pulsation. When tires are rotated, inspect
brake pads for wear and evenly tighten wheel nuts in
the proper sequence to GM torque specifications.
Brake linings should always be replaced as complete
axle sets.
SeeBrake System Inspection on page 6-15.
Brake Pedal Travel
See your dealer if the brake pedal does not return to
normal height, or if there is a rapid increase in
pedal travel. This could be a sign of brake trouble.
Brake Adjustment
Every time you make a brake stop, your disc brakes
adjust for wear.
5-38
2003 - Sierra Denali
Page 300 of 408
Jump Starting
If your battery (or batteries) has run down, you may
want to use another vehicle and some jumper cables to
start your vehicle. Be sure to follow the steps below
to do it safely.
{CAUTION:
Batteries can hurt you. They can be dangerous
because:
•They contain acid that can burn you.
•They contain gas that can explode or
ignite.
•They contain enough electricity to
burn you.
If you don’t follow these steps exactly, some
or all of these things can hurt you.Notice:Ignoring these steps could result in costly
damage to your vehicle that wouldn’t be covered
by your warranty.
Trying to start your vehicle by pushing or pulling it
won’t work, and it could damage your vehicle.
1. Check the other vehicle. It must have a 12-volt
battery with a negative ground system.
Notice:If the other system isn’t a 12-volt system
with a negative ground, both vehicles can be
damaged.
2. Get the vehicles close enough so the jumper cables
can reach, but be sure the vehicles aren’t touching
each other. If they are, it could cause a ground
connection you don’t want. You wouldn’t be able to
start your vehicle, and the bad grounding could
damage the electrical systems.
To avoid the possibility of the vehicles rolling, set
the parking brakefirmly on both vehicles involved in
the jump start procedure. Put the automatic
transmission in PARK (P) before setting the parking
brake. If you have a four-wheel-drive vehicle, be
sure the transfer case is in a drive gear not in
NEUTRAL.
5-40
2003 - Sierra Denali
Page 353 of 408

Fuses Usage
4WDFour-Wheel Drive System,
Auxiliary Battery
HTR A/C Climate Control System
LOCK (Relay)Power Door Lock Relay
(Lock Function)
HVAC 1 Climate Control System
L DOORDriver’s Door Harness
Connection
CRUISECruise Control, Power Take
Off (PTO)
UNLOCK (Relay)Power Door Lock Relay
(Unlock Function)
RR FOG LP Not Used
BRAKE Anti-Lock Brake System
DRIVER UNLOCKPower Door Lock Relay
(Driver’s Door Unlock
Function)
IGN 0 TCM
TBC IGN 0 Truck Body Controller
VEH CHMSLVehicle and Trailer High
Mounted StoplampFuses Usage
LT TRLR ST/TRN Left Turn Signal/Stop Trailer
LT TRNLeft Turn Signals and
Sidemarkers
VEH STOPVehicle Stoplamps, Brake
Module, Electronic Throttle
Control Module
RT TRLR ST/TRN Right Turn Signal/Stop Trailer
RT TRNRight Turn Signals and
Sidemarkers
BODY Harness Connector
DDM Driver Door Module
AUX PWR 2 Not Used
LOCKS Power Door Lock System
ECC Not Used
TBC 2C Truck Body Controller
FLASH Flasher Module
CB LT DOORSLeft Power Windows Circuit
Breaker
TBC 2B Truck Body Controller
TBC 2A Truck Body Controller
5-93
2003 - Sierra Denali