ECO mode GMC SIERRA 2004 Get To Know Guide
[x] Cancel search | Manufacturer: GMC, Model Year: 2004, Model line: SIERRA, Model: GMC SIERRA 2004Pages: 16, PDF Size: 0.4 MB
Page 5 of 16

5
Automatic Dimming Rearview
Mirror with OnStar®, Compass
and Temperature Display
(if equipped)
Controls for the dimming feature, as well
as OnStar
®(if equipped) and the com-
pass and temperature displays, are
located on the bottom of the mirror.
When on, the automatic interior dimming
rearview mirror automatically dims to the
proper level to minimize glare from lights
behind you when it’s dark outside.
Turn the self-dimming function
on or off
•Press and hold for approximately
eight seconds.
Use the OnStar Communications
system
•Press to connect to an OnStar
®
Advisor.
•Press to answer or end a call
from the OnStar
®Center.
•Press in an emergency to connect
to an OnStar
®Advisor who can con-
tact the nearest emergency services
provider.
Turn the outside temperature dis-
plays and compass readings on or off
•Press .
Display temperature
•Press and hold for four seconds
(until the display blinks) to toggle
between °C and °F. Once the desired
°C or °F is displayed, release the
button. Wait four seconds and the
temperature will be displayed.
See Section 2 of your Owner Manual.
Automatic Climate Control
System (if equipped)
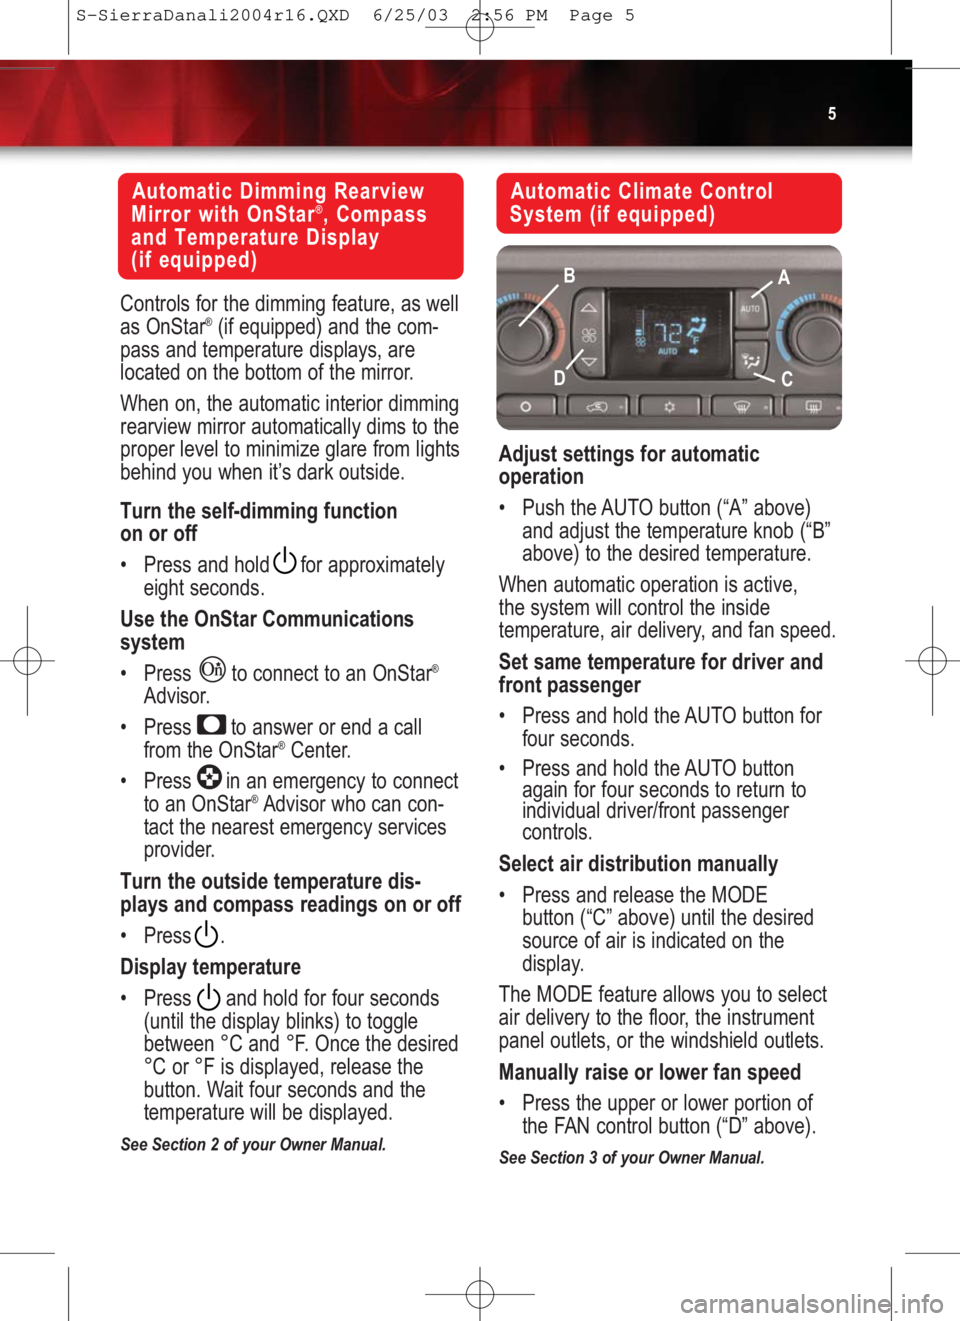
Adjust settings for automatic
operation
•Push the AUTO button (“A” above)
and adjust the temperature knob (“B”
above) to the desired temperature.
When automatic operation is active,
the system will control the inside
temperature, air delivery, and fan speed.
Set same temperature for driver and
front passenger
•Press and hold the AUTO button for
four seconds.
•Press and hold the AUTO button
again for four seconds to return to
individual driver/front passenger
controls.
Select air distribution manually
•Press and release the MODE
button (“C” above) until the desired
source of air is indicated on the
display.
The MODE feature allows you to select
air delivery to the floor, the instrument
panel outlets, or the windshield outlets.
Manually raise or lower fan speed
•Press the upper or lower portion of
the FAN control button (“D” above).
See Section 3 of your Owner Manual.
A B
CD
S-SierraDanali2004r16.QXD 6/25/03 2:56 PM Page 5
Page 6 of 16

Getting to Know YourSierra/Sierra Denali6
Manual Climate Control System
(if equipped)
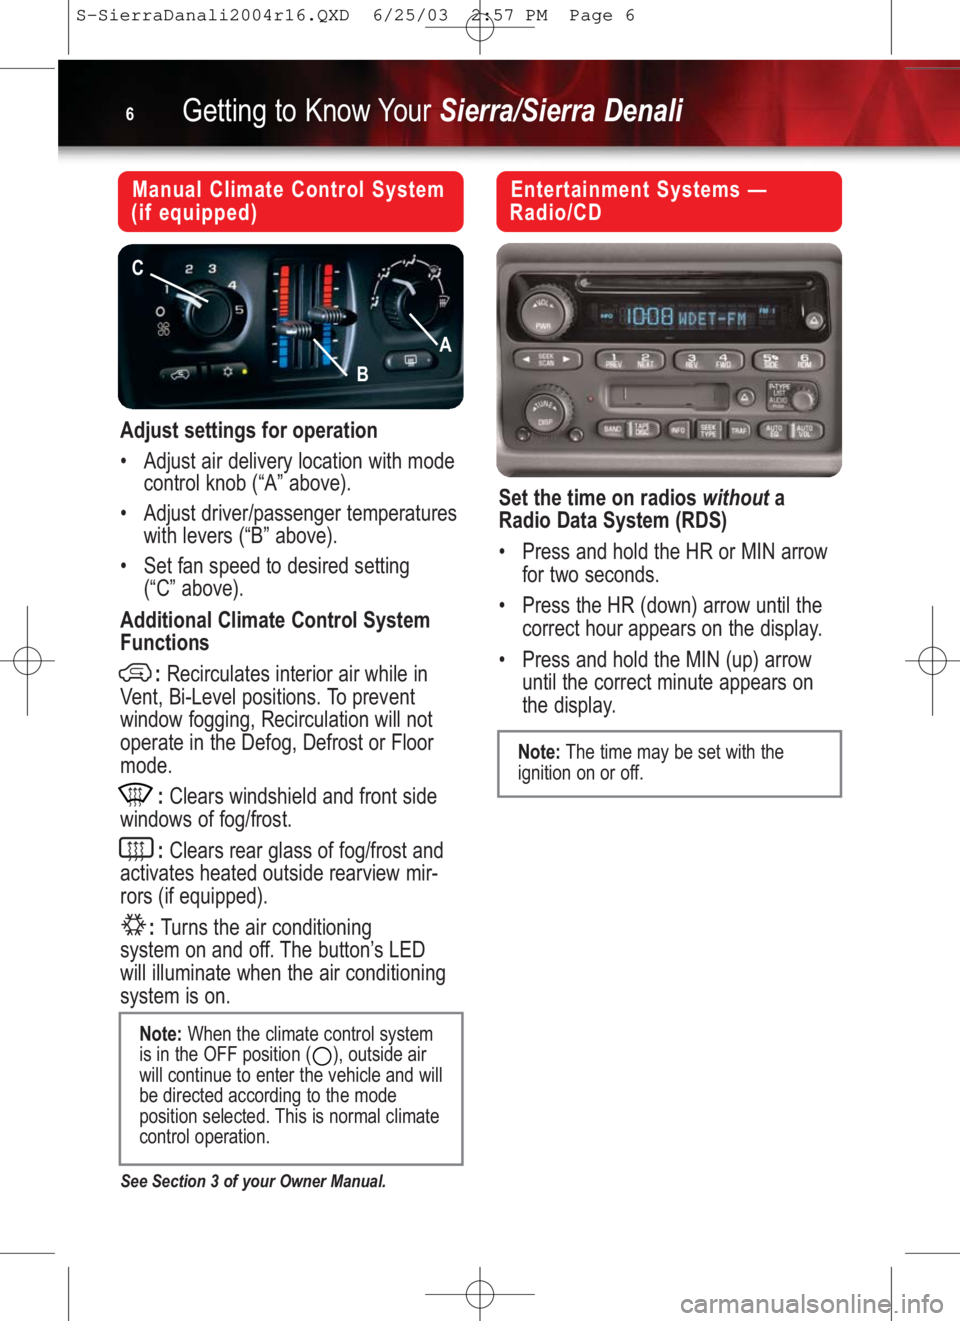
Adjust settings for operation
•Adjust air delivery location with mode
control knob (“A” above).
•Adjust driver/passenger temperatures
with levers (“B” above).
•Set fan speed to desired setting
(“C” above).
Additional Climate Control System
Functions
:Recirculates interior air while in
Vent, Bi-Level positions. To prevent
window fogging, Recirculation will not
operate in the Defog, Defrost or Floor
mode.
:Clears windshield and front side
windows of fog/frost.
:Clears rear glass of fog/frost and
activates heated outside rearview mir-
rors (if equipped).
:Turns the air conditioning
system on and off. The button’s LED
will illuminate when the air conditioning
system is on.
See Section 3 of your Owner Manual.
Note:When the climate control system
is in the OFF position ( ), outside air
will continue to enter the vehicle and will
be directed according to the mode
position selected. This is normal climate
control operation.
Entertainment Systems —
Radio/CD
Set the time on radios withouta
Radio Data System (RDS)
•Press and hold the HR or MIN arrow
for two seconds.
•Press the HR (down) arrow until the
correct hour appears on the display.
•Press and hold the MIN (up) arrow
until the correct minute appears on
the display.
Note:The time may be set with the
ignition on or off.
A
B
C
S-SierraDanali2004r16.QXD 6/25/03 2:57 PM Page 6
Page 14 of 16

Getting to Know YourSierra/Sierra Denali14
Odometer/Trip Settings
(if equipped)
Your vehicle’s personal trip and busi-
ness trip odometers operate only when
they are turned on. The controls are
located on the steering wheel.
Enable the system
•Press the Trip button ( ) until the
words “Personal Trip” appear. Then
press to denote Personal Trip
ON. Press the Trip button again to
monitor your mileage. (Note:
Continue to press the Trip button to
monitor the features shown in the
next column.)Use the above procedure to monitor the
following settings:
•Personal/Business: Miles
•Personal/Business: Gal.
•Personal/Business: Avg. MPG
•Personal/Business: MPH
•Personal/Business: Annual % Usage
•Business: Hourmeter (Total Engine
Run Time)
•Business: Annual Log
•Business: Timer
Reset trip information
•Press and hold the Select button
( ) for two seconds while viewing
any of the trip modes on the Driver
Information Center.
See Section 2 of your Owner Manual.
Note:Whether your vehicle is equipped
with a Driver Information Center or not,
you can select and reset trip features by
using the Trip Odometer Reset Stem
located on the instrument panel cluster.
S-SierraDanali2004r16.QXD 6/25/03 2:57 PM Page 14
Page 15 of 16

15
Vehicle Symbols Glossary
Air Bag Readiness Light
Air Conditioning (A/C)
Antilock Brake System
Warning Light
Auxiliary Roof-Mounted Lamp
Switch (if equipped)
Battery Warning Light
Brake System Warning Light
Cargo Lamp Button
Content Theft Deterrent
Cruise Control Set
Dome Lamps Override Button
Driver Information Center Trip
Information Button (on steering
wheel)
Driver Information Center Fuel
Information Button (on steering
wheel)
Driver Information Center
Personalization/Menu Button
(on steering wheel)
Driver Information Center Select
Button (on steering wheel)
Fog Lamps
Four-Wheel Drive Light
Four-Wheel Steer (if equipped)Front and Side Window Defrost
Headlamps
Instrument Panel Brightness
Control
Malfunction Indicator Lamp
(Check Engine Light)
Off (for example, headlamp and
climate controls)
Off/On (for example, inside
rearview mirror)
On (for example, cruise control
lever)
Overdrive Disabled (Shown on
shift lever, if equipped with
Allison transmission)
Parking Lamps
Driver and Front Passenger
Safety Belt Reminder Light
(if equipped)
Rear Door Security Locks
(if equipped)
Rear Window Defogger
(if equipped)
Tow/Haul Mode Light
Traction Off Light
Up-Shift Light
(vehicles with manual transmission)
Following are examples of symbols you may find on your vehicle. It is important to
become familiar with them, as they alert you to various vehicle operating conditions.
S-SierraDanali2004r16.QXD 6/25/03 2:57 PM Page 15
Page 16 of 16

Getting to Know YourSierra/Sierra Denali16
04SIERDENQRG
Roadside Assistance Program
My GMLink
1-800-GMC-8782
TTY: 1-888-889-2438
As the proud owner of a GMC Sierra or
Sierra Denali, you are automatically
enrolled in the GMC Roadside
Assistance Program. This value-added
service is intended to provide you with
peace of mind as you drive in the city
or travel the open road.
GMC’s Roadside Assistance toll-free
number is staffed by a team of techni-
cally trained advisors, who are available
24 hours a day, 365 days a year. We
take the anxiety out of uncertain situa-
tions by providing minor repair informa-
tion over the phone or making arrange-
ments to tow your vehicle to the nearest
GMC dealer.
We will provide the following services for
3 years/36,000 miles (60,000 km), at no
expense to you:
•Fuel delivery
•Lockout service
(identification required)
•Tow to nearest dealership for
warranty service
•Change a flat tire
•Jump starts
The GMC Owner Center at MyGMLink
is a complimentary service for GMC
Owners, a one-stop resource to
enhance your GMC ownership experi-
ence. Exclusive member benefits
include online service reminders, vehicle
maintenance tips, online owner manual,
special privileges and more. Sign up
today at www.mygmlink.com For prompt and efficient assistance
when calling, please provide the follow-
ing information to the advisor:
•Location of the vehicle
•Telephone number or your location
•Vehicle model, year and color
•Vehicle mileage
•Vehicle Identification Number (VIN)
•Vehicle license plate number
GMC reserves the right to limit services
or reimbursement to an owner or driver
when, in GMC’s judgment, the claims
become excessive in frequency or type
of occurrence.
Certain restrictions, precautions and safety procedures apply to your vehicle. Please read your Owner
Manual for complete instructions. All information contained herein is based on information available at
the time of printing and is subject to change without notice. Copyright 2003 by GM Corp.
All rights reserved.
S-SierraDanali2004r16.QXD 6/25/03 2:57 PM Page 16