instrument panel GMC SIERRA 2009 Get To Know Guide
[x] Cancel search | Manufacturer: GMC, Model Year: 2009, Model line: SIERRA, Model: GMC SIERRA 2009Pages: 24, PDF Size: 1.4 MB
Page 1 of 24
Congratulations on your purchase of a GMC Sierra. Please read this information about your vehicle’s features and
your Owner Manual to ensure an outstanding ownership experience. Note that your vehicle may not include all the
features described in this booklet. Keep this booklet with your Owner Manual for easy reference.
DRIVER INFORMATION
Instrument Panels . . . . . . . . . . . . .2
Instrument Panel Cluster . . . . . . .4
Voltmeter Operation . . . . . . . . . . . .5
Driver Information Center . . . . . .5
SAFETY & SECURITY
Remote Keyless Entry . . . . . . . . . .7
Content Theft-Deterrent System . .7
OnStar
® . . . . . . . . . . . . . . . . . . . . . .7
COMFORT
Power Seat Controls . . . . . . . . . . .8
Heated Seats . . . . . . . . . . . . . . . . . .8
Heated and Cooled Seats . . . . . . .8
Memory Settings . . . . . . . . . . . . . .8
Adjustable Pedals . . . . . . . . . . . . .9
Automatic Climate Controls . . . . .9
ENTERTAINMENT
Audio System Features . . . . . . . .10
Multiple-Disc CD Player . . . . . . . .13
Touch Screen Navigation
Entertainment System . . . . . . . . .13XM
®Radio . . . . . . . . . . . . . . . . . . .13
Rear Seat Audio and DVD Rear
Seat Entertainment Systems . . .14
Audio Steering Wheel Controls .14
Bluetooth
®System . . . . . . . . . . . .15
CONVENIENCE
Remote Vehicle Start . . . . . . . . . .15
Cruise Control . . . . . . . . . . . . . . .16
Rainsense™ II Windshield
Wipers . . . . . . . . . . . . . . . . . . . . . .16
Heated Windshield Washer
Fluid . . . . . . . . . . . . . . . . . . . . . . . .17
Automatic Headlamp System
and Interior Lamps . . . . . . . . . . . .17
Sunroof . . . . . . . . . . . . . . . . . . . . .18
Power Sliding Rear Window . . . .18
Ultrasonic Rear Parking Assist .18
Universal Home Remote . . . . . . .19
Automatic Dimming Rearview
Mirror . . . . . . . . . . . . . . . . . . . . . . .19
Power Foldaway Mirrors . . . . . . .19Rear Vision Camera . . . . . . . . . . .20
Trailer-Tow Mirrors . . . . . . . . . . . .20
Folding the Rear Seat . . . . . . . . .20
Cargo Management System . . . .20
PERFORMANCE & MAINTENANCE
6-Speed Automatic
Transmission Controls . . . . . . . .21
StabiliTrak
®– Stability Control
System . . . . . . . . . . . . . . . . . . . . .21
Tire Pressure Monitor . . . . . . . . .21
Integrated Trailer Brake Control
System . . . . . . . . . . . . . . . . . . . . .22
Tighten Gas Cap Message . . . . .22
FlexFuel (E85) – Yellow Gas Cap 22
Resetting the Oil Life
System . . . . . . . . . . . . . . . . . . . . .23
OWNER INFORMATION
Sierra Accessories . . . . . . . . . . . .23
Roadside Assistance . . . . . . . . . .24
My GMLink . . . . . . . . . . . . . . . . . .24
Page 2 of 24
Getting to Know Your Sierra2
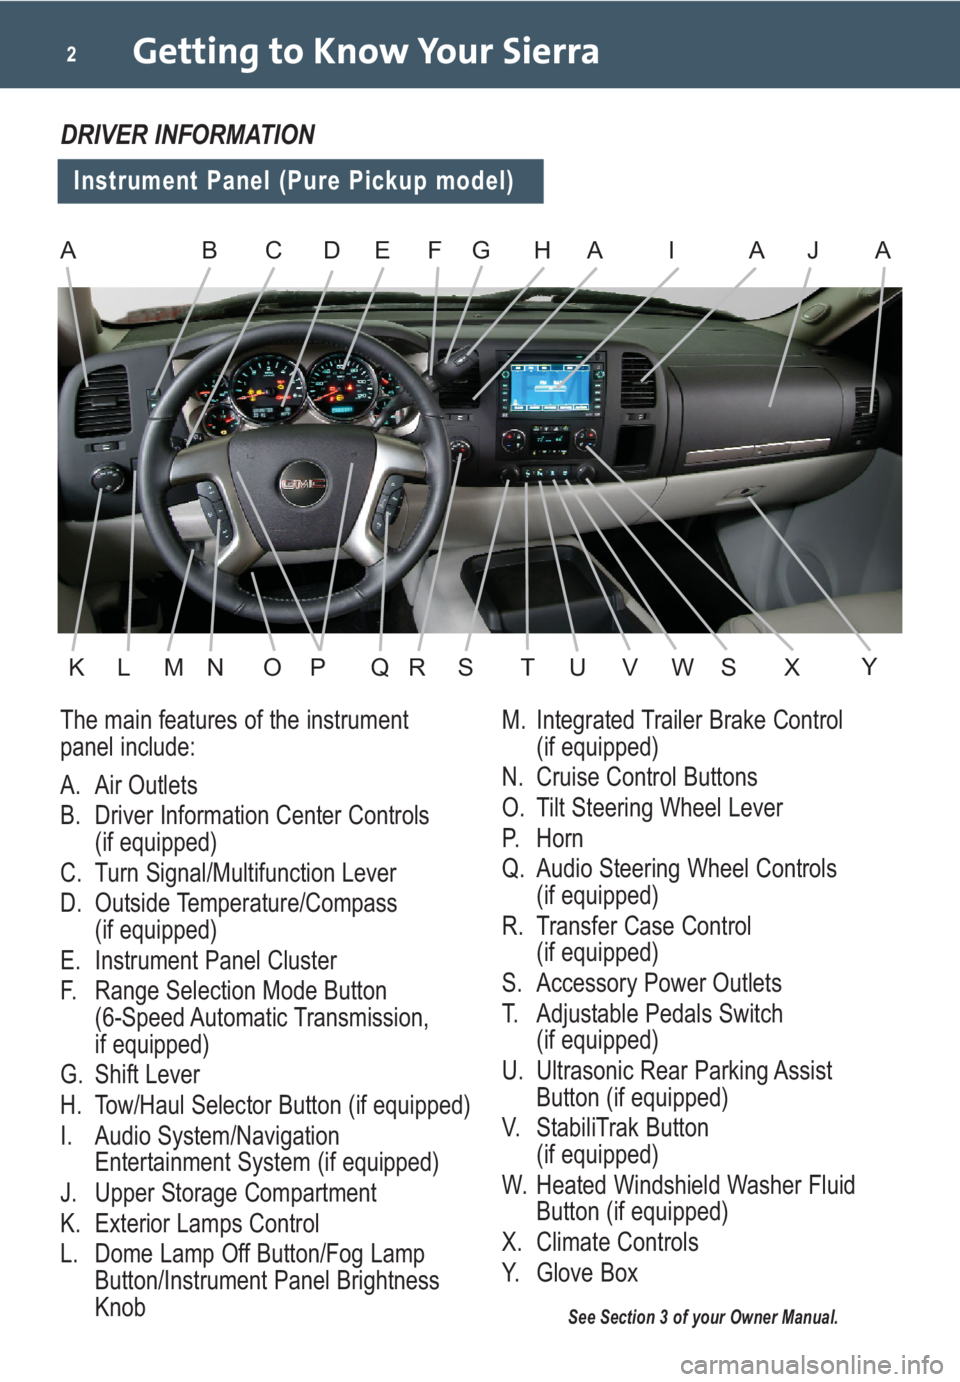
The main features of the instrument
panel include:
A. Air Outlets
B. Driver Information Center Controls
(if equipped)
C. Turn Signal/Multifunction Lever
D. Outside Temperature/Compass
(if equipped)
E. Instrument Panel Cluster
F. Range Selection Mode Button
(6-Speed Automatic Transmission,
if equipped)
G. Shift Lever
H. Tow/Haul Selector Button (if equipped)
I. Audio System/Navigation
Entertainment System (if equipped)
J. Upper Storage Compartment
K. Exterior Lamps Control
L. Dome Lamp Off Button/Fog Lamp
Button/Instrument Panel Brightness
Knob
See Section 3 of your Owner Manual.
DRIVER INFORMATION
Instrument Panel (Pure Pickup model)
M. Integrated Trailer Brake Control
(if equipped)
N. Cruise Control Buttons
O. Tilt Steering Wheel Lever
P. Horn
Q. Audio Steering Wheel Controls
(if equipped)
R. Transfer Case Control
(if equipped)
S. Accessory Power Outlets
T. Adjustable Pedals Switch
(if equipped)
U. Ultrasonic Rear Parking Assist
Button (if equipped)
V. StabiliTrak Button
(if equipped)
W. Heated Windshield Washer Fluid
Button (if equipped)
X. Climate Controls
Y. Glove Box
ABEFHAI
KLMOPQRST
A
U
CJ
VWXS
A
Y
D
N
G
Page 3 of 24
3
See Section 3 of your Owner Manual.
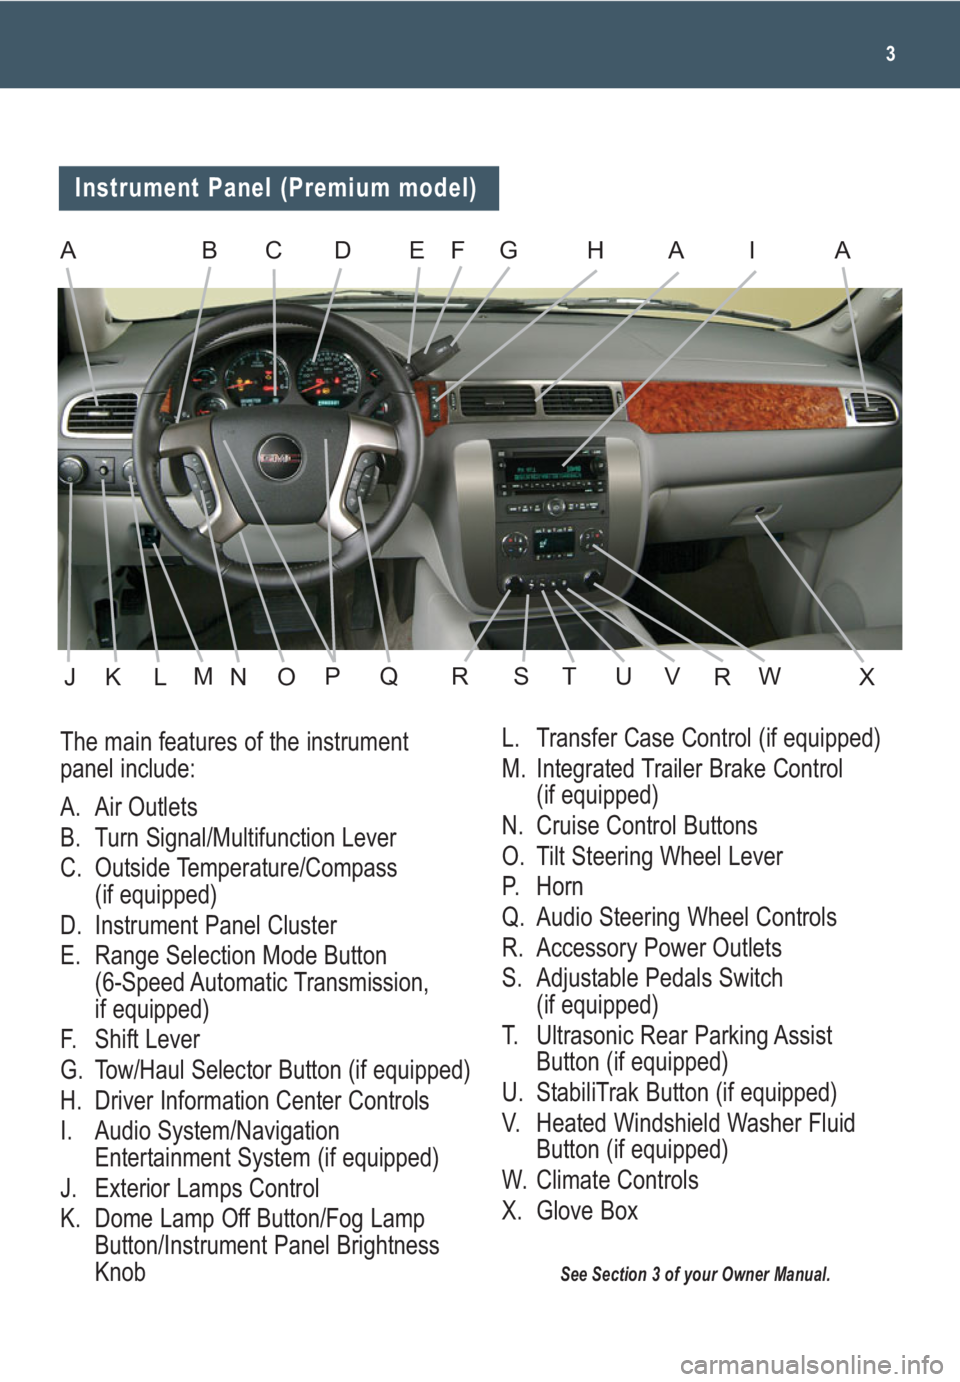
The main features of the instrument
panel include:
A. Air Outlets
B. Turn Signal/Multifunction Lever
C. Outside Temperature/Compass
(if equipped)
D. Instrument Panel Cluster
E. Range Selection Mode Button
(6-Speed Automatic Transmission,
if equipped)
F. Shift Lever
G. Tow/Haul Selector Button (if equipped)
H. Driver Information Center Controls
I. Audio System/Navigation
Entertainment System (if equipped)
J. Exterior Lamps Control
K. Dome Lamp Off Button/Fog Lamp
Button/Instrument Panel Brightness
Knob
Instrument Panel (Premium model)
ABEGHAAIC
JKLOPQRSXTUVWRN
L. Transfer Case Control (if equipped)
M. Integrated Trailer Brake Control
(if equipped)
N. Cruise Control Buttons
O. Tilt Steering Wheel Lever
P. Horn
Q. Audio Steering Wheel Controls
R. Accessory Power Outlets
S. Adjustable Pedals Switch
(if equipped)
T. Ultrasonic Rear Parking Assist
Button (if equipped)
U. StabiliTrak Button (if equipped)
V. Heated Windshield Washer Fluid
Button (if equipped)
W. Climate Controls
X. Glove Box
D
M
F
Page 4 of 24
Getting to Know Your Sierra4
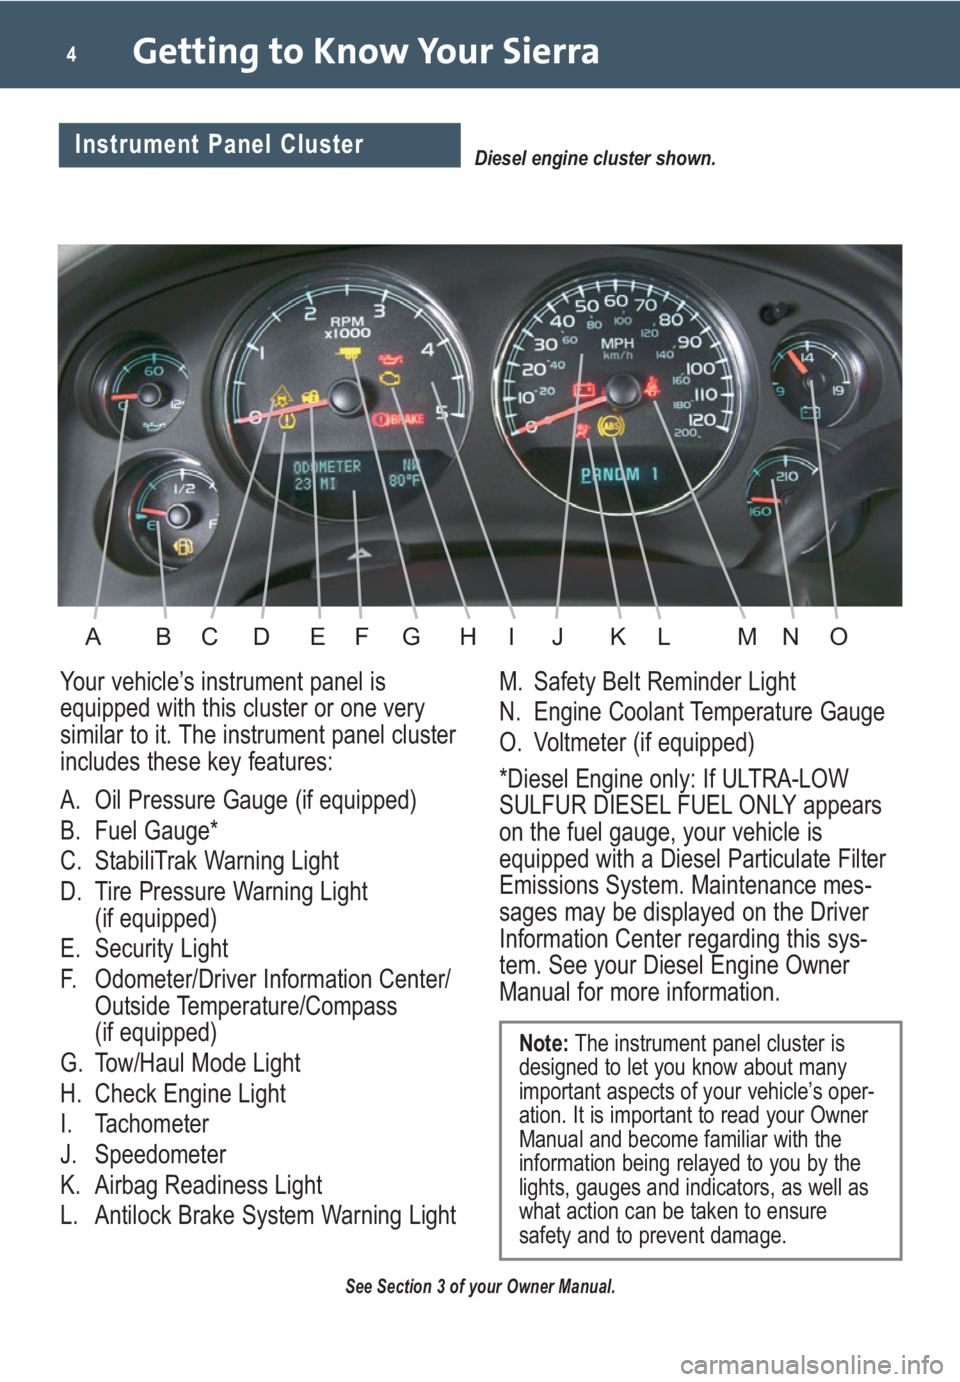
Your vehicle’s instrument panel is
equipped with this cluster or one very
similar to it. The instrument panel cluster
includes these key features:
A. Oil Pressure Gauge (if equipped)
B. Fuel Gauge*
C. StabiliTrak Warning Light
D. Tire Pressure Warning Light
(if equipped)
E. Security Light
F. Odometer/Driver Information Center/
Outside Temperature/Compass
(if equipped)
G. Tow/Haul Mode Light
H. Check Engine Light
I. Tachometer
J. Speedometer
K. Airbag Readiness Light
L. Antilock Brake System Warning LightM. Safety Belt Reminder Light
N. Engine Coolant Temperature Gauge
O. Voltmeter (if equipped)
*Diesel Engine only: If ULTRA-LOW
SULFUR DIESEL FUEL ONLY appears
on the fuel gauge, your vehicle is
equipped with a Diesel Particulate Filter
Emissions System. Maintenance mes-
sages may be displayed on the Driver
Information Center regarding this sys-
tem. See your Diesel Engine Owner
Manual for more information.
See Section 3 of your Owner Manual.
Note:The instrument panel cluster is
designed to let you know about many
important aspects of your vehicle’s oper-
ation. It is important to read your Owner
Manual and become familiar with the
information being relayed to you by the
lights, gauges and indicators, as well as
what action can be taken to ensure
safety and to prevent damage.
Diesel engine cluster shown.Instrument Panel Cluster
ABDFGHEIKLJNOMC
Page 5 of 24
5
Voltmeter Operation
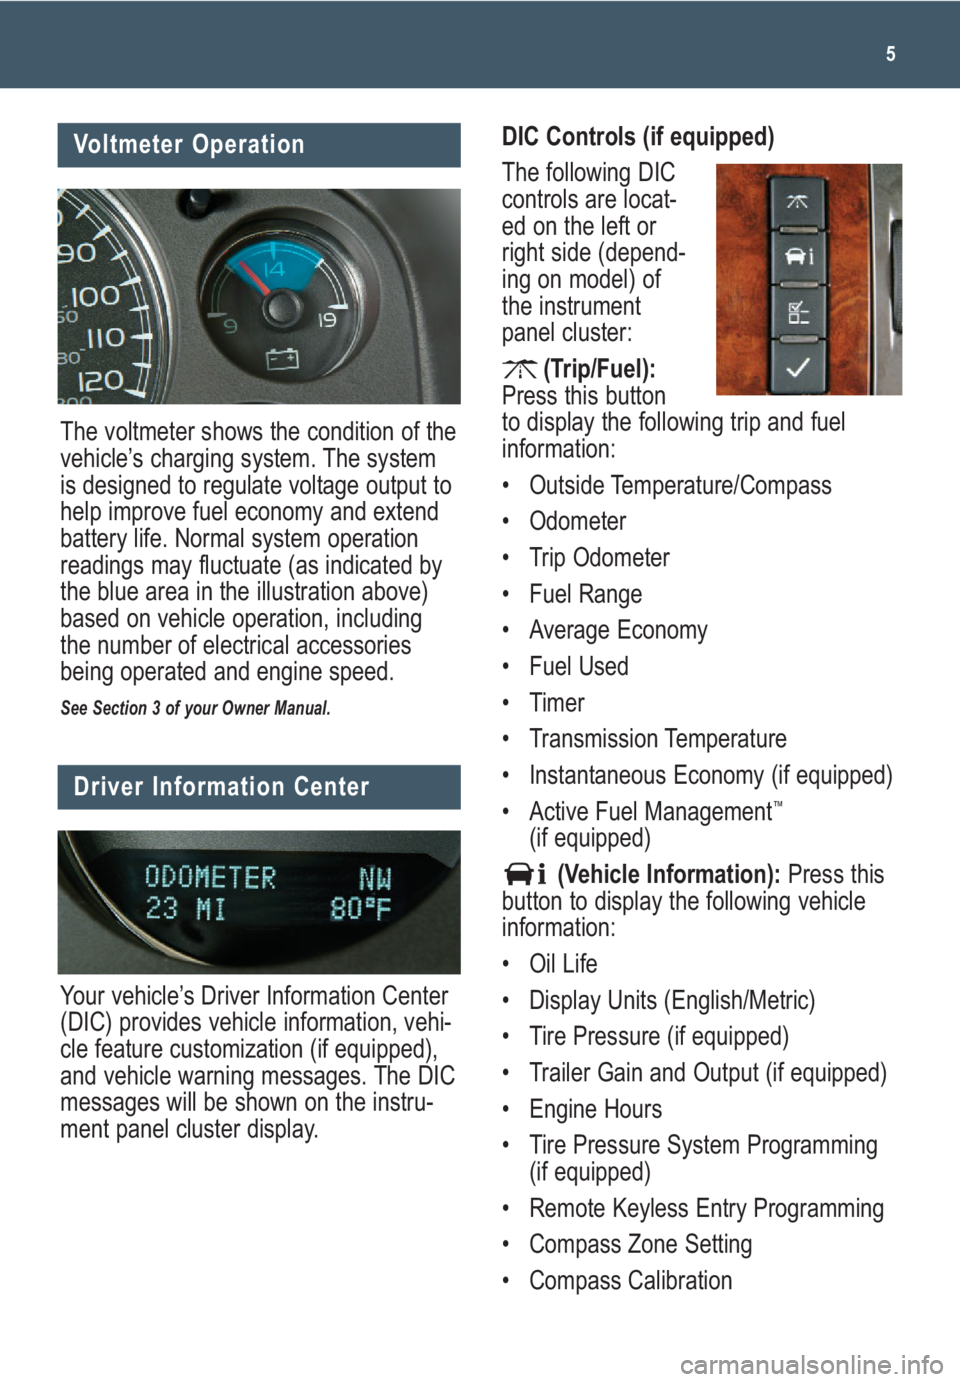
The voltmeter shows the condition of the
vehicle’s charging system. The system
is designed to regulate voltage output to
help improve fuel economy and extend
battery life. Normal system operation
readings may fluctuate (as indicated by
the blue area in the illustration above)
based on vehicle operation, including
the number of electrical accessories
being operated and engine speed.
See Section 3 of your Owner Manual.
Driver Information Center
Your vehicle’s Driver Information Center
(DIC) provides vehicle information, vehi-
cle feature customization (if equipped),
and vehicle warning messages. The DIC
messages will be shown on the instru-
ment panel cluster display.
DIC Controls (if equipped)
The following DIC
controls are locat-
ed on the left or
right side (depend-
ing on model) of
the instrument
panel cluster:
(Trip/Fuel):
Press this button
to display the following trip and fuel
information:
• Outside Temperature/Compass
• Odometer
• Trip Odometer
• Fuel Range
• Average Economy
• Fuel Used
• Timer
• Transmission Temperature
• Instantaneous Economy (if equipped)
• Active Fuel Management
™
(if equipped)
(Vehicle Information):Press this
button to display the following vehicle
information:
• Oil Life
• Display Units (English/Metric)
• Tire Pressure (if equipped)
• Trailer Gain and Output (if equipped)
• Engine Hours
• Tire Pressure System Programming
(if equipped)
• Remote Keyless Entry Programming
• Compass Zone Setting
• Compass Calibration
Page 7 of 24
7
Remote Keyless Entry
(if equipped)
SAFETY & SECURITY
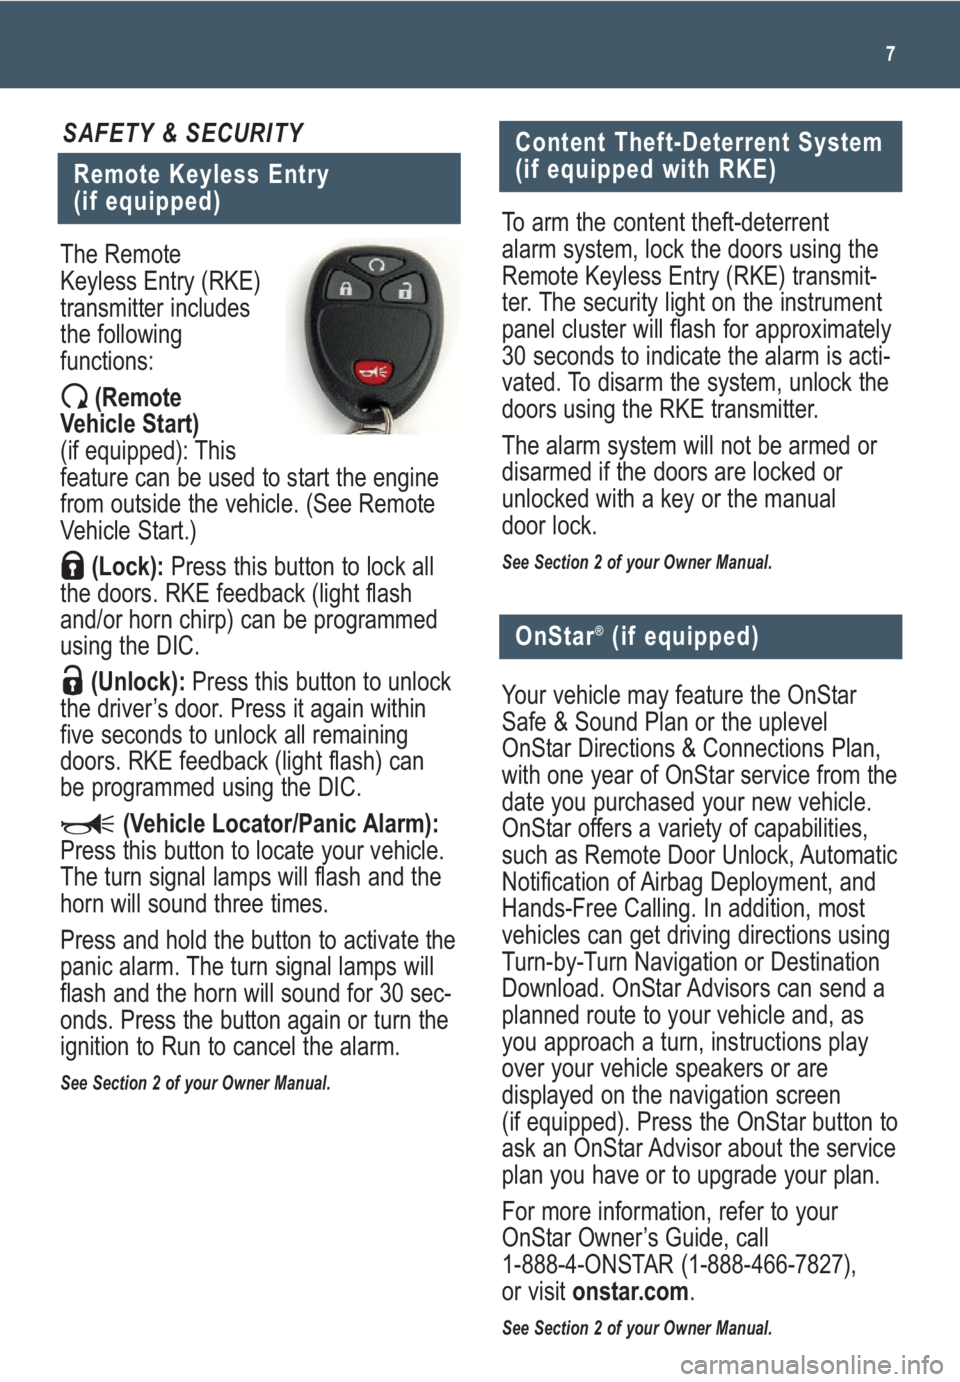
The Remote
Keyless Entry (RKE)
transmitter includes
the following
functions:
(Remote
Vehicle Start)
(if equipped): This
feature can be used to start the engine
from outside the vehicle. (See Remote
Vehicle Start.)
(Lock):Press this button to lock all
the doors. RKE feedback (light flash
and/or horn chirp) can be programmed
using the DIC.
(Unlock):Press this button to unlock
the driver’s door. Press it again within
five seconds to unlock all remaining
doors. RKE feedback (light flash) can
be programmed using the DIC.
(Vehicle Locator/Panic Alarm):
Press this button to locate your vehicle.
The turn signal lamps will flash and the
horn will sound three times.
Press and hold the button to activate the
panic alarm. The turn signal lamps will
flash and the horn will sound for 30 sec-
onds. Press the button again or turn the
ignition to Run to cancel the alarm.
See Section 2 of your Owner Manual.
Content Theft-Deterrent System
(if equipped with RKE)
To arm the content theft-deterrent
alarm system, lock the doors using the
Remote Keyless Entry (RKE) transmit-
ter. The security light on the instrument
panel cluster will flash for approximately
30 seconds to indicate the alarm is acti-
vated. To disarm the system, unlock the
doors using the RKE transmitter.
The alarm system will not be armed or
disarmed if the doors are locked or
unlocked with a key or the manual
door lock.
See Section 2 of your Owner Manual.
Your vehicle may feature the OnStar
Safe & Sound Plan or the uplevel
OnStar Directions & Connections Plan,
with one year of OnStar service from the
date you purchased your new vehicle.
OnStar offers a variety of capabilities,
such as Remote Door Unlock, Automatic
Notification of Airbag Deployment, and
Hands-Free Calling. In addition, most
vehicles can get driving directions using
Turn-by-Turn Navigation or Destination
Download. OnStar Advisors can send a
planned route to your vehicle and, as
you approach a turn, instructions play
over your vehicle speakers or are
displayed on the navigation screen
(if equipped). Press the OnStar button to
ask an OnStar Advisor about the service
plan you have or to upgrade your plan.
For more information, refer to your
OnStar Owner’s Guide, call
1-888-4-ONSTAR (1-888-466-7827),
or visit onstar.com.
See Section 2 of your Owner Manual.
OnStar®(if equipped)
Page 9 of 24
9
The accelerator and brake pedals can
be adjusted to a comfortable and safe
operating position by using the
adjustable pedals switch located on
the instrument panel below the climate
controls.
Adjustable Pedals (if equipped)
The automatic climate control system
maintains the desired individual temper-
ature for the driver and front seat pas-
senger. The system adjusts the airflow
mode, fan speed, air conditioning and
recirculation functions to reach the set
temperature(s) as quickly as possible.
Automatic Operation
To set the automatic mode:
1. Press the AUTO button.
2. Set the driver’s and front passenger’s
temperature using the + or – temper-
ature buttons.
Automatic Climate Controls
(if equipped)
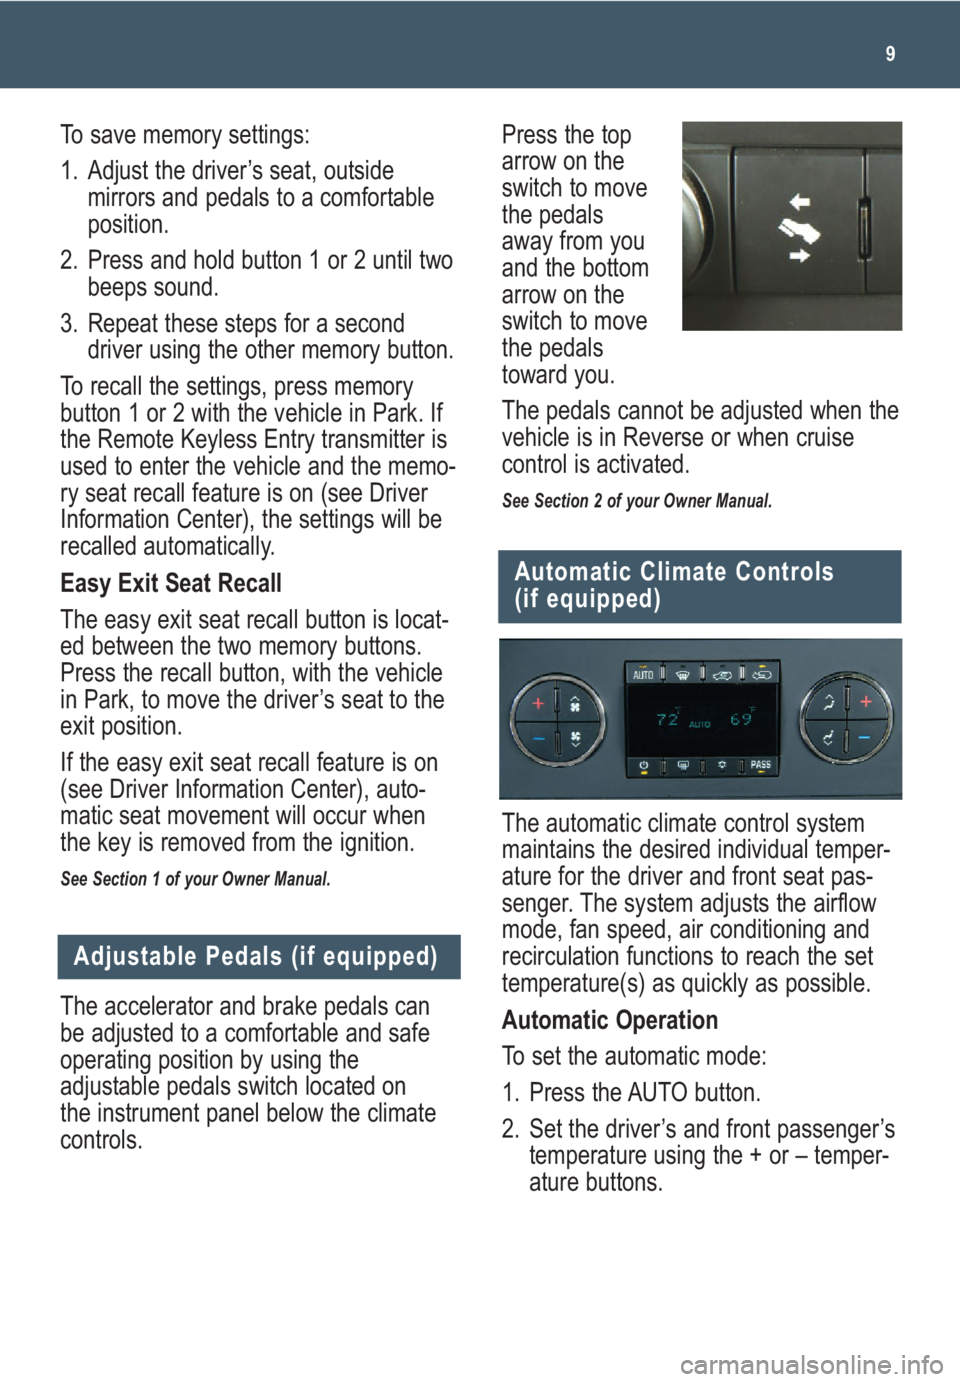
Press the top
arrow on the
switch to move
the pedals
away from you
and the bottom
arrow on the
switch to move
the pedals
toward you.
The pedals cannot be adjusted when the
vehicle is in Reverse or when cruise
control is activated.
See Section 2 of your Owner Manual.
To save memory settings:
1. Adjust the driver’s seat, outside
mirrors and pedals to a comfortable
position.
2. Press and hold button 1 or 2 until two
beeps sound.
3. Repeat these steps for a second
driver using the other memory button.
To recall the settings, press memory
button 1 or 2 with the vehicle in Park. If
the Remote Keyless Entry transmitter is
used to enter the vehicle and the memo-
ry seat recall feature is on (see Driver
Information Center), the settings will be
recalled automatically.
Easy Exit Seat Recall
The easy exit seat recall button is locat-
ed between the two memory buttons.
Press the recall button, with the vehicle
in Park, to move the driver’s seat to the
exit position.
If the easy exit seat recall feature is on
(see Driver Information Center), auto-
matic seat movement will occur when
the key is removed from the ignition.
See Section 1 of your Owner Manual.
Page 16 of 24
Getting to Know Your Sierra16
Cruise Control (if equipped)
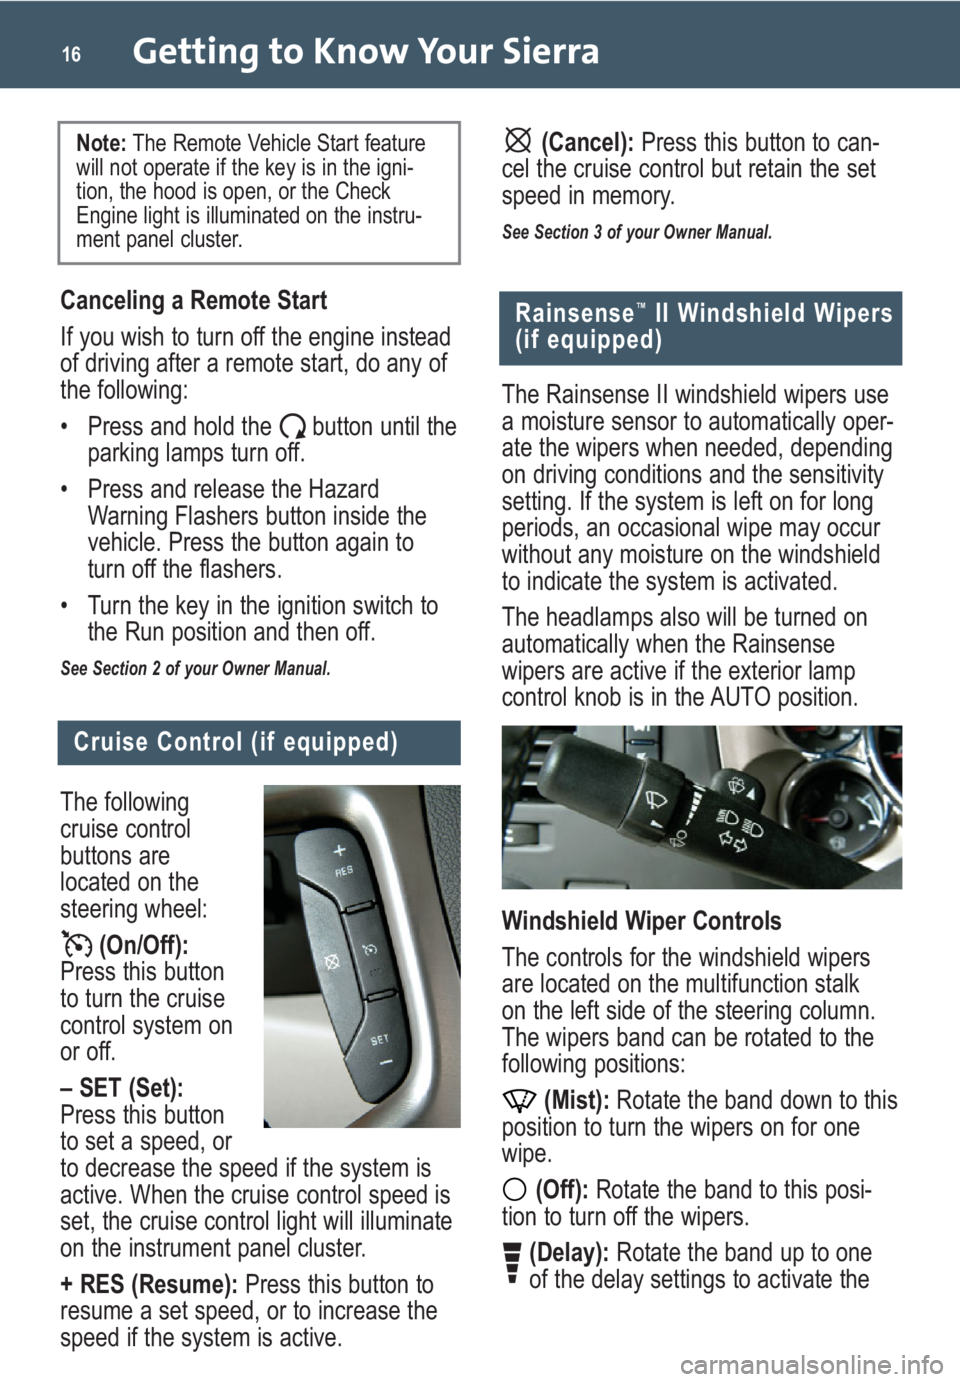
The following
cruise control
buttons are
located on the
steering wheel:
(On/Off):
Press this button
to turn the cruise
control system on
or off.
– SET (Set):
Press this button
to set a speed, or
to decrease the speed if the system is
active. When the cruise control speed is
set, the cruise control light will illuminate
on the instrument panel cluster.
+ RES (Resume):Press this button to
resume a set speed, or to increase the
speed if the system is active.
Rainsense™II Windshield Wipers
(if equipped)
The Rainsense II windshield wipers use
a moisture sensor to automatically oper-
ate the wipers when needed, depending
on driving conditions and the sensitivity
setting. If the system is left on for long
periods, an occasional wipe may occur
without any moisture on the windshield
to indicate the system is activated.
The headlamps also will be turned on
automatically when the Rainsense
wipers are active if the exterior lamp
control knob is in the AUTO position.
Windshield Wiper Controls
The controls for the windshield wipers
are located on the multifunction stalk
on the left side of the steering column.
The wipers band can be rotated to the
following positions:
(Mist):Rotate the band down to this
position to turn the wipers on for one
wipe.
(Off):Rotate the band to this posi-
tion to turn off the wipers.
(Delay):Rotate the band up to one
of the delay settings to activate the
Canceling a Remote Start
If you wish to turn off the engine instead
of driving after a remote start, do any of
the following:
• Press and hold the button until the
parking lamps turn off.
• Press and release the Hazard
Warning Flashers button inside the
vehicle. Press the button again to
turn off the flashers.
• Turn the key in the ignition switch to
the Run position and then off.
See Section 2 of your Owner Manual.
Note: The Remote Vehicle Start feature
will not operate if the key is in the igni-
tion, the hood is open, or the Check
Engine light is illuminated on the instru-
ment panel cluster.(Cancel):Press this button to can-
cel the cruise control but retain the set
speed in memory.
See Section 3 of your Owner Manual.
Page 17 of 24
operation, avoid placing any objects on
or near the sensor.
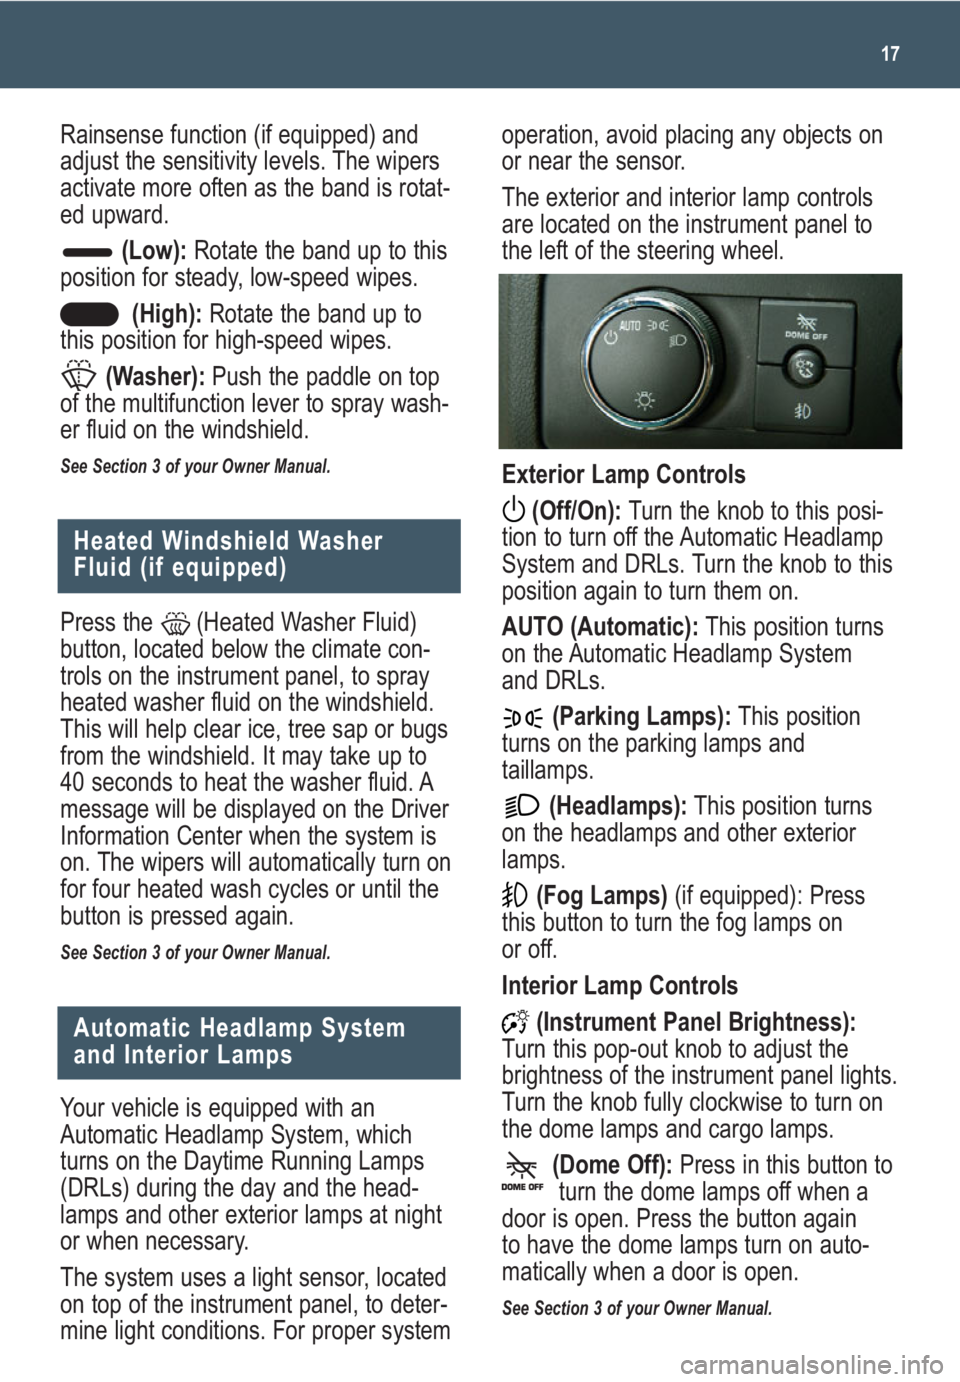
The exterior and interior lamp controls
are located on the instrument panel to
the left of the steering wheel.
Exterior Lamp Controls
(Off/On): Turn the knob to this posi-
tion to turn off the Automatic Headlamp
System and DRLs. Turn the knob to this
position again to turn them on.
AUTO (Automatic):This position turns
on the Automatic Headlamp System
and DRLs.
(Parking Lamps):This position
turns on the parking lamps and
taillamps.
(Headlamps):This position turns
on the headlamps and other exterior
lamps.
(Fog Lamps)(if equipped): Press
this button to turn the fog lamps on
or off.
Interior Lamp Controls
(Instrument Panel Brightness):
Turn this pop-out knob to adjust the
brightness of the instrument panel lights.
Turn the knob fully clockwise to turn on
the dome lamps and cargo lamps.
(Dome Off):Press in this button to
turn the dome lamps off when a
door is open. Press the button again
to have the dome lamps turn on auto-
matically when a door is open.
See Section 3 of your Owner Manual.
17
Heated Windshield Washer
Fluid (if equipped)
Press the (Heated Washer Fluid)
button, located below the climate con-
trols on the instrument panel, to spray
heated washer fluid on the windshield.
This will help clear ice, tree sap or bugs
from the windshield. It may take up to
40 seconds to heat the washer fluid. A
message will be displayed on the Driver
Information Center when the system is
on. The wipers will automatically turn on
for four heated wash cycles or until the
button is pressed again.
See Section 3 of your Owner Manual.
Your vehicle is equipped with an
Automatic Headlamp System, which
turns on the Daytime Running Lamps
(DRLs) during the day and the head-
lamps and other exterior lamps at night
or when necessary.
The system uses a light sensor, located
on top of the instrument panel, to deter-
mine light conditions. For proper system
Automatic Headlamp System
and Interior Lamps
Rainsense function (if equipped) and
adjust the sensitivity levels. The wipers
activate more often as the band is rotat-
ed upward.
(Low):Rotate the band up to this
position for steady, low-speed wipes.
(High):Rotate the band up to
this position for high-speed wipes.
(Washer):Push the paddle on top
of the multifunction lever to spray wash-
er fluid on the windshield.
See Section 3 of your Owner Manual.
Page 19 of 24
19
Universal Home Remote
(if equipped)
Automatic Dimming
The automatic dimming feature is turned
on each time the vehicle is started. To
Automatic Dimming Rearview
Mirror (if equipped)
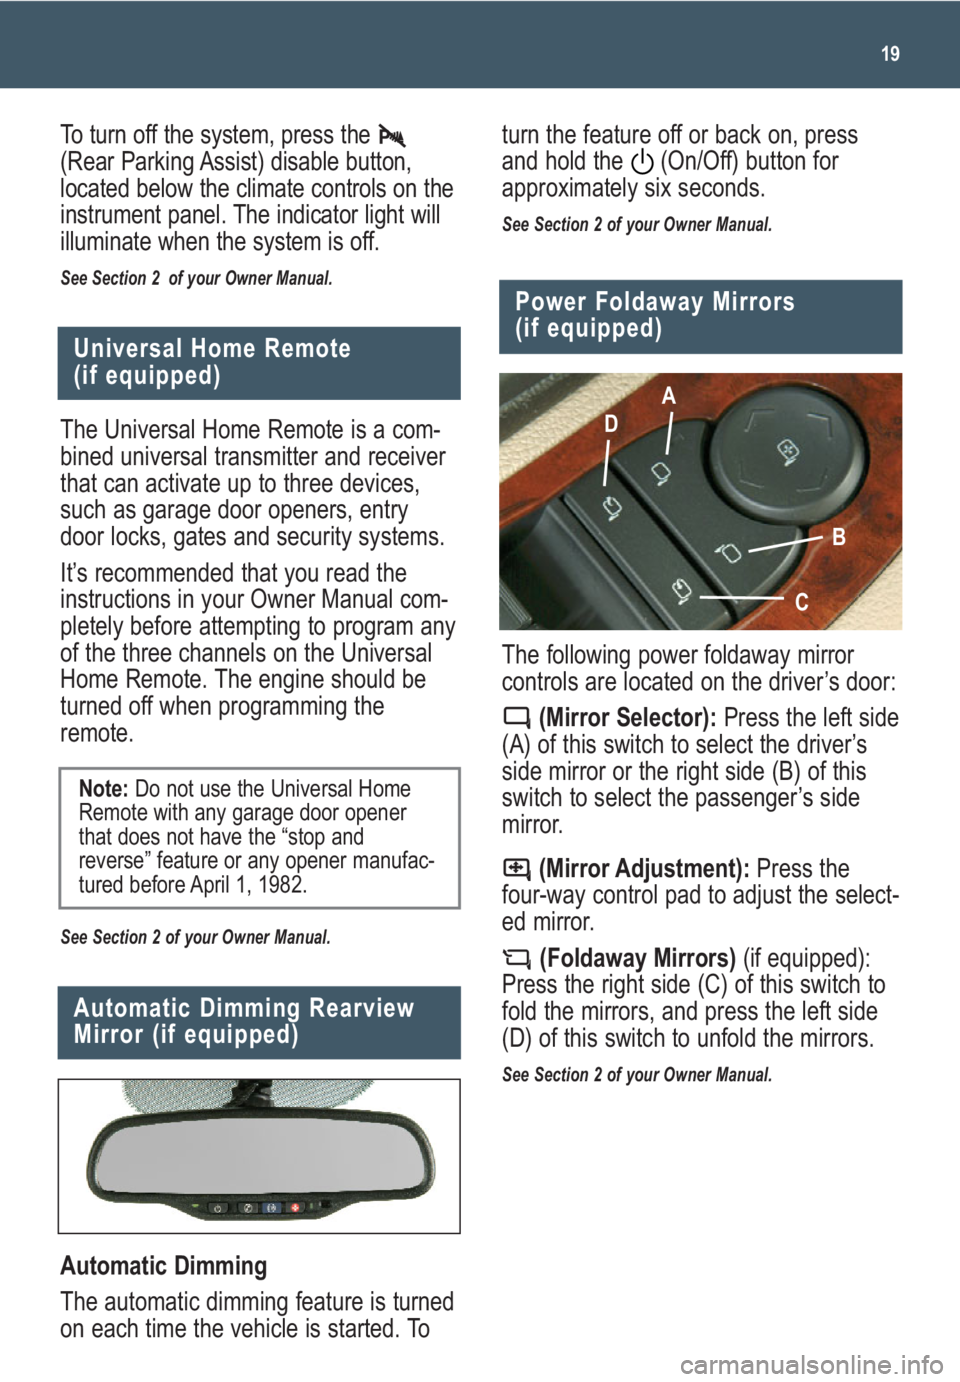
The following power foldaway mirror
controls are located on the driver’s door:
(Mirror Selector):Press the left side
(A) of this switch to select the driver’s
side mirror or the right side (B) of this
switch to select the passenger’s side
mirror.
(Mirror Adjustment):Press the
four-way control pad to adjust the select-
ed mirror.
(Foldaway Mirrors)(if equipped):
Press the right side (C) of this switch to
fold the mirrors, and press the left side
(D) of this switch to unfold the mirrors.
See Section 2 of your Owner Manual.
Power Foldaway Mirrors
(if equipped)
A
D
B
C
The Universal Home Remote is a com-
bined universal transmitter and receiver
that can activate up to three devices,
such as garage door openers, entry
door locks, gates and security systems.
It’s recommended that you read the
instructions in your Owner Manual com-
pletely before attempting to program any
of the three channels on the Universal
Home Remote. The engine should be
turned off when programming the
remote.
See Section 2 of your Owner Manual.
Note:Do not use the Universal Home
Remote with any garage door opener
that does not have the “stop and
reverse” feature or any opener manufac-
tured before April 1, 1982.
To turn off the system, press the
(Rear Parking Assist) disable button,
located below the climate controls on the
instrument panel. The indicator light will
illuminate when the system is off.
See Section 2 of your Owner Manual.
turn the feature off or back on, press
and hold the (On/Off) button for
approximately six seconds.
See Section 2 of your Owner Manual.