open hood GMC SIERRA 2010 Owner's Manual
[x] Cancel search | Manufacturer: GMC, Model Year: 2010, Model line: SIERRA, Model: GMC SIERRA 2010Pages: 630, PDF Size: 4.65 MB
Page 163 of 630
To Use the Engine Coolant Heater
1. Turn off the engine.
2. Open the hood and unwrap the electrical cord.The cord is secured to the Engine Compartment
Fuse Block with a clip. Carefully remove the wire
tie which bundles the electrical plug. Do not cut the
electrical cord.
3. Plug the cord into a normal, grounded 110-volt AC outlet.
{WARNING:
Plugging the cord into an ungrounded outlet could
cause an electrical shock. Also, the wrong kind of
extension cord could overheat and cause a fire.
You could be seriously injured. Plug the cord into
a properly grounded three-prong 110-volt AC
outlet. If the cord will not reach, use a heavy-duty
three-prong extension cord rated for at least
15 amps.
4. Before starting the engine, be sure to unplug and store the cord as it was before to keep it away from
moving engine parts. If you do not, it could be
damaged. The length of time the heater should remain plugged in
depends on several factors. Ask a dealer/retailer in the
area where you will be parking the vehicle for the best
advice on this.
Active Fuel Management™
Vehicles with V8 engines may have Active Fuel
Management™. This system allows the engine to
operate on either all or half of its cylinders, depending
on the driving conditions.
When less power is required, such as cruising at a
constant vehicle speed, the system will operate in the
half cylinder mode, allowing the vehicle to achieve
better fuel economy. When greater power demands are
required, such as accelerating from a stop, passing,
or merging onto a freeway, the system will maintain
full-cylinder operation.
If the vehicle has an Active Fuel Management™
indicator, see
DIC Operation and Displays (With DIC
Buttons)
on page 4‑51or DIC Operation and Displays
(Without DIC Buttons)on page 4‑58for more
information on using this display .
3-27
Page 247 of 630
Outlet Adjustment
Use the air outlets located in the center and on the side
of the instrument panel to direct the airflow. Use the
thumbwheels near the air outlets to open or close off
the airflow.
Operation Tips
.Clear away any ice, snow, or leaves from air inlets
at the base of the windshield that could block the
flow of air into the vehicle.
.Keep the path under the front seats clear of
objects to help circulate the air inside of the vehicle
more effectively.
.Use of non‐GM approved hood deflectors can
adversely affect the performance of the system.
Check with your dealer/retailer before adding
equipment to the outside of the vehicle.
Warning Lights, Gages, and
Indicators
Warning lights and gages can signal that something is
wrong before it becomes serious enough to cause an
expensive repair or replacement. Paying attention to the
warning lights and gages could prevent injury.
Warning lights come on when there might be or there is
a problem with one of the vehicle's functions. Some
warning lights come on briefly when the engine is
started to indicate they are working.
Gages can indicate when there might be or there is a
problem with one of the vehicle's functions. Often gages
and warning lights work together to indicate a problem
with the vehicle.
When one of the warning lights comes on and stays on
while driving, or when one of the gages shows there
could be a problem, check the section that explains
what to do. Follow this manual's advice. Waiting to do
repairs can be costly and even dangerous.
4-29
Page 286 of 630
HOOD OPEN
This message displays and a chime may sound if the
hood is not fully closed. Stop and turn off the vehicle,
check the hood for obstructions, and close the hood
again. Check to see if the message still appears on
the DIC.
ICE POSSIBLE DRIVE WITH CARE
This message displays when ice conditions are
possible.
LEFT REAR DOOR OPEN (Crew Cab)
This message displays and a chime may sound if the
driver side rear door is not fully closed and the vehicle
is shifted out of P (Park). Stop and turn off the vehicle,
check the door for obstructions, and close the door
again. Check to see if the message still appears on
the DIC.
OIL PRESSURE LOW STOP ENGINE
Notice:If you drive your vehicle while the engine oil
pressure is low, severe engine damage may occur.
If a low oil pressure warning appears on the Driver
Information Center (DIC), stop the vehicle as soon
as possible. Do not drive the vehicle until the cause
of the low oil pressure is corrected. See Engine Oil
on page 6‑18for more information. This message displays if low oil pressure levels occur.
Stop the vehicle as soon as safely possible and do not
operate it until the cause of the low oil pressure has
been corrected. Check the oil as soon as possible
and have your vehicle serviced by your dealer/retailer.
See
Engine Oil on page 6‑18.
PARK ASST BLOCKED SEE OWNERS
MANUAL
If your vehicle has the Ultrasonic Rear Parking Assist
(URPA) system, this message displays if there is
something interfering with the park assist system.
SeeUltrasonic Rear Parking Assist (URPA)
on
page 3‑60for more information.
PARK ASSIST OFF
If your vehicle has the Ultrasonic Rear Parking Assist
(URPA) system, after the vehicle has been started, this
message displays to remind the driver that the URPA
system has been turned off. Press the set/reset button
or the trip odometer reset stem to acknowledge this
message and clear it from the DIC display. To turn the
URPA system back on, see Ultrasonic Rear Parking
Assist (URPA) on page 3‑60.
4-68
Page 461 of 630
Hood Release
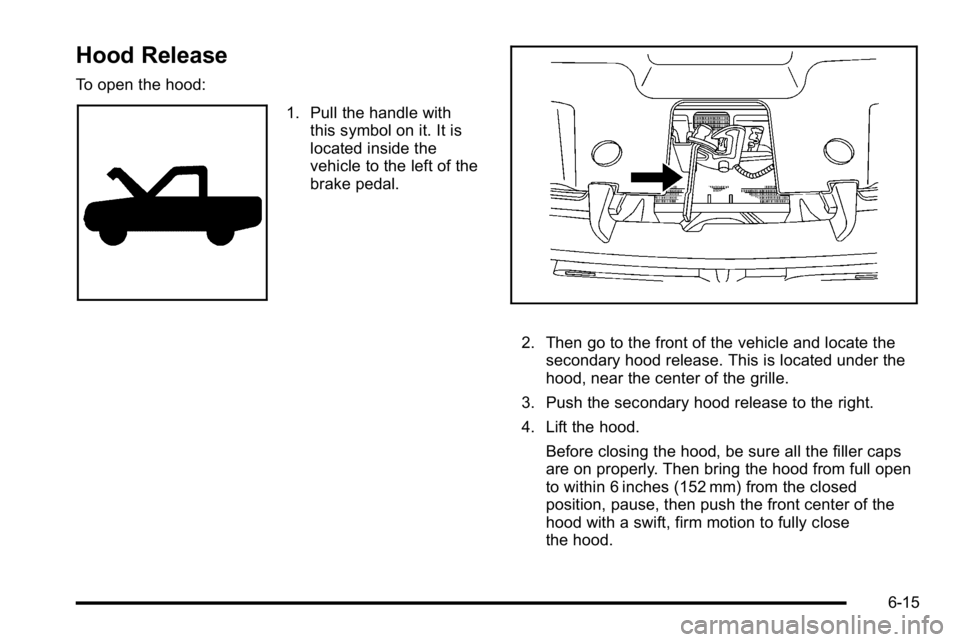
To open the hood:
1. Pull the handle withthis symbol on it. It is
located inside the
vehicle to the left of the
brake pedal.
2. Then go to the front of the vehicle and locate thesecondary hood release. This is located under the
hood, near the center of the grille.
3. Push the secondary hood release to the right.
4. Lift the hood. Before closing the hood, be sure all the filler caps
are on properly. Then bring the hood from full open
to within 6 inches (152 mm) from the closed
position, pause, then push the front center of the
hood with a swift, firm motion to fully close
the hood.
6-15
Page 481 of 630
You may decide not to lift the hood when this warning
appears, but instead get service help right away.
SeeRoadside Assistance Program on page 8‑7.
If you do decide to lift the hood, make sure the vehicle
is parked on a level surface.
Then check to see if the engine cooling fans are
running. If the engine is overheating, both fans should
be running. If they are not, do not continue to run the
engine and have the vehicle serviced.
Notice: Engine damage from running your engine
without coolant is not covered by your warranty.
See Overheated Engine Protection Operating Mode
on page 6‑36for information on driving to a safe
place in an emergency.
Notice: If the engine catches fire while driving
with no coolant, the vehicle can be badly damaged.
The costly repairs would not be covered by the
vehicle warranty. See Overheated Engine Protection
Operating Mode
on page 6‑36for information on
driving to a safe place in an emergency.
If Steam Is Coming From The Engine
Compartment
{WARNING:
Steam from an overheated engine can burn you
badly, even if you just open the hood. Stay away
from the engine if you see or hear steam coming
from it. Turn it off and get everyone away from the
vehicle until it cools down. Wait until there is no
sign of steam or coolant before you open
the hood.
If you keep driving when the vehicles engine is
overheated, the liquids in it can catch fire. You or
others could be badly burned. Stop the engine if it
overheats, and get out of the vehicle until the
engine is cool.
See Overheated Engine Protection Operating
Mode
on page 6‑36for information on driving to
a safe place in an emergency.
6-35
Page 491 of 630
To avoid the possibility of the vehicles rolling, set
the parking brake firmly on both vehicles involved
in the jump start procedure. Put the automatic
transmission in P (Park) or a manual transmission
in Neutral before setting the parking brake. If you
have a four-wheel-drive vehicle, be sure the
transfer case is in a drive gear, not in Neutral.
Notice: If you leave the radio or other accessories
on during the jump starting procedure, they could
be damaged. The repairs would not be covered by
the warranty. Always turn off the radio and other
accessories when jump starting the vehicle.
4. Turn off the ignition on both vehicles. Unplug unnecessary accessories plugged into the
cigarette lighter or the accessory power outlets.
Turn off the radio and all the lamps that are not
needed. This will avoid sparks and help save
both batteries. And it could save the radio!
5. Open the hood on the other vehicle and locate the positive (+) and negative (−) terminal locations on
that vehicle.
The positive (+) terminal, is located under a
red plastic cover at the positive battery post.
To uncover the positive (+) terminal, open the
red plastic cover.
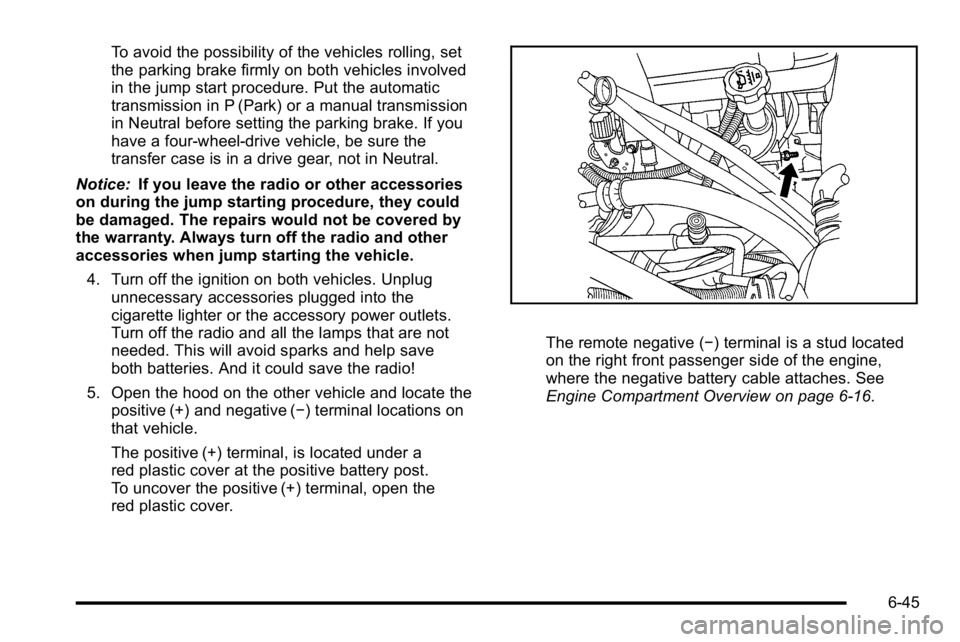
The remote negative (−) terminal is a stud located
on the right front passenger side of the engine,
where the negative battery cable attaches. See
Engine Compartment Overview on page 6‑16.
6-45
Page 492 of 630
{WARNING:
An electric fan can start up even when the engine
is not running and can injure you. Keep hands,
clothing and tools away from any underhood
electric fan.
{WARNING:
Using an open flame near a battery can cause
battery gas to explode. People have been hurt
doing this, and some have been blinded. Use a
flashlight if you need more light.
Be sure the battery has enough water. You do not
need to add water to the battery installed in your
new vehicle. But if a battery has filler caps, be
sure the right amount of fluid is there. If it is low,
add water to take care of that first. If you do not,
explosive gas could be present.(Continued)
WARNING: (Continued)
Battery fluid contains acid that can burn you. Do
not get it on you. If you accidentally get it in your
eyes or on your skin, flush the place with water
and get medical help immediately.
{WARNING:
Fans or other moving engine parts can injure you
badly. Keep your hands away from moving parts
once the engine is running.
6-46
Page 501 of 630
The vehicle should:
.Be placed so the headlamps are 25 ft. (7.6 m) from
a light colored wall.
.Have all four tires on a level surface which is level
all the way to the wall.
.Be placed so it is perpendicular to the wall.
.Not have any snow, ice, or mud on it.
.Be fully assembled and all other work stopped
while headlamp aiming is being performed.
.Normally loaded with a full tank of fuel and one
person or 160 lbs (75 kg) sitting on the driver seat.
.Have the tires properly inflated.
.Have the spare tire is in its proper location in the
vehicle.
Headlamp aiming is done with the vehicle's low-beam
headlamps. The high-beam headlamps will be correctly
aimed if the low-beam headlamps are aimed properly. To adjust the vertical aim:
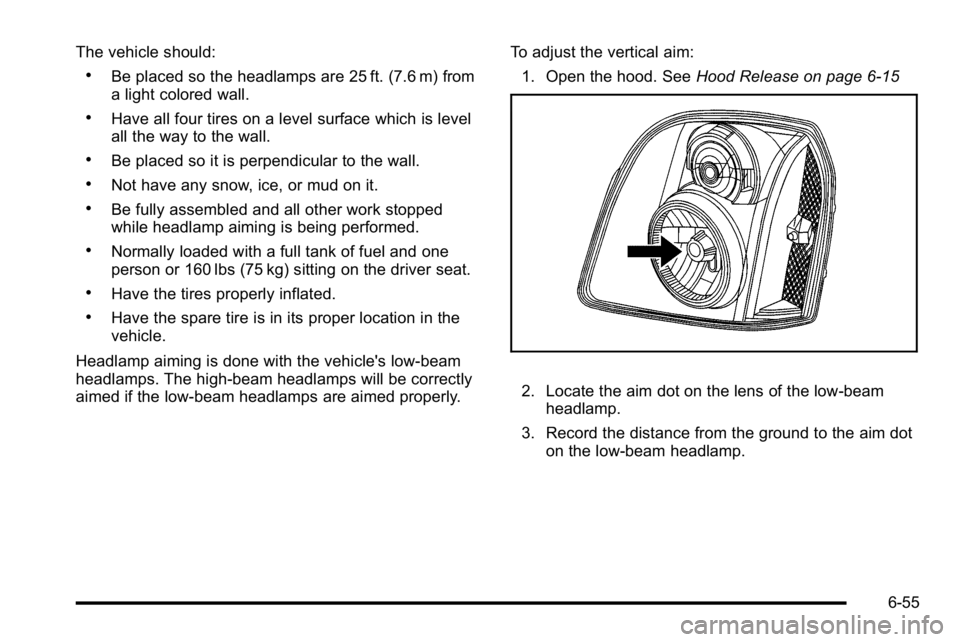
1. Open the hood. See Hood Release on page 6‑15
2. Locate the aim dot on the lens of the low‐beam
headlamp.
3. Record the distance from the ground to the aim dot on the low‐beam headlamp.
6-55
Page 503 of 630
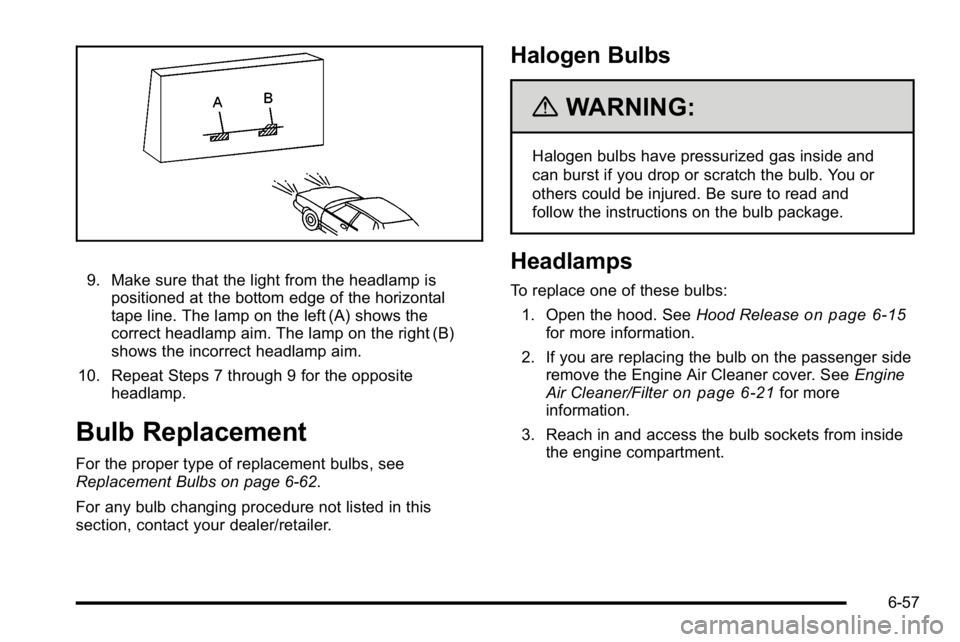
9. Make sure that the light from the headlamp ispositioned at the bottom edge of the horizontal
tape line. The lamp on the left (A) shows the
correct headlamp aim. The lamp on the right (B)
shows the incorrect headlamp aim.
10. Repeat Steps 7 through 9 for the opposite headlamp.
Bulb Replacement
For the proper type of replacement bulbs, see
Replacement Bulbs on page 6‑62.
For any bulb changing procedure not listed in this
section, contact your dealer/retailer.
Halogen Bulbs
{WARNING:
Halogen bulbs have pressurized gas inside and
can burst if you drop or scratch the bulb. You or
others could be injured. Be sure to read and
follow the instructions on the bulb package.
Headlamps
To replace one of these bulbs:
1. Open the hood. See Hood Release
on page 6‑15for more information.
2. If you are replacing the bulb on the passenger side remove the Engine Air Cleaner cover. See Engine
Air Cleaner/Filter
on page 6‑21for more
information.
3. Reach in and access the bulb sockets from inside the engine compartment.
6-57
Page 621 of 630

Fuel . . . . . . . . . . . . . . . . . . . . . . . . . . . . . . . . . . . . . . . . . . . . . . . . .6-6Additives . . . . . . . . . . . . . . . . . . . . . . . . . . . . . . . . . . . . . . . . . . 6-8
California Fuel . . . . . . . . . . . . . . . . . . . . . . . . . . . . . . . . . . . . . 6-8
E85 (85% Ethanol) . . . . . . . . . . . . . . . . . . . . . . . . . . . . . . . . 6-9
Filling a Portable Fuel Container . . . . . . . . . . . . . . . . . . 6-13
Filling the Tank . . . . . . . . . . . . . . . . . . . . . . . . . . . . . . . . . . . 6-11
Fuels in Foreign Countries . . . . . . . . . . . . . . . . . . . . . . . . 6-11
Gage . . . . . . . . . . . . . . . . . . . . . . . . . . . . . . . . . . . . . . . . . . . . . 4-49
Gasoline Octane . . . . . . . . . . . . . . . . . . . . . . . . . . . . . . . . . . . 6-7
Gasoline Specifications . . . . . . . . . . . . . . . . . . . . . . . . . . . . 6-7
Low Fuel Warning Light . . . . . . . . . . . . . . . . . . . . . . . . . . . 4-50
Management, Active . . . . . . . . . . . . . . . . . . . . . . . . . . . . . . 3-27
Fuel Economy Driving for Better . . . . . . . . . . . . . . . . . . . . . . . . . . . . . . . . . 1-33
Fuses Center Instrument Panel Fuse Block . . . . . . . . . . . . .6-121
Fuses and Circuit Breakers . . . . . . . . . . . . . . . . . . . . . . 6-118
Instrument Panel Fuse Block . . . . . . . . . . . . . . . . . . . . 6-119
Underhood Fuse Block . . . . . . . . . . . . . . . . . . . . . . . . . .6-122
Windshield Wiper . . . . . . . . . . . . . . . . . . . . . . . . . . . . . . . . 6-118G
Gages
Engine Coolant Temperature . . . . . . . . . . . . . . . . . . . . . 4-41
Fuel . . . . . . . . . . . . . . . . . . . . . . . . . . . . . . . . . . . . . . . . . . . . . . 4-49
Oil Pressure . . . . . . . . . . . . . . . . . . . . . . . . . . . . . . . . . . . . . . 4-46
Speedometer . . . . . . . . . . . . . . . . . . . . . . . . . . . . . . . . . . . . . 4-31
Tachometer . . . . . . . . . . . . . . . . . . . . . . . . . . . . . . . . . . . . . . . 4-31
Trip Odometer . . . . . . . . . . . . . . . . . . . . . . . . . . . . . . . . . . . . 4-31
Voltmeter Gage . . . . . . . . . . . . . . . . . . . . . . . . . . . . . . . . . . . 4-38
Garage Door Opener . . . . . . . . . . . . . . . . . . . . . . . . . . . . . . 3-69
Gasoline Octane . . . . . . . . . . . . . . . . . . . . . . . . . . . . . . . . . . . . . . . . . . . . 6-7
Specifications . . . . . . . . . . . . . . . . . . . . . . . . . . . . . . . . . . . . . . 6-7
Glove Box . . . . . . . . . . . . . . . . . . . . . . . . . . . . . . . . . . . . . . . . . 3-75
GM Mobility Reimbursement Program . . . . . . . . . . . . . . .8-7
H
Halogen Bulbs . . . . . . . . . . . . . . . . . . . . . . . . . . . . . . . . . . . . . 6-57
Hazard Warning Flashers . . . . . . . . . . . . . . . . . . . . . . . . . . . .4-3
Head Restraints . . . . . . . . . . . . . . . . . . . . . . . . . . . . . . . . . . . . .2-3
Headlamps . . . . . . . . . . . . . . . . . . . . . . . . . . . . . . . . . . . . . . . . 6-57 Aiming . . . . . . . . . . . . . . . . . . . . . . . . . . . . . . . . . . . . . . . . . . . . 6-54
Bulb Replacement . . . . . . . . . . . . . . . . . . . . . . . . . . . . . . . . 6-57
Daytime Running Lamps (DRL) . . . . . . . . . . . . . . . . . . . 4-12
i - 7