Balance GMC SIERRA 2014 Owner's Manual
[x] Cancel search | Manufacturer: GMC, Model Year: 2014, Model line: SIERRA, Model: GMC SIERRA 2014Pages: 544, PDF Size: 13.79 MB
Page 46 of 544
Black plate (10,1)GMC Sierra Owner Manual (GMNA-Localizing-U.S./Canada/Mexico-
5853626) - 2014 - 3rd crc - 6/6/14
2-10 Keys, Doors, and Windows
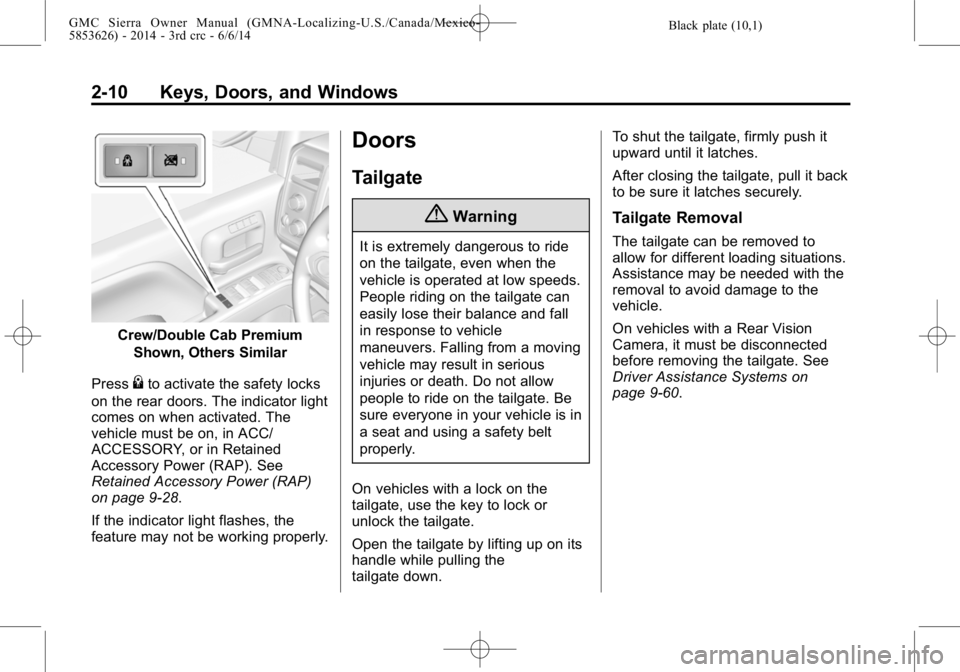
Crew/Double Cab PremiumShown, Others Similar
Press
{to activate the safety locks
on the rear doors. The indicator light
comes on when activated. The
vehicle must be on, in ACC/
ACCESSORY, or in Retained
Accessory Power (RAP). See
Retained Accessory Power (RAP)
on page 9-28.
If the indicator light flashes, the
feature may not be working properly.
Doors
Tailgate
{Warning
It is extremely dangerous to ride
on the tailgate, even when the
vehicle is operated at low speeds.
People riding on the tailgate can
easily lose their balance and fall
in response to vehicle
maneuvers. Falling from a moving
vehicle may result in serious
injuries or death. Do not allow
people to ride on the tailgate. Be
sure everyone in your vehicle is in
a seat and using a safety belt
properly.
On vehicles with a lock on the
tailgate, use the key to lock or
unlock the tailgate.
Open the tailgate by lifting up on its
handle while pulling the
tailgate down. To shut the tailgate, firmly push it
upward until it latches.
After closing the tailgate, pull it back
to be sure it latches securely.
Tailgate Removal
The tailgate can be removed to
allow for different loading situations.
Assistance may be needed with the
removal to avoid damage to the
vehicle.
On vehicles with a Rear Vision
Camera, it must be disconnected
before removing the tailgate. See
Driver Assistance Systems on
page 9-60.
Page 213 of 544
Black plate (9,1)GMC Sierra Owner Manual (GMNA-Localizing-U.S./Canada/Mexico-
5853626) - 2014 - 3rd crc - 6/6/14
Infotainment System 7-9
Radio
AM-FM Radio
Playing the Radio
While on the audio main page,
press the RADIO button repeatedly
to cycle through the available
sources AM, FM, and SiriusXM
®
(if equipped) or press the MEDIA
button repeatedly to cycle through
the available sources Bluetooth
®
Audio (if equipped), CD, USB, SD,
and AUX.
The steering wheel controls can
also be used to adjust the volume.
SeeSteering Wheel Controls on
page 5-3.
AM, FM, or SiriusXM (If Equipped)
To select AM, FM, or SiriusXM (if
equipped), press the RADIO button
to toggle to the desired broadcast
source. Press the RADIO faceplate button
to change the active radio source or
change to the radio from another
source. Press the MENU knob and
the following radio settings may
display:
Tone Settings:
.Bass, Midrange, and Treble:
Turn the MENU knob and
highlight. Press the MENU knob
to select. Turn the MENU knob
to adjust.
.Balance:
Turn the MENU knob
to highlight. Press the MENU
knob to select. Turn the MENU
knob left for more sound from
the left speakers or right for
more sound from the right
speakers. The middle position
balances the sound between the
left and right speakers.
.Fade: Turn the MENU knob to
highlight. Press the MENU knob
to select. Turn the MENU knob
to the left for more sound from
the front speakers and to the
right for more sound from the rear speakers. The middle
position balances the sound
between the front and rear
speakers.
.DSP: If equipped with a Bose
Surround®sound system, it will
have three DSP modes
including:
‐ Normal: Adjusts the audio to
provide the best sound for all
seating positions.
‐ Driver: Adjusts the audio to
provide the best sound for the
driver.
‐ Centerpoint: Creates a
surround sound from nearly
any audio source.
.EQ (Equalizer): If equipped with
a Bose Sound System, turn the
MENU knob to highlight. Turn
the MENU knob to scroll through
the options. Press the MENU
knob to select. Press the
o
BACK button to go to the
previous menu.
Page 221 of 544
Black plate (17,1)GMC Sierra Owner Manual (GMNA-Localizing-U.S./Canada/Mexico-
5853626) - 2014 - 3rd crc - 6/6/14
Infotainment System 7-17
Loading and Ejecting Discs
To load a disc:
1. Turn the vehicle on.
2. Insert a disc into the slot, labelside up. The player pulls it in the
rest of the way. If the disc is
damaged or improperly loaded,
there is an error and the disc
ejects.
Playing an Audio CD
Press the MEDIA button on the
faceplate until CD is selected.
On the CD main page, either a track
number displays at the beginning of
each track, or Song, Artist, and
Album information displays when
available.
Use the following screen controls to
play the disc:
t(Seek Previous/Fast Reverse):
While on the CD main page:
.Press to seek to the beginning of
the current or previous track.
If the track has been playing for less than five seconds, it seeks
to the previous track. If longer
than five seconds, the current
track starts from the beginning.
.Press and hold to fast reverse
through a track. Release the
button to return to playing
speed. Elapsed time displays.
u(Seek Next/Fast Forward):
While on the CD main page:
.Press to seek to the next track.
.Press and hold to fast forward
through a track. Release the
button to return to playing
speed. Elapsed time displays.
j/r(Pause/Play): While on the CD
main page, press to pause. Press
again to resume.
Z(Shuffle): PressZto play the
songs in random order. Press again
to turn off.
If a Blu-ray Disc
®or DVD disc is
loaded into the disc player and the
CD screen button is selected, a
message comes on the screen to
use the Video application. The Video application is only available
on vehicles with Rear Seat
Entertainment (RSE).
CD Menu
While on the CD main page, press
the MENU knob to display the CD
menu and the following may display:
Browse :
Select to display the files
or songs on the CD.
Tone Settings : Select to adjust
Bass, Midrange, Treble, Balance,
Fade, and EQ (Equalizer). See
“Tone Settings” underAM-FM Radio
on page 7-9.
Auto Volume : If equipped, this
feature adjusts the volume based on
the vehicle speed. Select the level
between Off, Low, Medium-Low,
Medium, Medium-High, and High.
Press BACK to go to the
previous menu.
DSP : If equipped, this feature
adjusts the pre-defined settings.
See “DSP Settings” inAM-FM Radio
on page 7-9.
Page 223 of 544
Black plate (19,1)GMC Sierra Owner Manual (GMNA-Localizing-U.S./Canada/Mexico-
5853626) - 2014 - 3rd crc - 6/6/14
Infotainment System 7-19
No Folder
When the CD only contains
compressed audio files without any
folders, all files are under the root
folder.
USB Port
Playing from a USB
A USB mass storage device or
Media Transfer Protocol (MTP)
device can be connected to the
USB port.
The USB ports are in the center
console.
USB MP3 Player and USB Drives
.The USB MP3 players and USB
drives connected must comply
with the USB Mass Storage
Class specification (USB MSC).
.Hard disk drives are not
supported.
To play a USB device:
.Connect the USB.
.Press the MEDIA button on the
faceplate until the connected
device is shown.
While the USB source is active,
press the corresponding faceplate
button for the icons on the screen to
operate USB function:
.t(Seek Previous/Fast
Reverse)
.u(Seek Next/Fast Forward)
.j/r(Play/Pause)
.Z(Shuffle)
For information on how to use the
screen icons, see “Playing an
Audio CD.”
USB Menu
Press the MENU knob to display the
USB menu and the following may
display:
Browse : Select to display the files
and folders on the USB device. Tone Settings :
Select to adjust
Bass, Midrange, Treble, Balance,
Fade, and EQ (Equalizer). See
“Tone Settings” under“Playing an
Audio CD.”
Auto Volume : If equipped, see
“Playing an Audio CD.”
EQ (Equalizer): If equipped, this
feature adjusts the equalizer
settings. See “EQ (Equalizer)
Settings” inAM-FM Radio on
page 7-9.Playing from an iPod®
This feature supports the following
iPod models:
.iPod nano®(1st, 2nd, 3rd, and
4th generation)
.iPod with video (5.0 and 5.5
generation).
.iPod classic®(6th generation)
.iPod touch®(1st and 2nd
generation)
Page 224 of 544
Black plate (20,1)GMC Sierra Owner Manual (GMNA-Localizing-U.S./Canada/Mexico-
5853626) - 2014 - 3rd crc - 6/6/14
7-20 Infotainment System
There may be problems with
operation and function in the
following situations:
.When connecting an iPod with a
more recent version of the
firmware installed than is
supported by the infotainment
system.
.When connecting an iPod on
which firmware from other
providers is installed.
To connect and control an iPod:
1. Connect one end of the standard iPod USB cable to the iPod's
dock connector.
2. Connect the other end to a USB port in the center console.
3. Press the MEDIA button to select the source.
iPod music information displays on
the radio’s display and begins
playing through the vehicle’s audio
system. The iPod battery recharges
automatically while the vehicle is on.
When the vehicle is off while an
iPod is connected using the iPod
USB cable, the iPod battery stops
charging and the iPod automatically
turns off.
If the iPod is an unsupported model,
it can still be listened to in the
vehicle by connecting to the
auxiliary input jack using a standard
3.5 mm (1/8 in) stereo cable.
iPod Menu
Press the MENU knob to display the
iPod Menu and the following may
display:
Browse :
Select to display the files
or songs on the iPod. See “Browse
iPod Media” later in this section.
Tone Settings : Select to adjust
Bass, Midrange, Treble, Balance,
Fade, and EQ (Equalizer). See
“Tone Settings” under“Playing an
Audio CD.”
Auto Volume : If equipped, see
“Playing an Audio CD.” EQ (Equalizer) Settings:
If equipped, this feature adjusts the
Equalizer settings. See
“EQ
(Equalizer) Settings” inAM-FM
Radio on page 7-9.
Browse iPod Media
Use the following to browse:
Playlists:
1. Turn the MENU knob to highlight and press to view the playlists
stored on the iPod.
2. Turn the MENU knob to highlight and press to select a playlist
name to view a list of all songs
in the playlist.
3. Turn the MENU knob to highlight and press to select the song
from the list to begin playback.
Artists:
1. Turn the MENU knob to highlight and press to view the artists
stored on the iPod.
Page 226 of 544
Black plate (22,1)GMC Sierra Owner Manual (GMNA-Localizing-U.S./Canada/Mexico-
5853626) - 2014 - 3rd crc - 6/6/14
7-22 Infotainment System
Playing Music from the SD Card
An SD Card is played the same way
a USB device is played. SeeUSB
Port on page 7-19.
Auxiliary Jack
The AUX jack is in the center
console. See Center Console
Storage on page 4-3.
Possible auxiliary audio sources
include:
.Laptop computer
.Audio music player
This jack is not an audio output. Do
not plug headphones into the
auxiliary input jack. Auxiliary
devices should be set up while the
vehicle is in P (Park).
Connect a 3.5 mm (1/8 in) cable
from the auxiliary device to the
auxiliary input jack.
If an auxiliary device has already
been connected, but a different
source is currently active, press the
MEDIA faceplate button repeatedly to scroll through all of the available
audio source screens, until the AUX
source screen is shown.
Playing from the AUX Jack
An auxiliary device is played
through the audio system and
controlled through the device itself.
AUX Menu
Press the MENU knob to display the
AUX menu and the following may
display:
Tone Settings :
Select to adjust
Bass, Midrange, Treble, Balance,
Fade, and EQ (Equalizer). See
“Tone Settings” underAM-FM Radio
on page 7-9.
Auto Volume : If equipped, see
“Playing an Audio CD.”
DSP: If equipped, this feature
adjusts the pre-defined settings.
See “DSP Settings” inAM-FM Radio
on page 7-9. EQ (Equalizer) Settings:
If equipped, this feature adjusts the
pre-defined equalizer settings. See
“EQ (Equalizer) Settings”
inAM-FM
Radio on page 7-9.
Bluetooth Audio
If equipped, music may be played
from a paired Bluetooth device. See
“Pairing” in“Information Controls”
under “Bluetooth” for help pairing a
device.
Volume and song selection may be
controlled using the Infotainment
controls or on the phone/device.
If Bluetooth Audio is selected and
nothing is heard, check the volume
setting on both phone/device and
the Infotainment system.
Page 292 of 544
Black plate (22,1)GMC Sierra Owner Manual (GMNA-Localizing-U.S./Canada/Mexico-
5853626) - 2014 - CRC - 6/6/14
9-22 Driving and Operating
weight of the people inside. But,
use about 68 kg (150 lb) for
each seat.
The total cargo load must not be
more than the vehicle's CWR.
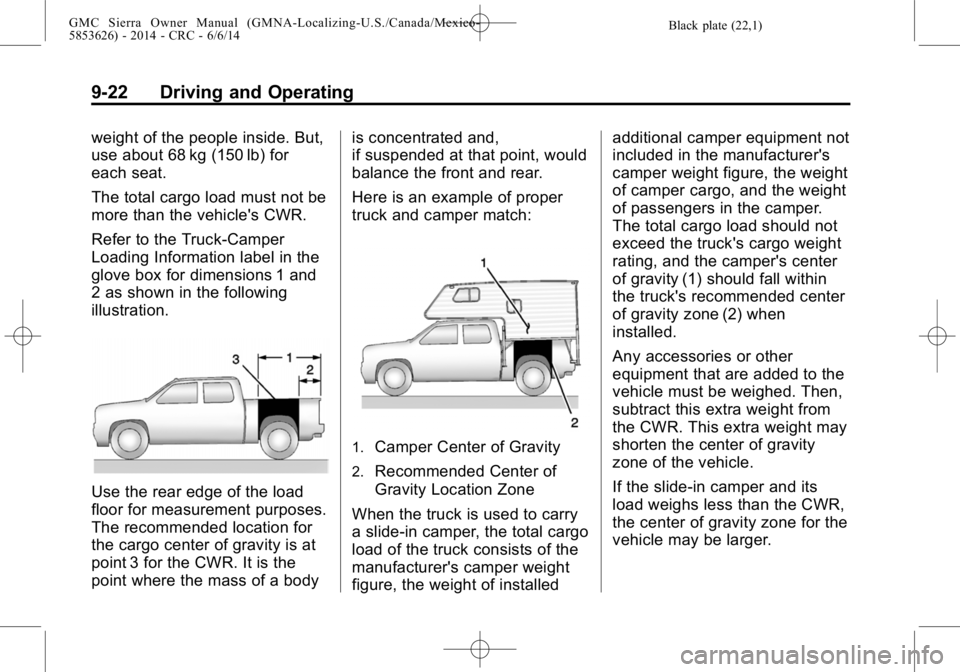
Refer to the Truck-Camper
Loading Information label in the
glove box for dimensions 1 and
2 as shown in the following
illustration.
Use the rear edge of the load
floor for measurement purposes.
The recommended location for
the cargo center of gravity is at
point 3 for the CWR. It is the
point where the mass of a bodyis concentrated and,
if suspended at that point, would
balance the front and rear.
Here is an example of proper
truck and camper match:
1.Camper Center of Gravity
2.Recommended Center of
Gravity Location Zone
When the truck is used to carry
a slide-in camper, the total cargo
load of the truck consists of the
manufacturer's camper weight
figure, the weight of installed additional camper equipment not
included in the manufacturer's
camper weight figure, the weight
of camper cargo, and the weight
of passengers in the camper.
The total cargo load should not
exceed the truck's cargo weight
rating, and the camper's center
of gravity (1) should fall within
the truck's recommended center
of gravity zone (2) when
installed.
Any accessories or other
equipment that are added to the
vehicle must be weighed. Then,
subtract this extra weight from
the CWR. This extra weight may
shorten the center of gravity
zone of the vehicle.
If the slide-in camper and its
load weighs less than the CWR,
the center of gravity zone for the
vehicle may be larger.
Page 293 of 544
Black plate (23,1)GMC Sierra Owner Manual (GMNA-Localizing-U.S./Canada/Mexico-
5853626) - 2014 - CRC - 6/6/14
Driving and Operating 9-23
Secure loose items to prevent
weight shifts that could affect the
balance of the vehicle. When the
truck-camper is loaded, drive to
a scale and weigh on the front
and on the rear wheels
separately to determine axle
loads. Individual axle loads
should not exceed either of the
gross axle weight ratings
(GAWR). The total axle loads
should not exceed the vehicle's
gross vehicle weight rating
(GVWR). These ratings are
given on the Certification/Tire
label attached to the B-pillar.See
“Certification/Tire Label”
under Vehicle Load Limits on
page 9-15. If weight ratings are
exceeded, move or remove
items to bring all weights below
the ratings.
See your dealer for more
information on curb weights,
cargo weights, Cargo Weight
Rating, and the correct center of
gravity zone.Starting and
Operating
New Vehicle Break-In
{Caution
The vehicle does not need an
elaborate break-in. But it will
perform better in the long run if
you follow these guidelines:
.Keep the vehicle speed at
88 km/h (55 mph) or less for
the first 805 km (500 mi).
.Do not drive at any one
constant speed, fast or slow,
for the first 805 km (500 mi).
Do not make full-throttle
starts. Avoid downshifting to
brake or slow the vehicle.
.Avoid making hard stops for
the first 322 km (200 mi) or
so. During this time the new
brake linings are not yet
(Continued)
Page 376 of 544
Black plate (2,1)GMC Sierra Owner Manual (GMNA-Localizing-U.S./Canada/Mexico-
5853626) - 2014 - 3rd crc - 6/6/14
10-2 Vehicle Care
Wheels and Tires
Tires . . . . . . . . . . . . . . . . . . . . . . . . 10-51
All-Season Tires . . . . . . . . . . . . 10-52
Winter Tires . . . . . . . . . . . . . . . . 10-53
Low-Profile Tires . . . . . . . . . . . 10-53
All-Terrain Tires . . . . . . . . . . . . 10-53
Tire Sidewall Labeling . . . . . . 10-54
Tire Designations . . . . . . . . . . . 10-56
Tire Terminology andDefinitions . . . . . . . . . . . . . . . . 10-58
Tire Pressure . . . . . . . . . . . . . . . 10-61
Tire Pressure Monitor System . . . . . . . . . . . . . . . . . . . 10-62
Tire Pressure Monitor Operation . . . . . . . . . . . . . . . . . 10-63
Tire Inspection . . . . . . . . . . . . . . 10-66
Tire Rotation . . . . . . . . . . . . . . . 10-67
Dual Tire Rotation . . . . . . . . . . 10-69
When It Is Time for New Tires . . . . . . . . . . . . . . . . . . . . . . 10-69
Buying New Tires . . . . . . . . . . . 10-70
Different Size Tires and Wheels . . . . . . . . . . . . . . . . . . . 10-72
Uniform Tire Quality Grading . . . . . . . . . . . . . . . . . . . 10-72
Wheel Alignment and Tire Balance . . . . . . . . . . . . . . . . . . . 10-74
Wheel Replacement . . . . . . . . 10-74
Tire Chains . . . . . . . . . . . . . . . . . 10-75 If a Tire Goes Flat . . . . . . . . . . 10-76
Tire Changing . . . . . . . . . . . . . . 10-78
Full-Size Spare Tire . . . . . . . . 10-88
Jump Starting
Jump Starting . . . . . . . . . . . . . . 10-89
Towing the Vehicle
Towing the Vehicle . . . . . . . . . 10-93
Recreational Vehicle
Towing . . . . . . . . . . . . . . . . . . . . 10-94
Appearance Care
Exterior Care . . . . . . . . . . . . . . . 10-96
Interior Care . . . . . . . . . . . . . . . 10-101
Floor Mats . . . . . . . . . . . . . . . . 10-104
General Information
For service and parts needs, visit
your dealer. You will receive
genuine GM parts and GM-trained
and supported service people.
Genuine GM parts have one of
these marks:
California Proposition
65 Warning
Most motor vehicles, including this
one, contain and/or emit chemicals
known to the State of California to
Page 403 of 544
Black plate (29,1)GMC Sierra Owner Manual (GMNA-Localizing-U.S./Canada/Mexico-
5853626) - 2014 - 3rd crc - 6/6/14
Vehicle Care 10-29
Properly torqued wheel nuts are
necessary to help prevent brake
pulsation. When tires are rotated,
inspect brake pads for wear and
evenly tighten wheel nuts in the
proper sequence to torque
specifications inCapacities and
Specifications on page 12-2.
Brake linings should always be
replaced as complete axle sets.
Brake Pedal Travel
See your dealer if the brake pedal
does not return to normal height,
or if there is a rapid increase in
pedal travel. This could be a sign
that brake service might be
required.
Brake Adjustment
Every time the brakes are applied,
with or without the vehicle moving,
the brakes adjust for wear.
Replacing Brake System Parts
The braking system on a vehicle is
complex. Its many parts have to be
of top quality and work well together
if the vehicle is to have really good
braking. The vehicle was designed
and tested with top-quality brake
parts. When parts of the braking
system are replaced, be sure to get
new, approved replacement parts.
If this is not done, the brakes might
not work properly. For example,
installing disc brake pads that are
wrong for the vehicle, can change
the balance between the front and
rear brakes —for the worse. The
braking performance expected can
change in many other ways if the
wrong replacement brake parts are
installed.
Brake Fluid
The brake master cylinder reservoir
is filled with DOT 3 brake fluid. See
Engine Compartment Overview on
page 10-5 for the location of the
reservoir.
There are only two reasons why the
brake fluid level in the reservoir
might go down:
.The brake fluid level goes down
because of normal brake lining
wear. When new linings are
installed, the fluid level goes
back up.
.A fluid leak in the brake
hydraulic system can also cause
a low fluid level. Have the brake
hydraulic system fixed, since a
leak means that sooner or later
the brakes will not work well.