check engine GMC SIERRA 2019 Owner's Guide
[x] Cancel search | Manufacturer: GMC, Model Year: 2019, Model line: SIERRA, Model: GMC SIERRA 2019Pages: 477, PDF Size: 8.7 MB
Page 295 of 477
GMC Sierra/Sierra Denali Owner Manual (GMNA-Localizing-U.S./Canada/
Mexico-1500-11698638) - 2019 - CRC - 5/14/19
294 Driving and Operating
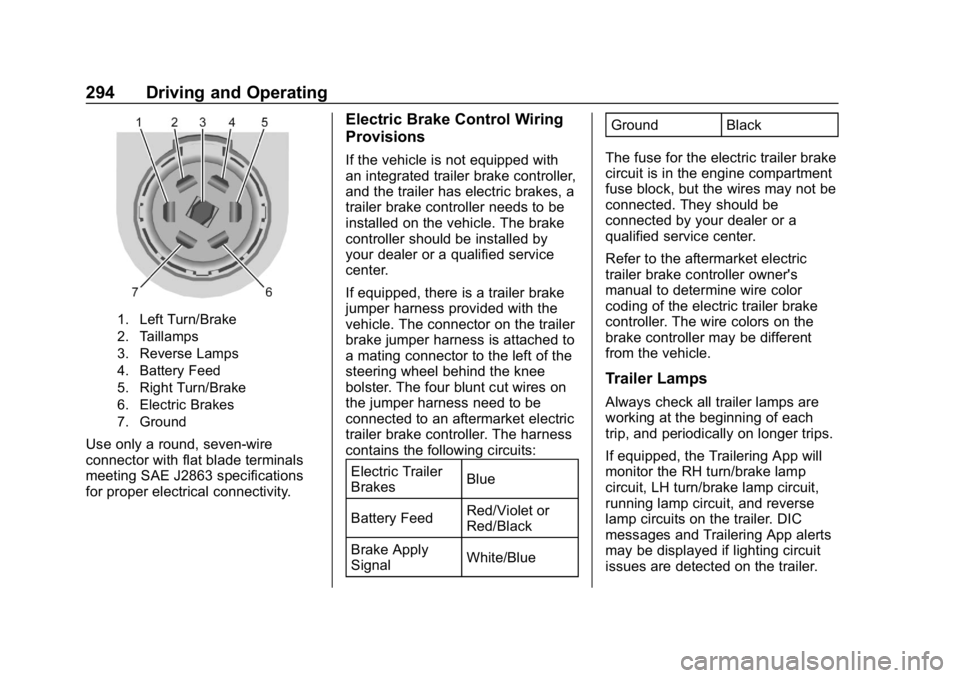
1. Left Turn/Brake
2. Taillamps
3. Reverse Lamps
4. Battery Feed
5. Right Turn/Brake
6. Electric Brakes
7. Ground
Use only a round, seven-wire
connector with flat blade terminals
meeting SAE J2863 specifications
for proper electrical connectivity.
Electric Brake Control Wiring
Provisions
If the vehicle is not equipped with
an integrated trailer brake controller,
and the trailer has electric brakes, a
trailer brake controller needs to be
installed on the vehicle. The brake
controller should be installed by
your dealer or a qualified service
center.
If equipped, there is a trailer brake
jumper harness provided with the
vehicle. The connector on the trailer
brake jumper harness is attached to
a mating connector to the left of the
steering wheel behind the knee
bolster. The four blunt cut wires on
the jumper harness need to be
connected to an aftermarket electric
trailer brake controller. The harness
contains the following circuits:Electric Trailer
Brakes Blue
Battery Feed Red/Violet or
Red/Black
Brake Apply
Signal White/Blue Ground Black
The fuse for the electric trailer brake
circuit is in the engine compartment
fuse block, but the wires may not be
connected. They should be
connected by your dealer or a
qualified service center.
Refer to the aftermarket electric
trailer brake controller owner's
manual to determine wire color
coding of the electric trailer brake
controller. The wire colors on the
brake controller may be different
from the vehicle.
Trailer Lamps
Always check all trailer lamps are
working at the beginning of each
trip, and periodically on longer trips.
If equipped, the Trailering App will
monitor the RH turn/brake lamp
circuit, LH turn/brake lamp circuit,
running lamp circuit, and reverse
lamp circuits on the trailer. DIC
messages and Trailering App alerts
may be displayed if lighting circuit
issues are detected on the trailer.
Page 300 of 477
GMC Sierra/Sierra Denali Owner Manual (GMNA-Localizing-U.S./Canada/
Mexico-1500-11698638) - 2019 - CRC - 5/14/19
Driving and Operating 299
while driving, the ITBC system may
not be fully functional or may not
function at all. When traffic
conditions allow, carefully pull the
vehicle over to the side of the road
and turn the ignition off. Check the
wiring connection to the trailer and
turn the ignition back on. If either of
these messages continues, either
the vehicle or trailer needs service.
A GM dealer may be able to
diagnose and repair problems with
the trailer. However, any diagnosis
and repair of the trailer is not
covered under the vehicle warranty.
Contact your trailer dealer for
assistance with trailer repairs and
trailer warranty information.
Trailer Sway
Control (TSC)
Vehicles with StabiliTrak/Electronic
Stability Control (ESC) have a
Trailer Sway Control (TSC) feature.
Trailer sway is unintended
side-to-side motion of a trailer while
towing. If the vehicle is towing a
trailer and the TSC detects that
sway is increasing, the vehiclebrakes are selectively applied at
each wheel, to help reduce
excessive trailer sway. If equipped
with the Integrated Trailer Brake
Control (ITBC) system, and the
trailer has an electric brake system,
StabiliTrak/ESC may also apply the
trailer brakes.
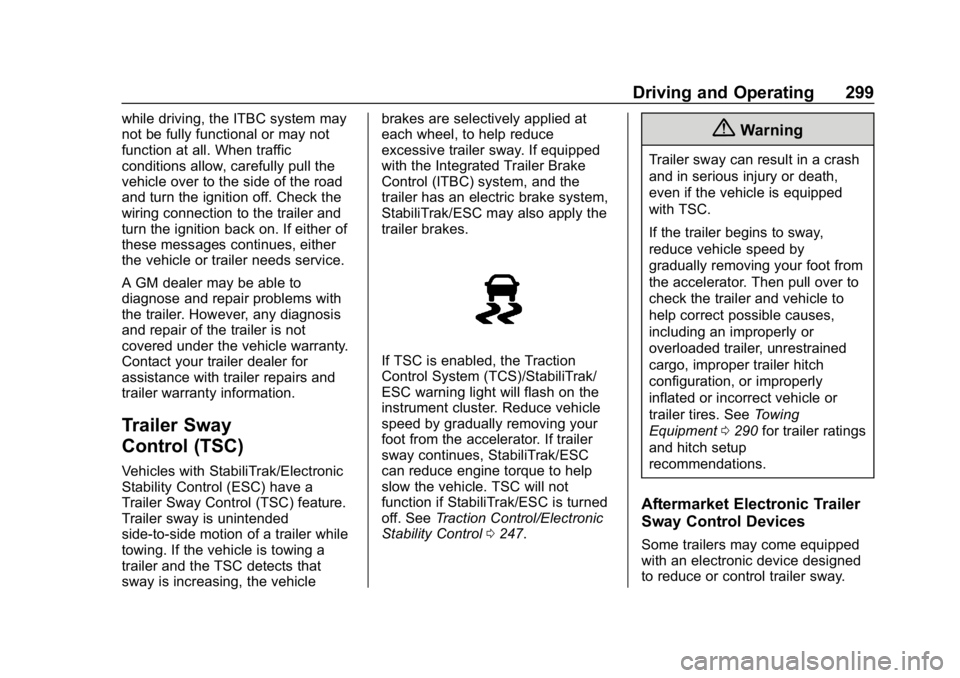
If TSC is enabled, the Traction
Control System (TCS)/StabiliTrak/
ESC warning light will flash on the
instrument cluster. Reduce vehicle
speed by gradually removing your
foot from the accelerator. If trailer
sway continues, StabiliTrak/ESC
can reduce engine torque to help
slow the vehicle. TSC will not
function if StabiliTrak/ESC is turned
off. See
Traction Control/Electronic
Stability Control 0247.
{Warning
Trailer sway can result in a crash
and in serious injury or death,
even if the vehicle is equipped
with TSC.
If the trailer begins to sway,
reduce vehicle speed by
gradually removing your foot from
the accelerator. Then pull over to
check the trailer and vehicle to
help correct possible causes,
including an improperly or
overloaded trailer, unrestrained
cargo, improper trailer hitch
configuration, or improperly
inflated or incorrect vehicle or
trailer tires. See Towing
Equipment 0290 for trailer ratings
and hitch setup
recommendations.
Aftermarket Electronic Trailer
Sway Control Devices
Some trailers may come equipped
with an electronic device designed
to reduce or control trailer sway.
Page 312 of 477
GMC Sierra/Sierra Denali Owner Manual (GMNA-Localizing-U.S./Canada/
Mexico-1500-11698638) - 2019 - CRC - 5/14/19
Driving and Operating 311
Tow/Haul Mode Reminder
This is a reminder to turn on the
Tow/Haul Mode when towing a
trailer. SeeTow/Haul Mode 0238.
Touch Tow/Haul Mode Reminder in
Settings to view the Tow/Haul Mode
Reminder settings page. These
alerts are based on the Trailer
Profile, so the settings for each
Trailer Profile must be turned on or
off. Touch a profile to view more
information or to adjust the setting
for that profile.
This setting will default to OFF for
each Trailer Profile, including the
Guest Trailer Profile.
If Tow/Haul Mode is off and this
setting is on for a Trailer Profile,
each time the ignition is turned on a
reminder will appear to turn on Tow/
Haul Mode when the Trailer Profile
is active.
If Tow/Haul Mode is on and this
setting is on for a Trailer Profile, the
reminder will not appear when the
Trailer Profile is active.
Conversions and
Add-Ons
Add-On Electrical
Equipment
{Warning
The Data Link Connector (DLC) is
used for vehicle service and
Emission Inspection/Maintenance
testing. See Malfunction
Indicator Lamp (Check Engine
Light) 0151. A device connected
to the DLC —such as an
aftermarket fleet or
driver-behavior tracking device —
may interfere with vehicle
systems. This could affect vehicle
operation and cause a crash.
Such devices may also access
information stored in the vehicle’s
systems.
Caution
Some electrical equipment can
damage the vehicle or cause
components to not work and
would not be covered by the
vehicle warranty. Always check
with your dealer before adding
electrical equipment.
Add-on equipment can drain the
vehicle's 12-volt battery, even if the
vehicle is not operating.
The vehicle has an airbag system.
Before attempting to add anything
electrical to the vehicle, see
Servicing the Airbag-Equipped
Vehicle 097 and
Adding Equipment to the
Airbag-Equipped Vehicle 098.
For information on wiring auxiliary
switches, see www.gmupfitter.com
or contact your dealer.
Page 317 of 477
GMC Sierra/Sierra Denali Owner Manual (GMNA-Localizing-U.S./Canada/
Mexico-1500-11698638) - 2019 - CRC - 5/14/19
316 Vehicle Care
Vehicle Care
General Information
General Information . . . . . . . . . . 317
California Proposition65 Warning . . . . . . . . . . . . . . . . . 318
California Perchlorate Materials Requirements . . . . . 318
Accessories and Modifications . . . . . . . . . . . . . . . . 318
Vehicle Checks
Doing Your OwnService Work . . . . . . . . . . . . . . . 319
Hood . . . . . . . . . . . . . . . . . . . . . . . . . 319
Engine Compartment Overview . . . . . . . . . . . . . . . . . . . . 321
Engine Oil . . . . . . . . . . . . . . . . . . . . 326
Engine Oil Life System . . . . . . . 328
Automatic Transmission Fluid . . . . . . . . . . . . . . . . . . . . . . . . 330
Engine Air Filter Life System . . . . . . . . . . . . . . . . . . . . . . 330
Engine Air Cleaner/Filter . . . . . . 331
Cooling System . . . . . . . . . . . . . . 332
Engine Overheating . . . . . . . . . . 336
Overheated Engine Protection Operating Mode . . . . . . . . . . . . . 338
Engine Fan . . . . . . . . . . . . . . . . . . . 338 Washer Fluid . . . . . . . . . . . . . . . . . 339
Brakes . . . . . . . . . . . . . . . . . . . . . . . 340
Brake Pad Life System . . . . . . . 340
Brake Fluid . . . . . . . . . . . . . . . . . . . 341
Battery - North America . . . . . . 342
Four-Wheel Drive . . . . . . . . . . . . . 345
Front Axle . . . . . . . . . . . . . . . . . . . . 345
Rear Axle . . . . . . . . . . . . . . . . . . . . 346
Noise Control System . . . . . . . . 347
Starter Switch Check . . . . . . . . . 348
Ignition Transmission Lock
Check . . . . . . . . . . . . . . . . . . . . . . . 348
Park Brake and P (Park) Mechanism Check . . . . . . . . . . 348
Wiper Blade Replacement . . . . 349
Windshield Replacement . . . . . 350
Gas Strut(s) . . . . . . . . . . . . . . . . . . 350
Headlamp Aiming
Front Headlamp Aiming . . . . . . 351
Bulb Replacement
Bulb Replacement . . . . . . . . . . . . 351
Halogen Bulbs . . . . . . . . . . . . . . . . 351
LED Lighting . . . . . . . . . . . . . . . . . 352
Headlamps, Front Turn Signal, Sidemarker, and Parking
Lamps . . . . . . . . . . . . . . . . . . . . . . 352
Taillamps, Turn Signal,
Stoplamps, and Back-Up
Lamps . . . . . . . . . . . . . . . . . . . . . . 352 Center High-Mounted
Stoplamp (CHMSL) and
Cargo Lamp . . . . . . . . . . . . . . . . . 353
License Plate Lamp . . . . . . . . . . 354
Electrical System
Electrical System Overload . . . 354
Fuses and Circuit Breakers . . . 355
Engine Compartment Fuse Block . . . . . . . . . . . . . . . . . . . . . . . . 355
Instrument Panel Fuse Block (Right) . . . . . . . . . . . . . . . . . . . . . . 359
Instrument Panel Fuse Block (Left) . . . . . . . . . . . . . . . . . 361
Wheels and Tires
Tires . . . . . . . . . . . . . . . . . . . . . . . . . . 363
All-Season Tires . . . . . . . . . . . . . . 364
Winter Tires . . . . . . . . . . . . . . . . . . 364
Low-Profile Tires . . . . . . . . . . . . . 365
All-Terrain Tires . . . . . . . . . . . . . . . 365
Tire Sidewall Labeling . . . . . . . . 365
Tire Designations . . . . . . . . . . . . . 368
Tire Terminology andDefinitions . . . . . . . . . . . . . . . . . . 369
Tire Pressure . . . . . . . . . . . . . . . . . 372
Tire Pressure for High-Speed Operation . . . . . . . . . . . . . . . . . . . 373
Tire Pressure Monitor
System . . . . . . . . . . . . . . . . . . . . . . 374
Page 320 of 477
GMC Sierra/Sierra Denali Owner Manual (GMNA-Localizing-U.S./Canada/
Mexico-1500-11698638) - 2019 - CRC - 5/14/19
Vehicle Care 319
Vehicle Checks
Doing Your Own
Service Work
{Warning
It can be dangerous to work on
your vehicle if you do not have
the proper knowledge, service
manual, tools, or parts. Always
follow owner’s manual procedures
and consult the service manual
for your vehicle before doing any
service work.
If doing some of your own service
work, use the proper service
manual. It tells you much more
about how to service the vehicle
than this manual can. To order the
proper service manual, see
Publication Ordering Information
0 447.
This vehicle has an airbag system.
Before attempting to do your own
service work, see Servicing the
Airbag-Equipped Vehicle 097. If equipped with remote vehicle
start, open the hood before
performing any service work to
prevent remote starting the vehicle
accidentally. See
Remote Vehicle
Start 044.
Keep a record with all parts receipts
and list the mileage and the date of
any service work performed. See
Maintenance Records 0433.
Caution
Even small amounts of
contamination can cause damage
to vehicle systems. Do not allow
contaminants to contact the fluids,
reservoir caps, or dipsticks.
Hood
{Warning
Turn the vehicle off before
opening the hood. If the vehicle is
on, the engine will start when the
hood is opened. You or others
could be injured.
{Warning
Components under the hood can
get hot from running the engine.
To help avoid the risk of burning
unprotected skin, never touch
these components until they have
cooled, and always use a glove or
towel to avoid direct skin contact.
Clear any snow from the hood
before opening.
To open the hood: 1. Pull the hood release lever with the
isymbol. It is on the
lower left side of the instrument
panel.
2. Go to the front of the vehicle and locate the secondary
release lever under the front
center of the hood. Push the
secondary hood release lever
to the right to release.
Page 323 of 477

GMC Sierra/Sierra Denali Owner Manual (GMNA-Localizing-U.S./Canada/
Mexico-1500-11698638) - 2019 - CRC - 5/14/19
322 Vehicle Care
1. Remote Negative (–) Location.See Jump Starting - North
America 0400.
2. Positive (+) Terminal (Under Cover). See Jump Starting -
North America 0400.
3. Battery - North America 0342.
4. Engine Compartment Fuse
Block 0355.
5. Engine Cooling Fans (Out of View). See Cooling System
0 332.
6. Engine Oil Fill Cap. See “When
to Add Engine Oil” under
Engine Oil 0326.
7. Engine Oil Dipstick. See “Checking Engine Oil” under
Engine Oil 0326.
8. Coolant Surge Tank and Pressure Cap. See Cooling
System 0332. 9.
Engine Air Cleaner/Filter 0331.
10. Brake Fluid Reservoir. See Brake Fluid 0341.
11. Windshield Washer Fluid Reservoir. See “Adding Washer
Fluid” under Washer Fluid
0 339.
Page 325 of 477

GMC Sierra/Sierra Denali Owner Manual (GMNA-Localizing-U.S./Canada/
Mexico-1500-11698638) - 2019 - CRC - 5/14/19
324 Vehicle Care
1. Remote Negative (–) Location.See Jump Starting - North
America 0400.
2. Positive (+) Terminal (Under Cover). See Jump Starting -
North America 0400.
3. Battery - North America 0342.
4. Engine Compartment Fuse
Block 0355.
5. Engine Cooling Fans (Out of View). See Cooling System
0 332.
6. Engine Oil Dipstick. See “Checking Engine Oil” under
Engine Oil 0326.
7. Engine Oil Fill Cap. See “When
to Add Engine Oil” under
Engine Oil 0326.
8. Coolant Surge Tank and Pressure Cap. See Cooling
System 0332. 9.
Engine Air Cleaner/Filter 0331.
10. Brake Fluid Reservoir. See Brake Fluid 0341.
11. Windshield Washer Fluid Reservoir. See “Adding Washer
Fluid” under Washer Fluid
0 339.
Page 327 of 477
GMC Sierra/Sierra Denali Owner Manual (GMNA-Localizing-U.S./Canada/
Mexico-1500-11698638) - 2019 - CRC - 5/14/19
326 Vehicle Care
1. Remote Negative (–) Location.See Jump Starting - North
America 0400.
2. Positive (+) Terminal (Under Cover). See Jump Starting -
North America 0400.
3. Battery - North America 0342.
4. Engine Compartment Fuse
Block 0355.
5. Engine Oil Dipstick. See “Checking Engine Oil” under
Engine Oil 0326.
6. Engine Cooling Fans (Out of View). See Cooling System
0 332.
7. Engine Oil Fill Cap. See “When
to Add Engine Oil” under
Engine Oil 0326.
8. Coolant Surge Tank and Pressure Cap. See Cooling
System 0332.
9. Engine Air Cleaner/Filter 0331.
10. Brake Fluid Reservoir. See Brake Fluid 0341. 11. Windshield Washer Fluid
Reservoir. See “Adding Washer
Fluid” under Washer Fluid
0 339.
If the vehicle has a diesel engine,
see the Duramax diesel
supplement.
Engine Oil
For diesel engine vehicles, see
“Engine Oil” in the Duramax diesel
supplement.
To ensure proper engine
performance and long life, careful
attention must be paid to engine oil.
Following these simple, but
important steps will help protect
your investment:
. Use engine oil approved to the
proper specification and of the
proper viscosity grade. See
“Selecting the Right Engine Oil”
in this section.
. Check the engine oil level
regularly and maintain the
proper oil level. See “Checking
Engine Oil” and“When to Add
Engine Oil” in this section. .
Change the engine oil at the
appropriate time. See Engine Oil
Life System 0328.
. Always dispose of engine oil
properly. See “What to Do with
Used Oil” in this section.
Checking Engine Oil
Check the engine oil level regularly,
every 650 km (400 mi), especially
prior to a long trip. The engine oil
dipstick handle is a loop. See
Engine Compartment Overview
0321 for the location.
{Warning
The engine oil dipstick handle
may be hot; it could burn you.
Use a towel or glove to touch the
dipstick handle.
If a low oil Driver Information Center
(DIC) message displays, check the
oil level.
Page 328 of 477
GMC Sierra/Sierra Denali Owner Manual (GMNA-Localizing-U.S./Canada/
Mexico-1500-11698638) - 2019 - CRC - 5/14/19
Vehicle Care 327
Follow these guidelines:
.To get an accurate reading, park
the vehicle on level ground.
Check the engine oil level after
the engine has been off for at
least two hours. Checking the
engine oil level on steep grades
or too soon after engine shutoff
can result in incorrect readings.
Accuracy improves when
checking a cold engine prior to
starting. Remove the dipstick
and check the level.
. If unable to wait two hours, the
engine must be off for at least
15 minutes if the engine is
warm, or at least 30 minutes if
the engine is not warm. Pull out
the dipstick, wipe it with a clean
paper towel or cloth, then push it
back in all the way. Remove it
again, keeping the tip down, and
check the level.When to Add Engine Oil
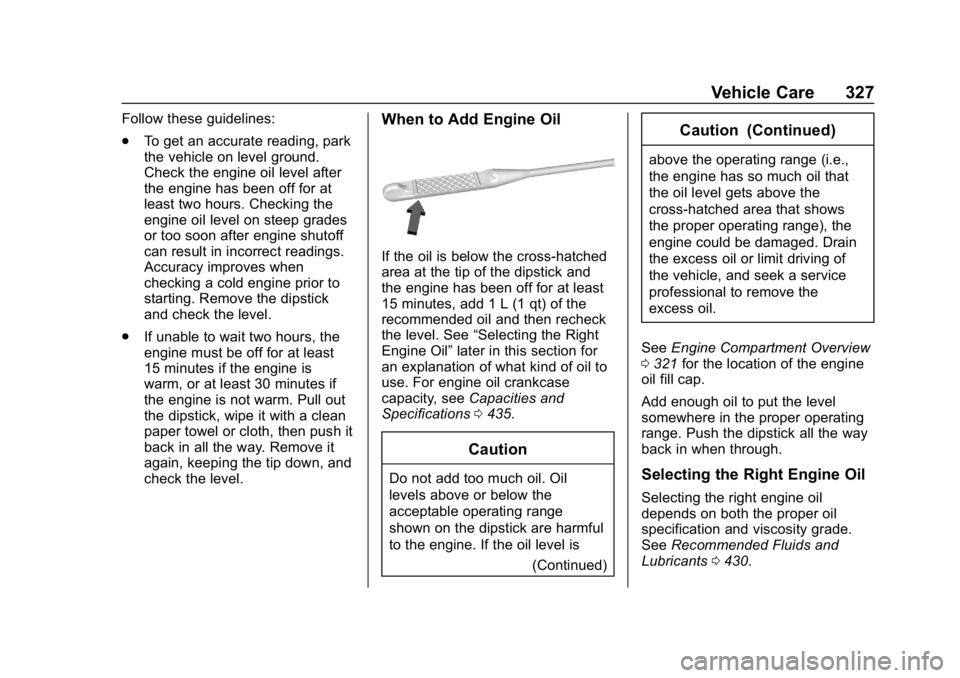
If the oil is below the cross-hatched
area at the tip of the dipstick and
the engine has been off for at least
15 minutes, add 1 L (1 qt) of the
recommended oil and then recheck
the level. See “Selecting the Right
Engine Oil” later in this section for
an explanation of what kind of oil to
use. For engine oil crankcase
capacity, see Capacities and
Specifications 0435.
Caution
Do not add too much oil. Oil
levels above or below the
acceptable operating range
shown on the dipstick are harmful
to the engine. If the oil level is
(Continued)
Caution (Continued)
above the operating range (i.e.,
the engine has so much oil that
the oil level gets above the
cross-hatched area that shows
the proper operating range), the
engine could be damaged. Drain
the excess oil or limit driving of
the vehicle, and seek a service
professional to remove the
excess oil.
See Engine Compartment Overview
0 321 for the location of the engine
oil fill cap.
Add enough oil to put the level
somewhere in the proper operating
range. Push the dipstick all the way
back in when through.
Selecting the Right Engine Oil
Selecting the right engine oil
depends on both the proper oil
specification and viscosity grade.
See Recommended Fluids and
Lubricants 0430.
Page 330 of 477
GMC Sierra/Sierra Denali Owner Manual (GMNA-Localizing-U.S./Canada/
Mexico-1500-11698638) - 2019 - CRC - 5/14/19
Vehicle Care 329
include engine revolutions, engine
temperature, and miles driven.
Based on driving conditions, the
mileage at which an oil change is
indicated can vary considerably. For
the oil life system to work properly,
the system must be reset every time
the oil is changed.
On some vehicles, when the system
has calculated that oil life has been
diminished, a CHANGE ENGINE
OIL SOON message comes on to
indicate that an oil change is
necessary. Change the oil as soon
as possible within the next 1 000 km
(600 mi). It is possible that, if driving
under the best conditions, the oil life
system might indicate that an oil
change is not necessary for up to a
year. The engine oil and filter must
be changed at least once a year
and, at this time, the system must
be reset. For vehicles without the
CHANGE ENGINE OIL SOON
message, an oil change is needed
when the REMAINING OIL LIFE
percentage is near 0%. Your dealer
has trained service people who will
perform this work and reset the
system. It is also important to checkthe oil regularly over the course of
an oil drain interval and keep it at
the proper level.
If the system is ever reset
accidentally, the oil must be
changed at 5 000 km (3,000 mi)
since the last oil change.
Remember to reset the oil life
system whenever the oil is changed.
How to Reset the Engine Oil
Life System
Reset the system whenever the
engine oil is changed so that the
system can calculate the next
engine oil change. Always reset the
engine oil life to 100% after every oil
change. It will not reset itself. To
reset the engine oil life system:
1. Display the oil life percentage on the DIC. See Driver
Information Center (DIC)
(Midlevel and Uplevel) 0163 or
Driver Information Center (DIC)
(Base Level) 0161.
2. Press the thumbwheel on the steering wheel, or the trip
odometer reset stem if the
vehicle does not have DIC controls, for several seconds.
When the confirmation
message displays, select YES.
The oil life will change
to 100%.
The oil life system can also be reset
as follows:
1. Display the oil life percentage on the DIC. See Driver
Information Center (DIC)
(Midlevel and Uplevel) 0163 or
Driver Information Center (DIC)
(Base Level) 0161.
2. Fully press the accelerator pedal slowly three times within
five seconds.
3. If the display changes to 100%, the system is reset.
If the vehicle has a CHANGE
ENGINE OIL SOON message and it
comes back on when the vehicle is
started and/or the oil life percentage
is near 0%, the engine oil life
system has not been reset. Repeat
the procedure.