trailer GMC SIERRA 2020 Get To Know Guide
[x] Cancel search | Manufacturer: GMC, Model Year: 2020, Model line: SIERRA, Model: GMC SIERRA 2020Pages: 24, PDF Size: 4.75 MB
Page 3 of 24
3
Refer to your Owner’s Manual to learn about the information being relayed by the lights, gauges and indicators on the instrument cluster.
See Introduction in your Owner’s Manual.
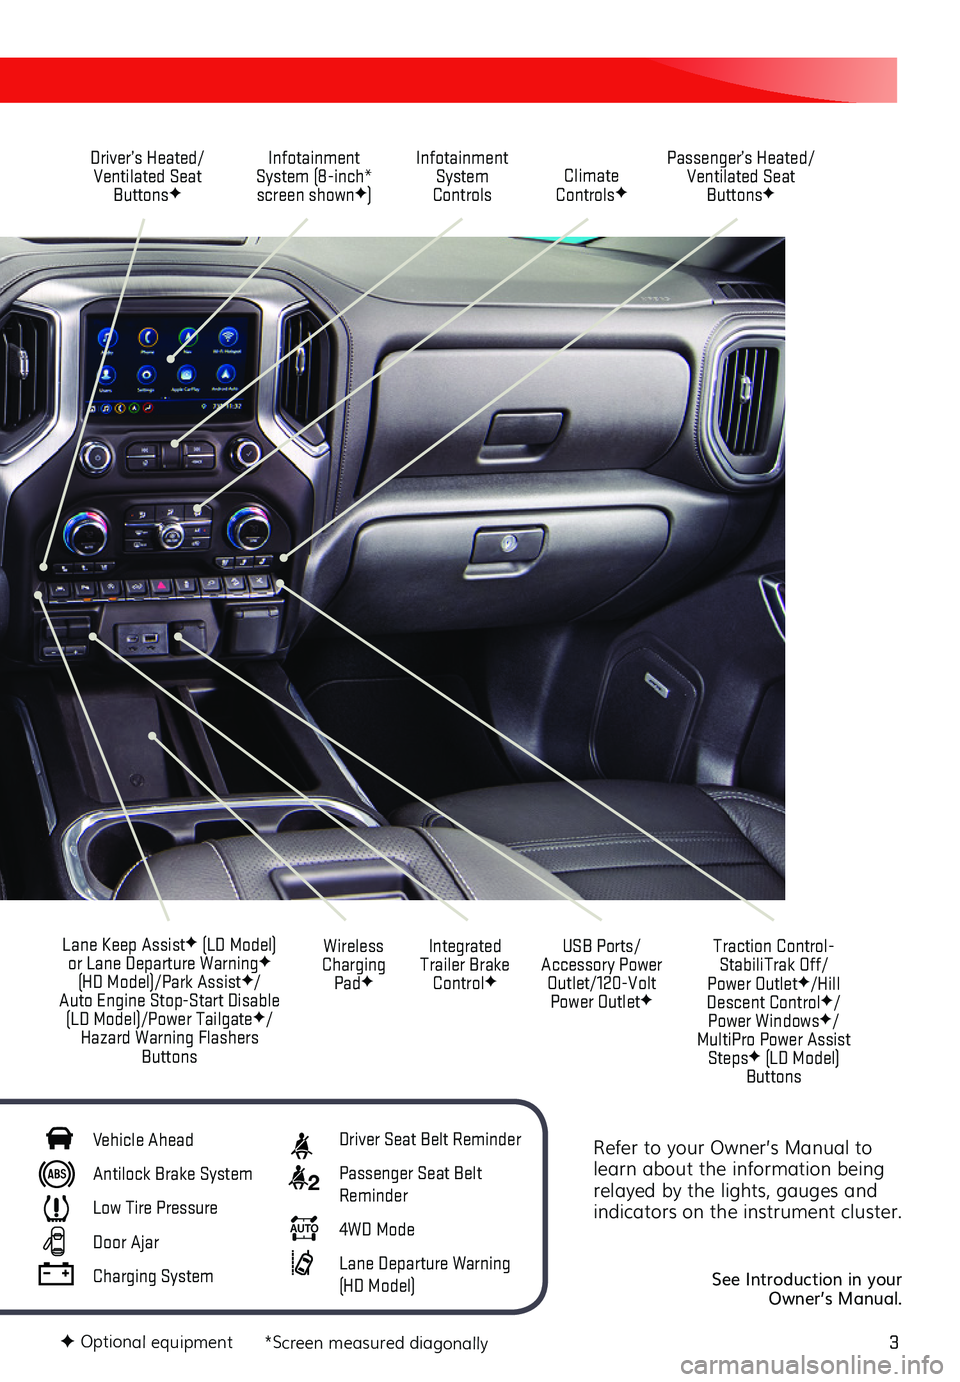
Driver’s Heated/Ventilated Seat ButtonsF
Infotainment System (8-inch* screen shownF)
Passenger’s Heated/Ventilated Seat ButtonsF
Infotainment System Controls Climate ControlsF
USB Ports/ Accessory Power Outlet/120-Volt Power OutletF
Integrated Trailer Brake ControlF
Wireless Charging PadF
Lane Keep AssistF (LD Model) or Lane Departure WarningF (HD Model)/Park AssistF/Auto Engine Stop-Start Disable (LD Model)/Power TailgateF/Hazard Warning Flashers Buttons
F Optional equipment *Screen measured diagonally
Traction Control-StabiliTrak Off/ Power OutletF/Hill Descent ControlF/ Power WindowsF/MultiPro Power Assist StepsF (LD Model) Buttons
Vehicle Ahead
Antilock Brake System
Low Tire Pressure
Door Ajar
Charging System
Driver Seat Belt Reminder
2 Passenger Seat Belt Reminder
AUTO 4WD Mode
Lane Departure Warning (HD Model)
Page 8 of 24
8
REAR SEATSF
POWER MIRRORSF/TRAILER-TOW MIRRORSF
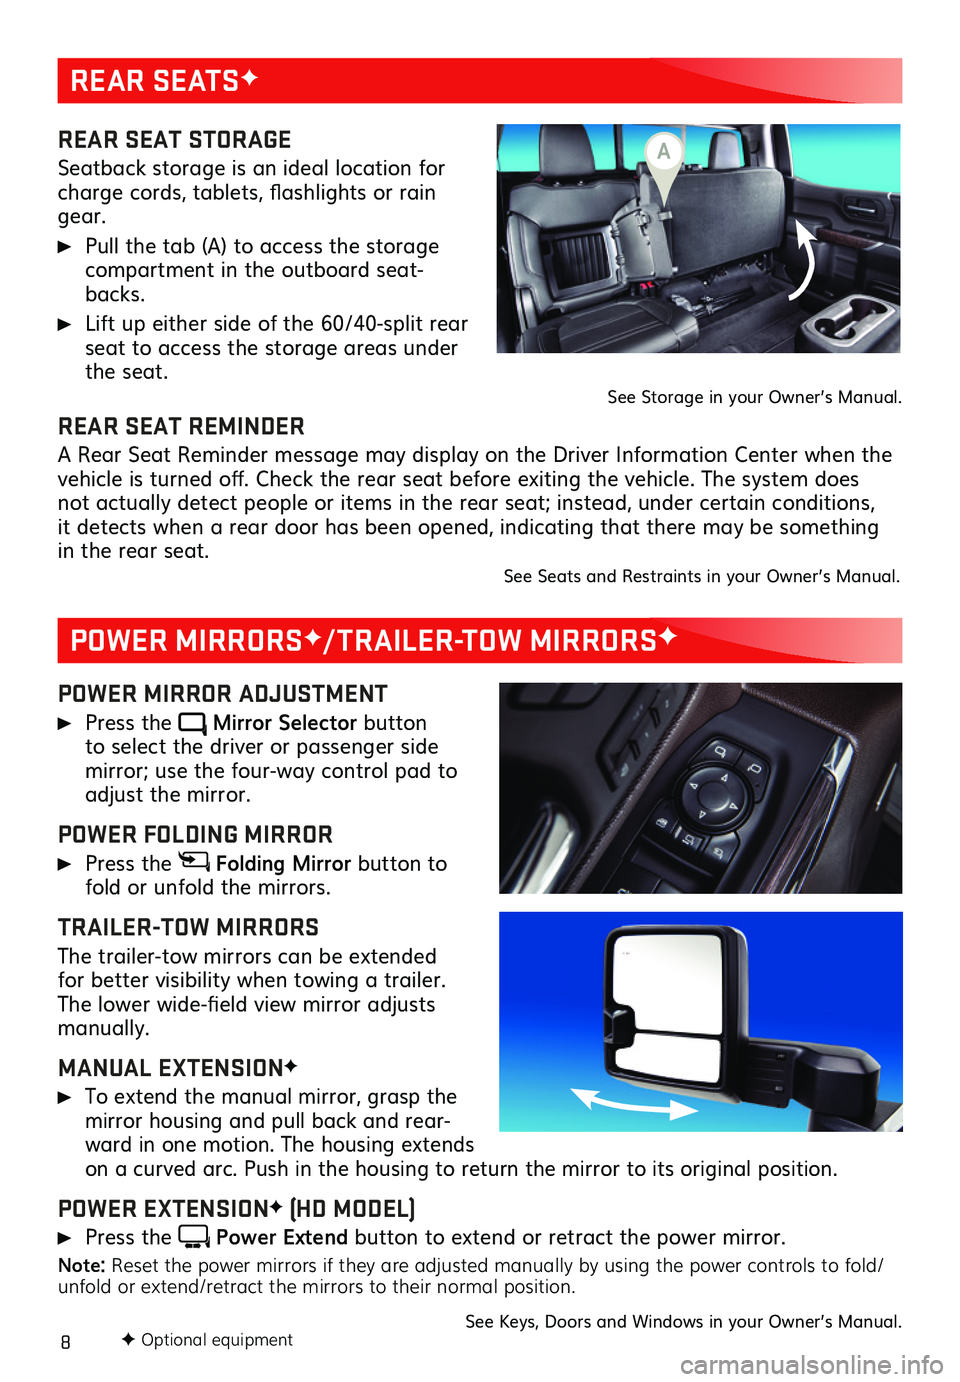
REAR SEAT STORAGE
Seatback storage is an ideal location for charge cords, tablets, flashlights or rain gear.
Pull the tab (A) to access the storage compartment in the outboard seat-backs.
Lift up either side of the 60/40-split rear seat to access the storage areas under the seat.See Storage in your Owner’s Manual.
POWER MIRROR ADJUSTMENT
Press the Mirror Selector button to select the driver or passenger side
mirror; use the four-way control pad to adjust the mirror.
POWER FOLDING MIRROR
Press the Folding Mirror button to fold or unfold the mirrors.
TRAILER-TOW MIRRORS
The trailer-tow mirrors can be extended for better visibility when towing a trailer. The lower wide-field view mirror adjusts manually.
MANUAL EXTENSIONF
To extend the manual mirror, grasp the mirror housing and pull back and rear-ward in one motion. The housing extends on a curved arc. Push in the housing to return the mirror to its original position.
POWER EXTENSIONF (HD MODEL)
Press the Power Extend button to extend or retract the power mirror.
Note: Reset the power mirrors if they are adjusted manually by using the power controls to fold/unfold or extend/retract the mirrors to their normal position.
See Keys, Doors and Windows in your Owner’s Manual.
REAR SEAT REMINDER
A Rear Seat Reminder message may display on the Driver Information Center when the vehicle is turned off. Check the rear seat before exiting the vehicle. The system does not actually detect people or items in the rear seat; instead, under certain conditions, it detects when a rear door has been opened, indicating that there may be something in the rear seat. See Seats and Restraints in your Owner’s Manual.
F Optional equipment
A
Page 18 of 24
18
REAR VISION CAMERA/SURROUND VISIONF
REAR VISION CAMERA
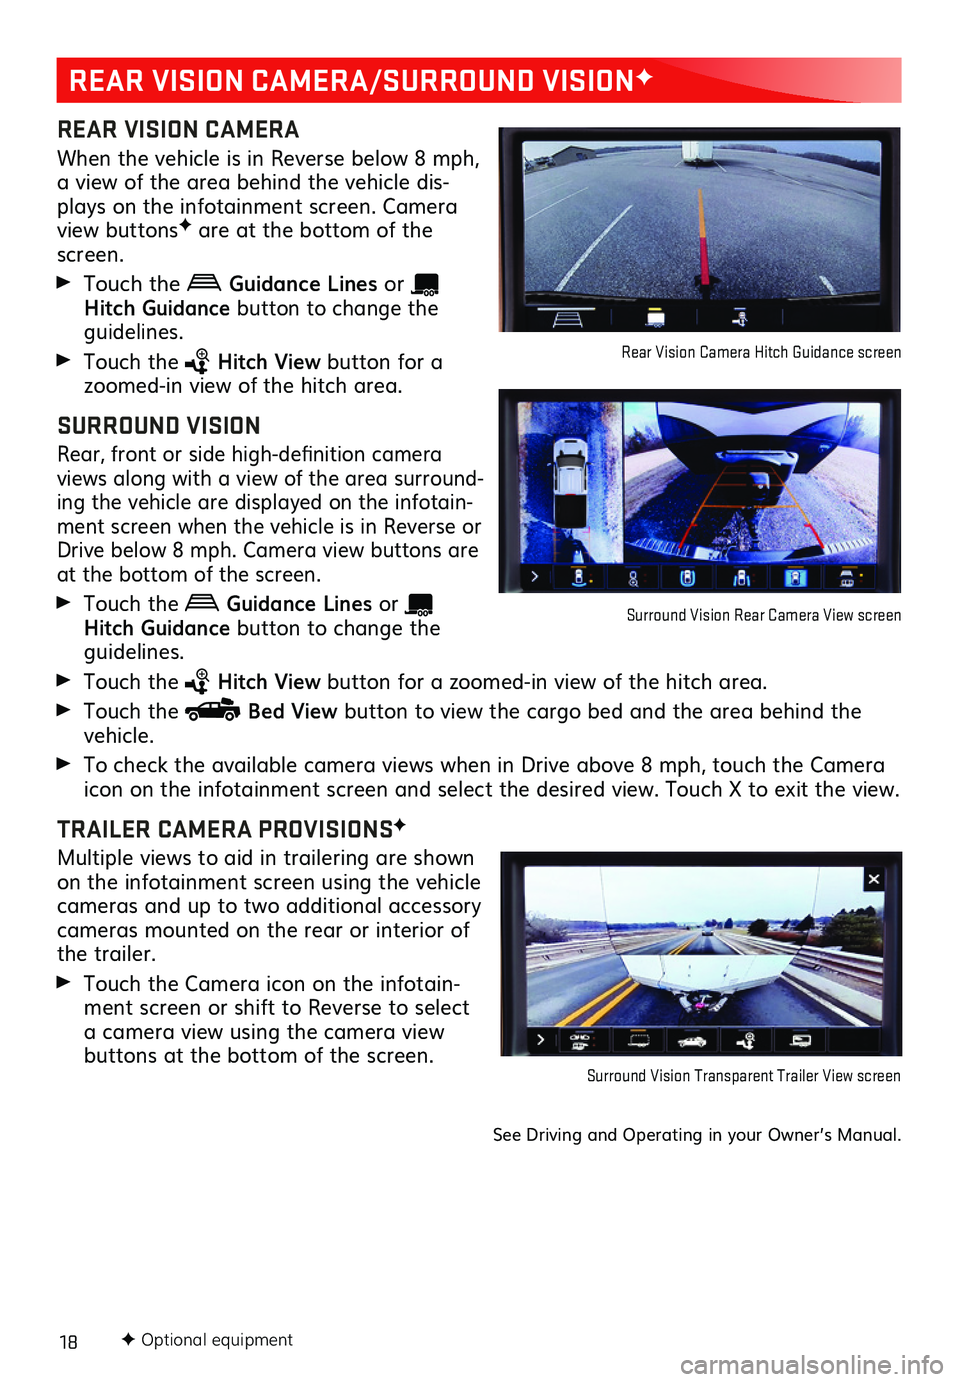
When the vehicle is in Reverse below 8 mph, a view of the area behind the vehicle dis-plays on the infotainment screen. Camera view buttonsF are at the bottom of the screen.
Touch the Guidance Lines or Hitch Guid ance button to change the guidelines.
Touch the Hitch View button for a zoomed-in view of the hitch area.
SURROUND VISION
Rear, front or side high-definition
camera views along with a view of the area surround-ing the vehicle are displayed on the infotain-ment screen when the vehicle is in Reverse or Drive below 8 mph. Camera view
buttons are at the bottom of the screen.
Touch the Guidance Lines or Hitch Guidance button to change the guidelines.
Touch the Hitch View button for a zoomed-in view of the hitch area.
Touch the Bed View button to view the cargo bed and the area behind the vehicle.
To check the available camera views when in Drive above 8 mph, touch the Camera icon on the
infotainment screen and select the desired view. Touch X to exit the view.
TRAILER CAMERA PROVISIONSF
Multiple views to aid in trailering are shown on the infotainment screen using the vehicle cameras and up to two additional accessory cameras mounted on the rear or interior of the trailer.
Touch the Camera icon on the infotain-ment screen or shift to Reverse to select a camera view using the camera view buttons at the bottom of the screen.
See Driving and Operating in your Owner’s Manual.
Surround Vision Transparent Trailer View screen
Rear Vision Camera Hitch Guidance screen
Surround Vision Rear Camera View screen
F Optional equipment
Page 22 of 24
22F Optional equipment
TRAILERINGF
TRAILERING APP
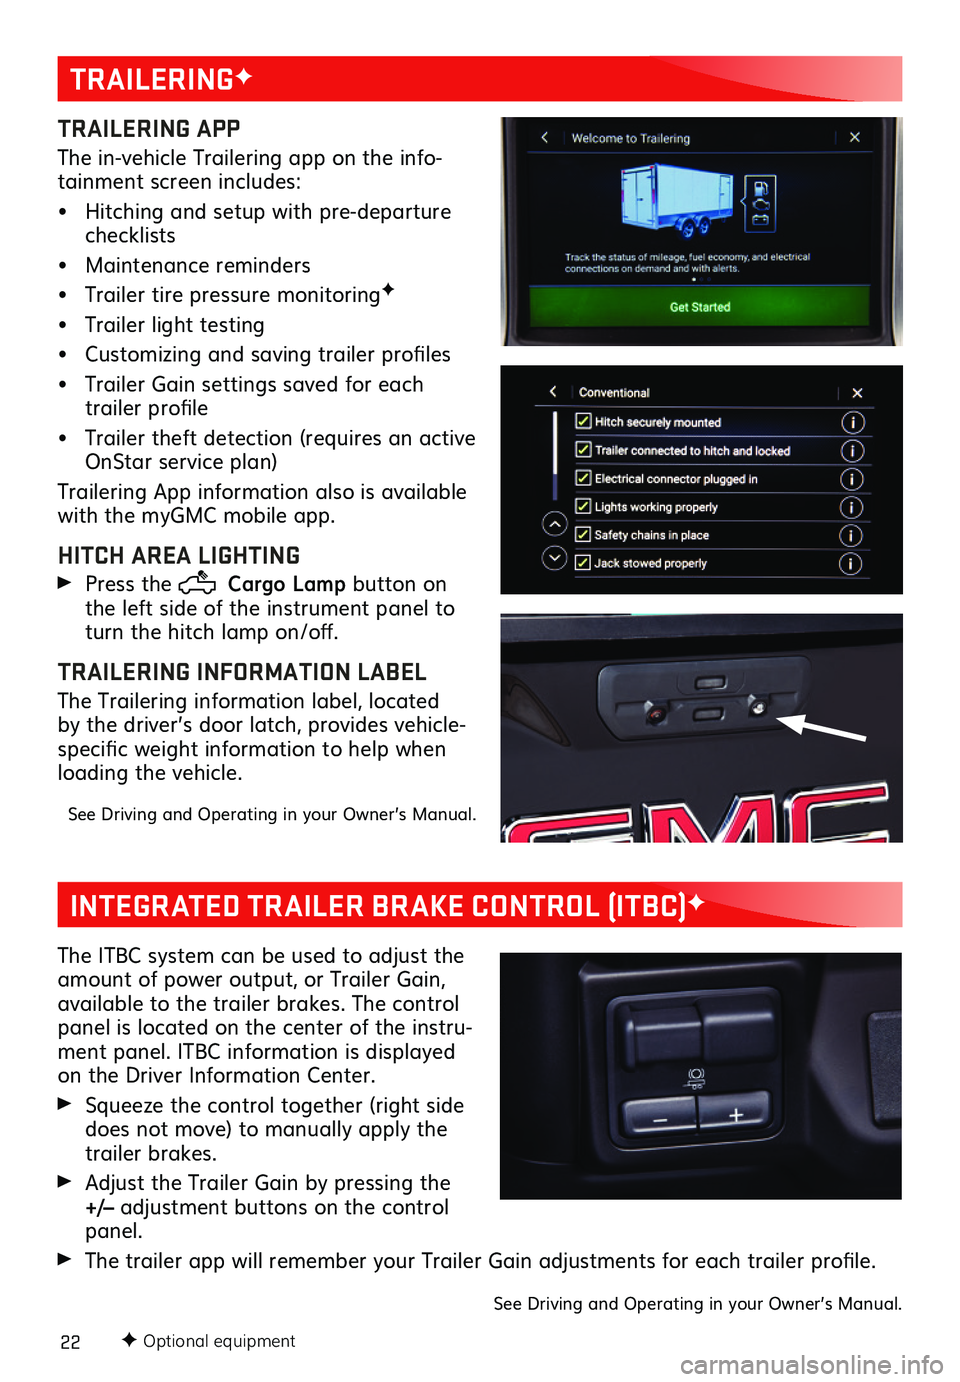
The in-vehicle Trailering app on the info-tainment screen includes:
• Hitching and setup with pre-departure checklists
• Maintenance reminders
• Trailer tire pressure monitoringF
• Trailer light testing
• Customizing and saving trailer profiles
• Trailer Gain settings saved for each trailer profile
• Trailer theft detection (requires an active OnStar service plan)
Trailering App information also is available with the myGMC mobile app.
HITCH AREA LIGHTING
Press the Cargo Lamp button on the left side of the instrument panel to turn the hitch lamp on/off.
TRAILERING INFORMATION LABEL
The Trailering information label, located by the driver’s door latch, provides vehicle-specific weight information to help when loading the vehicle.
See Driving and Operating in your Owner’s Manual.
INTEGRATED TRAILER BRAKE CONTROL (ITBC)F
The ITBC system can be used to adjust the amount of power output, or Trailer Gain, available to the trailer brakes. The control panel is located on the center of the instru-ment panel. ITBC information is displayed on the Driver Information Center.
Squeeze the control together (right side does not move) to manually apply the trailer brakes.
Adjust the Trailer Gain by pressing the +/– adjustment buttons on the control panel.
The trailer app will remember your Trailer Gain adjustments for each trailer profile.
See Driving and Operating in your Owner’s Manual.
Page 23 of 24
23
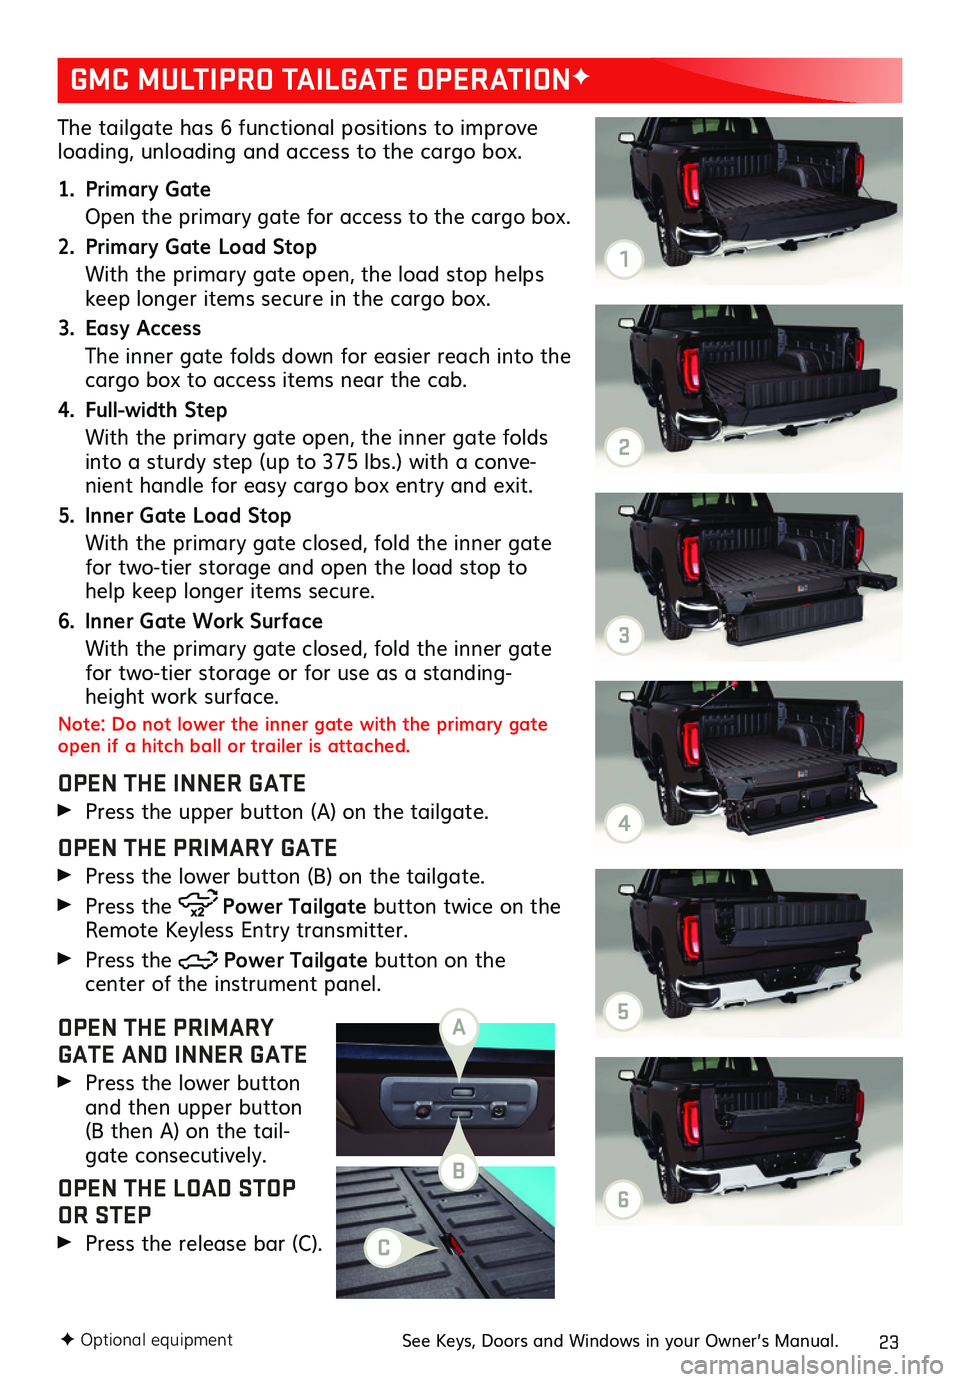
The tailgate has 6 functional positions to improve loading, unloading and access to the cargo box.
1. Primary Gate
Open the primary gate for access to the cargo box.
2. Primary Gate Load Stop
With the primary gate open, the load stop helps keep longer items secure in the cargo box.
3. Easy Access
The inner gate folds down for easier reach into the cargo box to access items near the cab.
4. Full-width Step
With the primary gate open, the inner gate folds into a sturdy step (up to 375 lbs.) with a conve-nient handle for easy cargo box entry and exit.
5. Inner Gate Load Stop
With the primary gate closed, fold the inner gate for two-tier storage and open the load stop to help keep longer items secure.
6. Inner Gate Work Surface
With the primary gate closed, fold the inner gate for two-tier storage or for use as a standing-height work surface.
Note: Do not lower the inner gate with the primary gate open if a hitch ball or trailer is attached.
OPEN THE INNER GATE
Press the upper button (A) on the tailgate.
OPEN THE PRIMARY GATE
Press the lower button (B) on the tailgate.
Press the Power Tailgate button twice on the Remote Keyless Entry transmitter.
Press the Power Tailgate button on the
center of the instrument panel.
OPEN THE PRIMARY GATE AND INNER GATE
Press the lower button and then upper button (B then A) on the tail-gate consecutively.
OPEN THE LOAD STOP OR STEP
Press the release bar (C).
GMC MULTIPRO TAILGATE OPERATIONF
F Optional equipmentSee Keys, Doors and Windows in your Owner’s Manual.
A
B
C
1
2
3
4
5
6