GMC SIERRA 2024 Owners Manual
Manufacturer: GMC, Model Year: 2024, Model line: SIERRA, Model: GMC SIERRA 2024Pages: 440, PDF Size: 9.21 MB
Page 301 of 440
GMC Sierra/Sierra Denali 2500 HD/3500 HD Owner Manual (GMNA-
Localizing-U.S./Canada-16908340) - 2024 - CRC - 12/13/22
Driving and Operating 299
.Trailer Width: 120 cm (47.2 in)–260 cm
(102.3 in). Measure from the left edge of
the trailer to the right edge.
.Trailer Height: 1 cm (0.39 in) –450 cm
(177.1 in). Measure from the ground to
tallest point of the trailer.
.Hitching Point Length: 180 cm (70.8 in) –
970 cm (381.8 in). Measure from the
center of the coupler to the middle of
tires.
.Trailer Tongue Length: 50 cm (19.6 in) –
220 cm (86.6 in). Measure from the center
of the coupler to the trailer front wall if
trailer has a flat front. If it does not have
a flat front, measure from the center of
the coupler to the point where the taper
meets the full width of the trailer.
.Vehicle Hitch Height: 10 cm (3.9 in) –
100 cm (39.3 in). Measure from the
ground to the top of coupler.
.Vehicle Hitch Length: 10 cm (3.9 in) –
100 cm (39.3 in). Measure from the hitch
receiver to the center of ball.
Dimensions for a bed hitch (gooseneck or
fifth wheel) trailer:
.Trailer Length: 300 cm (118.1 in) –2500 cm
(984.2 in). Measure from the front bottom
corner of the trailer to the furthest rear
point of the trailer.
.Trailer Box Width: 3 cm (1 in) –300 cm
(118.1 in). Measure the flat width at the
front bottom corners of the trailer.
.Hitching Point Length: 3 cm (1 in) –
1524 cm (600 in). Measure from the center
of the king pin (for fifth wheel) or coupler
(for gooseneck) to the middle of tires.
.Vehicle Cab to Trailer Length: 3 cm (1 in) –
610 cm (240.2 in). Measure from the back
of the vehicle cab to the front bottom
corner of the trailer.
.Vehicle Cab to Hitch Length: 3 cm (1 in) –
305 cm (120.1 in). Measure from the back
of vehicle cab to the center of the king
pin (for fifth wheel) or coupler (for
gooseneck).
Rear Trailer Guidance Setup
If equipped, a rear trailer camera must be
mounted on the trailer and electrically
connected to the vehicle before rear trailer
guidance feature can be used. See Assistance
Systems for Parking or Backing 0253.
Follow the on-screen instructions to enter
trailer dimensions.
Trailer dimensions must be in range to
enable this feature.
.Trailer Length: 300 cm (118.1 in) –1300 cm
(511.8 in). Measure from center of coupler
to furthest rear point on the trailer.
1. If trailer dimensions are out of range, this feature will be unavailable.
2. Ensure rear trailer camera is connected.
3. Follow the on-screen instructions to drive forward to complete calibration.
Jack-Knife Alert Setup
If equipped, follow the on-screen instructions
to drive forward to complete calibration.
Trailer Length Indicator Setup
If equipped, follow the on-screen instructions
to drive forward to complete calibration.
Trailer Side Blind Zone Alert Setup
If equipped, trailer dimensions must be in
range to enable this feature.
Follow the on-screen instructions to enter
trailer dimensions.
.Trailer Length: 300 cm (118.1 in) –1200 cm
(472.4 in). Measure from center of coupler
to furthest rear point on the trailer.
.Vehicle Hitch Length: 10 cm (3.9 in) –
100 cm (839.3 in). Measure from the hitch
receiver to the center of ball.
Page 302 of 440
GMC Sierra/Sierra Denali 2500 HD/3500 HD Owner Manual (GMNA-
Localizing-U.S./Canada-16908340) - 2024 - CRC - 12/13/22
300 Driving and Operating
If trailer dimensions are out of range, this
feature will be unavailable.
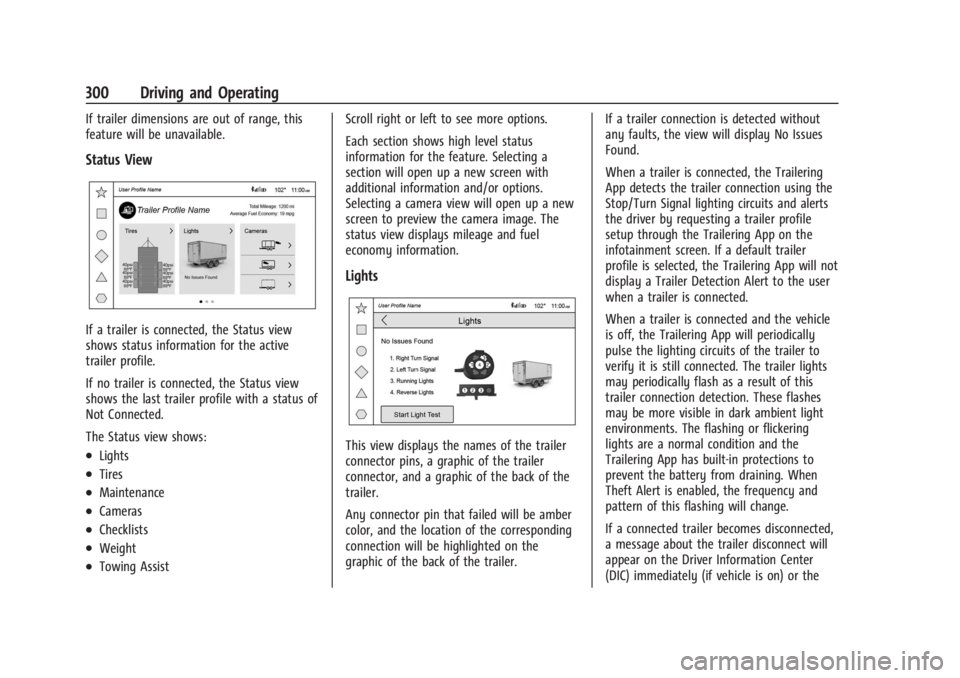
Status View
If a trailer is connected, the Status view
shows status information for the active
trailer profile.
If no trailer is connected, the Status view
shows the last trailer profile with a status of
Not Connected.
The Status view shows:
.Lights
.Tires
.Maintenance
.Cameras
.Checklists
.Weight
.Towing AssistScroll right or left to see more options.
Each section shows high level status
information for the feature. Selecting a
section will open up a new screen with
additional information and/or options.
Selecting a camera view will open up a new
screen to preview the camera image. The
status view displays mileage and fuel
economy information.
Lights
This view displays the names of the trailer
connector pins, a graphic of the trailer
connector, and a graphic of the back of the
trailer.
Any connector pin that failed will be amber
color, and the location of the corresponding
connection will be highlighted on the
graphic of the back of the trailer.
If a trailer connection is detected without
any faults, the view will display No Issues
Found.
When a trailer is connected, the Trailering
App detects the trailer connection using the
Stop/Turn Signal lighting circuits and alerts
the driver by requesting a trailer profile
setup through the Trailering App on the
infotainment screen. If a default trailer
profile is selected, the Trailering App will not
display a Trailer Detection Alert to the user
when a trailer is connected.
When a trailer is connected and the vehicle
is off, the Trailering App will periodically
pulse the lighting circuits of the trailer to
verify it is still connected. The trailer lights
may periodically flash as a result of this
trailer connection detection. These flashes
may be more visible in dark ambient light
environments. The flashing or flickering
lights are a normal condition and the
Trailering App has built-in protections to
prevent the battery from draining. When
Theft Alert is enabled, the frequency and
pattern of this flashing will change.
If a connected trailer becomes disconnected,
a message about the trailer disconnect will
appear on the Driver Information Center
(DIC) immediately (if vehicle is on) or the
Page 303 of 440

GMC Sierra/Sierra Denali 2500 HD/3500 HD Owner Manual (GMNA-
Localizing-U.S./Canada-16908340) - 2024 - CRC - 12/13/22
Driving and Operating 301
next time the vehicle is turned on (if trailer
was disconnected while vehicle is off). Check
your trailer connection if needed.
Connection Problem
If any of the trailer connections are lost, a
message about the connection issue appears
on the DIC. The infotainment screen will also
show the connection issue in the Lights
Status view.
Connection Trailer Lighting Faults Detected
The Trailering App monitors for electrical
faults on the trailer lights. A message about
the lighting issue appears on the DIC. The
infotainment screen will also show the
lighting issue in the Lights Status view.
Repair your trailer lights if needed. A trailer
lighting issue is not covered by your GM
warranty.
The Running Lights connection may not
detect partial outages. Activate the light test
to check all trailer lamps. See“Light Test”
following. Light Test
Touch Start Light Test to cycle the trailer
lights on and off to determine if they are
working. The test follows this sequence:
1. The running lights turn on first and remain on throughout the sequence.
2. The brake lights turn on for about two seconds.
3. The left turn signal light flashes three times.
4. The right turn signal light flashes three times.
5. The reverse lights turn on for about two seconds.
6. Steps 2-5 repeat for approximately one minute and 45 seconds, or until the
test deactivates.
Touch Stop to stop the test. The test will
automatically end after one minute and
45 seconds.
The sequence also deactivates when any of
the following occur:
.The vehicle is turned off.
.The transmission is shifted out of
P (Park).
.The brake pedal is pressed.
.The turn signal is activated.
.The hazard warning lights are activated.
Tires
Tire Pressure and Temperature
If the TTPMS sensor-to-vehicle learn process
was completed, the status view will display
the current tire pressure and temperature of
the trailer tires related to the active Trailer
Profile. If a tire’s pressure is low or high, the
color of the pressure value will be amber.
If a sensor malfunctions, the values are
dashed lines. If the screen displays “Service
Tire Pressure Monitoring System,” the
vehicle needs to be taken to a dealer for
service.
Touch to set up the TTPMS for the Trailer
Profile. See “Trailer Tire Pressure Setup”
previously in this section for details on the
setup. Also, touch Sensor Setup if the trailer
Page 304 of 440

GMC Sierra/Sierra Denali 2500 HD/3500 HD Owner Manual (GMNA-
Localizing-U.S./Canada-16908340) - 2024 - CRC - 12/13/22
302 Driving and Operating
tires were rotated or if the tire pressure
sensors in the tires were replaced for this
Trailer Profile. The vehicle will need to
relearn the tire sensors and their locations.
See“Trailer Tire Pressure Setup” previously
in this section.
Touch Edit Target Pressure to change the
recommended tire pressure for the trailer
tires. This will change the number at which
the vehicle displays alerts related to trailer
tire pressure.
Maintenance
Touch to view a list of maintenance
reminders for the Trailer Profile.
The Maintenance Status view displays
reminders for the Trailer Profile. Touch a
reminder to view, reset, delete, or edit it. Resetting a reminder will reset the time and
mileage values for the reminder. The
progress bar turns yellow when the
maintenance item reaches 90% complete.
The progress bar turns red when the
maintenance item reaches 100% complete.
Touch New Reminder to add a new
maintenance reminder.
Suggested reminders that were previously
set will not appear. Suggested reminders
that have not been set have empty boxes
next to them. The maximum number of
reminders is 50.
Maintenance Notifications
Touch Reset to reset time and mileage
values for the reminder.
Touch Remind Me Later to delay the
reminder.
If an Upcoming Alert (90%) is dismissed, it
will not appear again.
If a Maintenance Due Alert (100%) is
dismissed, it will appear when the vehicle is
turned off and back on again.
Always follow all of the maintenance
instructions that came with your trailer.
Cameras
This view shows a preview of the selected
camera view. Touch X to exit the preview.
Touch the camera icon to open the
camera app.
Checklist View
This view shows the recommended steps to
take before towing a trailer.
Page 305 of 440

GMC Sierra/Sierra Denali 2500 HD/3500 HD Owner Manual (GMNA-
Localizing-U.S./Canada-16908340) - 2024 - CRC - 12/13/22
Driving and Operating 303
Touch the box next to each item if that step
has been completed.
Touch
4to access a detailed view of each
step. Within each detailed view, touch Next
and Previous to navigate between steps.
Touch Clear All to clear the completed
statuses from all items in the current
checklist.
Custom Checklist Items
For each of the Trailer Profile checklists,
there is an option to create custom items to
view in the checklist. The custom item will
appear at the bottom of the checklist.
Guest Trailer and No Trailer Connected
If a Guest Trailer Profile is active, or if no
trailer is connected, the checklist will show
all of the checklists associated with Custom
Trailer Profiles in addition to default
checklist.
Weight
Touch to turn on or off the Gross Combined
Weight (GCW).
When on, an alert may be presented when
the combined weight of the vehicle and
trailer may exceed the vehicle’s Gross Combined Weight Rating (GCWR). For more
information on the GCW Alert, see
Trailer
Towing 0280.
Towing Assist
A trailer should be connected to complete
this portion of profile setup.
Touch to set up towing assist features for
the Trailer Profile. See "Towing Assist" for
details on the setup.
Guest Trailer Status View
If the Guest Trailer Profile is active, the
Status view shows:
.Lights
.Cameras
.Checklist
.Weight
Scroll right or left to see more options.
The Trailer Status view displays mileage and
fuel economy information. Mileage and fuel
economy will reset after the trailer
disconnects.
Accessory/No Trailer Status View
If the Accessory/No Trailer profile is active,
trailer status information is not available.
Trailers View
Touch the trailer profile icon/name in the
Status View to view, activate, create, edit,
or delete Trailer Profiles.
If a trailer is connected, touch the Trailer
Profile name to activate a Trailer Profile.
There can be up to five Custom Trailer
Profiles on the vehicle.
The Custom Trailer Profiles and Guest Trailer
are in order of the most frequently used.
The Accessory/No Trailer profile is shown
below the Custom Trailer Profiles and Guest
Trailer Profile.
Guest Trailer
If the Guest Trailer Profile is the active
Trailer Profile, trailer detection, lights/
connections status, theft, and the Tow/Haul
reminder alerts can be sent. The system will
not track total mileage or fuel economy, but
the system will track trip mileage and fuel
economy if the Guest Trailer Profile is active.
The TTPMS or maintenance reminders
cannot be set up for a Guest Trailer Profile.
The Guest Trailer Profile cannot be edited.
Page 306 of 440

GMC Sierra/Sierra Denali 2500 HD/3500 HD Owner Manual (GMNA-
Localizing-U.S./Canada-16908340) - 2024 - CRC - 12/13/22
304 Driving and Operating
Accessory/No Trailer
If the Accessory/No Trailer Profile is active,
alerts will not be sent and the system will
not track mileage or fuel economy. The
TTPMS or maintenance reminders cannot be
set up for the Accessory/No Trailer Profile.
The Accessory/No Trailer profile cannot be
edited.
No Trailer Connected
When there is no trailer connected, Trailer
Profiles cannot be activated but most
options can be edited.
Trailer Brake Gain Memory
The system can store the brake gain setting
of a Trailer Profile or a Guest Trailer Profile.
When a Trailer Profile or Guest Trailer Profile
is selected, and a brake gain setting is set
for that Trailer Profile, the system will recall
the stored brake gain value.
If a Trailer Profile is already active and the
brake gain setting has been set for that
Trailer Profile, the system will recall the
brake gain value whenever the vehicle is
turned on.If there was an error in setting the brake
gain for a Trailer Profile, there will be a
notification. This pop-up will not appear if
the Guest Trailer Profile is active or if there
is no trailer connected.
Trailer brake gain should be set for a specific
trailering condition and must be adjusted
anytime vehicle loading, trailer loading,
or road surface conditions change.
Editing a Trailer Profile
Touch the trailer profile icon/name in the
Status View to access the Trailer
Profile view:
.Trailer Name
.Total Mileage
.Average Fuel Economy
.Set as Default Trailer
.GCW Alert
.Tow/Haul Mode Reminder Alert
.Theft Alert
.Maintenance Alert
.Delete/Remove Trailer
Trailer Name
Touch to edit the Trailer Profile’s name. Use
at least one character and no spaces.
Total Mileage
Touch to edit the Trailer Profile’s mileage.
Touch Reset to reset trailer mileage to zero,
or enter a new value and touch Save.
Effect on Maintenance Reminders
If the mileage is reset or changed, and
mileage has already accumulated, any
maintenance reminders that have been set
up will be adjusted accordingly.
Average Fuel Economy
Touch to reset the average fuel economy for
the trailer profile. Touch Reset to reset fuel
economy.
Delete/Remove Trailer
Touch to remove the Trailer Profile and all
of its settings.
Page 307 of 440
GMC Sierra/Sierra Denali 2500 HD/3500 HD Owner Manual (GMNA-
Localizing-U.S./Canada-16908340) - 2024 - CRC - 12/13/22
Driving and Operating 305
On the pop-up, touch Remove to remove the
Trailer Profile from the vehicle. Touch Cancel
to dismiss the pop-up and return to the
previous view.
Remove is displayed if there is a connected
OnStar plan active with the vehicle.
Removing a trailer profile will remove the
profile from the vehicle but the profile will
still be associated with the user account.
However, if there is not a connected OnStar
plan, then the remove button will read
DELETE and the profile will be deleted
permanently.
Set as Default Trailer
Touch Set as Default Trailer to select the
current profile as default.
The default Trailer profile will be
automatically selected each time a new
connection is detected. The Trailer Detection
Alert will no longer appear.
If this setting is turned off, the current
trailer profile is not the default trailer.GCW Alerts
Touch GCW Alert to turn on/off the GCW
Alert for the selected profile. These alerts
are based on the Trailer Profile, so the
settings for each Trailer Profile must be
turned on or off.
Turn this setting off to not receive GCW
Alerts in the DIC when that Trailer Profile is
active.
Maintenance Alerts
Touch Maintenance Alert to turn on/off
Maintenance Alerts for the selected profile.
These alerts are based on the Trailer Profile,
so the settings for each Trailer Profile must
be turned on or off.
All Maintenance Alerts for that active Trailer
Profile will be received when the setting
is on.
Turn this setting off to dismiss Maintenance
Alerts when that Trailer Profile is active.
Theft Alert
Theft alert can be set if a trailer is
connected and the alert is enabled. When
the trailer is disconnected and the vehicle is
off, an alarm will sound.Touch Theft Alert to turn on/off Theft Alerts
for the selected profile. These alerts are
based on the Trailer Profile, so the settings
for each Trailer Profile must be turned on
or off.
A smartphone will receive a notification that
the trailer related to the selected Trailer
Profile is disconnected from the vehicle,
if the setting is on for the active Trailer
Profile, the vehicle has an OnStar or
connected service plan and the smartphone
number has been added to the account for
this notification.
If the setting is turned off for a given Trailer
Profile, the smartphone will not receive this
security notification even if the Trailer
Profile is active.
Tow/Haul Mode Reminder
This is a reminder to turn on the Tow/Haul
Mode when towing a trailer. See
Driver
Mode Control 0238.
Touch Tow/Haul Mode Reminder to turn
on/off Tow/Haul Mode reminders for the
selected profile. These alerts are based on
the Trailer Profile, so the settings for each
Trailer Profile must be turned on or off.
Page 308 of 440
GMC Sierra/Sierra Denali 2500 HD/3500 HD Owner Manual (GMNA-
Localizing-U.S./Canada-16908340) - 2024 - CRC - 12/13/22
306 Driving and Operating
If Tow/Haul Mode is off and this setting is
on for a Trailer Profile, each time the vehicle
is turned on, a reminder will appear in the
DIC to turn on Tow/Haul Mode when the
Trailer Profile is active.
If Tow/Haul Mode is on and this setting is
on for a Trailer Profile, the reminder will not
appear when the Trailer Profile is active.
Conversions and Add-Ons
Add-On Electrical Equipment
{Warning
The Data Link Connector (DLC) is used for
vehicle service and Emission Inspection/
Maintenance testing. SeeMalfunction
Indicator Lamp (Check Engine Light) 0122.
A device connected to the DLC —such as
an aftermarket fleet or driver-behavior
tracking device —may interfere with
vehicle systems. This could affect vehicle
operation and cause a crash. Such devices
may also access information stored in the
vehicle’s systems.
Caution
Some electrical equipment can damage
the vehicle or cause components to not
work and would not be covered by the
vehicle warranty. Always check with your
dealer before adding electrical equipment.
Add-on equipment can drain the vehicle's
12-volt battery, even if the vehicle is not
operating.
The vehicle has an airbag system. Before
attempting to add anything electrical to the
vehicle, see Servicing the Airbag-Equipped
Vehicle 073 and
Adding Equipment to the Airbag-Equipped
Vehicle 073.
For information on wiring auxiliary switches,
see www.gmupfitter.com or contact your
dealer.
Adding a Snow Plow or Similar
Equipment
Caution
Do not exceed 72 km/h (45 mph) with a
snow plow mounted to the vehicle. The
vehicle could overheat and be damaged.
Before installing a snow plow on the vehicle,
follow these guidelines:
Caution
If the vehicle does not have the snow
plow prep package, RPO VYU, adding a
plow can damage the vehicle, and the
repairs would not be covered by the
vehicle warranty. Unless the vehicle was
built to carry a snow plow, do not add
one to the vehicle. If the vehicle has RPO
VYU, then the payload the vehicle can
carry will be reduced when a snow plow
is installed. The vehicle can be damaged
if either the front or rear axle ratings or
the Gross Vehicle Weight Rating (GVWR)
are exceeded.
Page 309 of 440
GMC Sierra/Sierra Denali 2500 HD/3500 HD Owner Manual (GMNA-
Localizing-U.S./Canada-16908340) - 2024 - CRC - 12/13/22
Driving and Operating 307
The plow the vehicle can carry depends on
many things, such as:
.The options the vehicle came with, and
the weight of those options.
.The weight and number of passengers to
be carried.
.The weight of items added to the vehicle,
like a tool box or truck cap.
.The total weight of any additional cargo
to be carried.
To safely carry a snow plow on the vehicle:
.With a snow plow attached, the engine
coolant temperature gauge may show a
higher temperature than while driving
without one. The snow plow could block
the airflow to the radiator. This could be
more noticeable as vehicle speed
increases. At speeds above 72 km/h
(45 mph), this may cause the engine
coolant to overheat. Move or angle the
snow plow blade to allow increased
airflow to the radiator.
.To increase the airflow, move the snow
plow blade position.
.If driving more than 24 km/h (15 mph),
angle the plow blade position.
.Make sure the weight on the front and
rear axles does not exceed the axle rating
for each.
.Follow the snowplow manufacturer’s
recommendations for any rear ballast that
may be required. Rear ballast may be
required to ensure a proper front and rear
weight distribution ratio even though the
actual weight at the front axle may be
less than the front axle rating.
.The snowplow manufacturer or installer
can assist in determining the amount of
rear ballast required to ensure that the
vehicle with the attached snowplow does
not exceed the GVW rating, the front and
rear axle ratings, or the front and rear
weight distribution ratio (refer to the GM
Upfitter Manual).
Front axle reserve capacity is the difference
between the Front Gross Axle Weight
Rating (GAWR) and the front axle weight of
the vehicle with full fuel, passengers, and
any other cargo. This is the amount of
weight that can be added to the front axle
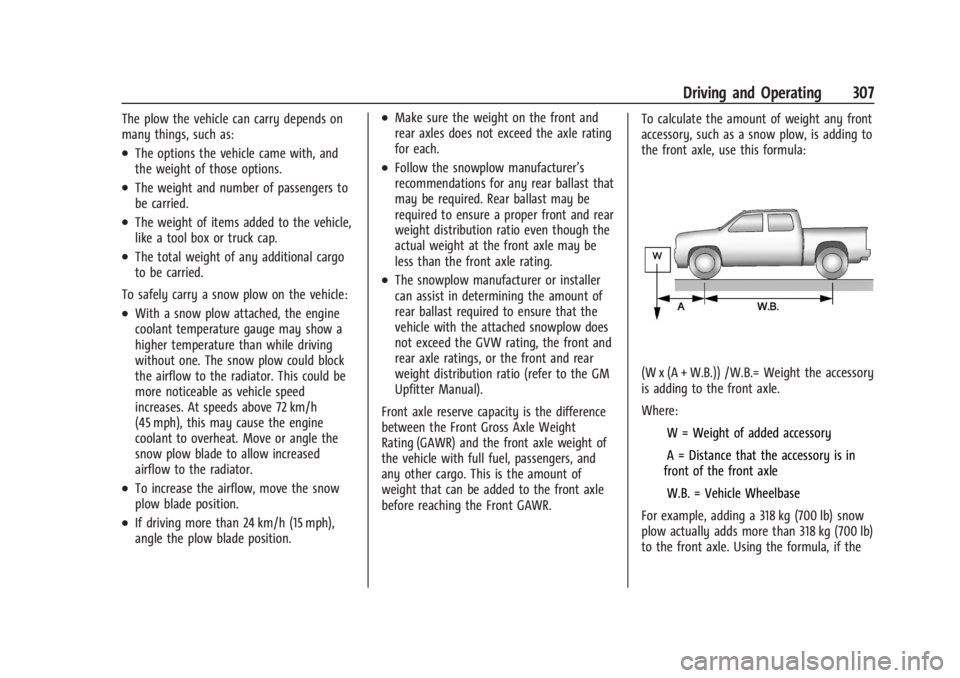
before reaching the Front GAWR. To calculate the amount of weight any front
accessory, such as a snow plow, is adding to
the front axle, use this formula:
(W x (A + W.B.)) /W.B.= Weight the accessory
is adding to the front axle.
Where:
IW = Weight of added accessory
IA = Distance that the accessory is in
front of the front axle
IW.B. = Vehicle Wheelbase
For example, adding a 318 kg (700 lb) snow
plow actually adds more than 318 kg (700 lb)
to the front axle. Using the formula, if the
Page 310 of 440
GMC Sierra/Sierra Denali 2500 HD/3500 HD Owner Manual (GMNA-
Localizing-U.S./Canada-16908340) - 2024 - CRC - 12/13/22
308 Driving and Operating
snow plow is 122 cm (4 ft) in front of the
front axle and the wheelbase is 305 cm
(10 ft), then:IW = 318 kg (700 lb)
IA = 122 cm (4 ft)
IW.B. = 305 cm (10 ft)
(W x (A + W.B.)/W.B. = (318 x (122 + 305))/305
= 445 kg (980 lb)
This means if the front axle reserve capacity
is more than 445 kg (980 lb), the snow plow
could be added without exceeding the
front GAWR.
Heavier equipment can be added on the
front of the vehicle if less cargo or fewer
passengers are carried, or by positioning
cargo toward the rear. This reduces the load
on the front. However, the front GAWR, rear
GAWR, and Gross Vehicle Weight
Rating (GVWR) must never be exceeded.{Warning
On some vehicles that have certain front
mounted equipment, such as a snow
plow, it may be possible to load the front
axle to the front Gross Axle Weight
Rating (GAWR) but not have enough
weight on the rear axle to have proper
braking performance. If the brakes cannot
work properly, the vehice could crash.
Always follow the snow plow
manufacturer or installer's
recommendation for rear ballast to
ensure a proper front and rear weight
distribution ratio. Maintaining a proper
front and rear weight distribution ratio is
necessary to provide proper braking
performance.
See your dealer for additional advice and
information about using a snow plow on the
vehicle. Also, see Vehicle Load Limits 0210.
Pickup Conversion to Chassis Cab
We are aware that some vehicle owners
might consider having the pickup box
removed and a commercial or recreational
body installed. Owners should be aware
that, as manufactured, there are differences
between a chassis cab and a pickup with the
box removed which could affect vehicle
safety. The components necessary to adapt
a pickup to permit its safe use with a
specialized body should be installed by the
body builder.