run flat GMC SIERRA 2024 Owners Manual
[x] Cancel search | Manufacturer: GMC, Model Year: 2024, Model line: SIERRA, Model: GMC SIERRA 2024Pages: 440, PDF Size: 9.21 MB
Page 94 of 440
GMC Sierra/Sierra Denali 2500 HD/3500 HD Owner Manual (GMNA-
Localizing-U.S./Canada-16908340) - 2024 - CRC - 12/7/22
92 Seats and Restraints
Securing Child Restraints (With
the Seat Belt in the Center
Front Seat)
{Warning
A child in a child restraint in the center
front seat can be badly injured or killed
by the frontal airbags if they inflate.
Never secure a child restraint in the
center front seat. It is always better to
secure a child restraint in a rear seat.
Do not use child restraints in the center
front seat position.
Securing Child Restraints (With
the Seat Belt in the Rear Seat)
When securing a child restraint with the
seat belts in a rear seat position, study the
instructions that came with the child
restraint to make sure it is compatible with
this vehicle.
If the child restraint has the LATCH system,
see Lower Anchors and Tethers for Children
(LATCH System) 081 for how and where to
install the child restraint using LATCH. If a
child restraint is secured in the vehicle using a seat belt and it uses a top tether, see
Lower Anchors and Tethers for Children
(LATCH System)
081 for top tether anchor
locations.
Do not secure a child seat in a position
without a top tether anchor if a national or
local law requires that the top tether be
anchored, or if the instructions that come
with the child restraint say that the top
tether must be anchored. Refer to the
instructions that came with the child
restraint and see Lower Anchors and Tethers
for Children (LATCH System) 081.
In Canada, the law requires that
forward-facing child restraints have a top
tether, and that the tether be attached.
If the child restraint or vehicle seat position
does not have the LATCH system, you will
be using the seat belt to secure the child
restraint. Be sure to follow the instructions
that came with the child restraint.
If more than one child restraint needs to be
installed in the rear seat, be sure to read
Where to Put the Restraint 080.
Double Cab
1. Remove the head restraint or headrest
prior to installing a forward-facing child
restraint in an outboard rear seating position. See
“Head Restraint or Headrest
Removal and Reinstallation” underLower
Anchors and Tethers for Children (LATCH
System) 081.
2. Put the child restraint on the seat.
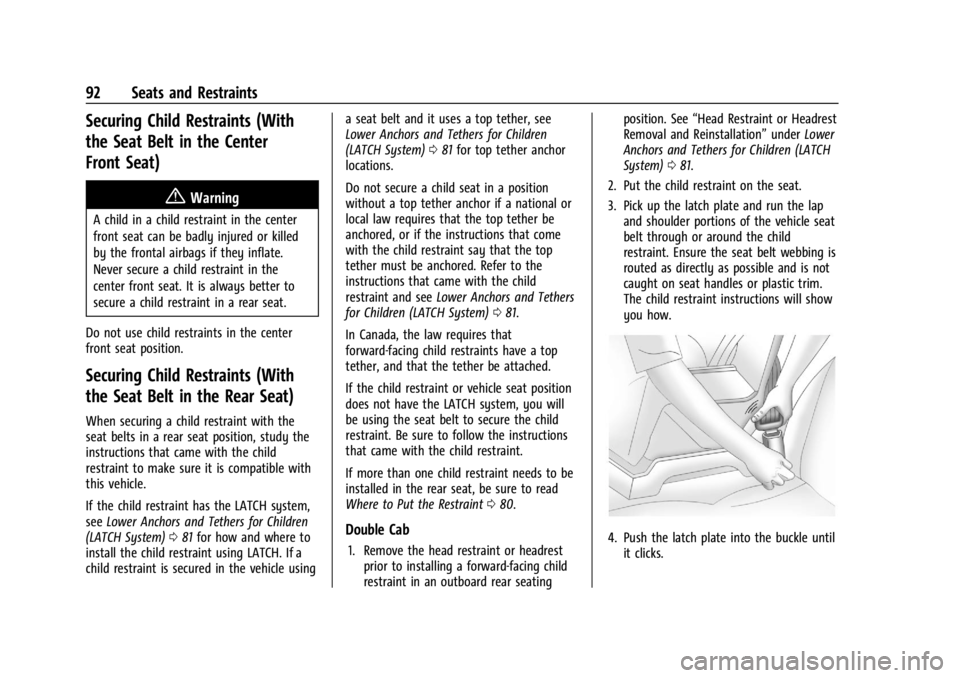
3. Pick up the latch plate and run the lap and shoulder portions of the vehicle seat
belt through or around the child
restraint. Ensure the seat belt webbing is
routed as directly as possible and is not
caught on seat handles or plastic trim.
The child restraint instructions will show
you how.4. Push the latch plate into the buckle untilit clicks.
Page 124 of 440

GMC Sierra/Sierra Denali 2500 HD/3500 HD Owner Manual (GMNA-
Localizing-U.S./Canada-16908340) - 2024 - CRC - 12/15/22
122 Instruments and Controls
will light either ON or OFF, or either the on
or off symbol, to let you know the status of
the front outboard passenger frontal airbag.
If the word ON or the on symbol is lit on
the passenger airbag status indicator, it
means that the front outboard passenger
frontal airbag is allowed to inflate.
If the word OFF or the off symbol is lit on
the passenger airbag status indicator, it
means that the passenger sensing system
has turned off the front outboard passenger
frontal airbag.
If, after several seconds, both status
indicator lights remain on, or if there are no
lights at all, or if the airbag readiness light
is on, there may be a problem with the
lights or the passenger sensing system. See
your dealer for service right away.
{Warning
If the airbag readiness light ever comes
on and stays on, it means that
something may be wrong with the airbag
system. To help avoid injury to yourself
or others, have the vehicle serviced right(Continued)
Warning (Continued)
away. SeeAirbag Readiness Light 0121
for more information, including important
safety information.
Charging System Light
The charging system light comes on briefly
when the ignition is turned on, but the
engine is not running, as a check to show
the light is working. It should go out when
the engine is started.
If the light stays on, or comes on while
driving, there may be a problem with the
electrical charging system. Have it checked
by your dealer. Driving while this light is on
could drain the battery.
When this light comes on, or is flashing, the
Driver Information Center (DIC) also displays
a message. If a short distance must be driven with the
light on, be sure to turn off all accessories,
such as the radio and air conditioner. Find a
safe place to stop the vehicle.
Malfunction Indicator Lamp
(Check Engine Light)
This light is part of the vehicle’s emission
control on-board diagnostic system. If this
light is on while the engine is running, a
malfunction has been detected and the
vehicle may require service. The light should
come on to show that it is working when
the ignition is on and the engine is not
running. See
Ignition Positions 0216.
Malfunctions are often indicated by the
system before any problem is noticeable.
Being aware of the light and seeking service
promptly when it comes on may prevent
damage.
Page 131 of 440

GMC Sierra/Sierra Denali 2500 HD/3500 HD Owner Manual (GMNA-
Localizing-U.S./Canada-16908340) - 2024 - CRC - 12/15/22
Instruments and Controls 129
Tire Pressure Light
If equipped with the Tire Pressure Monitor
System (TPMS), this light comes on briefly
when the vehicle is started. It provides
information about tire pressures and
the TPMS.
When the Light Is On Steady
This indicates that one or more of the tires
are significantly underinflated.
A Driver Information Center (DIC) tire
pressure message may also display. Stop as
soon as possible, and inflate the tires to the
pressure value shown on the Tire and
Loading Information label. SeeTire Pressure
0 350.
When the Light Flashes First and Then Is On
Steady
If the light flashes for about a minute and
then stays on, there may be a problem with
the TPMS. If the problem is not corrected, the light will come on every time the
vehicle is started. See
Tire Pressure Monitor
Operation 0351.
Engine Oil Pressure Light (Uplevel
Cluster)
Caution
Driving the vehicle with low engine oil
pressure can damage the engine and the
repairs would not be covered by the
vehicle warranty.
If the engine oil pressure light comes on
while driving:
1. Stop in a safe location and turn off the engine.
2. Check the oil level. See Engine Oil
0 314.
3. Add oil if the oil level is below the normal operating range.
4. Restart the vehicle. If the engine oil pressure light stays on for more
than 10 seconds, turn the vehicle
back off. Do not restart the vehicle.
See your dealer for service.
This light should come on briefly when the
engine starts. When the engine is off and
the vehicle is on, the light should remain
illuminated. If it does not come on under
either condition, contact your dealer.
If the light comes on and stays on when the
engine is running, it may not have adequate
oil pressure. The oil level may be low or
there may be some other oil system
problem. Turn the engine off when it is safe
to do so and contact your dealer.
Low Fuel Warning Light
A Low Fuel Warning Light near the fuel
gauge comes on briefly when the ignition is
turned on as a check to show it is working.
Page 209 of 440
GMC Sierra/Sierra Denali 2500 HD/3500 HD Owner Manual (GMNA-
Localizing-U.S./Canada-16908340) - 2024 - CRC - 12/13/22
Driving and Operating 207
Hydroplaning
Hydroplaning is dangerous. Water can build
up under the vehicle's tires so they actually
ride on the water. This can happen if the
road is wet enough and you are going fast
enough. When the vehicle is hydroplaning, it
has little or no contact with the road.
There is no hard and fast rule about
hydroplaning. The best advice is to slow
down when the road is wet.
Other Rainy Weather Tips
Besides slowing down, other wet weather
driving tips include:
.Allow extra following distance.
.Pass with caution.
.Keep windshield wiping equipment in
good shape.
.Keep the windshield washer fluid reservoir
filled.
.Have good tires with proper tread depth.
SeeTires 0345.
.Turn off cruise control.
Hill and Mountain Roads
Driving on steep hills or through mountains
is different than driving on flat or rolling
terrain. Tips include:
.Keep the vehicle serviced and in good
shape.
.Check all fluid levels and brakes, tires, and
cooling system.
.Shift to a lower gear when going down
steep or long hills.
{Warning
Using the brakes to slow the vehicle on a
long downhill slope can cause brake
overheating, can reduce brake
performance, and could result in a loss of
braking. Shift the transmission to a lower
gear to let the engine assist the brakes
on a steep downhill slope.
{Warning
Coasting downhill in N (Neutral) or with
the ignition off is dangerous. This can
cause overheating of the brakes and loss
of steering assist. Always have the engine
running and the vehicle in gear.
.Drive at speeds that keep the vehicle in
its own lane. Do not swing wide or cross
the center line.
.Be alert on top of hills; something could
be in your lane (e.g., stalled car, crash).
.Pay attention to special road signs
(e.g., falling rocks area, winding roads,
long grades, passing or no-passing zones)
and take appropriate action.
Winter Driving
Driving on Snow or Ice
Caution
To avoid damage to the wheels and
brake components, always clear snow and
ice from inside the wheels and
underneath the vehicle before driving.
Snow or ice between the tires and the road
creates less traction or grip, so drive
carefully. Wet ice can occur at about 0 °C
(32 °F) when freezing rain begins to fall.
Avoid driving on wet ice or in freezing rain
until roads can be treated.
Page 373 of 440
GMC Sierra/Sierra Denali 2500 HD/3500 HD Owner Manual (GMNA-
Localizing-U.S./Canada-16908340) - 2024 - CRC - 12/7/22
Vehicle Care 371
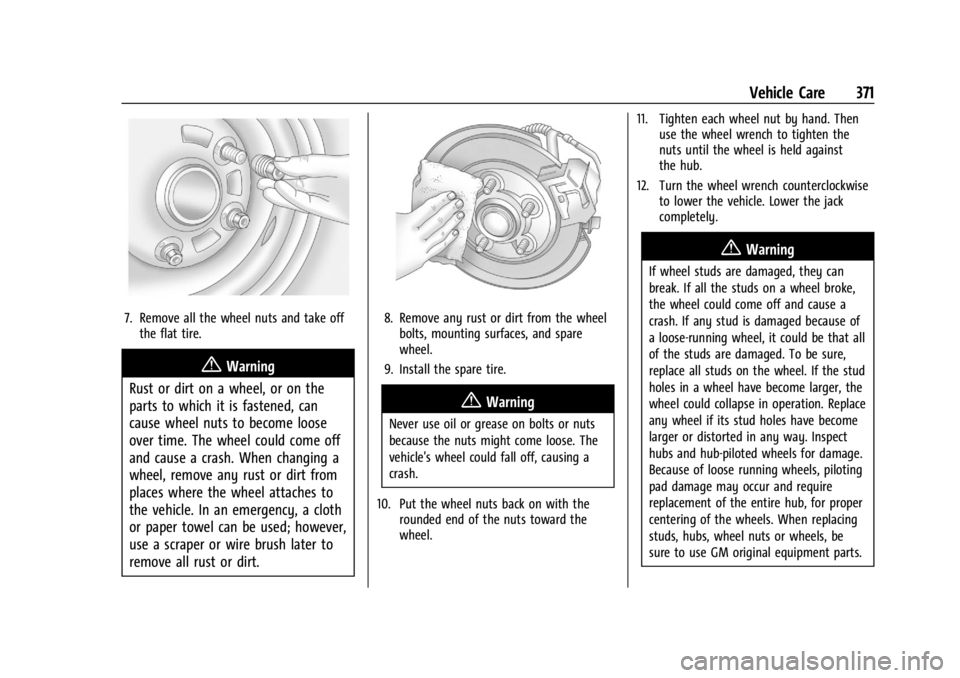
7. Remove all the wheel nuts and take offthe flat tire.
{Warning
Rust or dirt on a wheel, or on the
parts to which it is fastened, can
cause wheel nuts to become loose
over time. The wheel could come off
and cause a crash. When changing a
wheel, remove any rust or dirt from
places where the wheel attaches to
the vehicle. In an emergency, a cloth
or paper towel can be used; however,
use a scraper or wire brush later to
remove all rust or dirt.
8. Remove any rust or dirt from the wheel bolts, mounting surfaces, and spare
wheel.
9. Install the spare tire.
{Warning
Never use oil or grease on bolts or nuts
because the nuts might come loose. The
vehicle's wheel could fall off, causing a
crash.
10. Put the wheel nuts back on with the rounded end of the nuts toward the
wheel. 11. Tighten each wheel nut by hand. Then
use the wheel wrench to tighten the
nuts until the wheel is held against
the hub.
12. Turn the wheel wrench counterclockwise to lower the vehicle. Lower the jack
completely.
{Warning
If wheel studs are damaged, they can
break. If all the studs on a wheel broke,
the wheel could come off and cause a
crash. If any stud is damaged because of
a loose-running wheel, it could be that all
of the studs are damaged. To be sure,
replace all studs on the wheel. If the stud
holes in a wheel have become larger, the
wheel could collapse in operation. Replace
any wheel if its stud holes have become
larger or distorted in any way. Inspect
hubs and hub‐piloted wheels for damage.
Because of loose running wheels, piloting
pad damage may occur and require
replacement of the entire hub, for proper
centering of the wheels. When replacing
studs, hubs, wheel nuts or wheels, be
sure to use GM original equipment parts.
Page 378 of 440
GMC Sierra/Sierra Denali 2500 HD/3500 HD Owner Manual (GMNA-
Localizing-U.S./Canada-16908340) - 2024 - CRC - 12/7/22
376 Vehicle Care
Caution
If the vehicle has four-wheel drive and a
different size spare tire is installed, do
not drive in four-wheel drive until the flat
tire is repaired and/or replaced. The
vehicle could be damaged and the repairs
would not be covered by the warranty.
Never use four-wheel drive when a
different size spare tire is installed on the
vehicle.
The vehicle may have a different size spare
tire than the road tires originally installed
on the vehicle. This spare tire was developed
for use on this vehicle, so it is all right to
drive on it. If the vehicle has four-wheel
drive and a different size spare tire is
installed, drive only in two-wheel drive.
If the vehicle has a spare tire that does not
match the vehicle’s original road tires and
wheels, in size and type, do not include the
spare in the tire rotation.
Jump Starting
Jump Starting - North America
For more information about the vehicle
battery, see Battery - North America 0327.
If the vehicle's battery (or batteries) has run
down, you may want to use another vehicle
and some jumper cables to start your
vehicle. Be sure to use the following steps
to do it safely.
{Warning
WARNING: Battery posts, terminals and
related accessories can expose you to
chemicals including lead and lead
compounds, which are known to the
State of California to cause cancer and
birth defects or other reproductive harm.
Wash hands after handling. For more
information go to
www.P65Warnings.ca.gov.
See California Proposition 65 Warning 01.
{Warning
Batteries can hurt you. They can be
dangerous because:
.They contain acid that can burn you.
.They contain gas that can explode or
ignite.
.They contain enough electricity to
burn you.
If you do not follow these steps exactly,
some or all of these things can hurt you.
Caution
Ignoring these steps could result in costly
damage to the vehicle that would not be
covered by the vehicle warranty. Trying
to start the vehicle by pushing or pulling
it will not work, and it could damage the
vehicle.
Caution
If the jumper cables are connected or
removed in the wrong order, electrical
shorting may occur and damage the
vehicle. The repairs would not be covered
(Continued)
Page 381 of 440
GMC Sierra/Sierra Denali 2500 HD/3500 HD Owner Manual (GMNA-
Localizing-U.S./Canada-16908340) - 2024 - CRC - 12/7/22
Vehicle Care 379
11. Start the vehicle with the good batteryand run the engine for a while.
12. Try to start the vehicle that had the dead battery. If it will not start after a
few tries, it probably needs service.
Jumper Cable Removal
Reverse the sequence exactly when
removing the jumper cables.
After starting the disabled vehicle and
removing the jumper cables, allow it to idle
for several minutes.
Towing the Vehicle
Transporting a Disabled Vehicle
Caution
Incorrectly transporting a disabled vehicle
may cause damage to the vehicle. Use
proper tire straps to secure the vehicle to
the flatbed tow truck. Do not strap or
hook to any frame, underbody,
or suspension component not specified
below. Do not move vehicles with drive
axle tires on the ground. Damage is not
covered by the vehicle warranty.
Caution
The vehicle may be equipped with an
electric parking brake and/or a
mechanical transmission range select
shifter. In the event of a loss of 12-volt
battery power, the electric parking brake
cannot be released, and the vehicle
cannot be shifted to N (Neutral). Tire
skates or dollies must be used under the
non-rolling tires to prevent damage while
loading/unloading the vehicle. Dragging
the vehicle will cause damage not
covered by the vehicle warranty.
Caution
The vehicle may be equipped with a tow
eye. Improper use of the tow eye may
cause damage to the vehicle and is not
covered by the vehicle warranty.
If equipped, use the tow eye to load the
vehicle onto a flatbed tow truck from a
flat road surface, or to move the vehicle
a very short distance at a walking pace.
The tow eye is not designed for off-road
(Continued)
Caution (Continued)
recovery. The vehicle must be in
N (Neutral) with the electric parking
brake released when using the tow eye.
Contact a professional towing service if the
disabled vehicle must be transported. GM
recommends a flatbed tow truck to
transport a disabled vehicle. Use ramps to
help reduce approach angles, if necessary.
If equipped, a tow eye may be located near
the spare tire or emergency jack. Do not use
the tow eye to pull the vehicle from the
snow, mud, sand, or ditch. Tow eye threads
may have right or left-hand threads. Use
caution when installing or removing the
tow eye.
The vehicle must be in N (Neutral) and the
electric parking brake must be released
when loading the vehicle onto a flatbed tow
truck.
.If the 12-volt battery is dead and/or
electric parking brake is not released, the
vehicle will not move. Try to jump start
the vehicle with a known good 12-volt
battery, shift the car into N (Neutral), and
release the electric parking brake. Refer to
Jump Starting - North America 0376.
Page 431 of 440

GMC Sierra/Sierra Denali 2500 HD/3500 HD Owner Manual (GMNA-
Localizing-U.S./Canada-16908340) - 2024 - CRC - 12/7/22
Index 429
Engine (cont'd)Running While Parked . . . . . . . . . . . . . . . . . 223
Starting . . . . . . . . . . . . . . . . . . . . . . . . . . . . . . . . 218
Entry Lighting . . . . . . . . . . . . . . . . . . . . . . . . . . . . 151
Equipment, Towing . . . . . . . . . . . . . . . . . . . . . . 284
Event Data Recorders . . . . . . . . . . . . . . . . . . . . .415
Exit Lighting . . . . . . . . . . . . . . . . . . . . . . . . . . . . . . 151
Extended Mirrors . . . . . . . . . . . . . . . . . . . . . . . . . .35
Extended Parking . . . . . . . . . . . . . . . . . . . . . . . . 222
Extender, Seat Belt . . . . . . . . . . . . . . . . . . . . . . . 63
Exterior Cargo Lamps . . . . . . . . . . . . . . . . . . . . . . . . . . . 149
Lamp Controls . . . . . . . . . . . . . . . . . . . . . . . . . 143
Lamps Off Reminder . . . . . . . . . . . . . . . . . . . 145
Lighting Battery Saver . . . . . . . . . . . . . . . . . 152
F
Fan
Engine . . . . . . . . . . . . . . . . . . . . . . . . . . . . . . . . . 323
Filter Engine Air Cleaner . . . . . . . . . . . . . . . . . . . . . 318
Flash-to-Pass . . . . . . . . . . . . . . . . . . . . . . . . . . . . . .145
Flashers, Hazard Warning . . . . . . . . . . . . . . . . 146
Flat Tire . . . . . . . . . . . . . . . . . . . . . . . . . . . . . . . . . 364
Changing . . . . . . . . . . . . . . . . . . . . . . . . . . . . . . 365
Floor Console
Storage . . . . . . . . . . . . . . . . . . . . . . . . . . . . . . . . 101
Floor Mats . . . . . . . . . . . . . . . . . . . . . . . . . . . . . . . 391 Fluid
Automatic Transmission . . . . . . . . . . . . . . . . 317
Brakes . . . . . . . . . . . . . . . . . . . . . . . . . . . . . . . . . 326
Power Steering . . . . . . . . . . . . . . . . . . . . . . . . 323
Washer . . . . . . . . . . . . . . . . . . . . . . . . . . . . . . . . 324
Fog Lamp Light Front . . . . . . . . . . . . . . . . . . . . . . . . . . . . . . . . . . 130
Fog Lamps . . . . . . . . . . . . . . . . . . . . . . . . . . . . . . . 148
Folding Mirrors . . . . . . . . . . . . . . . . . . . . . . . . . . . 36
Four-Wheel Drive . . . . . . . . . . . . . . . . . . . 228, 329
Four-Wheel-Drive Light . . . . . . . . . . . . . . . . . . . . . . . . . . . . . . . . . . . 125
Frequency Statement Radio . . . . . . . . . . . . . . . . . . . . . . . . . . . . . . . . . . 413
Front Axle . . . . . . . . . . . . . . . . . . . . . . . . . . . . . . . . . . . 329
Heated and Ventilated Seats . . . . . . . . . . . . 54
Front Seats Adjustment . . . . . . . . . . . . . . . . . . . . . . . . . . . . . 48
Fuel Additives . . . . . . . . . . . . . . . . . . . . . . . . . . . . . . 272
E85 . . . . . . . . . . . . . . . . . . . . . . . . . . . . . . . . . . . . 272
Economy, Driving for Better . . . . . . . . . . . 199
Filling a Portable Fuel Container . . . . . . . 276
Filling the Tank . . . . . . . . . . . . . . . . . . . . 273, 275
Foreign Countries . . . . . . . . . . . . . . . . . . . . . . 272
Gauge . . . . . . . . . . . . . . . . . . . . . . . . . . . . . . . . . . 116
Low Fuel Warning Light . . . . . . . . . . . . . . . 129 Fuel (cont'd)
Prohibited Fuels . . . . . . . . . . . . . . . . . . . . . . . 272
Recommended . . . . . . . . . . . . . . . . . . . . . . . . . 272
Top Tier . . . . . . . . . . . . . . . . . . . . . . . . . . . . . . . . 271
Full-Size Spare Tire . . . . . . . . . . . . . . . . . . . . . . . 375
Fuses Engine Compartment Fuse Block . . . . . . . 337
Fuses and Circuit Breakers . . . . . . . . . . . . . 337
Instrument Panel Fuse Block . . . . . . 341, 342
G
Garage Door Opener . . . . . . . . . . . . . . . . . . . . . 140
Programming . . . . . . . . . . . . . . . . . . . . . . . . . . 140
Gas Strut(s) . . . . . . . . . . . . . . . . . . . . . . . . . . . . . . 332
Gauges Engine Coolant Temperature . . . . . . . . . . . . 118
Engine Oil Pressure . . . . . . . . . . . . . . . . . . . . . 117
Fuel . . . . . . . . . . . . . . . . . . . . . . . . . . . . . . . . . . . . . 116
Odometer . . . . . . . . . . . . . . . . . . . . . . . . . . . . . . 116
Speedometer . . . . . . . . . . . . . . . . . . . . . . . . . . . 116
Tachometer . . . . . . . . . . . . . . . . . . . . . . . . . . . . . 116
Transmission Temperature . . . . . . . . . . . . . . 119
Trip Odometer . . . . . . . . . . . . . . . . . . . . . . . . . . 116
Voltmeter . . . . . . . . . . . . . . . . . . . . . . . . . . . . . . . 119
Warning Lights and Indicators . . . . . . . . . . 111
General Information
Service and Maintenance . . . . . . . . . . . . . . 393
Towing . . . . . . . . . . . . . . . . . . . . . . . . . . . . . . . . 276