ECO mode GMC SIERRA DENALI 2005 Owners Manual
[x] Cancel search | Manufacturer: GMC, Model Year: 2005, Model line: SIERRA DENALI, Model: GMC SIERRA DENALI 2005Pages: 428, PDF Size: 2.5 MB
Page 77 of 428
Programmable Automatic Door
Locks
Your vehicle is equipped with an automatic lock/unlock
feature which enables you to program your vehicle’s
power door locks. You can program this feature through
the Driver Information Center (DIC), or by the following
method. SeeDIC Vehicle Customization on page 3-54
for more information on DIC programming.
Programmable Locking Feature
The following two modes are available programming
options:
Mode 1:All doors lock when the transmission is shifted
out of PARK (P).
Mode 2:All doors lock when the vehicle speed is
greater than 8 mph (13 km/h).
The following instructions tell you how to change
the automatic door lock mode. Choose one of the
two programming options listed above before entering
the program mode. To enter the program mode, do
the following:
1. Begin with the ignition off. Then pull the turn
signal/multifunction lever toward you and hold
it there while you perform the next step.2. Turn the key to RUN then back to LOCK twice.
Then, with the key in LOCK, release the turn
signal/multifunction lever. Once you do this, the
doors will lock and unlock, the horn will chirp twice,
and a 30-second timer will begin. You are now
ready to program the automatic door lock feature.
3. Press the lock side of the power lock switch once.
You will hear either one or two chimes. The number
of chimes tells you which lock mode is currently
selected. Continue to press the door lock switch until
the number of chimes that you hear matches the
number of the mode that you want. If you take longer
than 30 seconds, the locks will automatically lock
and unlock and the horn will chirp twice to indicate
that you have left the program mode. If this occurs,
you can repeat the procedure beginning with Step 1
to re-enter the programming mode.
You can exit the program mode any time by turning the
ignition to RUN. The doors will automatically lock
and unlock and the horn will chirp twice to indicate that
you are leaving the program mode. If the lock/unlock
switches are not pressed while in the programming
mode, the current automatic settings will not be
modi�ed.
2-9
Page 78 of 428
Programmable Unlocking Feature
The following is the list of available programming
options:
Mode 1:Driver’s door unlocks when the transmission is
shifted into PARK (P).
Mode 2:All doors unlock when the transmission is
shifted into PARK (P).
Mode 3:All doors unlock when the key is removed
from the ignition.
Mode 4:No automatic door unlock.
The following instructions tell you how to change the
automatic door unlock mode. Choose one of the
four programming options listed above before entering
the program mode. To enter the program mode, do
the following:
1. Begin with the ignition off. Then pull the turn
signal/multifunction lever toward you and hold
it there while you perform the next step.
2. Turn the key to RUN and LOCK twice. Then, with
the key in LOCK, release the turn
signal/multifunction lever. Once you do this, the
doors will lock and unlock, the horn will chirp twice,
and a 30-second timer will begin. You are now
ready to program the automatic door unlock feature.3. Press the unlock side of the power lock
switch once. You will hear one, two, three, or
four chimes. The number of chimes tells you which
unlock mode is currently selected. Continue to press
the door unlock switch until the number of chimes
that you hear matches the number of the mode that
you want. If you take longer than 30 seconds, the
locks will automatically lock and unlock and the horn
will chirp twice to indicate that you have left the
program mode. If this occurs, you can repeat the
procedure beginning with Step 1 to re-enter the
programming mode.
You can exit the program mode any time by turning the
ignition to RUN. The doors will automatically lock
and unlock and the horn will chirp twice to indicate that
you are leaving the program mode. If the lock/unlock
switches are not pressed while in the programming
mode, the current automatic settings will not be
modi�ed.
2-10
Page 98 of 428
Automatic Dimming Mirror Operation
The automatic dimming mirror function is turned
on automatically each time the ignition is started. To
operate the automatic dimming mirror, do the following:
1. Make sure the green indicator light, located to the left
of the on/off button, is lit. If it’s not, press and hold the
on/off button for approximately six seconds until the
green light comes on, indicating that the mirror is in
automatic dimming mode.
2. Turn off the automatic dimming mirror function by
pressing and holding the on/off button for
approximately six seconds, until the green indicator
light turns off.
Compass Variance
The mirror is set in zone eight upon leaving the factory. It
will be necessary to adjust the compass to compensate
for compass variance if you live outside of zone eight.
Under certain circumstances, as during a long distance
cross-country trip, it will be necessary to adjust for
compass variance. Compass variance is the difference
between earth’s magnetic north and true geographic
north. If not adjusted to account for compass variance,
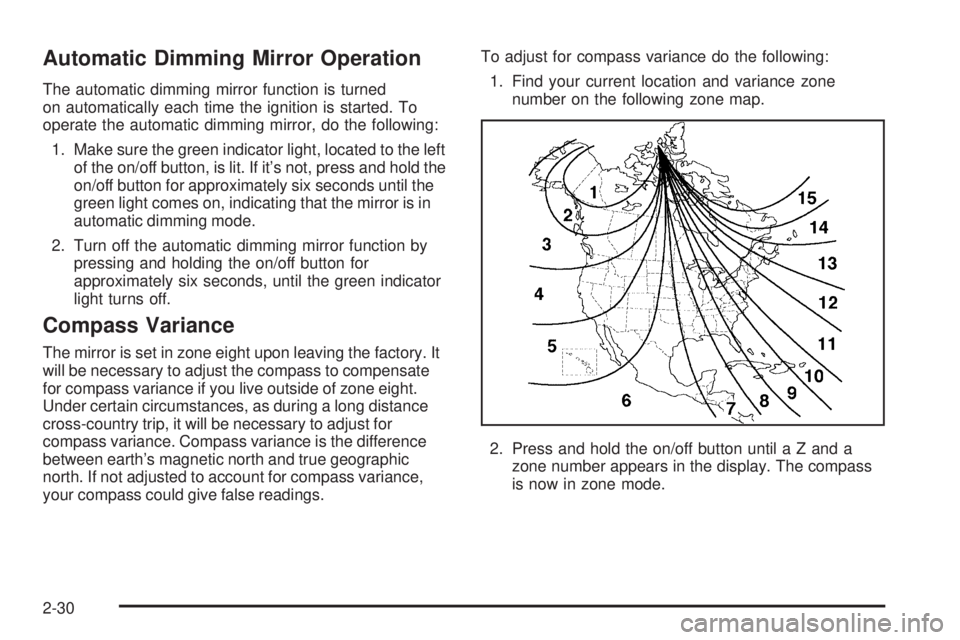
your compass could give false readings.To adjust for compass variance do the following:
1. Find your current location and variance zone
number on the following zone map.
2. Press and hold the on/off button until a Z and a
zone number appears in the display. The compass
is now in zone mode.
2-30
Page 105 of 428
This device complies with RSS-210 of Industry Canada.
Operation is subject to the following two conditions:
(1) this device may not cause interference, and
(2) this device must accept any interference, including
interference that may cause undesired operation of the
device.
Changes and modi�cations to this system by other than
an authorized service facility could void authorization
to use this equipment.
Programming the HomeLink®
Transmitter
Do not use the HomeLink®Transmitter with any garage
door opener that does not have the “stop and reverse”
feature. This includes any garage door opener model
manufactured before April 1, 1982. If you have a newer
garage door opener with rolling codes, please be
sure to follow Steps 6 through 8 to complete the
programming of your HomeLink
®Transmitter.Read the instructions completely before attempting to
program the HomeLink
®Transmitter. Because of
the steps involved, it may be helpful to have another
person available to assist you in programming the
transmitter.
Keep the original transmitter for use in other vehicles as
well as for future HomeLink
®programming. It is also
recommended that upon the sale of the vehicle,
the programmed HomeLink
®buttons should be erased
for security purposes. Refer to “Erasing HomeLink®
Buttons” or, for assistance, contact HomeLink®on the
internet at: www.homelink.com or by calling
1-800-355-3515.
Be sure that people and objects are clear of the garage
door or gate operator you are programming. When
programming a garage door, it is advised to park outside
of the garage.
It is recommended that a new battery be installed in
your hand-held transmitter for quicker and more
accurate transmission of the radio frequency.
2-37
Page 108 of 428
Using HomeLink®
Press and hold the appropriate HomeLink®button for at
least half of a second. The indicator light will come
on while the signal is being transmitted.
Erasing HomeLink®Buttons
To erase programming from the three buttons do the
following:
1. Press and hold down the two outside buttons until
the indicator light begins to �ash, after 20 seconds.
Do not hold the two outside buttons for longer
than 30 seconds.
2. Release both buttons.
HomeLink
®is now in the train (learning) mode and can
be programmed at any time beginning with Step 2
under “Programming HomeLink
®” shown earlier in this
section.
Individual buttons cannot be erased, but they can be
reprogrammed. See “Reprogramming a Single
HomeLink
®Button” following this section.
Reprogramming a Single HomeLink®
Button
To program a device to HomeLink®using a HomeLink®
button previously trained, follow these steps:
1. Press and hold the desired HomeLink
®button.
Do not release the button.
2. The indicator light will begin to �ash after
20 seconds. While still holding the HomeLink
®
button, proceed with Step 2 under “Programming
HomeLink®” shown earlier in this section.
Resetting Defaults
To reset HomeLink®to default settings do the following:
1. Hold down the two outside buttons for about
20 seconds until the indicator light begins to �ash.
2. Continue to hold both buttons until the HomeLink
®
indicator light turns off.
3. Release both buttons.
For questions or comments, contact HomeLink
®at
1-800-355-3515, or on the internet at
www.homelink.com.
2-40
Page 127 of 428
Using Cruise Control on Hills
How well your cruise control will work on hills depends
upon your speed, load and the steepness of the
hills. When going up steep hills, you may want to step
on the accelerator pedal to maintain your speed.
When going downhill, you may have to brake or shift to
a lower gear to keep your speed down. Of course,
applying the brake takes you out of cruise control. Many
drivers �nd this to be too much trouble and don’t use
cruise control on steep hills.
Ending Cruise Control
There are four ways to turn off the cruise control:
Step lightly on the brake pedal,
move the cruise control switch to off, or
shift the transmission to NEUTRAL (N).
If your vehicle has the StabiliTrak®feature, cruise
control will turn off if road conditions cause
StabiliTrak
®to activate.
If the accelerator pedal is held for 60 seconds or
longer, cruise control will turn off.
Erasing Speed Memory
When you turn off the cruise control or the ignition, your
cruise control set speed memory is erased.
Headlamps
The control on the driver’s side of the instrument panel
operates the exterior lamps.
Turn the control clockwise to operate the lamps.
The exterior lamp control has four positions:
9(OFF):Turning the control to this position turns off
the Daytime Running Lamps (DRL), and the automatic
headlamps.
AUTO (Automatic):Turning the control to this position
puts the system into automatic headlamp mode.
3-13
Page 135 of 428
Turn the knob counterclockwise or clockwise to lower or
increase the cabin temperature. The display will show
the temperature setting decreasing or increasing and an
arrow pointing to the passenger will be displayed
under and to the right of the temperature setting.
The passenger’s temperature setting can be set to
match the driver’s temperature setting by pressing and
holding the AUTO button for four seconds. Both the
driver and passenger arrows will be displayed.
Automatic Operation
AUTO (Automatic):When automatic operation is
active the system will control the inside temperature, the
air delivery, and the fan speed.
Use the steps below to place the entire system in
automatic mode:
1. Press the AUTO button.
When AUTO is selected, the display will change to
show the current driver’s set temperature, delivery
mode and fan speed. Press the AUTO button again
within �ve seconds to display the passenger’s set
temperature.If the driver’s and passenger’s temperature settings
are the same when AUTO is pressed, the
temperature setting and both arrows will be displayed
for �ve seconds along with the automatic air delivery
mode and fan speed. After the �ve second update,
the display will change to show the temperature
setting, both arrows and AUTO.
If the driver’s and passenger’s temperature
settings are not the same, the opposite side
temperature setting will be displayed for an
additional �ve seconds. To make the passenger’s
temperature the same as the driver’s press and hold
the AUTO button for about four seconds.
When auto is selected, the air conditioning operation
and air inlet will be automatically controlled. The
air conditioning compressor will run when the
outside temperature is over about 40°F (4°C). The
air inlet will normally be set to outside air. If it’s
hot outside, the air inlet may automatically switch to
recirculate inside air to help quickly cool down
your vehicle. The light on the button will illuminate
in recirculation.
3-21
Page 157 of 428
DIC Operation and Displays
The Driver Information Center (DIC) comes on when the
ignition is on. After a short delay, the DIC will display
the information that was last displayed before the engine
was turned off.
The DIC has different modes which can be accessed by
pressing the four DIC buttons located on the steering
wheel. These buttons are trip information, fuel
information, customization and select. The button
functions are detailed in the following pages.
Trip Information Button
3
(Trip Information):Press the trip information
button to scroll through the ODOMETER, TRIP A,
TRIP B, TIMER and ENGINE HOURS.
Odometer:Press the trip information button until
ODOMETER appears on the display. This mode shows
the total distance the vehicle has been driven in
either miles or kilometers. Pressing the reset stem
located on the instrument cluster with the vehicle off will
also display the odometer.
Trip A:Press the trip information button until TRIP A
appears on the display. This mode shows the current
distance traveled since the last reset for TRIP A in either
miles or kilometers.Trip B:Press the trip information button until TRIP B
appears on the display. This mode shows the current
distance traveled since the last reset for TRIP B in either
miles or kilometers.
To reset TRIP A or TRIP B information, press and hold
the select button for one second while in one of the
trip modes. This will reset the information for TRIP A or
TRIP B.
You can also reset TRIP A or TRIP B while they are
displayed by pressing the reset stem on the cluster. If you
press and hold the reset stem or the select button for four
seconds, the display will show the distance traveled since
the last ignition cycle for TRIP A or TRIP B.
Timer:The DIC can be used as a timer. Press the
select button while TIMER is displayed to start the timer.
The display will show the amount of time that has
passed since the timer was last reset, not including time
the ignition is off. Time will continue to be counted as
long as the ignition is on, even if another display is being
shown on the DIC. The timer will record up to 99 hours,
59 minutes and 59 seconds (99:59:59) after which
the display will roll back to zero.
To stop the counting of time, press the select button
brie�y while TIMER is displayed.
To reset the timer to zero, press and hold the select
button while TIMER is displayed.
3-43
Page 158 of 428
Engine Hours:Press the trip information button until
ENGINE HOURS appears on the display. This
mode shows the total number of hours the engine has
run. Pressing and holding the reset stem located on
the instrument cluster for about four seconds will also
display the engine hour information after the odometer is
displayed when the vehicle is off.
Fuel Information Button
t
(Fuel Information):Press the fuel information
button to scroll through the range, fuel used, average
fuel economy and the engine oil life system.
Fuel Range:Press the fuel information button until
RANGE appears on the display. This mode shows the
remaining distance you can drive without refueling.
It is based on fuel economy and the fuel remaining in
the tank. The display will show LOW if the fuel level
is low.
The fuel economy data used to determine fuel range is
an average of recent driving conditions. As your driving
conditions change, this data is gradually updated. Fuel
range cannot be reset.Fuel Used:Press the fuel information button until
FUEL USED appears on the display. This mode shows
the number of gallons or liters of fuel used since the
last reset of this menu item. To reset the fuel used
information, press and hold the select button for
one second while FUEL USED is displayed.
Average Fuel Economy:Press the fuel information
button until AVG ECON appears on the display.
This mode shows how many miles per gallon (MPG) or
liters per 100 kilometers (L/100 km) your vehicle is
getting based on current and past driving conditions.
Press and hold the select button for one second while
AVG ECON is displayed to reset the average fuel
economy. Average fuel economy will then be calculated
starting from that point. If the average fuel economy is not
reset, it will be continually updated each time you drive.
Engine Oil Life System:Press the fuel information
button until ENGINE OIL LIFE appears on the display.
The engine oil life system shows an estimate of the oil’s
remaining useful life. It will show 100% when the
system is reset after an oil change. It will alert you to
change your oil on a schedule consistent with your
driving conditions.
3-44
Page 163 of 428
KEYFOB X BATTERY LOW
If a remote keyless entry transmitter battery is low, this
message will appear on the DIC. The battery needs to be
replaced in the transmitter. See “Battery Replacement”
underRemote Keyless Entry System Operation on
page 2-4. Pressing any of the four DIC buttons, if
equipped, will acknowledge the message and clear it
from the DIC display. If your vehicle is not equipped with
the four DIC buttons, pressing the trip odometer reset
stem will acknowledge the message and clear it from the
DIC display.
LOW COOLANT LEVEL
If your vehicle is equipped with a low coolant level sensor,
this message will appear on the DIC if the engine coolant
level is low. Adding coolant will clear the message. See
Cooling System on page 5-29. Pressing any of the
four DIC buttons, if equipped, will acknowledge the
message and clear it from the DIC display. If your vehicle
is not equipped with the four DIC buttons, pressing the
trip odometer reset stem will acknowledge the message
and clear it from the DIC display.
Notice:Engine damage from running your engine
without coolant is not covered by your warranty. See
“Overheated Engine Protection Operating Mode”
in the Index for information on driving to a safe
place in an emergency.
OIL LIFE RESET
This message will appear on the display for about
10 seconds after resetting the change engine oil
message. See “Engine Oil Life System” underDIC
Operation and Displays on page 3-43andEngine Oil on
page 5-14for more information.
OIL PRESSURE LOW
If low oil pressure levels occur, this message will be
displayed on the DIC and a chime will sound. Stop the
vehicle as soon as safely possible and do not operate
it until the cause of the low oil pressure has been
corrected. Check your oil as soon as possible and have
your vehicle serviced by your GM dealer.
Notice:If you drive your vehicle while the engine
oil pressure is low, severe engine damage may
occur. If a low oil pressure warning appears on the
Driver Information Center (DIC), stop the vehicle
as soon as possible. Do not drive the vehicle until
the cause of the low oil pressure is corrected.
SeeEngine Oil on page 5-14for more information.
3-49