air condition GMC SIERRA DENALI 2010 User Guide
[x] Cancel search | Manufacturer: GMC, Model Year: 2010, Model line: SIERRA DENALI, Model: GMC SIERRA DENALI 2010Pages: 550, PDF Size: 4.17 MB
Page 117 of 550
Remote Vehicle Start
Your vehicle may have a remote starting feature. This
feature allows you to start the engine from outside of
the vehicle. It may also start up the vehicle's heating or
air conditioning systems and rear window defogger.
Normal operation of the system will return after the key
is turned to the ON/RUN position.
If your vehicle has an automatic climate control system,
the climate control system will default to a heating or
cooling mode depending on the outside temperatures.
If your vehicle does not have an automatic climate
control system, the system will turn on at the setting the
vehicle was set to when the vehicle was last turned off.
During a remote start, if your vehicle has an automatic
climate control system and heated seats, the heated
seats will turn on during colder outside temperatures
and will shut off when the key is turned to ON/RUN.If your vehicle does not have an automatic climate
control system, during remote start, you will need to
manually turn the heated seats on and off. See
Heated
Seats
on page 2‑5for additional information.
Laws in some communities may restrict the use of
remote starters. For example, some laws may require a
person using the remote start to have the vehicle in
view when doing so. Check local regulations for any
requirements on remote starting of vehicles.
Do not use the remote start feature if your vehicle is low
on fuel. Your vehicle may run out of fuel.
If your vehicle has the remote start feature, the RKE
transmitter functions will have an increased range of
operation. However, the range may be less while the
vehicle is running.
There are other conditions which can affect the
performance of the transmitter, see Remote Keyless
Entry (RKE) System
on page 3‑4for additional
information.
3-7
Page 139 of 550
N (Neutral) :In this position, the engine does not
connect with the wheels. To restart the engine when the
vehicle is already moving, use N (Neutral) only. Also,
use N (Neutral) when the vehicle is being towed.
{WARNING:
Shifting into a drive gear while the engine is
running at high speed is dangerous. Unless your
foot is firmly on the brake pedal, the vehicle could
move very rapidly. You could lose control and hit
people or objects. Do not shift into a drive gear
while the engine is running at high speed.
Notice: Shifting out of P (Park) or N (Neutral) with
the engine running at high speed may damage the
transmission. The repairs would not be covered by
the vehicle warranty. Be sure the engine is not
running at high speed when shifting the vehicle. D (Drive) :
This position is for normal driving. It provides
the best fuel economy for the vehicle. If you need more
power for passing, and you are:
.Going less than about 35 mph (55 km/h), push the
accelerator pedal about halfway down.
.Going about 35 mph (55 km/h) or more, push the
accelerator all the way down.
D (Drive) can be used when towing a trailer, carrying a
heavy load, driving on steep hills, or for off-road driving.
You may want to shift the transmission to a lower gear
selection if the transmission shifts too often.
Downshifting the transmission in slippery road
conditions could result in skidding, see “Skidding”under
Loss of Control on page 5‑11.
When temperatures are very cold, the Hydra-Matic
®
Automatic Transmission's gear shifting may be delayed
providing more stable shifts until the engine warms up.
Shifts may be more noticeable with a cold transmission.
This difference in shifting is normal.
3-29
Page 140 of 550
M (Manual Mode) :This position lets drivers select the
range of gears appropriate for current driving
conditions. See Range Selection Mode later in this
section.
Notice: Spinning the tires or holding the vehicle in
one place on a hill using only the accelerator pedal
may damage the transmission. The repair will not be
covered by the vehicle warranty. If you are stuck, do
not spin the tires. When stopping on a hill, use the
brakes to hold the vehicle in place.
The vehicle has a shift stabilization feature that
adjusts the transmission shifting to the current
driving conditions in order to reduce rapid upshifts and
downshifts. This shift stabilization feature is designed to
determine, before making an upshift, if the engine will
be able to maintain vehicle speed by analyzing things
such as throttle position, vehicle load, and hill grade. If the shift stabilization feature determines that a current
vehicle speed cannot be maintained, the transmission
does not upshift and instead holds the current gear. In
some cases, this may appear to be a delayed shift,
however the transmission is operating normally.
The vehicle's transmission uses adaptive shift controls.
Adaptive shift controls continually compares key shift
parameters to pre‐programmed ideal shift conditions
stored in the transmissions computer. The transmission
constantly makes adjustments to improve vehicle
performance according to the way the vehicle is being
used, such as with a heavy load. During this adaptive
shift controls process, some shifts may feel different as
the transmission determines the best settings for a
particular shift.
3-30
Page 152 of 550
Outside Convex Mirror
{WARNING:
A convex mirror can make things, like other
vehicles, look farther away than they really are.
If you cut too sharply into the right lane, you could
hit a vehicle on the right. Check the inside mirror
or glance over your shoulder before changing
lanes.
The passenger side mirror is convex shaped. A convex
mirror's surface is curved so more can be seen from the
driver seat.
Outside Heated Mirrors
For vehicles with heated mirrors:
<(Rear Window Defogger): Press to heat the
mirrors. If the vehicle has a towing mirror, only the
upper glass of the mirror is heated. The lower convex
part of the towing mirror is not heated.
Depending on the vehicle's features, see “Rear Window
Defogger” under,Climate Control System (With Air
Conditioning)
on page 4‑17or Climate Control System
(With Heater Only)on page 4‑20or Dual Automatic
Climate Control Systemon page 4‑21for more
information.
3-42
Page 154 of 550
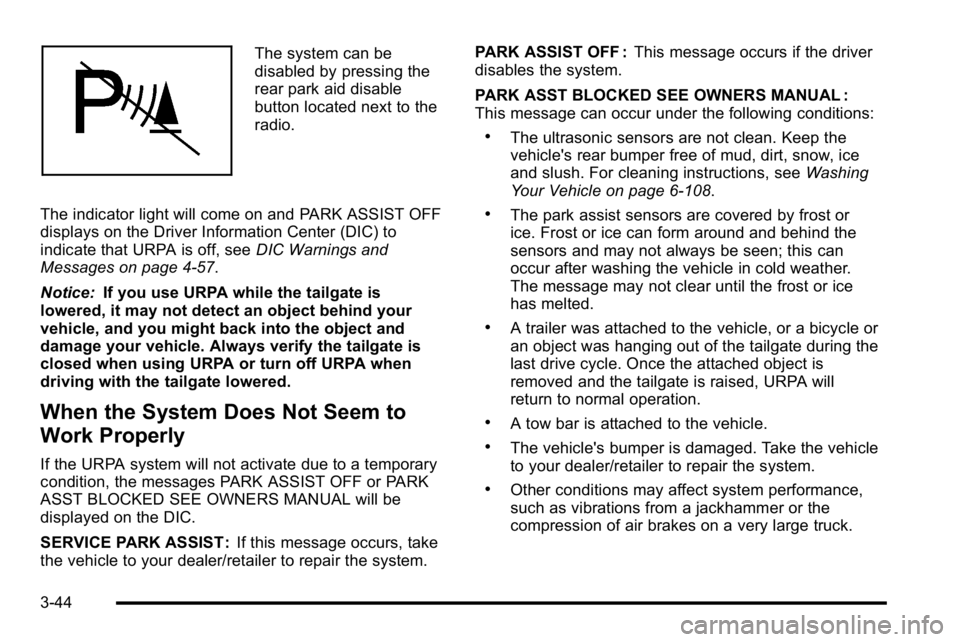
The system can be
disabled by pressing the
rear park aid disable
button located next to the
radio.
The indicator light will come on and PARK ASSIST OFF
displays on the Driver Information Center (DIC) to
indicate that URPA is off, see DIC Warnings and
Messages on page 4‑57.
Notice: If you use URPA while the tailgate is
lowered, it may not detect an object behind your
vehicle, and you might back into the object and
damage your vehicle. Always verify the tailgate is
closed when using URPA or turn off URPA when
driving with the tailgate lowered.
When the System Does Not Seem to
Work Properly
If the URPA system will not activate due to a temporary
condition, the messages PARK ASSIST OFF or PARK
ASST BLOCKED SEE OWNERS MANUAL will be
displayed on the DIC.
SERVICE PARK ASSIST : If this message occurs, take
the vehicle to your dealer/retailer to repair the system. PARK ASSIST OFF :
This message occurs if the driver
disables the system.
PARK ASST BLOCKED SEE OWNERS MANUAL :
This message can occur under the following conditions:
.The ultrasonic sensors are not clean. Keep the
vehicle's rear bumper free of mud, dirt, snow, ice
and slush. For cleaning instructions, see Washing
Your Vehicle on page 6‑108.
.The park assist sensors are covered by frost or
ice. Frost or ice can form around and behind the
sensors and may not always be seen; this can
occur after washing the vehicle in cold weather.
The message may not clear until the frost or ice
has melted.
.A trailer was attached to the vehicle, or a bicycle or
an object was hanging out of the tailgate during the
last drive cycle. Once the attached object is
removed and the tailgate is raised, URPA will
return to normal operation.
.A tow bar is attached to the vehicle.
.The vehicle's bumper is damaged. Take the vehicle
to your dealer/retailer to repair the system.
.Other conditions may affect system performance,
such as vibrations from a jackhammer or the
compression of air brakes on a very large truck.
3-44
Page 173 of 550
Section 4 Instrument Panel
Instrument Panel Overview. . . . . . . . . . . . . . . . . . . . . . . .4-3
Hazard Warning Flashers . . . . . . . . . . . . . . . . . . . . . . . 4-3
Horn . . . . . . . . . . . . . . . . . . . . . . . . . . . . . . . . . . . . . . . . . . . . 4-3
Tilt Wheel . . . . . . . . . . . . . . . . . . . . . . . . . . . . . . . . . . . . . . . 4-3
Turn Signal/Multifunction Lever . . . . . . . . . . . . . . . . . . 4-4
Turn and Lane-Change Signals . . . . . . . . . . . . . . . . . 4-4
Headlamp High/Low-Beam Changer . . . . . . . . . . . . 4-5
Flash-to-Pass . . . . . . . . . . . . . . . . . . . . . . . . . . . . . . . . . . . 4-5
Windshield Wipers . . . . . . . . . . . . . . . . . . . . . . . . . . . . . . 4-6
Windshield Washer . . . . . . . . . . . . . . . . . . . . . . . . . . . . . 4-6
Cruise Control . . . . . . . . . . . . . . . . . . . . . . . . . . . . . . . . . . 4-7
Exterior Lamps . . . . . . . . . . . . . . . . . . . . . . . . . . . . . . . . 4-10
Headlamps on Reminder . . . . . . . . . . . . . . . . . . . . . . . 4-11
Daytime Running Lamps (DRL) . . . . . . . . . . . . . . . . 4-11
Automatic Headlamp System . . . . . . . . . . . . . . . . . . 4-12
Puddle Lamps . . . . . . . . . . . . . . . . . . . . . . . . . . . . . . . . . 4-13
Fog Lamps . . . . . . . . . . . . . . . . . . . . . . . . . . . . . . . . . . . . 4-13
Instrument Panel Brightness . . . . . . . . . . . . . . . . . . . 4-13
Dome Lamps . . . . . . . . . . . . . . . . . . . . . . . . . . . . . . . . . . 4-13
Dome Lamp Override . . . . . . . . . . . . . . . . . . . . . . . . . . 4-14
Entry Lighting . . . . . . . . . . . . . . . . . . . . . . . . . . . . . . . . . . 4-14
Exit Lighting . . . . . . . . . . . . . . . . . . . . . . . . . . . . . . . . . . . 4-14
Reading Lamps . . . . . . . . . . . . . . . . . . . . . . . . . . . . . . . . 4-14
Cargo Lamp . . . . . . . . . . . . . . . . . . . . . . . . . . . . . . . . . . . 4-14
Electric Power Management . . . . . . . . . . . . . . . . . . . 4-15 Battery Run-Down Protection . . . . . . . . . . . . . . . . . . 4-15
Accessory Power Outlet(s) . . . . . . . . . . . . . . . . . . . . . 4-16
Ashtray(s) and Cigarette Lighter . . . . . . . . . . . . . . . 4-17
Climate Controls . . . . . . . . . . . . . . . . . . . . . . . . . . . . . . . . . . 4-17
Climate Control System (With Air
Conditioning) . . . . . . . . . . . . . . . . . . . . . . . . . . . . . . . . 4-17
Climate Control System (With Heater Only) . . . . 4-20
Dual Automatic Climate Control System . . . . . . . 4-21
Outlet Adjustment . . . . . . . . . . . . . . . . . . . . . . . . . . . . . . 4-27
Warning Lights, Gages, and Indicators . . . . . . . . . .4-27
Instrument Panel Cluster . . . . . . . . . . . . . . . . . . . . . . . 4-28
Speedometer and Odometer . . . . . . . . . . . . . . . . . . . 4-29
Trip Odometer . . . . . . . . . . . . . . . . . . . . . . . . . . . . . . . . . 4-29
Tachometer . . . . . . . . . . . . . . . . . . . . . . . . . . . . . . . . . . . . 4-29
Safety Belt Reminders . . . . . . . . . . . . . . . . . . . . . . . . . 4-30
Airbag Readiness Light . . . . . . . . . . . . . . . . . . . . . . . . 4-31
Passenger Airbag Status Indicator . . . . . . . . . . . . . 4-32
Charging System Light . . . . . . . . . . . . . . . . . . . . . . . . 4-33
Voltmeter Gage . . . . . . . . . . . . . . . . . . . . . . . . . . . . . . . . 4-33
Brake System Warning Light . . . . . . . . . . . . . . . . . . . 4-34
Antilock Brake System (ABS) Warning Light . . . 4-36
StabiliTrak
®Indicator Light . . . . . . . . . . . . . . . . . . . . . 4-36
Engine Coolant Temperature Gage . . . . . . . . . . . . 4-37
Tire Pressure Light . . . . . . . . . . . . . . . . . . . . . . . . . . . . 4-37
4-1
Page 189 of 550
Ashtray(s) and Cigarette Lighter
The vehicle may have a front ashtray located near the
center of the instrument panel. Pull on the door to open
it. The ashtray may have a cigarette lighter.
Notice:If papers, pins, or other flammable items are
put in the ashtray, hot cigarettes or other smoking
materials could ignite them and possibly damage
the vehicle. Never put flammable items in the
ashtray.
To remove the ashtray, open the door and pull the
ashtray bin toward you. To replace the ashtray, insert
the ashtray bin inside the ashtray door and press down
until it engages. To use the cigarette lighter, push it in
all the way, and let go. When it is ready for use, the
lighter pops back out.
Notice: Holding a cigarette lighter in while it is
heating does not let the lighter back away from the
heating element when it is hot. Damage from
overheating can occur to the lighter or heating
element, or a fuse could be blown. Do not hold a
cigarette lighter in while it is heating.
Climate Controls
Climate Control System
(With Air Conditioning)
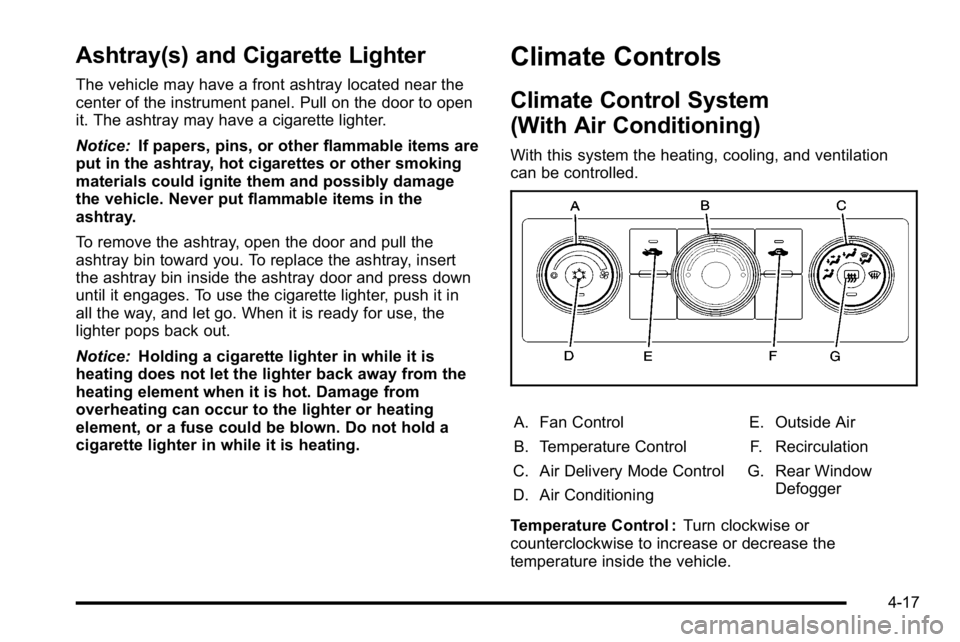
With this system the heating, cooling, and ventilation
can be controlled.
A. Fan Control
B. Temperature Control
C. Air Delivery Mode Control
D. Air Conditioning E. Outside Air
F. Recirculation
G. Rear Window Defogger
Temperature Control : Turn clockwise or
counterclockwise to increase or decrease the
temperature inside the vehicle.
4-17
Page 190 of 550

9(Fan Control):Turn clockwise or counterclockwise
to increase or decrease the fan speed. Turn the knob all
the way counterclockwise to turn the front system off.
Air Delivery Mode Control : Turn clockwise or
counterclockwise to change the direction of the airflow
inside the vehicle. The knob can be positioned between
two modes to select a combination of those modes.
Select from the following:
H (Vent) : Air is directed to the instrument panel outlets.
) (Bi-Level) : Air is divided between the instrument
panel and floor outlets.
6 (Floor) : Air is directed to the floor outlets, with some
air directed to the windshield and side window outlets.
In this mode, the system automatically selects outside
air. Recirculation cannot be selected in floor mode.
- (Defog) : This mode clears the windows of fog or
moisture. Air is directed to the windshield, floor outlets,
and side window vents. 0
(Defrost) : This mode removes fog or frost from the
windshield more quickly. Air is directed to the
windshield and the side window vents, with some air
directed to the floor vents. The system automatically
forces outside air into the vehicle.
The recirculation mode cannot be selected in the defog
or defrost mode. When either mode is selected, the
system runs the air conditioning compressor, unless the
outside temperature is close to freezing.
Do not drive the vehicle until all the windows are clear.
:(Outside Air): Press to turn the outside air mode
on. An indicator light comes on to show that outside air
is on. In this mode outside air circulates throughout the
vehicle. The outside air mode can be used with all
modes, but it cannot be used with the
recirculation mode.
4-18
Page 191 of 550
?(Recirculation):Press to turn the recirculation
mode on. An indicator light comes on to show that
recirculation is on.
This mode recirculates and helps to quickly cool the air
inside the vehicle. It can be used to help prevent
outside air and odors from entering the vehicle.
The recirculation mode cannot be used with floor, defog
or defrost modes. If recirculation is selected with one of
these modes, the indicator light flashes three times and
then turns off. While in recirculation mode the windows
may fog when the weather is cold and damp. To clear
the fog, select either the defog or defrost mode and
increase the fan speed.
The recirculation mode can be turned off by pressing
the outside air button, or by turning off the ignition.
# (Air Conditioning) : Press to turn the air conditioning
system on or off. An indicator light comes on to show
that the air conditioning is on. The air conditioning can
be selected in any mode as long as the fan switch is on.
The air conditioning system removes moisture from the
air, so a small amount of water might drip under the
vehicle while idling or after turning off the engine. This
is normal.Rear Window Defogger
For vehicles with a rear window defogger, a warming
grid is used to remove fog from the rear window.
< (Rear) : Press to turn the rear window defogger on
or off. An indicator light on the button comes on to show
that the rear window defogger is on.
The rear window defogger only works when the ignition
is in ON/RUN. The rear window defogger stays on for
approximately 10 minutes after the button is pressed,
unless the ignition is turned to ACC/ACCESSORY or
LOCK/OFF. The defogger can also be turned off by
turning off the engine.
Notice: Do not use anything sharp on the inside of
the rear window. If you do, you could cut or damage
the warming grid, and the repairs would not be
covered by the vehicle warranty. Do not attach a
temporary vehicle license, tape, a decal or anything
similar to the defogger grid.
4-19
Page 193 of 550
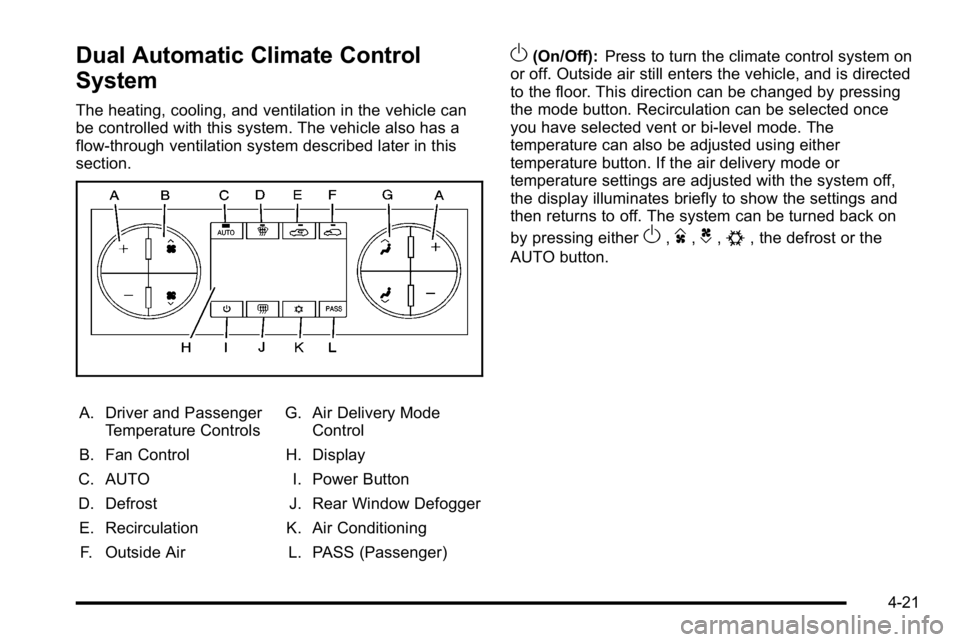
Dual Automatic Climate Control
System
The heating, cooling, and ventilation in the vehicle can
be controlled with this system. The vehicle also has a
flow-through ventilation system described later in this
section.
A. Driver and PassengerTemperature Controls
B. Fan Control
C. AUTO
D. Defrost E. Recirculation F. Outside Air G. Air Delivery Mode
Control
H. Display
I. Power Button
J. Rear Window Defogger
K. Air Conditioning L. PASS (Passenger)
O(On/Off): Press to turn the climate control system on
or off. Outside air still enters the vehicle, and is directed
to the floor. This direction can be changed by pressing
the mode button. Recirculation can be selected once
you have selected vent or bi-level mode. The
temperature can also be adjusted using either
temperature button. If the air delivery mode or
temperature settings are adjusted with the system off,
the display illuminates briefly to show the settings and
then returns to off. The system can be turned back on
by pressing either
O,D,C,#, the defrost or the
AUTO button.
4-21