hood release GMC SIERRA DENALI 2010 Owners Manual
[x] Cancel search | Manufacturer: GMC, Model Year: 2010, Model line: SIERRA DENALI, Model: GMC SIERRA DENALI 2010Pages: 550, PDF Size: 4.17 MB
Page 9 of 550

A.Outlet Adjustment on page 4‑27.
B. Turn Signal/Multifunction Lever on page 4‑4.
C. Instrument Panel Cluster on page 4‑28.
D. Hazard Warning Flashers
on page 4‑3.
E. Shift Lever. See Automatic Transmission Operation
on page 3‑28.
F. Tow/Haul Mode
on page 3‑32(If Equipped).
G. Driver Information Center (DIC) Buttons. See Driver Information Center (DIC) on page 4‑44.
H. Audio System(s) on page 4‑76.
I. Exterior Lamps on page 4‑10.
J. Integrated Trailer Brake Controller (If Equipped). See Towing a Trailer on page 5‑42.
K. Dome Lamp Override
on page 4‑14.Dome Lampson page 4‑13.
L. Cruise Control on page 4‑7.
M. Hood Release on page 6‑14.
N. Parking Brake on page 3‑34. O.
Tilt Wheel on page 4‑3.
P. Horn on page 4‑3.
Q. Audio Steering Wheel Controls on page 4‑137.
R. Climate Control System (With Air Conditioning)
on
page 4‑17or Climate Control System (With Heater
Only)on page 4‑20or Dual Automatic Climate
Control Systemon page 4‑21(If Equipped).
S. Accessory Power Outlet(s)
on page 4‑16.
Cigarette Lighter (If Equipped). See Ashtray(s) and
Cigarette Lighter
on page 4‑17.
T. StabiliTrak®Systemon page 5‑6(If Equipped).
Pedal Adjust Button (If Equipped). See Adjustable
Throttle and Brake Pedal
on page 3‑26. Ultrasonic
Rear Parking Assist (URPA)on page 3‑43(If Equipped). Heated Windshield Washer Fluid
Button (If Equipped). See Windshield Washeron
page 4‑6.
U. Passenger Airbag Off Control (If Equipped). See Passenger Sensing System on page 2‑66.
V. Glove Box on page 3‑57.
1-3
Page 333 of 550
3. Shift back to a low gear, release the parking brake,and drive straight down.
4. If the engine will not start, get out and get help.
Driving Across an Incline
An off-road trail will probably go across the incline of a
hill. To decide whether to try to drive across the incline,
consider the following:
{WARNING:
Driving across an incline that is too steep will
make your vehicle roll over. You could be
seriously injured or killed. If you have any doubt
about the steepness of the incline, do not drive
across it. Find another route instead.
.A hill that can be driven straight up or down
might be too steep to drive across. When going
straight up or down a hill, the length of the wheel
base —the distance from the front wheels to the
rear wheels —reduces the likelihood the vehicle
will tumble end over end. But when driving across
an incline, the narrower track width —the distance
between the left and right wheels —might not
prevent the vehicle from tilting and rolling over. Driving across an incline puts more weight on the
downhill wheels which could cause a downhill slide
or a rollover.
.Surface conditions can be a problem. Loose
gravel, muddy spots, or even wet grass can cause
the tires to slip sideways, downhill. If the vehicle
slips sideways, it can hit something that will
trip it
—a rock, a rut, etc. —and roll over.
.Hidden obstacles can make the steepness of the
incline even worse. If you drive across a rock with
the uphill wheels, or if the downhill wheels drop
into a rut or depression, the vehicle can tilt
even more.
For these reasons, carefully consider whether to try to
drive across an incline. Just because the trail goes
across the incline does not mean you have to drive it.
The last vehicle to try it might have rolled over.
If you feel the vehicle starting to slide sideways, turn
downhill. This should help straighten out the vehicle and
prevent the side slipping. The best way to prevent this
is to “walk the course” first, so you know what the
surface is like before driving it.
5-21
Page 375 of 550
Section 6 Service and Appearance Care
Service. . . . . . . . . . . . . . . . . . . . . . . . . . . . . . . . . . . . . . . . . . . . . 6-4
Accessories and Modifications . . . . . . . . . . . . . . . . . . 6-4
California Proposition 65 Warning . . . . . . . . . . . . . . . 6-5
California Perchlorate Materials Requirements . . . . . . . . . . . . . . . . . . . . . . . . . . . . . . . . . 6-5
Doing Your Own Service Work . . . . . . . . . . . . . . . . . . 6-5
Adding Equipment to the Outside of the Vehicle . . . . . . . . . . . . . . . . . . . . . . . . . . . . . . . . . . . . . . . . 6-6
Fuel . . . . . . . . . . . . . . . . . . . . . . . . . . . . . . . . . . . . . . . . . . . . . . . . . 6-6
Gasoline Octane . . . . . . . . . . . . . . . . . . . . . . . . . . . . . . . . 6-7
Gasoline Specifications . . . . . . . . . . . . . . . . . . . . . . . . . 6-7
California Fuel . . . . . . . . . . . . . . . . . . . . . . . . . . . . . . . . . . 6-7
Additives . . . . . . . . . . . . . . . . . . . . . . . . . . . . . . . . . . . . . . . . 6-8
Fuel E85 (85% Ethanol) . . . . . . . . . . . . . . . . . . . . . . . . . 6-9
Fuels in Foreign Countries . . . . . . . . . . . . . . . . . . . . . 6-10
Filling the Tank . . . . . . . . . . . . . . . . . . . . . . . . . . . . . . . . 6-10
Filling a Portable Fuel Container . . . . . . . . . . . . . . . 6-13
Checking Things Under the Hood . . . . . . . . . . . . . . .6-14
Hood Release . . . . . . . . . . . . . . . . . . . . . . . . . . . . . . . . . 6-14
Engine Compartment Overview . . . . . . . . . . . . . . . . 6-16
Engine Oil . . . . . . . . . . . . . . . . . . . . . . . . . . . . . . . . . . . . . 6-18
Engine Oil Life System . . . . . . . . . . . . . . . . . . . . . . . . 6-20
Engine Air Cleaner/Filter . . . . . . . . . . . . . . . . . . . . . . . 6-22
Automatic Transmission Fluid . . . . . . . . . . . . . . . . . . 6-24
Cooling System . . . . . . . . . . . . . . . . . . . . . . . . . . . . . . . . 6-28 Engine Coolant . . . . . . . . . . . . . . . . . . . . . . . . . . . . . . . . 6-29
Engine Overheating . . . . . . . . . . . . . . . . . . . . . . . . . . . 6-34
Overheated Engine Protection
Operating Mode . . . . . . . . . . . . . . . . . . . . . . . . . . . . . 6-37
Engine Fan Noise . . . . . . . . . . . . . . . . . . . . . . . . . . . . . 6-37
Power Steering Fluid . . . . . . . . . . . . . . . . . . . . . . . . . . 6-38
Windshield Washer Fluid . . . . . . . . . . . . . . . . . . . . . . 6-39
Brakes . . . . . . . . . . . . . . . . . . . . . . . . . . . . . . . . . . . . . . . . . 6-40
Battery . . . . . . . . . . . . . . . . . . . . . . . . . . . . . . . . . . . . . . . . . 6-43
Jump Starting . . . . . . . . . . . . . . . . . . . . . . . . . . . . . . . . . . 6-44
All-Wheel Drive . . . . . . . . . . . . . . . . . . . . . . . . . . . . . . . . . . . 6-49
Rear Axle . . . . . . . . . . . . . . . . . . . . . . . . . . . . . . . . . . . . . . . . . 6-50
Front Axle . . . . . . . . . . . . . . . . . . . . . . . . . . . . . . . . . . . . . . . . . 6-51
Headlamp Aiming . . . . . . . . . . . . . . . . . . . . . . . . . . . . . . . . 6-52
Bulb Replacement . . . . . . . . . . . . . . . . . . . . . . . . . . . . . . . . 6-55
Halogen Bulbs . . . . . . . . . . . . . . . . . . . . . . . . . . . . . . . . . 6-55
Headlamps . . . . . . . . . . . . . . . . . . . . . . . . . . . . . . . . . . . . 6-55
Center High-Mounted Stoplamp (CHMSL) and Cargo Lamp . . . . . . . . . . . . . . . . . . . . . . . . . . . . . 6-57
Taillamps, Turn Signal, Stoplamps and Back-up Lamps . . . . . . . . . . . . . . . . . . . . . . . . . . . . . . 6-58
License Plate Lamp . . . . . . . . . . . . . . . . . . . . . . . . . . . . 6-60
Replacement Bulbs . . . . . . . . . . . . . . . . . . . . . . . . . . . . 6-60
Windshield Wiper Blade Replacement . . . . . . . . . . .6-61
6-1
Page 388 of 550
Checking Things Under
the Hood
{WARNING:
An electric fan under the hood can start up and
injure you even when the engine is not running.
Keep hands, clothing, and tools away from any
underhood electric fan.
{WARNING:
Things that burn can get on hot engine parts and
start a fire. These include liquids like fuel, oil,
coolant, brake fluid, windshield washer and other
fluids, and plastic or rubber. You or others could
be burned. Be careful not to drop or spill things
that will burn onto a hot engine.
Hood Release
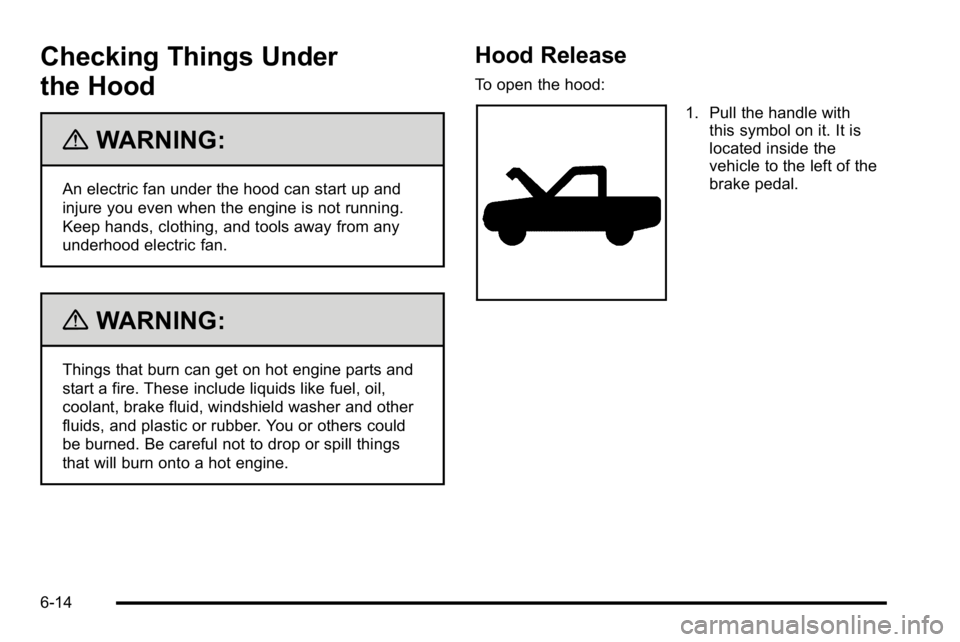
To open the hood:
1. Pull the handle withthis symbol on it. It is
located inside the
vehicle to the left of the
brake pedal.
6-14
Page 389 of 550
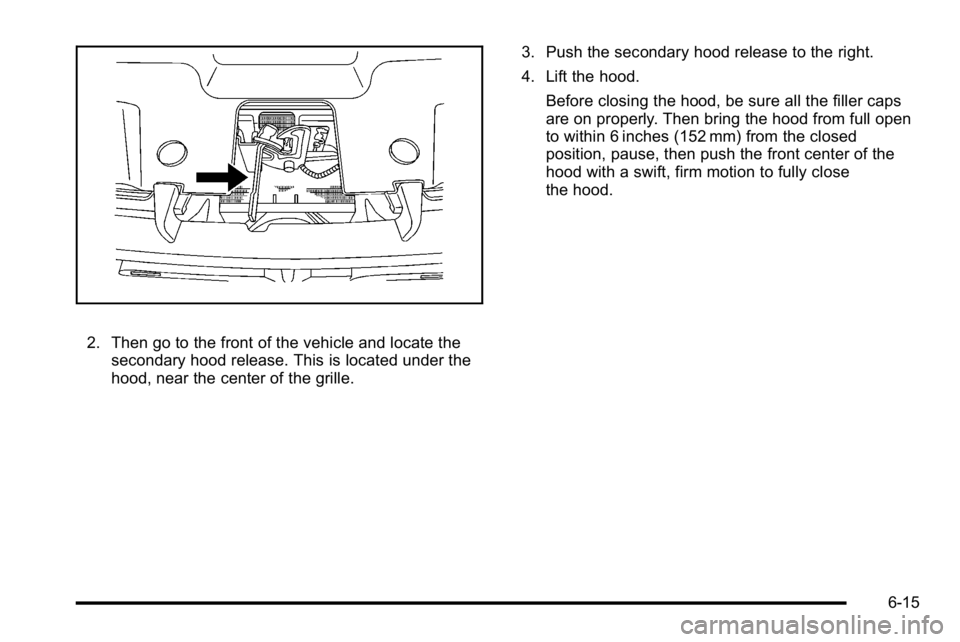
2. Then go to the front of the vehicle and locate thesecondary hood release. This is located under the
hood, near the center of the grille. 3. Push the secondary hood release to the right.
4. Lift the hood.
Before closing the hood, be sure all the filler caps
are on properly. Then bring the hood from full open
to within 6 inches (152 mm) from the closed
position, pause, then push the front center of the
hood with a swift, firm motion to fully close
the hood.
6-15
Page 427 of 550
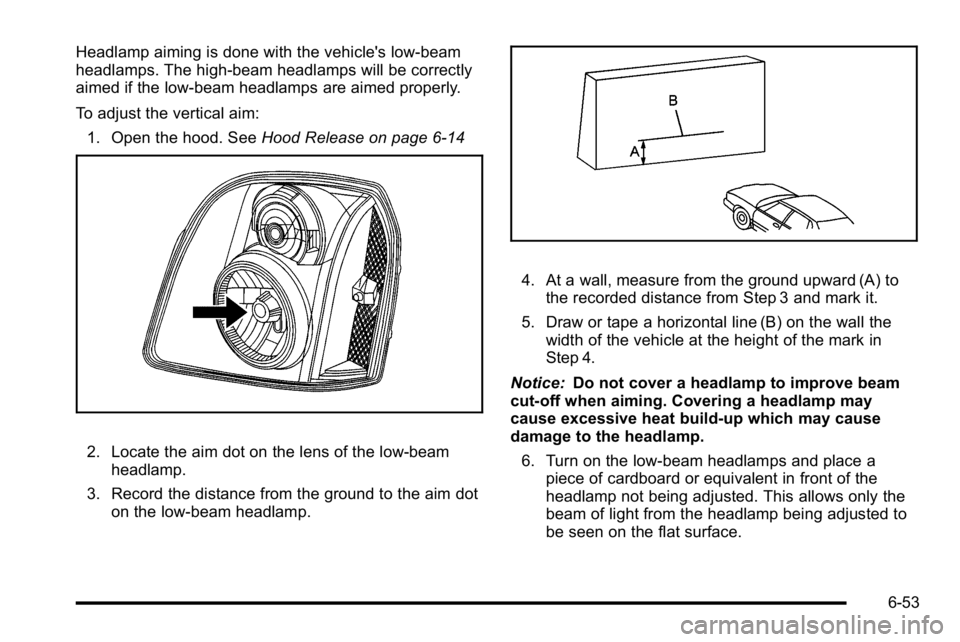
Headlamp aiming is done with the vehicle's low-beam
headlamps. The high-beam headlamps will be correctly
aimed if the low-beam headlamps are aimed properly.
To adjust the vertical aim:1. Open the hood. See Hood Release on page 6‑14
2. Locate the aim dot on the lens of the low‐beam
headlamp.
3. Record the distance from the ground to the aim dot on the low‐beam headlamp.
4. At a wall, measure from the ground upward (A) tothe recorded distance from Step 3 and mark it.
5. Draw or tape a horizontal line (B) on the wall the width of the vehicle at the height of the mark in
Step 4.
Notice: Do not cover a headlamp to improve beam
cut-off when aiming. Covering a headlamp may
cause excessive heat build-up which may cause
damage to the headlamp.
6. Turn on the low-beam headlamps and place a piece of cardboard or equivalent in front of the
headlamp not being adjusted. This allows only the
beam of light from the headlamp being adjusted to
be seen on the flat surface.
6-53
Page 429 of 550
Bulb Replacement
For the proper type of replacement bulbs, see
Replacement Bulbs on page 6‑60.
For any bulb changing procedure not listed in this
section, contact your dealer/retailer.
Halogen Bulbs
{WARNING:
Halogen bulbs have pressurized gas inside and
can burst if you drop or scratch the bulb. You or
others could be injured. Be sure to read and
follow the instructions on the bulb package.
Headlamps
To replace one of these bulbs:1. Open the hood. See Hood Release
on page 6‑14for more information.
2. If you are replacing the bulb on the passenger side remove the Engine Air Cleaner cover. See Engine
Air Cleaner/Filter
on page 6‑22for more
information.
3. Reach in and access the bulb sockets from inside the engine compartment.
6-55
Page 542 of 550

Headlamps . . . . . . . . . . . . . . . . . . . . . . . . . . . . . . . . . . . . . . . . 6-55Aiming . . . . . . . . . . . . . . . . . . . . . . . . . . . . . . . . . . . . . . . . . . . . 6-52
Bulb Replacement . . . . . . . . . . . . . . . . . . . . . . . . . . . . . . . . 6-55
Daytime Running Lamps (DRL) . . . . . . . . . . . . . . . . . . . 4-11
Exterior Lamps . . . . . . . . . . . . . . . . . . . . . . . . . . . . . . . . . . . 4-10
Flash-to-Pass . . . . . . . . . . . . . . . . . . . . . . . . . . . . . . . . . . . . . . 4-5
High/Low Beam Changer . . . . . . . . . . . . . . . . . . . . . . . . . . 4-5
On Reminder . . . . . . . . . . . . . . . . . . . . . . . . . . . . . . . . . . . . . 4-11
Heated Seats . . . . . . . . . . . . . . . . . . . . . . . . . . . . . . . . . . . . . . . .2-5
Heater . . . . . . . . . . . . . . . . . . . . . . . . . . . . . . . . . . . . . . . 4-17, 4-20 Engine Coolant . . . . . . . . . . . . . . . . . . . . . . . . . . . . . . . . . . . 3-26
High-Speed Operation, Tires . . . . . . . . . . . . . . . . . . . . . . 6-72
Highbeam On Light . . . . . . . . . . . . . . . . . . . . . . . . . . . . . . . . 4-42
Highway Hypnosis . . . . . . . . . . . . . . . . . . . . . . . . . . . . . . . . . 5-26
Hill and Mountain Roads . . . . . . . . . . . . . . . . . . . . . . . . . . . 5-26
Hood Checking Things Under . . . . . . . . . . . . . . . . . . . . . . . . . . . 6-14
Release . . . . . . . . . . . . . . . . . . . . . . . . . . . . . . . . . . . . . . . . . . 6-14
Horn . . . . . . . . . . . . . . . . . . . . . . . . . . . . . . . . . . . . . . . . . . . . . . . . .4-3
How to Wear Safety Belts Properly . . . . . . . . . . . . . . . . 2-16I
Ignition Positions . . . . . . . . . . . . . . . . . . . . . . . . . . . . . . . . . . 3-23
Infants and Young Children, Restraints . . . . . . . . . . . . 2-36
Inflation - Tire Pressure . . . . . . . . . . . . . . . . . . . . . . . . . . . . 6-71
Instrument Panel Brightness . . . . . . . . . . . . . . . . . . . . . . . . . . . . . . . . . . . . . . . . 4-13
Storage Area . . . . . . . . . . . . . . . . . . . . . . . . . . . . . . . . . . . . . 3-58
Instrument Panel Cluster . . . . . . . . . . . . . . . . . . . . . . . . . . 4-28
Integrated Trailer Brake Control System (ITBC) . . . . 5-42
Introduction . . . . . . . . . . . . . . . . . . . . . . . . . . . . . . . . . . . . . . . . . .7-2
J
Jump Starting . . . . . . . . . . . . . . . . . . . . . . . . . . . . . . . . . . . . . . 6-44
K
Keyless Entry Remote (RKE) System . . . . . . . . . . . . . . . . . . . . . . . . . . . . 3-4
Keyless Entry System . . . . . . . . . . . . . . . . . . . . . . . . . . . . . . .3-4
Keys . . . . . . . . . . . . . . . . . . . . . . . . . . . . . . . . . . . . . . . . . . . . . . . . .3-3
i - 8