clock GMC SIERRA DENALI 2024 Owners Manual
[x] Cancel search | Manufacturer: GMC, Model Year: 2024, Model line: SIERRA DENALI, Model: GMC SIERRA DENALI 2024Pages: 440, PDF Size: 9.21 MB
Page 104 of 440
GMC Sierra/Sierra Denali 2500 HD/3500 HD Owner Manual (GMNA-
Localizing-U.S./Canada-16908340) - 2024 - CRC - 12/7/22
102 Storage
Additional Storage Features
Cargo Tie-Downs
Caution
The truck bed walls will collapse if the
tie-downs are overloaded.
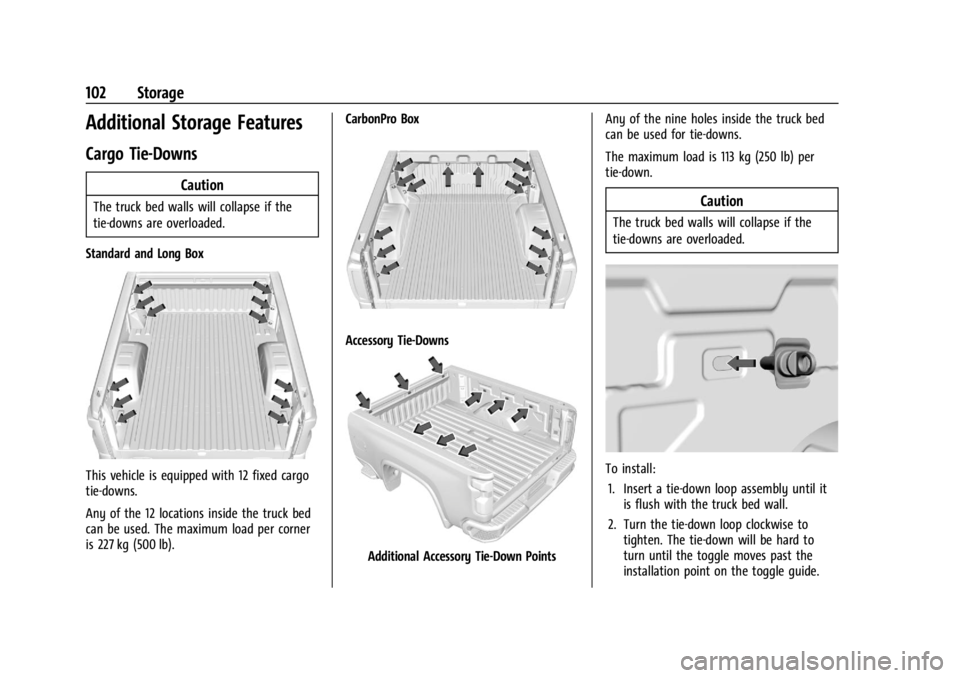
Standard and Long Box
This vehicle is equipped with 12 fixed cargo
tie-downs.
Any of the 12 locations inside the truck bed
can be used. The maximum load per corner
is 227 kg (500 lb). CarbonPro Box
Accessory Tie-Downs
Additional Accessory Tie-Down PointsAny of the nine holes inside the truck bed
can be used for tie-downs.
The maximum load is 113 kg (250 lb) per
tie-down.
Caution
The truck bed walls will collapse if the
tie-downs are overloaded.
To install:
1. Insert a tie-down loop assembly until it is flush with the truck bed wall.
2. Turn the tie-down loop clockwise to tighten. The tie-down will be hard to
turn until the toggle moves past the
installation point on the toggle guide.
Page 105 of 440

GMC Sierra/Sierra Denali 2500 HD/3500 HD Owner Manual (GMNA-
Localizing-U.S./Canada-16908340) - 2024 - CRC - 12/7/22
Storage 103
3. Fasten the tie-down firmly by hand only.Do not use tools.
To remove: 1. Remove the tie-down loop completely by turning counterclockwise while holding
the backing plate against the truck
bed wall.
2. Pull the backing plate away from the truck bed wall until a click is heard. This
locks the toggle into position on the
toggle guide.
3. Push the backing plate against the truck bed wall. This allows the toggle nut
to spin.
4. Remove the backing plate, toggle guide, and toggle nut from the truck bed wall
completely.
5. Reinstall the tie-down loop through the backing plate into the toggle nut for
reuse.
Page 106 of 440
GMC Sierra/Sierra Denali 2500 HD/3500 HD Owner Manual (GMNA-
Localizing-U.S./Canada-16908340) - 2024 - CRC - 12/15/22
104 Instruments and Controls
Instruments and Controls
Controls
Steering Wheel Adjustment . . . . . . . . . . . 105
Heated Steering Wheel . . . . . . . . . . . . . . . . 105
Horn . . . . . . . . . . . . . . . . . . . . . . . . . . . . . . . . . . 106
Windshield Wiper/Washer . . . . . . . . . . . . 106
Compass . . . . . . . . . . . . . . . . . . . . . . . . . . . . . . . 107
Clock . . . . . . . . . . . . . . . . . . . . . . . . . . . . . . . . . . 107
Power Outlets . . . . . . . . . . . . . . . . . . . . . . . . . 107
Wireless Charging . . . . . . . . . . . . . . . . . . . . . 109
Warning Lights, Gauges, and Indicators
Warning Lights, Gauges, andIndicators . . . . . . . . . . . . . . . . . . . . . . . . . . . . . 111
Instrument Cluster (Base Level) . . . . . . . . 112
Instrument Cluster (Uplevel) . . . . . . . . . . . 113
Speedometer . . . . . . . . . . . . . . . . . . . . . . . . . . 116
Odometer . . . . . . . . . . . . . . . . . . . . . . . . . . . . . . 116
Trip Odometer . . . . . . . . . . . . . . . . . . . . . . . . . 116
Tachometer . . . . . . . . . . . . . . . . . . . . . . . . . . . . 116
Fuel Gauge . . . . . . . . . . . . . . . . . . . . . . . . . . . . 116
Engine Oil Pressure Gauge . . . . . . . . . . . . . 117
Engine Coolant Temperature Gauge . . . . 118
Transmission Temperature Gauge (Uplevel only) . . . . . . . . . . . . . . . . . . . . . . . . 119
Voltmeter Gauge . . . . . . . . . . . . . . . . . . . . . . 119
Seat Belt Reminders . . . . . . . . . . . . . . . . . . . 120
Airbag Readiness Light . . . . . . . . . . . . . . . . . 121
Passenger Airbag Status Indicator . . . . . . 121 Charging System Light . . . . . . . . . . . . . . . . . 122
Malfunction Indicator Lamp (Check
Engine Light) . . . . . . . . . . . . . . . . . . . . . . . . . 122
Brake System Warning Light . . . . . . . . . . 124
Electric Parking Brake Light . . . . . . . . . . . . 124
Service Electric Parking Brake Light . . . . 124
Antilock Brake System (ABS) Warning Light . . . . . . . . . . . . . . . . . . . . . . . . . . . . . . . . . 125
Four-Wheel-Drive Light . . . . . . . . . . . . . . . . . 125
Tow/Haul Mode Light . . . . . . . . . . . . . . . . . 125
Hill Descent Control Light . . . . . . . . . . . . . 126
Lane Departure Warning (LDW) Light . . . . . . . . . . . . . . . . . . . . . . . . . . . . . . . . . 126
Automatic Emergency Braking (AEB) Disabled Light . . . . . . . . . . . . . . . . . . . . . . . 126
Vehicle Ahead Indicator . . . . . . . . . . . . . . . . 126
Pedestrian Ahead Indicator . . . . . . . . . . . . 126
Traction Off Light . . . . . . . . . . . . . . . . . . . . . . 127
Traction Control System (TCS)/Electronic Stability Control Light . . . . . . . . . . . . . . . . 127
Electronic Stability Control (ESC) Off Light . . . . . . . . . . . . . . . . . . . . . . . . . . . . . . . . . 127
Engine Coolant Temperature Warning Light . . . . . . . . . . . . . . . . . . . . . . . . . . . . . . . . . 128
Driver Mode Control Light . . . . . . . . . . . . . 128
Tire Pressure Light . . . . . . . . . . . . . . . . . . . . . 129
Engine Oil Pressure Light (Uplevel Cluster) . . . . . . . . . . . . . . . . . . . . . . . . . . . . . . 129
Low Fuel Warning Light . . . . . . . . . . . . . . . 129
Security Light . . . . . . . . . . . . . . . . . . . . . . . . . . 130 High-Beam On Light . . . . . . . . . . . . . . . . . . . 130
Front Fog Lamp Light . . . . . . . . . . . . . . . . . . 130
Lamps On Reminder . . . . . . . . . . . . . . . . . . . 130
Cruise Control Light . . . . . . . . . . . . . . . . . . . . 131
Door Ajar Light . . . . . . . . . . . . . . . . . . . . . . . . . 131
Information Displays
Driver Information Center (DIC) (Base
Level) . . . . . . . . . . . . . . . . . . . . . . . . . . . . . . . . 131
Driver Information Center (DIC) (Uplevel) . . . . . . . . . . . . . . . . . . . . . . . . . . . . . 133
Head-Up Display (HUD) . . . . . . . . . . . . . . . . 135
Vehicle Messages
Vehicle Messages . . . . . . . . . . . . . . . . . . . . . . 139
Engine Power Messages . . . . . . . . . . . . . . . 139
Vehicle Speed Messages . . . . . . . . . . . . . . . 139
Universal Remote System
Universal Remote System . . . . . . . . . . . . . 140
Universal Remote System Programming . . . . . . . . . . . . . . . . . . . . . . . . 140
Universal Remote System Operation . . . 141
Page 109 of 440
GMC Sierra/Sierra Denali 2500 HD/3500 HD Owner Manual (GMNA-
Localizing-U.S./Canada-16908340) - 2024 - CRC - 12/15/22
Instruments and Controls 107
on the windshield and controls the
frequency of the windshield wiper based on
the current sensitivity setting.
Keep this area of the windshield clear of
debris to allow for best system performance.
To turn the Rain Sense feature on or off, see
“Rain Sense Wipers”under Settings >
Vehicle > Comfort and Convenience > Rain
Sense > Enable/Disable.
If Rain Sense is enabled in Settings, turning
the wiper lever to INT will activate Rain
Sense.
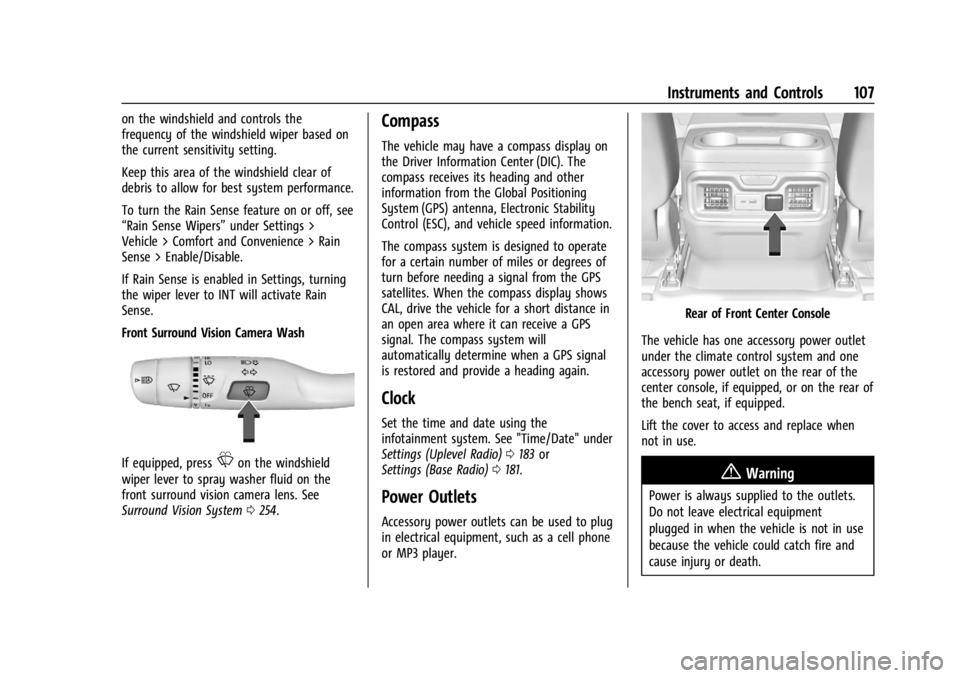
Front Surround Vision Camera Wash
If equipped, pressLon the windshield
wiper lever to spray washer fluid on the
front surround vision camera lens. See
Surround Vision System 0254.
Compass
The vehicle may have a compass display on
the Driver Information Center (DIC). The
compass receives its heading and other
information from the Global Positioning
System (GPS) antenna, Electronic Stability
Control (ESC), and vehicle speed information.
The compass system is designed to operate
for a certain number of miles or degrees of
turn before needing a signal from the GPS
satellites. When the compass display shows
CAL, drive the vehicle for a short distance in
an open area where it can receive a GPS
signal. The compass system will
automatically determine when a GPS signal
is restored and provide a heading again.
Clock
Set the time and date using the
infotainment system. See "Time/Date" under
Settings (Uplevel Radio) 0183 or
Settings (Base Radio) 0181.
Power Outlets
Accessory power outlets can be used to plug
in electrical equipment, such as a cell phone
or MP3 player.
Rear of Front Center Console
The vehicle has one accessory power outlet
under the climate control system and one
accessory power outlet on the rear of the
center console, if equipped, or on the rear of
the bench seat, if equipped.
Lift the cover to access and replace when
not in use.
{Warning
Power is always supplied to the outlets.
Do not leave electrical equipment
plugged in when the vehicle is not in use
because the vehicle could catch fire and
cause injury or death.
Page 183 of 440
GMC Sierra/Sierra Denali 2500 HD/3500 HD Owner Manual (GMNA-
Localizing-U.S./Canada-16908340) - 2024 - CRC - 12/7/22
Infotainment System 181
Settings
Settings (Base Radio)
The settings menu may be organized into
three categories. Select the desired category
by touching System, Apps, or Vehicle.
To access the menus:1. Touch Settings on the Home Page on the infotainment display.
2. Touch the desired category to display a list of available options.
3. Touch to select the desired feature setting.
4. Touch the options on the infotainment display to disable or enable a feature.
5. Touch
zto go to the top level of the
Settings menu.
System
The menu may contain the following:
Time / Date
Allows setting of the clock. Language
Sets the display language used on the
infotainment display. It may also use the
selected language for voice recognition and
audio feedback.
Phones
Allows connecting to a different cell phone
or mobile device source, disconnect a cell
phone or media device, or delete a cell
phone or media device.
Wi-Fi Networks
Shows connected and available Wi-Fi
networks.
If a 4G LTE data package is not active on the
vehicle, the infotainment system can be
connected to an external protected Wi-Fi
network, such as a mobile device or home
hotspot, to utilize connected services.
Wi-Fi Hotspot
Allows adjustment of different Wi-Fi
features.
Display
Allows adjustment of the infotainment
display.
Sounds
Allows adjustment of the infotainment
system sounds.
Favorites
Allows adjustment of the infotainment
favorite settings.
Preferences
Allows the infotainment system to disable
or enable the download of new updates in
the background.
About
Shows the infotainment system software
information.
Return to Factory Settings
Allows resetting the infotainment system
settings in the vehicle.
Page 186 of 440
GMC Sierra/Sierra Denali 2500 HD/3500 HD Owner Manual (GMNA-
Localizing-U.S./Canada-16908340) - 2024 - CRC - 12/7/22
184 Infotainment System
Seating Position
Adjusts different seating position settings.
Suspension
Adjusts different suspension settings.
Trailering
Adjusts different trailering settings.
Apps and Notifications
Shows a list of installed apps and the
permissions used.
Date / Time
Allows setting of the clock.
Display
Allows adjustment of the infotainment
display.
Sounds
Allows adjustment of the infotainment
system sounds.
Users
Modifies the infotainment system’s users.
Accounts
Allows adding or adjusting of the user
accounts.
Privacy
The menu may contain the following:
Location Services
Touch to view the Location Services screen.
App permissions
Touch to view the Permission manager
screen.
GM Privacy Statement
Touch to view the GM Privacy Statement
screen.
Google legal
Touch to view the Google legal screen.
Storage
This menu shows the storage info on the
infotainment system.
Security
This menu allows adjustment of the
infotainment security settings.
System
The menu may contain the following:
Language
This will set the display language used on
the infotainment display.
Keyboard & speech
Touch to change keyboard and speech
settings.
Reset Options
Touch to change reset settings.
About
Touch to view the infotainment system
software information.
Legal Information
Touch to view legal and license information.
Updates
This menu allows adjustment of the vehicle
update settings.
Google
This menu allows adjustment of the Google
settings.
Page 193 of 440
GMC Sierra/Sierra Denali 2500 HD/3500 HD Owner Manual (GMNA-
Localizing-U.S./Canada-16908340) - 2024 - CRC - 12/7/22
Climate Controls 191
Climate Controls
Climate Control Systems
Climate Control Systems . . . . . . . . . . . . . . . 191
Dual Automatic Climate ControlSystem . . . . . . . . . . . . . . . . . . . . . . . . . . . . . . 193
Air Vents
Air Vents . . . . . . . . . . . . . . . . . . . . . . . . . . . . . . 196
Maintenance
Passenger Compartment Air Filter . . . . . 196
Service . . . . . . . . . . . . . . . . . . . . . . . . . . . . . . . . . 197
Climate Control Systems
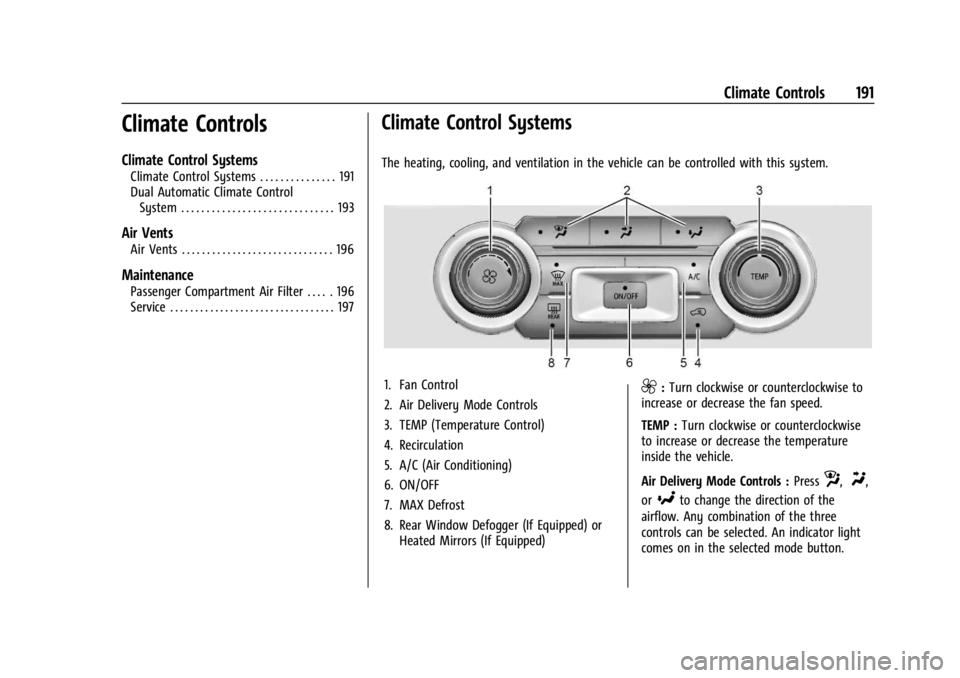
The heating, cooling, and ventilation in the vehicle can be controlled with this system.
1. Fan Control
2. Air Delivery Mode Controls
3. TEMP (Temperature Control)
4. Recirculation
5. A/C (Air Conditioning)
6. ON/OFF
7. MAX Defrost
8. Rear Window Defogger (If Equipped) or Heated Mirrors (If Equipped)9:Turn clockwise or counterclockwise to
increase or decrease the fan speed.
TEMP : Turn clockwise or counterclockwise
to increase or decrease the temperature
inside the vehicle.
Air Delivery Mode Controls : Press
z,Y,
or
[to change the direction of the
airflow. Any combination of the three
controls can be selected. An indicator light
comes on in the selected mode button.
Page 196 of 440
GMC Sierra/Sierra Denali 2500 HD/3500 HD Owner Manual (GMNA-
Localizing-U.S./Canada-16908340) - 2024 - CRC - 12/7/22
194 Climate Controls
The fan, air delivery mode, air conditioning,
driver and passenger temperatures, and Sync
settings can be controlled by touching
CLIMATE on the infotainment home screen.
A selection can then be made on the front
climate control page displayed.
The fan speed setting appears briefly on the
display screen when the center stack climate
controls are adjusted.
Automatic Operation
The system automatically controls the fan
speed, air delivery, air conditioning, and
recirculation in order to heat or cool the
vehicle to the desired temperature.
When AUTO is lit, all four functions operate
automatically. Each function can also be
manually set and the selected setting is
displayed. Functions not manually set will
continue to be automatically controlled,
even if the AUTO indicator is not lit.
For automatic operation:1. Press AUTO.
2. Set the temperature. Allow the system time to stabilize. Adjust the temperature
as needed for best comfort. To improve fuel efficiency and to cool the
vehicle faster, recirculation may be
automatically selected in warm weather.
The recirculation light will not come on
when automatically controlled. See
@
under
“Manual Operation” for more details.
Manual Operation
9:Press to increase or decrease the fan
speed. The fan speed setting appears on the
main display. Pressing either button cancels
automatic fan control and the fan is
controlled manually.
Press AUTO to return to automatic
operation.
Driver and Passenger Temperature Control :
The temperature can be adjusted separately
for the driver and passenger.
Turn the knob clockwise or counterclockwise
to increase or decrease the driver or
passenger temperature setting. The driver
side or passenger side temperature display
shows the temperature setting increasing or
decreasing. SYNC :
Press to link the passenger
temperature setting to the driver setting.
The SYNC indicator light will turn on. When
the passenger setting is adjusted, the SYNC
indicator light will turn off.
Air Delivery Mode Control : Press
z,Y,
or
[to change the direction of the
airflow. Any combination of the three
controls can be selected. An indicator light
comes on in the selected mode button.
Changing the mode cancels the automatic
operation and the system goes into manual
mode. Press AUTO to return to automatic
operation.
To change the current mode, select one or
more of the following:
z: Air is directed to the windshield,
outboard A/C outlets, and side window
outlets.
Y: Air is directed to the A/C outlets.
[:Air is directed to the floor outlets,
with some air directed to the windshield,
outboard A/C outlets, and side window
outlets.
Page 240 of 440
GMC Sierra/Sierra Denali 2500 HD/3500 HD Owner Manual (GMNA-
Localizing-U.S./Canada-16908340) - 2024 - CRC - 12/13/22
238 Driving and Operating
Noise from the Electronic Brake Control
Module (EBCM) is normal when HDC is
active.
When HDC is activated, the initial HDC
speed is set to the current driving speed.
It can be increased or decreased by pressing
+RES or SET- on the steering wheel, or by
applying the accelerator or brake pedal. This
adjusted speed becomes the new set speed.
HDC will remain enabled between 30 and
60 km/h (19 and 37 mph); however, vehicle
speed cannot be set or maintained in this
range. HDC will automatically disable if the
vehicle speed is above 80 km/h (50 mph) or
above 60 km/h (37 mph) for at least
30 seconds.
5must be pressed again to re-enable HDC.
HDC may disable after an extended period
of use. If this happens, HDC will require
time to cool down. The length of time HDC
remains active depends on road conditions,
grade, set speed, vehicle loading, and
outside temperature.
When enabled, if the vehicle speed is above
30 km/h (19 mph) and below 60 km/h
(37 mph), a DIC message will display.
Driver Mode Control
Driver Mode Control (DMC) allows the driver
to adjust the overall driving experience to
better suit preference by adjusting multiple
systems to fit specific driving needs. Drive
mode availability and affected vehicle
subsystems are dependent upon vehicle trim
level, region, and optional features.
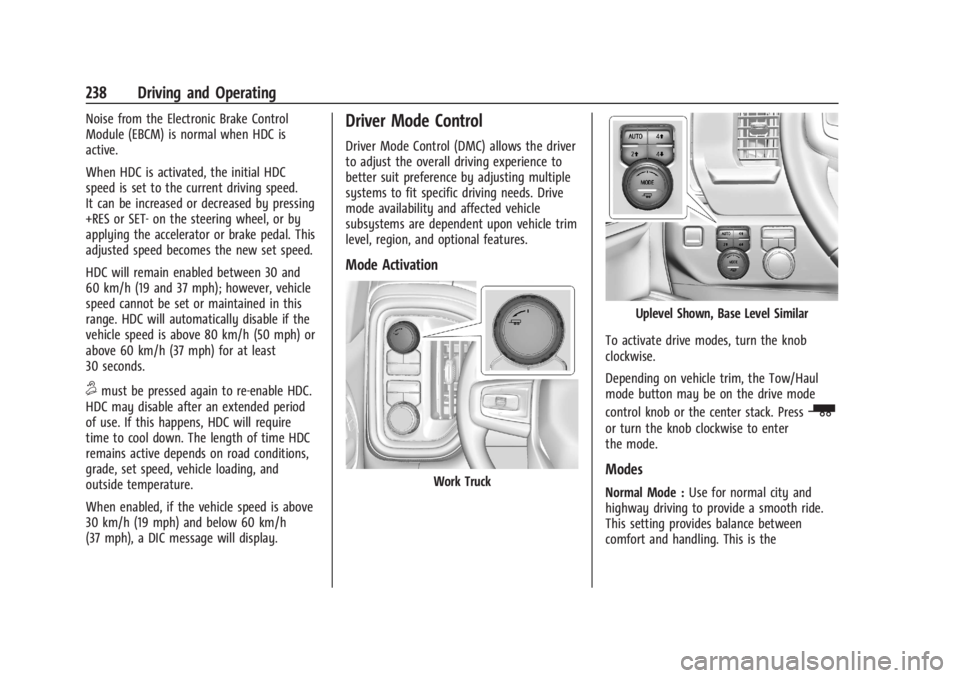
Mode Activation
Work Truck
Uplevel Shown, Base Level Similar
To activate drive modes, turn the knob
clockwise.
Depending on vehicle trim, the Tow/Haul
mode button may be on the drive mode
control knob or the center stack. Press
_
or turn the knob clockwise to enter
the mode.
Modes
Normal Mode : Use for normal city and
highway driving to provide a smooth ride.
This setting provides balance between
comfort and handling. This is the
Page 277 of 440
GMC Sierra/Sierra Denali 2500 HD/3500 HD Owner Manual (GMNA-
Localizing-U.S./Canada-16908340) - 2024 - CRC - 12/13/22
Driving and Operating 275
Filling the Tank (Chassis Cab and
Box Delete Models)
If the vehicle has a diesel engine, see the
Duramax diesel supplement.
An arrow on the fuel gauge indicates which
side of the vehicle the fuel fill is on. See
Fuel Gauge0116.
{Warning
Fuel vapors and fuel fires burn violently
and can cause injury or death.
Follow these guidelines to help avoid
injuries to you and others:
.Read and follow all the instructions on
the fuel pump island.
.Turn off the engine when refueling.
.Keep sparks, flames, and smoking
materials away from fuel.
.Do not leave the fuel pump
unattended.
.Avoid using electronic devices while
refueling.
.Do not re-enter the vehicle while
pumping fuel.
(Continued)
Warning (Continued)
.Keep children away from the fuel
pump and never let children
pump fuel.
.Before touching the fill nozzle, touch a
metallic object to discharge static
electricity from your body.
.Fuel can spray out if the fuel cap is
opened too quickly. This spray can
happen if the tank is nearly full, and is
more likely in hot weather. Open the
fuel cap slowly and wait for any hiss
noise to stop, then unscrew the cap all
the way.
Turn the fuel cap counterclockwise to
remove. Fully insert and latch the fill nozzle,
begin fueling. For models with dual fuel
tanks, the fuel gauge shows an average of
both tanks. When refueling, refuel the
primary front tank first, then add fuel to the
auxiliary rear tank.
{Warning
Overfilling the fuel tank by more than
three clicks of a standard fill nozzle may
cause:
.Vehicle performance issues, including
engine stalling and damage to the fuel
system.
.Fuel spills.
.Under certain conditions, fuel fires.
Be careful not to spill fuel. Wait five seconds
after you have finished pumping before
removing the fill nozzle. Clean fuel from
painted surfaces as soon as possible. See
Exterior Care 0383. Reinstall the cap by
turning it clockwise until it clicks.
{Warning
If a fire starts while you are refueling, do
not remove the fill nozzle. Shut off the
flow of fuel by shutting off the pump or
by notifying the station attendant. Leave
the area immediately.