stop start GMC TERRAIN 2010 Owner's Manual
[x] Cancel search | Manufacturer: GMC, Model Year: 2010, Model line: TERRAIN, Model: GMC TERRAIN 2010Pages: 410, PDF Size: 2.55 MB
Page 29 of 410
Seats and Restraints 2-3
Front Seats
Seat Adjustment
{WARNING
You can lose control of the
vehicle if you try to adjust a
manual driver's seat while the
vehicle is moving. The sudden(Continued)
WARNING (Continued)
movement could startle and
confuse you, or make you push a
pedal when you do not want to.
Adjust the driver's seat only when
the vehicle is not moving.
To adjust the seat position:
1. Pull the handle located at the front of the seat.
2. Move the seat forward or backward to adjust the seat
position.
3. Release the handle to stop the seat from moving.
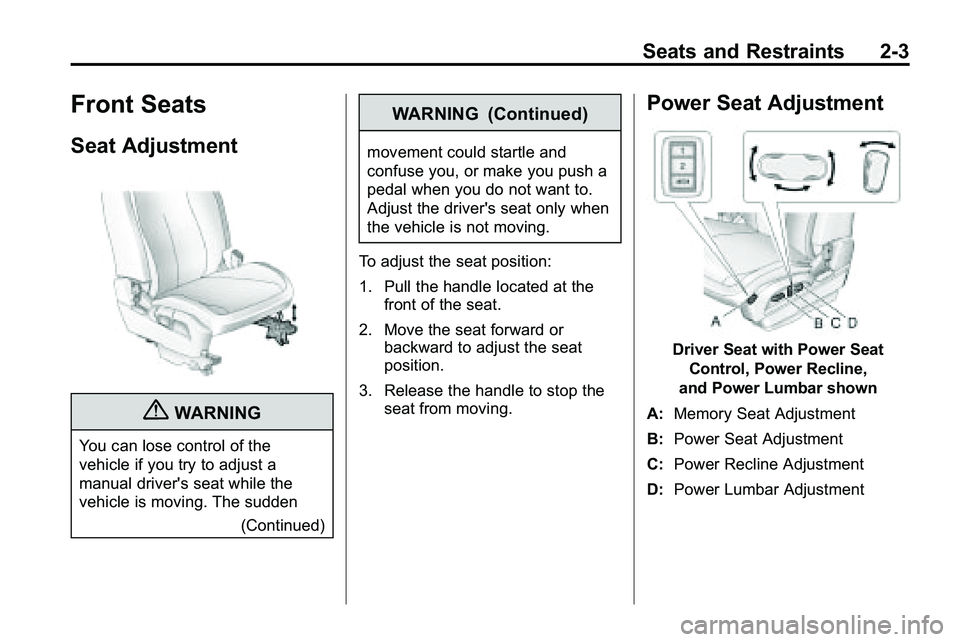
Power Seat Adjustment
Driver Seat with Power Seat
Control, Power Recline,
and Power Lumbar shown
A: Memory Seat Adjustment
B: Power Seat Adjustment
C: Power Recline Adjustment
D: Power Lumbar Adjustment
Page 31 of 410
Seats and Restraints 2-5
To stop recall movement of the RKE
remote recall feature, press one of
the power seat controls, memory
buttons, or power mirror buttons.
Memory Seat recall may stop if the
seat is blocked. Remove the
obstruction and then press the
memory button again. If the memory
function does not work properly, see
your dealer/retailer for service.
Easy Exit Seat
If the easy exit seat feature is on in
the Driver Information Center (DIC),
automatic adjustment occurs when
the ignition is turned to LOCK/OFF
and the driver door is opened. The
driver seat moves back.
SeeVehicle Personalization
on
page 4‑36for more information.
Lumbar Adjustment
Power Lumbar
Seats with power lumbar have
controls located on the outboard
side of the seat. See Power Seat
Adjustment
on page 2‑3for more
information.
Adjust lumbar support by using the
rocker switch (D) on the outboard
side of the driver seat.
Release the switch when the
seatback reaches the desired level
of lumbar support.
Reclining Seatbacks
Manual Reclining Seatbacks
{WARNING
You can lose control of the
vehicle if you try to adjust a
manual driver's seat while the
vehicle is moving. The sudden
(Continued)
WARNING (Continued)
movement could startle and
confuse you, or make you push a
pedal when you do not want to.
Adjust the driver's seat only when
the vehicle is not moving.
{WARNING
If either seatback is not locked, it
could move forward in a sudden
stop or crash. That could cause
injury to the person sitting there.
Always push and pull on the
seatbacks to be sure they are
locked.
Vehicles with manual reclining
seatbacks have a lever on the
outboard side of the seat. Lift the
lever and move the seatback to the
desired position, then release the
lever. The seatback should not
move when pushed or pulled.
Page 91 of 410

Storage 3-3
WARNING (Continued)
Never carry something longer or
wider than the roof rack on top of
the vehicle unless using a GM
Certified accessory carrier.
This vehicle may be equipped with a
roof rack. For roof racks that do not
have cross rails included, GM
Certified cross rails can be
purchased as an accessory. See
your dealer/retailer for additional
information.
Notice: Loading cargo on the
roof rack that weighs more than
100 kg (220 lbs) or hangs over the
rear or sides of the vehicle may
damage the vehicle. Load cargo
so that it rests evenly between
the crossrails, making sure to
fasten cargo securely. To prevent damage or loss of cargo
when driving, check to make sure
cross rails and cargo are securely
fastened. Loading cargo on the roof
rack will make the vehicle's center
of gravity higher. Avoid high speeds,
sudden starts, sharp turns, sudden
braking or abrupt maneuvers,
otherwise it may result in loss of
control. If driving for a long distance,
on rough roads, or at high speeds,
occasionally stop the vehicle to
make sure the cargo remains in its
place. Do not exceed the maximum
vehicle capacity when loading the
vehicle. For more information on
vehicle capacity and loading, see
Vehicle Load Limits on page 8‑22.
The roof rack crossrails can be
locked in four positions along the
roof rack side rails.
Page 106 of 410
4-14 Instruments and Controls
.The gauge moves a little while
turning a corner or speeding up.
.The gauge takes a few seconds
to stabilize after the ignition is
turned on, and goes back to
empty when the ignition is
turned off.
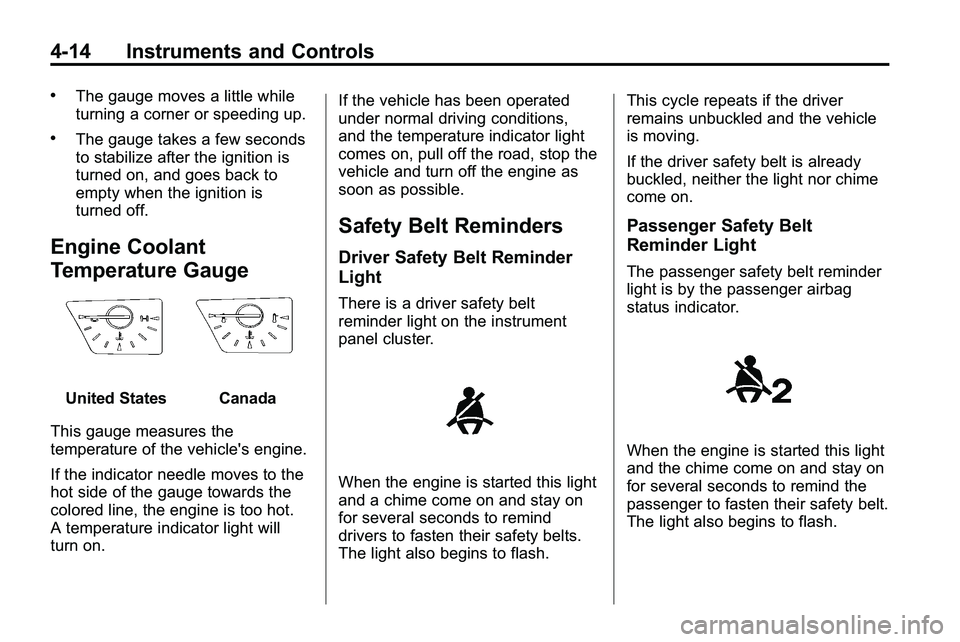
Engine Coolant
Temperature Gauge
United StatesCanada
This gauge measures the
temperature of the vehicle's engine.
If the indicator needle moves to the
hot side of the gauge towards the
colored line, the engine is too hot.
A temperature indicator light will
turn on. If the vehicle has been operated
under normal driving conditions,
and the temperature indicator light
comes on, pull off the road, stop the
vehicle and turn off the engine as
soon as possible.
Safety Belt Reminders
Driver Safety Belt Reminder
Light
There is a driver safety belt
reminder light on the instrument
panel cluster.
When the engine is started this light
and a chime come on and stay on
for several seconds to remind
drivers to fasten their safety belts.
The light also begins to flash.This cycle repeats if the driver
remains unbuckled and the vehicle
is moving.
If the driver safety belt is already
buckled, neither the light nor chime
come on.
Passenger Safety Belt
Reminder Light
The passenger safety belt reminder
light is by the passenger airbag
status indicator.
When the engine is started this light
and the chime come on and stay on
for several seconds to remind the
passenger to fasten their safety belt.
The light also begins to flash.
Page 110 of 410
4-18 Instruments and Controls
The following can prevent more
serious damage to the vehicle:
.Reduce vehicle speed.
.Avoid hard accelerations.
.Avoid steep uphill grades.
.If towing a trailer, reduce the
amount of cargo being hauled as
soon as it is possible.
If the light continues to flash, when
it is safe to do so, stop the vehicle.
Find a safe place to park the
vehicle. Turn the key off, wait at
least 10 seconds, and restart the
engine. If the light is still flashing,
follow the previous steps and see
your dealer/retailer for service as
soon as possible.
Light On Steady: An emission
control system malfunction has
been detected on the vehicle.
Diagnosis and service might be
required. An emission system malfunction
might be corrected.
.Make sure the fuel cap is fully
installed. See
Filling the Tankon
page 8‑56. The diagnostic
system can determine if the
fuel cap has been left off or
improperly installed. A loose or
missing fuel cap allows fuel to
evaporate into the atmosphere.
A few driving trips with the cap
properly installed should turn the
light off.
.If the vehicle has been driven
through a deep puddle of water,
the vehicle's electrical system
might be wet. The condition is
usually corrected when the
electrical system dries out.
A few driving trips should turn
the light off.
.Make sure to fuel the vehicle
with quality fuel. Poor fuel quality
causes the engine not to run as
efficiently as designed and may
cause: stalling after start-up,
stalling when the vehicle is
changed into gear, misfiring,
hesitation on acceleration,
or stumbling on acceleration.
These conditions might go away
once the engine is warmed up.
If one or more of these
conditions occurs, change the
fuel brand used. It will require at
least one full tank of the proper
fuel to turn the light off.
See Recommended Fuel
on
page 8‑54.
If none of the above have made
the light turn off, your dealer/retailer
can check the vehicle. The
dealer/retailer has the proper test
equipment and diagnostic tools to
fix any mechanical or electrical
problems that might have
developed.
Page 112 of 410

4-20 Instruments and Controls
When the ignition is on, the brake
system warning light comes on
when the parking brake is set. The
light stays on if the parking brake
does not fully release. If it stays on
after the parking brake is fully
released, there is a brake problem.
Have the brake system inspected
immediately.
{WARNING
The brake system might not be
working properly if the brake
system warning light is on.
Driving with the brake system
warning light on can lead to a
crash. If the light is still on after
the vehicle has been pulled off
the road and carefully stopped,
have the vehicle towed for
service.If the light comes on while driving, a
chime sounds. Pull off the road and
stop. The pedal might be harder to
push or go closer to the floor.
It might also take longer to stop.
If the light is still on, have the
vehicle towed for service. See
Towing the Vehicle on page 9‑81.
Antilock Brake System
(ABS) Warning Light
For vehicles with the Antilock Brake
System (ABS), this light comes on
briefly when the engine is started.
If the light does not come on, have it
fixed so it will be ready to warn if
there is a problem. If the ABS light stays on, turn the
ignition off. If the light comes on
while driving, stop as soon as it is
safely possible and turn the ignition
off. A chime may also sound when
the light comes on steady. Then
start the engine again to reset the
system. If the ABS light stays on,
or comes on again while driving, the
vehicle needs service. If the regular
brake system warning light is not
on, the vehicle still has brakes, but
not antilock brakes. If the regular
brake system warning light is also
on, the vehicle does not have
antilock brakes and there is a
problem with the regular brakes.
See
Brake System Warning Lighton page 4‑19.
For vehicles with a Driver
Information Center (DIC), see
Driver Information Center (DIC)
on
page 4‑25for all brake related DIC
messages.
Page 114 of 410
4-22 Instruments and Controls
The indicator/warning light flashes
while the StabiliTrak or TCS system
is working to control the vehicle on
a low traction surface.
If the TCS warning light comes on
and stays on while driving, the
vehicle needs service.
Check the Driver Information Center
(DIC) for applicable messages. See
Ride Control System Messages
on
page 4‑33for more information.
See Traction Control System (TCS)
on page 8‑41andStabiliTrak
Systemon page 8‑42for more
information.
Tire Pressure Light
For vehicles with a tire pressure
monitoring system, this light comes
on briefly when the engine is
started. It provides information
about tire pressures and the Tire
Pressure Monitoring System.
When the Light is On Steady
This indicates that one or more of
the tires are significantly
underinflated. A tire pressure message in the
Driver Information Center (DIC), can
accompany the light. See
Tire
Messages
on page 4‑35for more
information. Stop as soon as
possible, and inflate the tires to the
pressure value shown on the tire
loading information label. See Tire
Pressure
on page 9‑52for more
information.
When the Light Flashes First and
Then is On Steady
This indicates that there may be a
problem with the Tire Pressure
Monitor System. The light flashes
for about a minute and stays on
steady for the remainder of the
ignition cycle. This sequence
repeats with every ignition cycle.
See Tire Pressure Monitor
Operation
on page 9‑55for
more information.
Page 119 of 410
Instruments and Controls 4-27
Average Fuel Economy
This display shows the approximate
average liters per 100 kilometers
(L/100 km) or miles per
gallon (mpg). This number is
calculated based on the number
of L/100 km (mpg) recorded since
the last time this menu item was
reset. The fuel economy can be
reset by pressing
Vor SET/CLR
while the Average Fuel Economy
display is showing. The display may
not reset to zero.
Instantaneous Fuel Economy
This display shows the current fuel
economy in either liters per
100 kilometers (L/100 km) or miles
per gallon (mpg). This number
reflects only the fuel economy that
the vehicle has right now and
changes frequently as driving
conditions change. Unlike average
economy, this display cannot be
reset. Average Vehicle Speed
This display shows the average
speed of the vehicle in kilometers
per hour (km/h) or miles per
hour (mph). This average is
calculated based on the various
vehicle speeds recorded since
the last reset of this value. The
average speed can be reset by
pressingVor SET/CLR while the
Average Vehicle Speed display is
showing.
Timer
This display can be used as a timer.
To start the timer, press
Vor
SET/CLR while Timer is displayed.
The display will show the amount of
time that has passed since the timer
was last reset, not including time the
ignition is off. Time will continue to
be counted as long as the ignition is
on, even if another display is being
shown on the DIC. The timer will
record up to 99 hours, 59 minutes
and 59 seconds (99:59:59) after
which the display will return to zero. To stop the timer, press
Vor
SET/CLR briefly while Timer is
displayed. To reset the timer to zero,
press and hold
Vor SET/CLR.
Digital Speedometer
The speedometer shows how fast
the vehicle is moving in either
kilometers per hour (km/h) or miles
per hour (mph). The speedometer
cannot be reset.
Turn-by-Turn
This display is used for the OnStar
or Navigation System Turn-by-Turn
guidance. See OnStar
®Systemon
page 4‑41or the Navigation
manual, if the vehicle has
navigation, for more information.
Blank Display
This display shows no information.
Page 125 of 410
Instruments and Controls 4-33
Key and Lock Messages
Replace Battery In Remote Key
This message displays when the
battery in the Remote Keyless Entry
(RKE) transmitter needs to be
replaced.
Transport Mode On
This message displays when the
ignition is held in START for
15 seconds. The battery light may
also be flashing when this message
is displayed. To turn this message
off, start the vehicle and hold the
key in the START position for
15 seconds.
Object Detection System
Messages
Park Assist Off
This message is displayed when the
park assist system has been turned
off. SeeUltrasonic Parking Assist
on page 8‑47.
Service Park Assist
This message is displayed if there is
a problem with the park assist
system. Take the vehicle to your
dealer/retailer for service.
Ride Control System
Messages
All Wheel Drive Off
If your vehicle has the All-Wheel
Drive (AWD) system, this message
displays when the rear drive system
is overheating. This message turns
off when the rear drive system cools
down. If the warning message stays
on for a while, you need to reset the
warning message. To reset the
warning message, turn the ignition
off and then back on again. If the
message stays on, see your dealer/
retailer right away. See All-Wheel
Drive
on page 8‑38for more
information.
Service All Wheel Drive
If your vehicle has the All-Wheel
Drive (AWD) system, this message
displays if a problem occurs with
this system. If this message
appears, stop as soon as possible
and turn off the vehicle. Restart the
vehicle and check for the message
on the DIC display. If the message
is still displayed or appears again
when you begin driving, the AWD
system needs service. See your
dealer/retailer.
Service Traction Control
This message displays when there
is a problem with the Traction
Control System (TCS). When this
message is displayed, the system
will not limit wheel spin. Adjust your
driving accordingly. See your dealer/
retailer for service.
Page 126 of 410
4-34 Instruments and Controls
Service Stabilitrak
This message displays if there is a
problem with the StabiliTrak®
system. If this message appears, try
to reset the system. Stop; turn off
the engine for at least 15 seconds;
then start the engine again. If this
message still comes on, it means
there is a problem. See your dealer/
retailer for service. The vehicle is
safe to drive, however, you do not
have the benefit of StabiliTrak, so
reduce your speed and drive
accordingly.
Stabilitrak Off
This message displays when the
StabiliTrak system is turned off. See
StabiliTrak System
on page 8‑42for more information.
Traction Control Off
This message displays when the
Traction Control System (TCS) is
turned off. Adjust your driving
accordingly.
Traction Control On
This message displays when the
Traction Control System (TCS) is
first turned on. SeeTraction Control
System (TCS)
on page 8‑41for
more information.
Airbag System Messages
Service Airbag
This message is displayed if there is
a problem with the airbag system.
Take the vehicle to your dealer/
retailer for service.
Safety Belt Messages
Buckle Seatbelt
This message displays as a
reminder when the safety belt is
not buckled.
Anti-Theft Alarm System
Messages
Theft Attempted
This message displays if the vehicle
detects a tamper condition.
Service Vehicle Messages
Service AC System
This message is displayed if there is
a problem with the air conditioning
system. Take the vehicle to your
dealer/retailer for service.
Service Power Steering
This message is displayed if there is
a problem with the power steering
system. Take the vehicle to your
dealer/retailer for service.
Service Vehicle Soon
This message is displayed if there is
a problem with the vehicle. Take the
vehicle to your dealer/retailer for
service.