ESP GMC TERRAIN 2010 Owner's Manual
[x] Cancel search | Manufacturer: GMC, Model Year: 2010, Model line: TERRAIN, Model: GMC TERRAIN 2010Pages: 410, PDF Size: 2.55 MB
Page 12 of 410
1-6 Keys, Doors and Windows
Shutting the Engine Off After a
Remote Start
To shut off the engine:
.Press/until the parking lamps
turn off.
.Turn on the hazard warning
flashers.
.Insert the key and turn it to
ON/RUN and then back to
LOCK/OFF. Conditions in Which Remote Start
Will Not Work
The remote vehicle start feature will
not operate if:
.The key is in the ignition.
.The hood or doors are not
closed.
.The hazard warning flashers
are on.
.There is an emission control
system malfunction.
.The engine coolant temperature
is too high.
.The oil pressure is low.
.Two remote vehicle starts have
already been used.
.The vehicle is not in P (Park).
Door Locks
{WARNING
Unlocked doors can be
dangerous.
.Passengers, especially
children, can easily open the
doors and fall out of a moving
vehicle. The chance of being
thrown out of the vehicle in a
crash is increased if the
doors are not locked. So, all
passengers should wear
safety belts properly and the
doors should be locked
whenever the vehicle is
driven.
(Continued)
Page 19 of 410
Keys, Doors and Windows 1-13
Vehicle Security
Vehicle theft is big business,
especially in some cities. This
vehicle has theft-deterrent features,
however, they do not make it
impossible to steal.
Anti-Theft Alarm System
This vehicle has an anti-theft alarm
system.
Arming the System
To arm the system, either:
.PressQon the RKE transmitter.
.Or, lock the vehicle using the
key in the driver door.
The alarm automatically arms after
about 30 seconds. The security
light, located on the instrument
panel, flashes.
Press
Von the RKE transmitter to
open the liftgate without setting off
the alarm. The system rearms when
the liftgate is closed.
Disarming the System
To disarm the system, do one of the
following:
.PressKon the RKE transmitter.
.Turn the ignition to ON/RUN.
.Allow the alarm to time out after
about 30 seconds and reset
itself.
The alarm automatically disarms.
If the system is armed and any door
is unlocked without pressing
Kon
the RKE transmitter the alarm
sounds.
How to Detect a Tamper
Condition
IfKis pressed and the horn
sounds, an attempted break-in has
occurred while the system was
armed. If the alarm has been activated, the
“Theft Attempted”
message will
appear on the DIC. See Key and
Lock Messages
on page 4‑33for
additional information.
Immobilizer
See Radio Frequency Statementon
page 12‑16for information
regarding Part 15 of the Federal
Communications Commission (FCC)
Rules and RSS-210/211 of Industry
Canada.
Immobilizer Operation
This vehicle has a passive
theft-deterrent system.
The system does not have to be
manually armed or disarmed.
The vehicle is automatically
immobilized when the key is
removed from the ignition.
Page 22 of 410
1-16 Keys, Doors and Windows
Interior Mirrors
Automatic Dimming
Rearview Mirror
The vehicle may have an automatic
dimming inside rearview mirror.
Vehicles with OnStar
®have three
additional control buttons located at
the bottom of the mirror. See your
dealer/retailer for more information
on the system and how to subscribe
to OnStar. See OnStar
®Systemon
page 4‑41for more information
about the services OnStar provides.
O: Press to turn automatic
dimming on or off.
If the vehicle has a rear vision
camera (RVC) the
Obutton for
turning the automatic dimming
feature on or off will not be
available. See Rear Vision Camera
(RVC)
on page 8‑50for more
information.
Automatic Dimming Mirror
Operation
Automatic dimming reduces the
glare from the headlamps of the
vehicle behind you. The dimming
feature comes on and the indicator
light comes on each time the vehicle
is started.
Cleaning the Mirror
Do not spray glass cleaner directly
on the mirror. Use a soft towel
dampened with water.
Windows
{WARNING
Leaving children, helpless adults,
or pets in a vehicle with the
windows closed is dangerous.
They can be overcome by
the extreme heat and suffer
permanent injuries or even death
from heat stroke. Never leave a
child, a helpless adult, or a pet
alone in a vehicle, especially with
the windows closed in warm or
hot weather.
Page 30 of 410
2-4 Seats and Restraints
Driver Seat with Power SeatControl, Power Lumbar,
and Manual Recline shown
D: Power Lumbar Adjustment
E: Power Seat Adjustment
F: Manual Recline Adjustment
On vehicles with power seats, the
controls are located on the outboard
side of the seats.
Adjust the power seat by moving the
control (B) forward or rearward, up
or down, or by pressing the top or
bottom of control (E). Adjust the seatback by moving the
control (C) forward or rearward.
See
Reclining Seatbacks
on
page 2‑5for more information.
Adjust the lumbar support by
using the control (D). See Lumbar
Adjustment
on page 2‑5for more
information.
Memory Seats
The vehicle may have a memory
seat allowing saved and recalled
seat settings. Controls (A) are
located on the outboard side of
the seat.
To save:
1. Adjust the driver seat, including the seatback recliner, and both
outside mirrors, to a comfortable
position.
2. Press and hold the MEM button and button 1 at the same time
until a beep indicates the
position is stored. A second seating and mirror
position can be programmed by
repeating the above steps and
pressing button 2.
To recall the memory positions, the
vehicle must be in P (Park). Press
and hold either button 1 or button 2
corresponding to the desired driving
position. The seat, outside mirrors
and pedals, if available move to the
stored position. Releasing the
button before the stored position is
reached cancels the recall.
Entry using the Remote Keyless
Entry (RKE) transmitter with the
remote recall feature on
automatically adjusts the seat and
mirrors. There is no adjustment
when the position has not been
changed by another seating
position.
When the remote recall feature is
on, the seat and mirror position will
be stored when the ignition is turned
to LOCK/OFF. It is stored according
to the RKE transmitter used to start
the vehicle.
Page 33 of 410
Seats and Restraints 2-7
Heated Front Seats
{WARNING
If you cannot feel temperature
change or pain to the skin, the
seat heater may cause burns
even at low temperatures. To
reduce the risk of burns, people
with such a condition should use
care when using the seat heater,
especially for long periods of
time. Do not place anything on
the seat that insulates against
heat, such as a blanket, cushion,
cover or similar item. This may
cause the seat heater to
overheat. An overheated seat
heater may cause a burn or may
damage the seat.
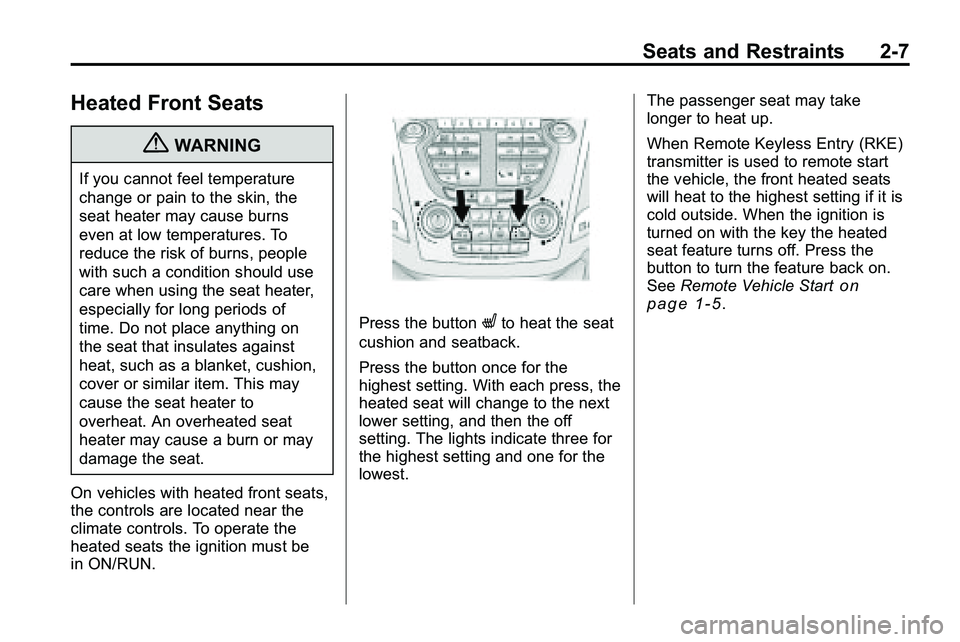
On vehicles with heated front seats,
the controls are located near the
climate controls. To operate the
heated seats the ignition must be
in ON/RUN.
Press the buttonLto heat the seat
cushion and seatback.
Press the button once for the
highest setting. With each press, the
heated seat will change to the next
lower setting, and then the off
setting. The lights indicate three for
the highest setting and one for the
lowest. The passenger seat may take
longer to heat up.
When Remote Keyless Entry (RKE)
transmitter is used to remote start
the vehicle, the front heated seats
will heat to the highest setting if it is
cold outside. When the ignition is
turned on with the key the heated
seat feature turns off. Press the
button to turn the feature back on.
See
Remote Vehicle Start
on
page 1‑5.
Page 38 of 410
2-12 Seats and Restraints
Questions and Answers About
Safety Belts
Q: Will I be trapped in the vehicleafter a crash if I am wearing a
safety belt?
A: You could be—whether you are
wearing a safety belt or not. But
your chance of being conscious
during and after an accident, so
you canunbuckle and get out,
is much greater if you are
belted. And you can unbuckle
a safety belt, even if you are
upside down. Q: If my vehicle has airbags, why
should I have to wear safety
belts?
A: Airbags are supplemental
systems only; so they work with
safety belts —not instead of
them. Whether or not an airbag
is provided, all occupants still
have to buckle up to get the
most protection. That is true not
only in frontal collisions, but
especially in side and other
collisions. Q: If I am a good driver, and I
never drive far from home,
why should I wear safety
belts?
A: You may be an excellent driver,
but if you are in a crash —even
one that is not your fault —you
and your passenger(s) can be
hurt. Being a good driver does
not protect you from things
beyond your control, such as
bad drivers.
Most accidents occur within
40 km (25 miles) of home.
And the greatest number of
serious injuries and deaths
occur at speeds of less than
65 km/h (40 mph).
Safety belts are for everyone.
Page 133 of 410
Instruments and Controls 4-41
OnStar®System
OnStar®uses several innovative
technologies and live advisors to
provide a wide range of safety,
security, navigation, diagnostics,
and calling services.
Automatic Crash Response
In a crash, built in sensors can
automatically alert an OnStar
advisor who is immediately
connected to the vehicle to see
if you need help.
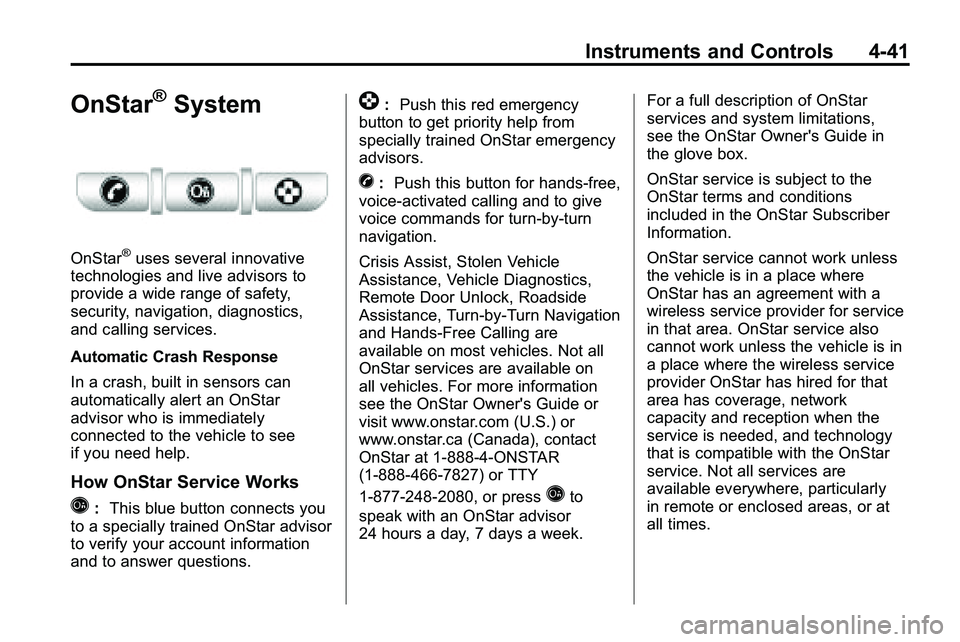
How OnStar Service Works
Q: This blue button connects you
to a specially trained OnStar advisor
to verify your account information
and to answer questions.
]: Push this red emergency
button to get priority help from
specially trained OnStar emergency
advisors.
X: Push this button for hands‐free,
voice‐activated calling and to give
voice commands for turn‐by‐turn
navigation.
Crisis Assist, Stolen Vehicle
Assistance, Vehicle Diagnostics,
Remote Door Unlock, Roadside
Assistance, Turn‐by‐Turn Navigation
and Hands‐Free Calling are
available on most vehicles. Not all
OnStar services are available on
all vehicles. For more information
see the OnStar Owner's Guide or
visit www.onstar.com (U.S.) or
www.onstar.ca (Canada), contact
OnStar at 1-888-4-ONSTAR
(1‐888‐466‐7827) or TTY
1‐877‐248‐2080, or press
Qto
speak with an OnStar advisor
24 hours a day, 7 days a week. For a full description of OnStar
services and system limitations,
see the OnStar Owner's Guide in
the glove box.
OnStar service is subject to the
OnStar terms and conditions
included in the OnStar Subscriber
Information.
OnStar service cannot work unless
the vehicle is in a place where
OnStar has an agreement with a
wireless service provider for service
in that area. OnStar service also
cannot work unless the vehicle is in
a place where the wireless service
provider OnStar has hired for that
area has coverage, network
capacity and reception when the
service is needed, and technology
that is compatible with the OnStar
service. Not all services are
available everywhere, particularly
in remote or enclosed areas, or at
all times.
Page 134 of 410
![GMC TERRAIN 2010 Owners Manual 4-42 Instruments and Controls
The OnStar system can record and
transmit vehicle information. This
information is automatically sent to
an OnStar call center when
Qis
pressed,
]is pressed, or if the
ai GMC TERRAIN 2010 Owners Manual 4-42 Instruments and Controls
The OnStar system can record and
transmit vehicle information. This
information is automatically sent to
an OnStar call center when
Qis
pressed,
]is pressed, or if the
ai](/img/44/35523/w960_35523-133.png)
4-42 Instruments and Controls
The OnStar system can record and
transmit vehicle information. This
information is automatically sent to
an OnStar call center when
Qis
pressed,
]is pressed, or if the
airbags or ACR system deploy. This
information usually includes the
vehicle's GPS location and, in the
event of a crash, additional
information regarding the crash that
the vehicle was involved in (e.g. the
direction from which the vehicle was
hit). When the virtual advisor feature
of OnStar hands-free calling is
used, the vehicle also sends OnStar
the vehicle's GPS location so they
can provide services where it is
located.
Location information about the
vehicle is only available if the GPS
satellite signals are unobstructed
and available. The vehicle must have a working
electrical system, including
adequate battery power, for the
OnStar equipment to operate. There
are other problems OnStar cannot
control that may prevent OnStar
from providing OnStar service at
any particular time or place. Some
examples are damage to important
parts of the vehicle in a crash, hills,
tall buildings, tunnels, weather or
wireless phone network congestion.
OnStar Steering Wheel
Controls
This vehicle may have a Talk/Mute
button that can be used to interact
with OnStar hands-free calling. See
Steering Wheel Controls
on
page 4‑6for more information. On some vehicles, the mute button
can be used to dial numbers into
voice mail systems, or to dial phone
extensions. See the OnStar Owner's
Guide for more information.
Your Responsibility
Increase the volume of the radio if
the OnStar advisor cannot be heard.
If the light next to the OnStar
buttons is red, the system may
not be functioning properly.
Press
Qand request a vehicle
diagnostic. If the light appears clear
(no light is appearing), your OnStar
subscription has expired and all
services have been deactivated.
Press
Qto confirm that the OnStar
equipment is active.
Page 151 of 410
Infotainment System 6-13
Storing a Station as a Favorite
Stations from all bands can be
stored in any order in the favorite
pages.
Up to six stations can be stored in
each favorite page and the number
of available favorite pages can
be set.
Storing a Station as a Favorite
To store the station to a position in
the list, press the corresponding
button 1 to 6 until a beep is heard.
Retrieving stations
Press the FAV button to open a
favorite page or to switch to another
favorite page. Briefly press one of
the 1 to 6 buttons to retrieve the
station.
Time Shifting (Radio with
CD/DVD and MEM)
The radio with MEM time shift
feature can rewind 20 minutes of
FM/AM content. While listening to
the radio, the content from the
current station is always being
buffered.
Press the
kbutton to pause the
radio. The radio displays the time
shift status bar. The status bar
shows the amount of content that is
stored in the buffer and the current
pause point.
To resume playback from the
current pause point, press
the
kbutton again. The radio is
no longer live, but played from the
time shift buffer. A status bar
displays below the station number.
Press and hold the
gSEEK
or
lSEEK buttons to fast forward
or rewind through the time shift buffer. Hold
lSEEK until the end
of the recorded buffer resumes live
playback.
Press and release the
gSEEK
or
lSEEK buttons to jump forward
or back 30 seconds in the time shift
buffer.
When the radio station is
changed, the buffer is cleared
and automatically restarted for the
current station. Content from a
previously tuned station is no longer
available.
The time shift feature is not
available while recording or with
other sources of playback.
Pausing AM/FM with the Vehicle
Turned Off
If AM/FM is paused when the
vehicle is turned off, the radio
continues to buffer the current radio
station for up to 20 minutes. If the
vehicle is turned back on within
20 minutes, the radio resumes
playback from the paused point.
Page 153 of 410
Infotainment System 6-15
Selecting an XM Channel
XM channels can be selected by
using
gSEEK,lSEEK, the
MENU/SEL knob, or the menu
system.
Selecting a Channel Using
gSEEK orlSEEK
(Radio with CD)
.Press and releasegSEEK or
lSEEK to go to the previous
or next channel.
.Press and holdgSEEK
or
lSEEK to scroll through the
previous or next channel until
the channel is reached.
Selecting a Channel Using
gSEEK orlSEEK (Radio
with CD/DVD and MEM)
Press and release
gSEEK
or
lSEEK to go to the previous
or next channel. Selecting a Channel Using the
MENU/SEL Knob
To select an XM channel using the
MENU/SEL knob:
Turn the MENU/SEL knob to
highlight an XM channel, the
channel is selected after a short
delay.
To select a channel using the menu:
1. Turn the menu knob and select
Channel List.
2. Select the desired channel.
Selecting a Channel Using the
Menu System
1. Turn the MENU/SEL knob.
2. Select XM Category List.
3. Select the category.
4. Select the channel.
Storing an XM Channel as a
Favorite
Channels from all bands can be
stored in any order in the favorite
pages.
Up to six channels can be stored in
each favorite page and the number
of available favorite pages can
be set.
Storing a Channel as a Favorite
To store the channel to a position
in the list, press and hold the
corresponding 1 to 6 button until the
channel can be heard again.
Retrieving Channels
Press the FAV button to open a
favorite page or to change to
another favorite page. Briefly press
one of the 1 to 6 buttons to retrieve
the channel.