navigation system GMC TERRAIN 2010 User Guide
[x] Cancel search | Manufacturer: GMC, Model Year: 2010, Model line: TERRAIN, Model: GMC TERRAIN 2010Pages: 410, PDF Size: 2.55 MB
Page 185 of 410
Infotainment System 6-47
Deleting a Paired Phone
1. Press
b/g.
.For vehicles without a
navigation system, the
system responds“Ready”,
followed by a tone.
.For vehicles with a
navigation system, the
system responds with a
tone. After the tone say
“Hands Free”. The system
responds “Ready”, followed
by a tone.
2. Say “Bluetooth”. The system
responds “Bluetooth ready”,
followed by a tone.
3. Say “Delete”. The system asks
which phone to delete followed
by a tone. 4. Say the name of the phone to be
deleted. If the phone name is
unknown, use the “List”
command for a list of all paired
phones. The system responds
“Would you like to delete
a tone.
5. Say “Yes”to delete the phone.
The system responds “OK,
deleting
Linking to a Different Phone
1. Press
b/g.
.For vehicles without a
navigation system, the
system responds “Ready”,
followed by a tone.
.For vehicles with a
navigation system, the
system responds with a
tone. After the tone say
“Hands Free”. The system
responds “Ready”, followed
by a tone. 2. Say
“Bluetooth”. The system
responds “Bluetooth ready”,
followed by a tone.
3. Say “Change phone”. The
system responds “Please wait
while I search for other phones”.
.If another phone is found,
the response will be
“
connected”.
.If another phone is not
found, the original phone
remains connected.
Storing Name Tags
The system can store up to thirty
phone numbers as name tags that
are shared between the Bluetooth
and OnStar systems.
The system uses the following
commands to store and retrieve
phone numbers:
.Store
.Digit Store
.Directory
Page 186 of 410
6-48 Infotainment System
Using the Store Command
The store command allows a phone
number to be stored without
entering the digits individually.
1. Press
b/g.
.For vehicles without a
navigation system, the
system responds“Ready”,
followed by a tone.
.For vehicles with a
navigation system, the
system responds with a
tone. After the tone say
“Hands Free”. The system
responds “Ready”, followed
by a tone.
2. Say “Store”. The system
responds “Store, number
please”, followed by a tone.
3. Say the complete phone number to be stored at once with no
pauses.
.If the system recognizes
the number, the response is
“OK, Storing”.
.If the system does not
recognize the phone
number, the response is
“Store
“Please say yes or no”.
If the number is correct, say
“Yes”. If the number is not
correct, say “No”. The
system will ask for the
number again.
4. After the system stores the phone number, it responds
“Please say the name tag”,
followed by a tone.
5. Say a name tag for the phone number. The name tag is
recorded and the system
responds “About to store
.If the name tag does not
sound correct, say “No”and
repeat Step 5.
.If the name tag sounds
correct, say “Yes”and the
name tag is stored. After
the number is stored the
system returns to the
main menu.
Using the Digit Store Command
The digit store command allows a
phone number to be stored by
entering the digits individually.
1. Press
b/g.
.For vehicles without a
navigation system, the
system responds “Ready”,
followed by a tone.
.For vehicles with a
navigation system, the
system responds with a
tone. After the tone say
“Hands Free”. The system
responds “Ready”, followed
by a tone.
Page 187 of 410
Infotainment System 6-49
2. Say“Digit Store”. The system
responds with “Please say the
first digit to store”, followed by
a tone.
3. Say the first digit to be stored. The system will repeat back the
digit it heard followed by a tone.
Continue entering digits until the
number to be stored is complete.
.If an unwanted number is
recognized by the system,
say “Clear” at any time to
clear the last number.
.To hear all of the numbers
recognized by the system,
say “Verify” at any time.
4. After the complete number has been entered, say “Store”. The
system responds “Please say
the name tag”, followed by
a tone. 5. Say a name tag for the phone
number. The name tag is
recorded and the system
responds “About to store
.If the name tag does not
sound correct, say “No”and
repeat Step 5.
.If the name tag sounds
correct, say “Yes”and the
name tag is stored. After
the number is stored the
system returns to the
main menu.
Using the Directory Command
The directory command lists all of
the name tags stored by the system.
To use the directory command:
1. Press
b/g.
.For vehicles without a
navigation system, the
system responds “Ready”,
followed by a tone.
.For vehicles with a
navigation system, the
system responds with a
tone. After the tone say
“Hands Free”. The system
responds “Ready”, followed
by a tone.
2. Say “Directory”. The system
responds “Directory” and lists all
stored name tags. The system
returns to the main menu when
the list is complete.
Deleting Name Tags
The system uses the following
commands to delete name tags:
.Delete
.Delete all name tags
Page 188 of 410
6-50 Infotainment System
Using the Delete Command
The delete command is used to
delete specific name tags.
To delete name tags:
1. Press
b/g.
.For vehicles without a
navigation system, the
system responds“Ready”,
followed by a tone.
.For vehicles with a
navigation system, the
system responds with a
tone. After the tone say
“Hands Free”. The system
responds “Ready”, followed
by a tone.
2. Say “Delete”. The system
responds “Delete, please say
the name tag”, followed by
a tone. 3. Say the name tag to be deleted.
The system responds “Would
you like to delete,
Please say yes or no”.
.If the name tag is correct,
say “Yes” to delete the
name tag. The system
responds with “OK, deleting
the main menu.”
.If the name tag is incorrect,
say “No”. The system
responds with “No. OK, let's
try again, please say the
name tag.”
Using the Delete All Name Tags
Command
The Delete All Name Tags
command deletes all stored phone
book name tags and route name
tags for OnStar, if stored. To delete all name tags:
1. Press
b/g.
.For vehicles without a
navigation system, the
system responds
“Ready”,
followed by a tone.
.For vehicles with a
navigation system, the
system responds with a
tone. After the tone say
“Hands Free”. The system
responds “Ready”, followed
by a tone.
2. Say “Delete all name tags”. The
system responds “You are about
to delete all name tags stored in
your phone directory and your
route destination directory. Are
you sure you want to do this?
Please say yes or no.”
.Say “Yes” to delete all
name tags.
.Say “No” to cancel the
function and return to the
main menu.
Page 189 of 410
Infotainment System 6-51
Making a Call
Calls can be made using the
following commands:
.Dial
.Digit Dial
.Call
.Re‐dial
Using the Dial Command
1. Press
b/g.
.For vehicles without a
navigation system, the
system responds “Ready”,
followed by a tone.
.For vehicles with a
navigation system, the
system responds with a
tone. After the tone say
“Hands Free”. The system
responds “Ready”, followed
by a tone. 2. Say
“Dial”. The system responds
“Dial using
“Number please”, followed by
a tone.
3. Say the entire number without pausing.
.If the system recognizes
the number, it responds
with “OK, Dialing” and dials
the number.
.If the system does not
recognize the number, it
confirms the numbers
followed by a tone. If the
number is correct, say
“Yes”. The system responds
“OK, Dialing” and dials the
number. If the number is
not correct, say “No”. The
system will ask for the
number again. Using the Digit Dial Command
1. Press
b/g.
.For vehicles without a
navigation system, the
system responds
“Ready”,
followed by a tone.
.For vehicles with a
navigation system, the
system responds with a
tone. After the tone say
“Hands Free”. The system
responds “Ready”, followed
by a tone.
2. Say “Digit Dial”. The system
responds “Digit dial using
first digit to dial”, followed by
a tone.
3. Say the digits to be dialed one at a time. The system repeats back
the digit it heard followed by
a tone.
Page 190 of 410
6-52 Infotainment System
4. Continue entering digits until thenumber to be dialed is complete.
After the whole number has
been entered, say “Dial”. The
system responds “OK, Dialing”
and dials the number.
.If an unwanted number is
recognized by the system,
say “Clear” at any time to
clear the last number.
.To hear all of the numbers
recognized by the system,
say “Verify” at any time.
Using the Call Command
1. Press
b/g.
.For vehicles without a
navigation system, the
system responds “Ready”,
followed by a tone.
.For vehicles with a
navigation system, the
system responds with a
tone. After the tone say
“Hands Free”. The system
responds “Ready”, followed
by a tone. 2. Say
“Call”. The system responds
“Call using
Please say the name tag”,
followed by a tone.
3. Say the name tag of the person to call.
.If the system recognizes
the name tag it responds
“OK, calling,
and dials the number.
.If the system does not
recognize the name tag, it
confirms the name tag
followed by a tone. If the
name tag is correct, say
“Yes”. The system responds
with “OK, calling,
If the name tag is not
correct, say “No”. The
system will ask for the
name tag again.
Once connected, the person called
will be heard through the audio
speakers. Using the Re‐dial Command
1. Press
b/g.
.For vehicles without a
navigation system, the
system responds
“Ready”,
followed by a tone.
.For vehicles with a
navigation system, the
system responds with a
tone. After the tone say
“Hands Free”. The system
responds with “Ready”,
followed by a tone.
2. After the tone, say “Re‐dial”. The
system responds “Re‐dial using
last number called from the
connected Bluetooth phone.
Once connected, the person called
will be heard through the audio
speakers.
Page 192 of 410
6-54 Infotainment System
To Transfer Audio to the Cell
Phone
During a call with the audio in the
vehicle:
1. Press
bg. The system
responds “Ready”, followed by
a tone.
2. Say “Transfer Call.” The system
responds “Transferring call” and
the audio transfers to the cell
phone.
To Transfer Audio to the In-Vehicle
Bluetooth System
The cell phone must be paired and
connected with the Bluetooth
system before a call can be
transferred. The connection process
can take up to two minutes after the
ignition is turned to ON/RUN or
ACC/ACCESSORY.
For vehicles without a navigation
system, press
b gduring a call
with the audio on the cell phone, the
audio transfers to the vehicle. For vehicles with a navigation
system, press
b
gduring a call
with the audio on the cell phone.
If the audio does not transfer to the
vehicle, use the audio transfer
feature on the cell phone. See the
cell phone manufacturers user guide
for more information.
Voice Pass-Thru
Voice pass‐thru allows access to the
voice recognition commands on the
cell phone. See the cell phone
manufacturers user guide to see if
the cell phone supports this feature.
To access contacts stored in the cell
phone:
1. Press
b/g.
.For vehicles without a
navigation system, the
system responds “Ready”,
followed by a tone.
.For vehicles with a
navigation system, the
system responds with a
tone. After the tone say
“Hands Free”. The system
responds “Ready”, followed
by a tone.
2. Say “Bluetooth”. The system
responds “Bluetooth ready”,
followed by a tone.
3. Say “Voice”. The system
responds “OK, accessing
.The cell phone's normal
prompt messages will go
through its cycle according
to the phone's operating
instructions.
Dual Tone Multi-Frequency
(DTMF) Tones
The in‐vehicle Bluetooth system can
send numbers and the numbers
stored as name tags during a call.
Use this feature when calling a
menu driven phone system. Account
numbers can also be stored for use.
Page 194 of 410
6-56 Infotainment System
Bluetooth (Navigation)
For information about how to
navigate the menu system using
the infotainment controls, see
“Overview”under Introduction, in
the Navigation supplement.
Bluetooth Pairing
To make calls with a Bluetooth
cell phone through your vehicle, it
must be paired to the vehicle's
Bluetooth system first and then
connected to the vehicle before
it can be used. Refer to the cell
phone manufacturer's user guide
for Bluetooth pairing instructions.
If a Bluetooth phone is off or not
connected, calls will automatically
be made using the OnStar
®
Hands‐Free Calling feature,
if available. Refer to the OnStar
owner's guide for more information
about OnStar Hands-Free Calling.
A Bluetooth phone with MP3
capability cannot be connected to
the vehicle as a phone and an MP3
player at the same time. The pairing process can be started
by using the voice recognition
system or the controls on the
infotainment system.
Pairing Information:
.Up to five cell phones can be
paired to the Bluetooth system.
.The pairing process is disabled
when the vehicle is moving.
.The Bluetooth system links with
the first available paired cell
phone based on the order
shown in the device list.
.Only one paired cell phone can
be connected to the vehicle's
Bluetooth system at a time.
.Pairing should only need to be
completed once, unless changes
to the pairing information have
been made or the phone is
deleted.
To link to a different paired phone,
see “Linking to a Different Phone”
later in this section. Pairing a Phone
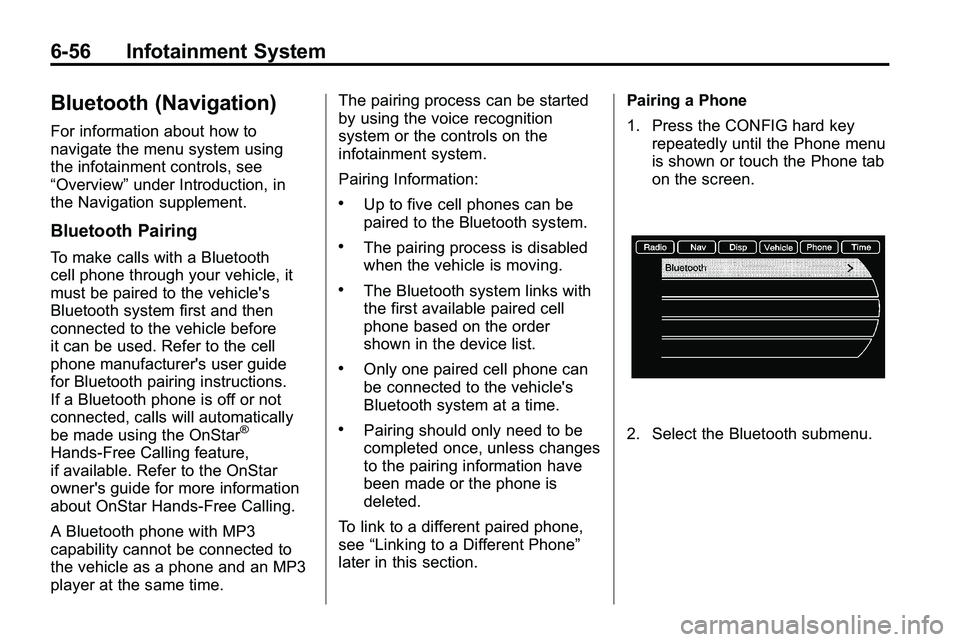
1. Press the CONFIG hard key
repeatedly until the Phone menu
is shown or touch the Phone tab
on the screen.2. Select the Bluetooth submenu.
Page 199 of 410
Infotainment System 6-61
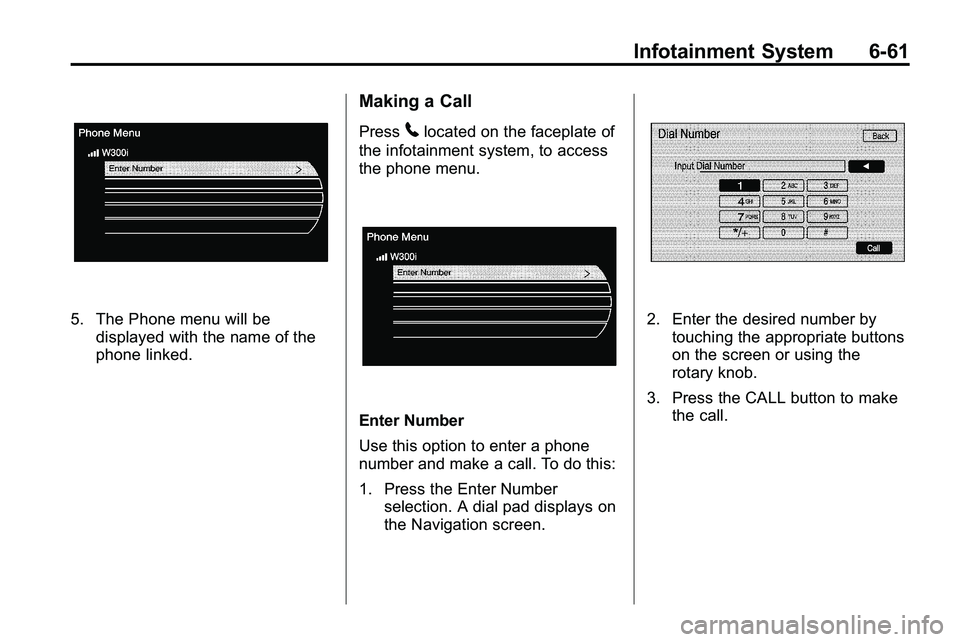
5. The Phone menu will bedisplayed with the name of the
phone linked.
Making a Call
Press5located on the faceplate of
the infotainment system, to access
the phone menu.
Enter Number
Use this option to enter a phone
number and make a call. To do this:
1. Press the Enter Number selection. A dial pad displays on
the Navigation screen.
2. Enter the desired number bytouching the appropriate buttons
on the screen or using the
rotary knob.
3. Press the CALL button to make the call.
Page 258 of 410
8-50 Driving and Operating
Rear Vision
Camera (RVC)
The vehicle may have a Rear Vision
Camera (RVC) system. Read this
entire section before using it.
The RVC can assist the driver when
backing up by displaying a view of
the area behind the vehicle.
{WARNING
The Rear Vision Camera (RVC)
system does not replace driver
vision. RVC does not:
.Detect objects that are
outside the camera's field of
view, below the bumper,
or underneath the vehicle.
.Detect children, pedestrians,
bicyclists, or pets.(Continued)
WARNING (Continued)
Do not back the vehicle by only
looking at the RVC screen, or use
the screen during longer, higher
speed backing maneuvers or
where there could be cross-traffic.
Your judged distances using the
screen will differ from actual
distances.
So if you do not use proper care
before backing up, you could hit a
vehicle, child, pedestrian,
bicyclist, or pet, resulting in
vehicle damage, injury, or death.
Even though the vehicle has the
RVC system, always check
carefully before backing up by
checking behind and around the
vehicle.
Vehicles Without a Navigation
System
When the key is in the ON/RUN
position and the driver shifts the
vehicle into R (Reverse), the video
image automatically appears on the
inside rear view mirror. Once the
driver shifts out of R (Reverse), the
video image automatically
disappears from the inside rear view
mirror.
Turning the Rear Vision Camera
System Off or On
To turn off the RVC system, press
and hold
z, located on the inside
rearview mirror, until the left
indicator light turns off. The RVC
display is now disabled.
To turn the RVC system on again,
press and hold
zuntil the left
indicator light illuminates. The RVC
system display is now enabled and
the display will appear in the mirror
normally.