buttons GMC TERRAIN 2010 Owner's Guide
[x] Cancel search | Manufacturer: GMC, Model Year: 2010, Model line: TERRAIN, Model: GMC TERRAIN 2010Pages: 410, PDF Size: 2.55 MB
Page 169 of 410

Infotainment System 6-31
3.5 mm Auxiliary Input Jack
Playback of an audio device that is
connected to the 3.5 mm auxiliary
input jack can only be controlled
using the controls on the device.
Adjusting the Volume
Turn the VOL/
Oknob to adjust the
volume of the infotainment system
after the volume level has been set
on the portable audio device.
USB Port
The following devices may be
connected to the USB port and
controlled by the infotainment
system.
.iPod's
.USB Mass Storage Devices
Not all iPod's or USB Mass Storage
Devices are compatible with the
infotainment system.
Connecting and Controlling
an iPod™
Not all iPod's can be controlled by
the Infotainment System.
Connecting an iPod
Connect the iPod to the USB port.
Selecting a Track
Using the control buttons:
.PressgSEEK orlSEEK to
select the previous or next track.
.Turn the MENU/SEL knob to
select the track in the current
sub menu. The track will start
to play.
Playing Tracks in Random Order
Press the MENU/SEL knob and set
Shuffle Songs to On or Off.
Shuffle On: Plays current tracks in
random order.
Shuffle Off: Plays current tracks in
sequential order. Searching For a Track
Tracks can be searched for by:
.Playlists
.Artists
.Albums
.Song Titles
.Genres
.Composers
.Audiobooks
The number of objects in each
category is shown in parentheses
after the category.
To search for tracks:
1. Press the MENU/SEL knob.
2. Select Search.
3. Select: Playlists, Artists, Albums, Song Titles, Genres,
Composers, or Audiobooks.
4. Select the track. The search rate increases if the MENU/SEL knob
is continuously turned while
searching in a list.
Page 170 of 410
6-32 Infotainment System
Connecting and Controlling a
USB Drive
Files that are not stored in folders
are displayed in the root
directory (USB).
Connecting a USB Drive
Connect the USB drive to the
USB port.
Disconnecting a USB Drive
A USB drive should be ejected from
the USB port before disconnecting
it. To eject a USB drive:
1. Press the MENU/SEL knob.
2. Select USB Eject.
Playing Tracks in Random Order
Press the MENU/SEL knob and
then set Shuffle Songs to On.Selecting a Track
Using the control buttons:.PressgSEEK orlSEEK to
select the previous or next track.
.Turn the MENU/SEL knob to
select a track in the current sub
menu. The track will start to play.
Selecting a track in a different
folder:
1. Press the MENU/SEL knob.
2. Select Folder List.
3. Select the folder.
4. Select the track.
Searching for Tracks
It is normal for the search feature
to take some time to display the
information after reading the device
due to the amount of information
stored.
Files that do not have any meta
data stored in the ID3 tag display as
Unknown. Tracks can be searched by:
.Playlists
.Artists
.Albums
.Song Titles
.Genres
The number of objects in each
category is shown in parentheses
after the category.
To search for tracks:
1. Press the MENU/SEL knob.
2. Select Search.
3. Select: Playlists, Artists, Albums, Song Titles, Genres,
Composers, or Audiobooks.
4. Select the track. The search rate increases if the MENU/SEL knob
is continuously turned while
searching in a list.
Recording Tracks to MEM
See Mass Storage Media (MEM)
on
page 6‑24for more information.
Page 175 of 410
Infotainment System 6-37
If a CD, DVD, or MP3 disc is in the
Radio DVD slot, the remote control
Obutton can be used to turn on the
video screen display and start the
disc. The infotainment system can
also turn on the video screen
display. See CD/DVD Player
on
page 6‑21or the separate
navigation system manual for more
information.
Notice: Storing the remote
control in a hot area or in direct
sunlight can damage it, and the
repairs will not be covered by the
warranty. Storage in extreme cold
can weaken the batteries. Keep
the remote control stored in a
cool, dry place.
Remote Control Buttons
O(Power): Press to turn the
video screens on and off.
P(Illumination): Press to turn the
remote control backlight on. The
backlight times out after several
seconds if no other button is
pressed.
v(Title): Press to return to the
main menu of the DVD. This
function could vary for each disc.
y(Main Menu): Press to access
the DVD menu. The DVD menu is
different on every DVD. Use the
navigation arrows to move the
cursor. After making a selection
press the enter button. This button
only operates when using a DVD.
n,q,p,o(Menu Navigation
Arrows): Use the arrow buttons to
navigate through a menu.
r(Enter): Press to select the
highlighted choice in any menu.
z(Display Menu): Press to
adjust the brightness, screen
display mode, and display the
language menu.
q(Return): Press to exit the
current active menu and return to
the previous menu. This button
operates only when the display
menu or a DVD menu is active.
c(Stop): Press to stop playing,
rewinding, or fast forwarding a
DVD. Press twice to return to the
beginning of the DVD.
s(Play/Pause): Press to start
playing a DVD. Press to pause a
DVD while it is playing. Press again
to continue playing.
Depending on the infotainment
system in the vehicle, DVD
playback may be slowed down by
pressing
sthen[. Reverse slow
play by pressing
sthenr.
Press
sagain to cancel slow play.
t(Previous Track/Chapter):
Press to go to the start of the
current track or chapter. Press again
to go to the previous track or
chapter. This button may not work
when the DVD is playing the
copyright information or the
previews.
Page 179 of 410
Infotainment System 6-41
DVD Distortion
Video distortion can occur when
operating cellular phones, scanners,
CB radios, Global Position Systems
(GPS)*, two-way radios, mobile fax,
or walkie talkies.
It might be necessary to turn off the
DVD player when operating one of
these devices in or near the vehicle.
*Excludes the OnStar
®System.
Cleaning the RSE Seatback
Console
Use only a clean cloth dampened
with clean water to clean the RSE
seatback console surface.
Cleaning the Video Screen
Use only a clean cloth dampened
with clean water. Use care when
touching or cleaning the screen as
damage could result.
Phone
Bluetooth (Overview)
Vehicles with a Bluetooth system
can use a Bluetooth capable cell
phone with a Hands‐Free Profile to
make and receive phone calls. The
infotainment system and voice
recognition are used to control the
system. The system can be used
while the ignition is in ON/RUN or
ACC/ACCESSORY. The range of
the Bluetooth system can be up to
9.1 m (30 ft.). Not all phones support
all functions and not all phones work
with the Bluetooth system. See
www.gm.com/bluetooth for more
information about compatible
phones.
Bluetooth Controls
Use the buttons located on the
infotainment system and the
steering wheel to operate the
Bluetooth system.Steering Wheel Controls
b/g(Push To Talk):
Press to
answer incoming calls, to confirm
system information, and to start
voice recognition.
$/c(Mute/End Call): Press to
end a call, reject a call, or to cancel
an operation.
Infotainment System Controls
For information about how to
navigate the menu system using the
infotainment controls, see Operation
on page 6‑7.
5(Phone):Press to enter the
Phone main menu.
Voice Recognition
The voice recognition system uses
commands to control the system
and dial phone numbers.
Noise: The system may not
recognize voice commands if there
is too much background noise.
Page 199 of 410
Infotainment System 6-61
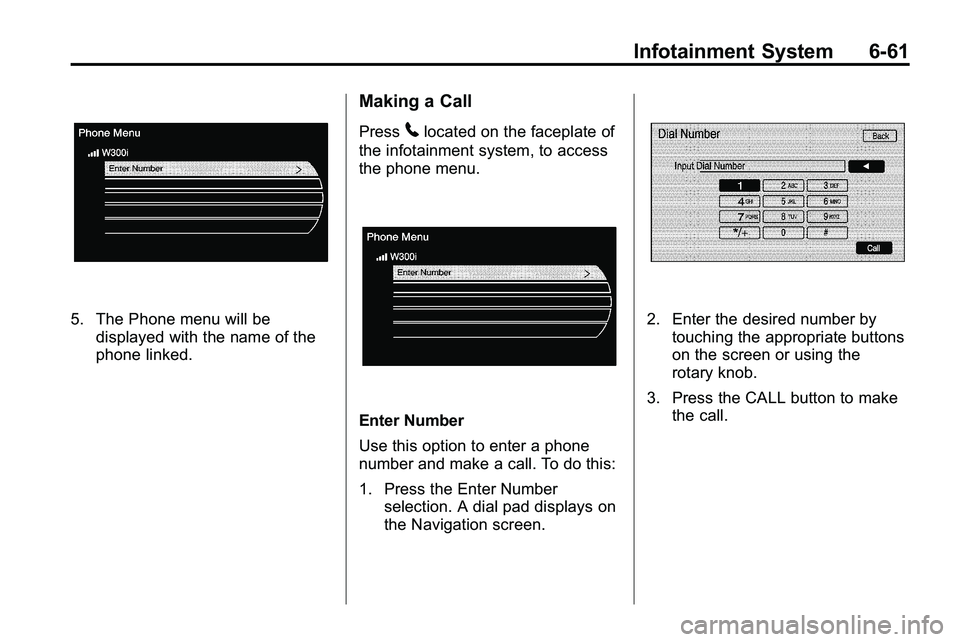
5. The Phone menu will bedisplayed with the name of the
phone linked.
Making a Call
Press5located on the faceplate of
the infotainment system, to access
the phone menu.
Enter Number
Use this option to enter a phone
number and make a call. To do this:
1. Press the Enter Number selection. A dial pad displays on
the Navigation screen.
2. Enter the desired number bytouching the appropriate buttons
on the screen or using the
rotary knob.
3. Press the CALL button to make the call.
Page 286 of 410

9-12 Vehicle Care
Engine Oil Life System
When to Change Engine Oil
This vehicle has a computer system
that indicates when to change the
engine oil and filter. This is based
on engine revolutions and engine
temperature, and not on mileage.
Based on driving conditions, the
mileage at which an oil change is
indicated can vary considerably. For
the oil life system to work properly,
the system must be reset every time
the oil is changed.
When the system has calculated
that oil life has been diminished, it
indicates that an oil change is
necessary. A“Change Engine Oil
Soon” message comes on.
See Engine Oil Messages
on
page 4‑31. Change the oil as soon as possible within the next 1 000 km
(600 miles). It is possible that,
if driving under the best conditions,
the oil life system might not indicate
that an oil change is necessary for
over a year. However, the engine oil
and filter must be changed at least
once a year and at this time the
system must be reset. Your dealer/
retailer has trained service people
who will perform this work using
genuine parts and reset the system.
It is also important to check the oil
regularly and keep it at the proper
level.
If the system is ever reset
accidentally, the oil must be
changed at 5 000 km (3,000 miles)
since the last oil change.
Remember to reset the oil life
system whenever the oil is changed.
How to Reset the Engine Oil
Life System
Reset the system whenever the
engine oil is changed so that the
system can calculate the next
engine oil change. To reset the
system:
1. Turn the ignition to ON/RUN with
the engine off.
2. Fully press and release the accelerator pedal three times
within five seconds.
If the vehicle has Driver Information
Center (DIC) buttons:
1. Turn the ignition to ON/RUN, with the engine off.
2. Press the DIC menu button until “Remaining Oil Life” displays.
3. Press and hold the set/clear button until “100%”is displayed.
4. Turn the key to LOCK/OFF.
The system is reset when the
“Change Engine Oil Soon” message
goes off.
Page 331 of 410
Vehicle Care 9-57
TPMS Sensor Matching
Process
Each TPMS sensor has a unique
identification code. Any time you
rotate your vehicle's tires or replace
one or more of the TPMS sensors,
the identification codes will need to
be matched to the new tire/wheel
position. The sensors are matched
to the tire/wheel positions in the
following order: driver side front tire,
passenger side front tire, passenger
side rear tire, and driver side rear
tire using a TPMS diagnostic tool.
See your dealer/retailer for service.
The TPMS sensors can also be
matched to each tire/wheel position
by increasing or decreasing the
tire's air pressure. If increasing the
tire's air pressure, do not exceed
the maximum inflation pressure
indicated on the tire's sidewall.To decrease air-pressure out of a
tire you can use the pointed end of
the valve cap, a pencil-style air
pressure gauge, or a key.
You have two minutes to match
the first tire/wheel position, and
five minutes overall to match all four
tire/wheel positions. If it takes longer
than two minutes, to match the first
tire and wheel, or more than
five minutes to match all four tire
and wheel positions the matching
process stops and you need to
start over.
The TPMS sensor matching process
is outlined below:
1. Set the parking brake.
2. Turn the ignition switch to
ON/RUN with the engine off. 3. Press the Remote Keyless Entry
(RKE) transmitter's lock and
unlock buttons at the same time
for approximately five seconds.
The horn sounds twice to signal
the receiver is in relearn mode
and Tire Learning Active
message displays on the DIC
screen.
4. Start with the driver side front tire.
5. Remove the valve cap from the valve cap stem. Activate the
TPMS sensor by increasing or
decreasing the tire's air pressure
for five seconds, or until a
horn chirp sounds. The horn
chirp, which may take up to
30 seconds to sound, confirms
that the sensor identification
code has been matched to this
tire and wheel position.
6. Proceed to the passenger side front tire, and repeat the
procedure in Step 5.
Page 363 of 410

Vehicle Care 9-89
At least every spring, flush these
materials from the underbody with
plain water. Clean any areas where
mud and debris can collect. Dirt
packed in close areas of the frame
should be loosened before being
flushed. Your dealer/retailer or an
underbody car washing system can
do this.
Chemical Paint Spotting
Some weather and atmospheric
conditions can create a chemical
fallout. Airborne pollutants can fall
upon and attack painted surfaces on
the vehicle. This damage can take
two forms: blotchy, ring-shaped
discolorations, and small, irregular
dark spots etched into the paint
surface.
Interior Care
The vehicle's interior will continue to
look its best if it is cleaned often.
Dust and dirt can accumulate on the
upholstery and cause damage to
the carpet, fabric, leather, and
plastic surfaces. Stains should be
removed quickly as extreme heat
could cause them to set rapidly.
Lighter colored interiors may require
more frequent cleaning.
Newspapers and garments that can
transfer color to home furnishings
can also transfer color to the
vehicle's interior.
Remove dust from small buttons
and knobs with a small brush with
soft bristles.
Your dealer/retailer has products for
cleaning the vehicle's interior. When
cleaning the vehicle's interior, only
use cleaners specifically designed
for the surfaces that are beingcleaned. Permanent damage can
result from using cleaners on
surfaces for which they were not
intended. Apply the cleaner directly
to the cleaning cloth to prevent
over-spray. Remove any accidental
over-spray from other surfaces
immediately.
Notice:
Using abrasive cleaners
when cleaning glass surfaces on
the vehicle, could scratch the
glass and/or cause damage to the
rear window defogger. When
cleaning the glass on the vehicle,
use only a soft cloth and glass
cleaner.
Cleaners can contain solvents that
can become concentrated in the
vehicle's interior. Before using
cleaners, read and adhere to all
safety instructions on the label.
While cleaning the vehicle's interior,
maintain adequate ventilation by
opening the vehicle's doors and
windows.