display GMC TERRAIN 2010 Owner's Guide
[x] Cancel search | Manufacturer: GMC, Model Year: 2010, Model line: TERRAIN, Model: GMC TERRAIN 2010Pages: 410, PDF Size: 2.55 MB
Page 154 of 410
6-16 Infotainment System
Time Shifting (Radio with
CD/DVD and MEM)
The radio with MEM time shift
feature can rewind 20 minutes of
XM content. While listening to the
radio, the content from the current
channel is always being buffered.
Press the
kbutton to pause the
radio. The radio displays the time
shift status bar. The status bar
shows the amount of content that is
stored in the buffer and the current
pause point.
To resume playback from the
current pause point, press the
kbutton again. The radio is no
longer live, but played from the time
shift buffer. A status bar displays
below the channel number.
Press and hold the
gSEEK or
lSEEK buttons to fast forward or
rewind through the time shift buffer.
Hold
lSEEK until the end of the
recorded buffer resumes live
playback. Press and release the
gSEEK or
lSEEK buttons to go to the next
or previous song in the time shift
buffer.
When the channel is changed, the
buffer is cleared and automatically
restarted for the current channel.
Content from a previously tuned
station is no longer available.
The time shift feature is not
available while recording or with
other sources of playback.
Pausing XM with the Vehicle
Turned Off
If XM is paused when the vehicle is
turned off, the radio continues to
buffer the current radio station for
up to 20 minutes. If the vehicle is
turned back on within 20 minutes,
the radio resumes playback from the
paused point.
XM Messages
XL (Explicit Language
Channels): These channels, or any
others, can be blocked by request,
by calling 1-800-852-XMXM (9696).
XM Updating: The encryption code
in the receiver is being updated, no
action is required. This process
should take no longer than
30 seconds.
Loading XM: The audio system is
acquiring and processing audio and
text data, no action is needed. This
message should disappear shortly.
Channel Off Air: This channel is
not currently in service. Tune in to
another channel.
Channel Unauth: This channel is
blocked or cannot be received with
your XM Subscription package.
Channel Unavailable: This
previously assigned channel is no
longer assigned. Tune to another
station.
Page 157 of 410
Infotainment System 6-19
If the bottom surface of a disc is
dirty, take a soft lint free cloth,
or dampen a clean soft cloth in a
mild neutral detergent solution
mixed with water, and clean it.
Wipe the disc from the center to
the outer edge.
Care of the CD Player
Do not add a label to a disc, as it
could get caught in the CD player.
If a label is needed, label the
top of the recorded disc with a
marking pen.
Do not use disc lens cleaners
because they could contaminate the
lens of the disc optics and damage
the CD player.
Notice:If a label is added to a
CD, or more than one CD is
inserted into the slot at a time,
or an attempt is made to play
scratched or damaged CDs, the
CD player could be damaged. While using the CD player, use
only CDs in good condition
without any label, load one CD at
a time, and keep the CD player
and the loading slot free of
foreign materials, liquids, and
debris.
Control Buttons
The buttons used to control the
CD player are:
CD:
Press to choose between the
CD and AUX player.
lSEEK orgSEEK : Press to
select tracks or to fast forward or
rewind within a track.
INFO: Press to display additional
information about the CD that may
be available.
MENU/SEL: Turn to select tracks.
Z(Eject):Press to remove
the CD.
k: Press to pause a CD or MP3
track, press again to resume
playback.
Inserting a CD
With the printed side facing up,
insert a disc into the CD slot until it
is drawn in.
Removing a CD
Press theZbutton.
The disc is pushed out of the
CD slot.
If the disc is not removed after it is
ejected, it is pulled back in after a
few seconds.
Playing a CD or MP3 CD
Press the CD button, if there is a
disc in the player it begins playing.
Information about the disc and
current track is shown on the
display depending on the data
stored.
Page 158 of 410
6-20 Infotainment System
Selecting a CD Track
Using the control buttons:
.Press thegSEEK orlSEEK
button to select the previous or
next track.
.Turn the MENU/SEL knob.
Using the CD Menu:
1. Press the MENU/SEL knob.
2. Select Tracks list.
3. Select the track.
Playing Tracks in Random Order
Press the MENU/SEL knob and
then set Shuffle Songs to On.
Fast Forward and Rewind
Press and hold
lSEEK or
gSEEK to fast forward or
rewind within the current track. Selecting an MP3 Track
Using the control buttons:
.Press thegSEEK orlSEEK
button to select the previous or
next track.
.Turn the MENU/SEL knob.
Using the CD Menu:
1. Press the MENU/SEL knob.
2. Select Playlists / Folders.
3. Select the playlist or folder.
4. Select the track.
Searching for MP3 Tracks
The search feature may take some
time to display the information after
reading the disc due to the amount
of information stored on the disc.
FM automatically plays while the
disc is being read. Tracks can be searched by:
.Playlists
.Artists
.Albums
.Song Titles
.Genres
.Folder View
To search for tracks:
1. Press the MENU/SEL knob.
2. Select Search.
3. Select: Playlists, Artists, Albums, Song Titles, Genres,
or Folder View.
4. Select the track.
Page 159 of 410
Infotainment System 6-21
CD/DVD Player
The CD/DVD player can play
CDs, DVD‐As, MP3/WMA CDs,
MP3/WMA DVDs, and DVD‐Vs.
The CD/DVD player will not play
8 cm (3 in.) discs.
Care of CDs and DVDs
Sound quality can be reduced due
to disc quality, recording method,
quality of the music recorded, and
how the disc has been handled.
Handle discs carefully and store
them in their original cases or other
protective cases away from direct
sunlight and dust. If the bottom
surface of a disc is damaged, the
disc may not play properly or at all.
Do not touch the bottom surface of
a disc while handling it; this could
damage the surface. Pick up discs
by grasping the outer edges or the
edge of the hole and the outer edge.
If the bottom surface of a disc is
dirty, take a soft lint free cloth,
or dampen a clean soft cloth in a
mild neutral detergent solutionmixed with water, and clean it. Wipe
the disc from the center to the
outer edge.
Care of the CD/DVD Player
Do not add a label to a disc, as it
could get caught in the CD/DVD
player. If a label is needed, label the
top of the recorded disc with a
marking pen.
Do not use disc lens cleaners
because they could contaminate the
lens of the disc optics and damage
the CD/DVD player.
Notice:
If a label is added to a
CD, or more than one CD is
inserted into the slot at a time,
or an attempt is made to play
scratched or damaged CDs, the
CD player could be damaged.
While using the CD player, use
only CDs in good condition
without any label, load one CD at
a time, and keep the CD player
and the loading slot free of
foreign materials, liquids, and
debris.
Control Buttons
The buttons used to control the
CD/DVD player are:
MEM/DVD/AUX: Press to choose
between the MEM, CD/DVD,
and AUX.
lSEEK orgSEEK : Press to
select tracks or to fast forward or
rewind within a track.
INFO: Press to display additional
information about the disc that may
be available.
MENU/SEL: Turn to select tracks.
Z(Eject):Press to remove
a disc.
k: Press to pause a CD, DVD‐A,
or DVD‐V, press again to resume
playback. Press and hold to stop a
DVD‐V disc.
Inserting a CD or DVD
With the printed side facing up,
insert a disc into the slot until it is
drawn in.
Page 160 of 410
6-22 Infotainment System
Removing a CD or DVD
Press theZbutton.
The disc is pushed out of the
CD/DVD slot.
If the disc is not removed after it is
ejected, it is pulled back in after a
few seconds.
Playing a CD or DVD‐A Disc
Press the MEM/DVD/AUX button if
there is a disc in the player, it
begins playing.
Information about the disc and
current track is shown on the
display depending on the data
stored.
Selecting CD or DVD‐A Tracks
Using the control buttons:
.Press thegSEEK orlSEEK
button to select the previous or
next track.
.Turn the MENU/SEL knob. Using the menu:
1. Press the MENU/SEL knob.
2. Select Tracks List.
3. Select the track.
Pausing a CD or DVD‐A Track
Press the
kbutton to pause a CD
or DVD‐A track. Press the
kbutton
again to continue playing the track.
Playing CD or DVD‐A Tracks in
Random Order
Press the MENU/SEL knob and
then set Shuffle Songs to On.
Fast Forward and Rewind
Press and hold the
lSEEK or
gSEEK button to fast forward or
rewind within the current track.
Playing an MP3 CD or DVD
Files that are not stored in folders
are displayed in the root
directory (disc). The search rate increases if the
MENU/SEL knob is continuously
turned while searching in a list.
Selecting an MP3 Track
Using the control buttons:
.Press thegSEEK orlSEEK
button to select the previous or
next track.
.Turn the MENU/SEL knob.
Using the CD or DVD Menu:
1. Press the MENU/SEL knob.
2. Select Folder List.
3. Select the folder.
4. Select the track.
Searching for MP3s on a CD
or DVD
It is normal for the search feature to
take some time to display the
information after reading the disc
due to the amount of information
stored on the disc. The infotainment
system automatically switches to
FM while the disc is being read.
Page 161 of 410
Infotainment System 6-23
Files that do not have any meta
data stored in the ID3 tag display as
Unknown.
Tracks can be searched for by:
.Playlists
.Artists
.Albums
.Song Titles
.Genres
The number of objects in each
category is shown in parentheses
after the category.
To search for tracks:
1. Press the MENU/SEL knob.
2. Select Search.
3. Select: Playlists, Artists, Albums, Song Titles, or Genres.
4. Select the track. The search rate increases if the menu
MENU/SEL knob is continuously
turned while searching in a list. Playing MP3 Tracks in Random
Order
Press the MENU/SEL knob and
then set Shuffle Songs to On.
Recording an Audio or MP3
CD to MEM
See
Mass Storage Media (MEM)on
page 6‑24for more information.
Playing a DVD‐V
See Rear Seat Entertainment (RSE)
Systemon page 6‑33for
information about how to control a
Video DVD using the wireless
remote control.
Selecting a Chapter
Using the control buttons:
.Press thegSEEK orlSEEK
button to select the previous or
next track.
.Turn the MENU/SEL knob. Using DVD Menu:
1. Press the MENU/SEL knob.
2. Select Chapter List.
3. Select the chapter.
Selecting a Title
1. Press the MENU/SEL knob.
2. Select Title List.
3. Select the title.
Changing the Audio Stream
1. Press the MENU/SEL knob.
2. Select Audio Stream.
3. Select Change Audio Stream.
4. Press MENU/SEL to change the
selection.
Select Cancel to exit the menu.
Pausing a DVD
1. Press the MENU/SEL knob.
2. Select Pause, to pause the disc. Select Unpause to start
playback.
Page 162 of 410
6-24 Infotainment System
Navigating the DVD‐V Disc Menu
Use the following actions to
navigate the title menu on a
DVD‐V Disc.
.Select / Enter
.Cursor UP
.Cursor DOWN
.Cursor RIGHT
.Cursor LEFT
.Up Menu
Use the following actions to
navigate the menu on a DVD‐V Disc
while playing chapters.
.Pause (Play)
.Chapter List
.Title List
.DVD/DVD
.DVD/AUX
.AUX/DVD
.AUX/AUX To navigate the menu:
1. Press the MENU/SEL knob.
2. Select the action.
Mass Storage
Media (MEM)
Infotainment systems with MEM
storage are able to record up to
1.1 GB (gigabyte) of music from
Audio CDs, MP3/WMA/AAC discs,
and USB storage devices. The MEM
player can also time shift audio from
AM, FM, and XM™
radio.
Music or content that is stored in
MEM that you did not create,
or have the right to distribute, must
be deleted before the sale or end of
the lease of the vehicle.
Control Buttons
The buttons used to control the
MEM player are:
MEM/DVD/AUX: Press to select
the MEM player.
lSEEK orgSEEK : Press to
select tracks or to fast forward or
rewind within a track.
INFO: Press to display additional
information about the MEM track
that may be available.
k: Press to pause the track
currently playing, press again to
resume playback.
OREC: Press to record music
from a CD, DVD-A, or USB drive.
FAV (Favorites): Press to display
MEM favorites.
1‐6: Press to select a track or a
stored playlist.
MENU/SEL: Turn to select tracks.
Recording From Audio CDs
The infotainment system can record
the current song playing or all songs
from an audio CD to MEM. A status
bar appears on the top of the
display when the recording process
starts and disappears when the
process has ended. Copy protected
CDs cannot be recorded to MEM.
Page 163 of 410
Infotainment System 6-25
Recording to MEM
Press
OREC, then select Record
Current Song or Record All Songs
on Disc. If the track has started
playing, the system will restart the
track and begin recording from the
beginning of the track. When the
song recording is completed, the
message Song Recorded to MEM
displays, and there may be a slight
pause.
Songs recorded to MEM are stored
as the current date, disc and track
number.
Re-recording a Previously
Recorded Disc
If the disc or track has already been
recorded to MEM, the message The
Song(s) is Already Recorded
displays. Stopping the Recording
Press theOREC button while
recording from an audio CD to
display the stop recording option.
Select Stop Recording Song
to MEM.
Renaming Recorded Discs
Discs that have been recorded to
MEM can be renamed.
1. Press the MENU/SEL knob.
2. Select Rename Recorded Discs.
3. Select the disc.
4. Select Album or Artist to rename either one.
5. Use the menu knob to enter the character sequence. See
Operation
on page 6‑7for
more information.
Recording From MP3/WMA
Discs or USB Storage Devices
USB Host Support
The USB connector uses the USB
standards, 1.1 and 2.0. USB Supported Devices
.USB Flash Drives
.Portable USB Hard Drives
Recording to MEM
Press
OREC, then select Record
Current Song or Record Current
Folder.
The information stored by MEM is
titled according to the ID3 tag
associated with it.
Re-recording a Previously
Recorded Disc
If the disc or track has already been
recorded to MEM, the message The
Song(s) is Already Recorded
displays.
Stopping the Recording
Press the
OREC button while
recording from an MP3/WMA CD or
USB storage device to display the
stop recording option. Select Stop
Recording Song to MEM.
Page 167 of 410
Infotainment System 6-29
Repeat
Press the MENU/SEL knob and set
Repeat to On or Off, then press the
0BACK button to return the main
screen.
On: Repeats the current track.
Off: Playback starts from the
beginning of the current track after
the last track finishes.
Connecting and Controlling a
PlaysForSure Device (PFD)
or Zune™
Connecting a PFD or Zune
Connect the PFD or Zune to the
USB port.
Searching For a Track
Tracks can be searched for by:
.Playlists
.Artists
.Albums
.Song Titles
.Podcasts
.Genres
To search for tracks:
1. Press the MENU/SEL knob.
2. Select Search.
3. Select: Playlists, Artists, Albums, Song Titles, Podcasts,
or Genres.
4. Select the track.
Shuffle Functionality
Press the MENU/SEL knob and set
Shuffle Songs (Random) to On
or Off.
On: Plays current tracks in random
order.
Off: Plays current tracks in
sequential order.
Repeat Functionality
Press the MENU/SEL knob and set
Repeat to On or Off.
Repeat On: Repeats the current
track. Repeat Off:
Playback starts from
the beginning of the current track
after the last track finishes.
Connecting and Controlling a
USB Drive
The infotainment system can only
play back .mp3 and .wma files from
a USB drive.
Only the first 2,500 songs are
recognized on the device.
When a device is not supported, the
message “No supported data found.
You can safely disconnect the
device” appears.
Connecting a USB Drive
Connect the USB drive to the
USB port.
Searching For a Track
It is normal for the search feature to
take some time to display the
information after reading the disc
due to the amount of information
stored on the disc.
Page 168 of 410
6-30 Infotainment System
Files that do not have any meta
data stored in the ID3 tag display as
Unknown.
Tracks can be searched for by:
.Playlists*
.Artists
.Albums
.Song Titles
.Genres
.Folder View
*This only displays if a playlist is
found on the device.
To search for tracks:
1. Press the MENU/SEL knob.
2. Select Search.
3. Select: Playlists, Artists, Albums, Song Titles, Genres,
or Folder View.
4. Select the track. Shuffle Functionality
Press the MENU/SEL knob and set
Shuffle Songs (Random) to On
or Off.
On:
Plays current tracks in random
order.
Off: Plays current tracks in
sequential order.
Repeat Functionality
Press the MENU/SEL knob and set
Repeat to On or Off.
Repeat On: Repeats the current
track.
Repeat Off: Playback starts from
the beginning of the current track
after the last track finishes.
Auxiliary Devices (Radio
with CD/DVD/MEM)
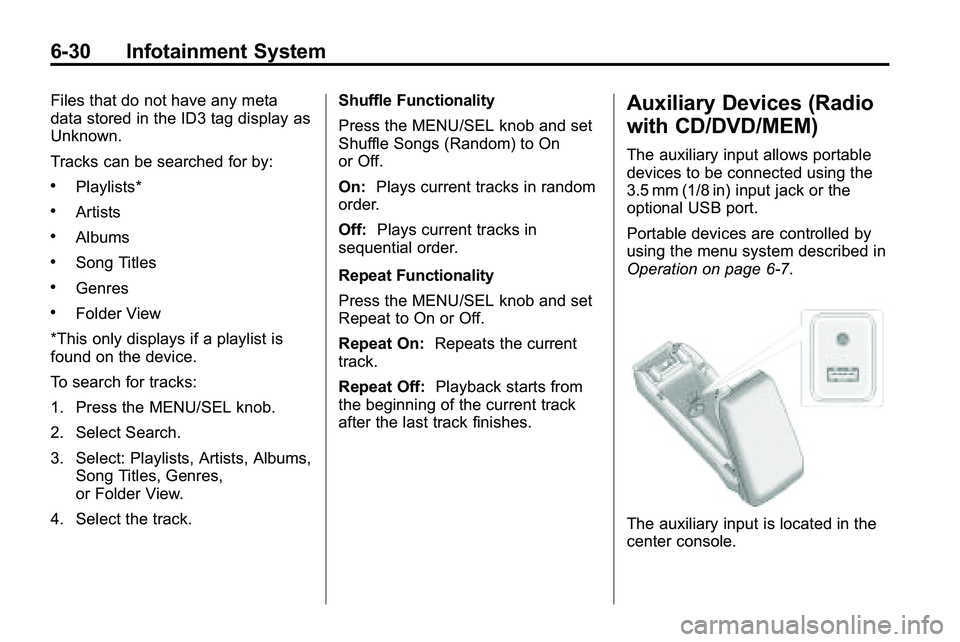
The auxiliary input allows portable
devices to be connected using the
3.5 mm (1/8 in) input jack or the
optional USB port.
Portable devices are controlled by
using the menu system described in
Operation on page 6‑7.
The auxiliary input is located in the
center console.