CD player GMC TERRAIN 2012 Owner's Manual
[x] Cancel search | Manufacturer: GMC, Model Year: 2012, Model line: TERRAIN, Model: GMC TERRAIN 2012Pages: 428, PDF Size: 5.45 MB
Page 1 of 428
Black plate (1,1)GMC Terrain Owner Manual (Include Mex) - 2012
2012 GMC Terrain Owner ManualM
In Brief. . . . . . . . . . . . . . . . . . . . . . . . 1-1
Instrument Panel . . . . . . . . . . . . . . 1-2
Initial Drive Information . . . . . . . . 1-4
Vehicle Features . . . . . . . . . . . . . 1-19
Performance and Maintenance . . . . . . . . . . . . . . . . 1-24
Keys, Doors, and Windows . . . . . . . . . . . . . . . . . . . . 2-1
Keys and Locks . . . . . . . . . . . . . . . 2-2
Doors . . . . . . . . . . . . . . . . . . . . . . . . . . 2-9
Vehicle Security . . . . . . . . . . . . . . 2-13
Exterior Mirrors . . . . . . . . . . . . . . . 2-15
Interior Mirrors . . . . . . . . . . . . . . . . 2-17
Windows . . . . . . . . . . . . . . . . . . . . . 2-18
Roof . . . . . . . . . . . . . . . . . . . . . . . . . . 2-20
Seats and Restraints . . . . . . . . . 3-1
Head Restraints . . . . . . . . . . . . . . . 3-2
Front Seats . . . . . . . . . . . . . . . . . . . . 3-3
Rear Seats . . . . . . . . . . . . . . . . . . . 3-10
Safety Belts . . . . . . . . . . . . . . . . . . 3-12
Airbag System . . . . . . . . . . . . . . . . 3-21
Child Restraints . . . . . . . . . . . . . . 3-35 Storage
. . . . . . . . . . . . . . . . . . . . . . . 4-1
Storage Compartments . . . . . . . . 4-1
Additional Storage Features . . . 4-2
Roof Rack System . . . . . . . . . . . . . 4-2
Instruments and Controls . . . . 5-1
Controls . . . . . . . . . . . . . . . . . . . . . . . 5-2
Warning Lights, Gauges, and
Indicators . . . . . . . . . . . . . . . . . . . . 5-7
Information Displays . . . . . . . . . . 5-23
Vehicle Messages . . . . . . . . . . . . 5-26
Vehicle Personalization . . . . . . . 5-33
Lighting . . . . . . . . . . . . . . . . . . . . . . . 6-1
Exterior Lighting . . . . . . . . . . . . . . . 6-1
Interior Lighting . . . . . . . . . . . . . . . . 6-4
Lighting Features . . . . . . . . . . . . . . 6-5
Infotainment System . . . . . . . . . 7-1
Introduction . . . . . . . . . . . . . . . . . . . . 7-1
Radio . . . . . . . . . . . . . . . . . . . . . . . . . . 7-8
Audio Players . . . . . . . . . . . . . . . . 7-14
Rear Seat Infotainment . . . . . . . 7-22
Phone . . . . . . . . . . . . . . . . . . . . . . . . 7-34
Trademarks and License Agreements . . . . . . . . . . . . . . . . . 7-46 Climate Controls
. . . . . . . . . . . . . 8-1
Climate Control Systems . . . . . . 8-1
Air Vents . . . . . . . . . . . . . . . . . . . . . . . 8-5
Maintenance . . . . . . . . . . . . . . . . . . . 8-6
Driving and Operating . . . . . . . . 9-1
Driving Information . . . . . . . . . . . . . 9-2
Starting and Operating . . . . . . . 9-20
Engine Exhaust . . . . . . . . . . . . . . 9-28
Automatic Transmission . . . . . . 9-29
Drive Systems . . . . . . . . . . . . . . . . 9-32
Brakes . . . . . . . . . . . . . . . . . . . . . . . 9-32
Ride Control Systems . . . . . . . . 9-35
Cruise Control . . . . . . . . . . . . . . . . 9-38
Object Detection Systems . . . . 9-40
Fuel . . . . . . . . . . . . . . . . . . . . . . . . . . 9-51
Towing . . . . . . . . . . . . . . . . . . . . . . . 9-56
Conversions and Add-Ons . . . 9-64
Vehicle Care . . . . . . . . . . . . . . . . . 10-1
General Information . . . . . . . . . . 10-2
Vehicle Checks . . . . . . . . . . . . . . . 10-4
Headlamp Aiming . . . . . . . . . . . 10-30
Bulb Replacement . . . . . . . . . . 10-32
Electrical System . . . . . . . . . . . . 10-38
Wheels and Tires . . . . . . . . . . . 10-44
Page 9 of 428
Black plate (3,1)GMC Terrain Owner Manual (Include Mex) - 2012
In Brief 1-3
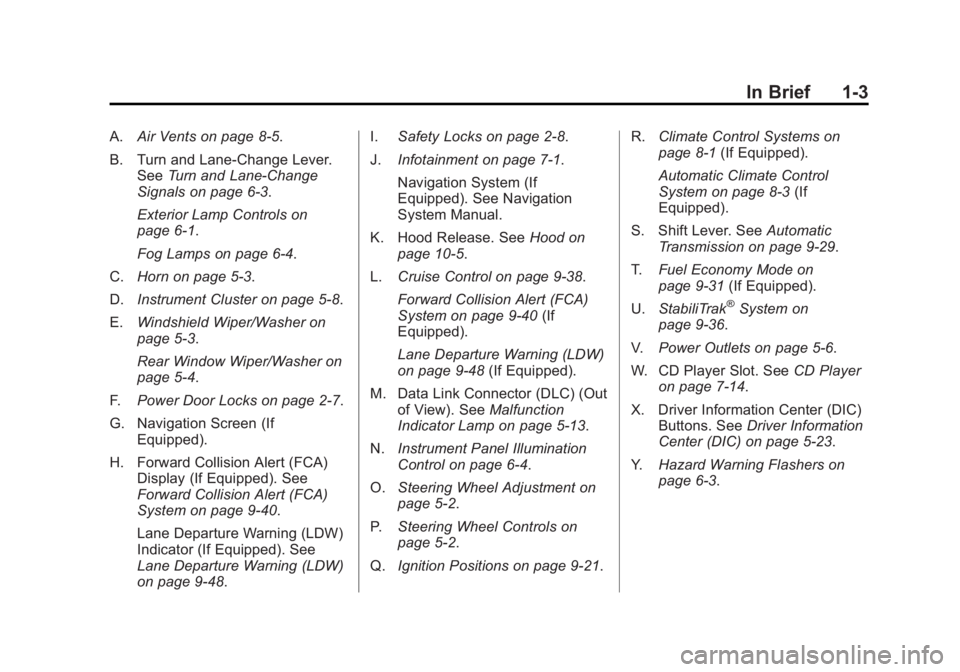
A.Air Vents on page 8‑5.
B. Turn and Lane‐Change Lever. See Turn and Lane-Change
Signals on page 6‑3.
Exterior Lamp Controls on
page 6‑1.
Fog Lamps on page 6‑4.
C. Horn on page 5‑3.
D. Instrument Cluster on page 5‑8.
E. Windshield Wiper/Washer on
page 5‑3.
Rear Window Wiper/Washer on
page 5‑4.
F. Power Door Locks on page 2‑7.
G. Navigation Screen (If Equipped).
H. Forward Collision Alert (FCA) Display (If Equipped). See
Forward Collision Alert (FCA)
System on page 9‑40.
Lane Departure Warning (LDW)
Indicator (If Equipped). See
Lane Departure Warning (LDW)
on page 9‑48. I.
Safety Locks on page 2‑8.
J. Infotainment on page 7‑1.
Navigation System (If
Equipped). See Navigation
System Manual.
K. Hood Release. See Hood on
page 10‑5.
L. Cruise Control on page 9‑38.
Forward Collision Alert (FCA)
System on page 9‑40 (If
Equipped).
Lane Departure Warning (LDW)
on page 9‑48 (If Equipped).
M. Data Link Connector (DLC) (Out of View). See Malfunction
Indicator Lamp on page 5‑13.
N. Instrument Panel Illumination
Control on page 6‑4.
O. Steering Wheel Adjustment on
page 5‑2.
P. Steering Wheel Controls on
page 5‑2.
Q. Ignition Positions on page 9‑21. R.
Climate Control Systems on
page 8‑1 (If Equipped).
Automatic Climate Control
System on page 8‑3 (If
Equipped).
S. Shift Lever. See Automatic
Transmission on page 9‑29.
T. Fuel Economy Mode on
page 9‑31 (If Equipped).
U. StabiliTrak
®System on
page 9‑36.
V. Power Outlets on page 5‑6.
W. CD Player Slot. See CD Player
on page 7‑14.
X. Driver Information Center (DIC) Buttons. See Driver Information
Center (DIC) on page 5‑23.
Y. Hazard Warning Flashers on
page 6‑3.
Page 26 of 428
Black plate (20,1)GMC Terrain Owner Manual (Include Mex) - 2012
1-20 In Brief
Portable Audio Devices
Some vehicles have a 3.5 mm
(1/8 in) auxiliary input and a USB
port located in the center console.
External devices such as iPods
®,
laptop computers, MP3 players, CD
changers, and USB storage devices
may be connected, depending on
the audio system.
For more information, see Auxiliary
Devices on page 7‑18.
Bluetooth®
The Bluetooth system allows users
with a Bluetooth-enabled cell phone
to make and receive hands-free
calls using the vehicle audio system
and controls.
The Bluetooth-enabled cell phone
must be paired with the in-vehicle
Bluetooth system before it can be
used in the vehicle. Not all phones
will support all functions. See
Bluetooth (Overview) on
page 7‑34 orBluetooth
(Infotainment Controls) on
page 7‑36 orBluetooth (Voice
Recognition) on page 7‑39.
Steering Wheel Controls
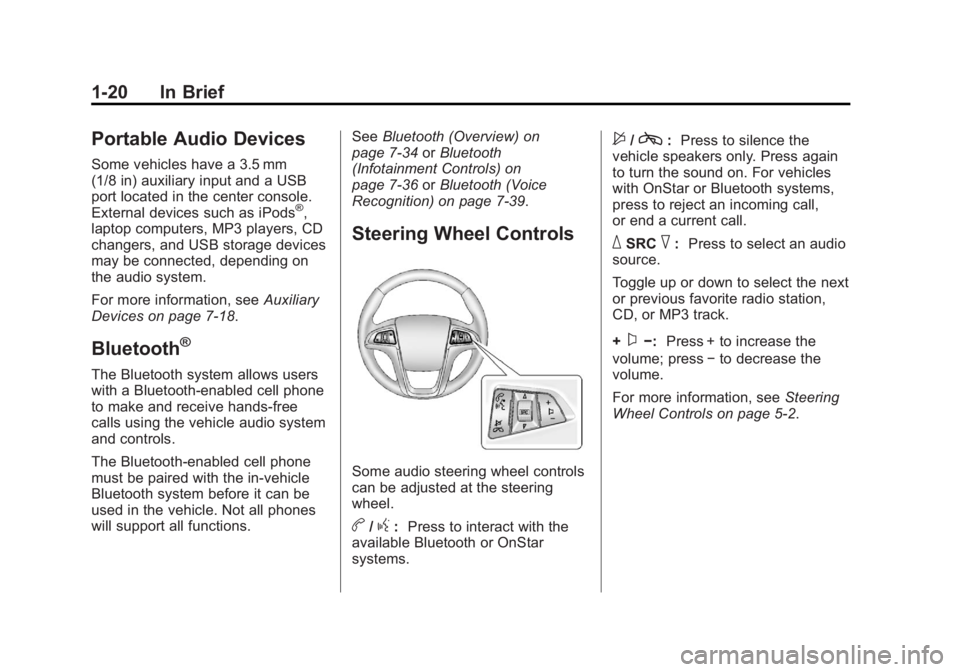
Some audio steering wheel controls
can be adjusted at the steering
wheel.
b/g: Press to interact with the
available Bluetooth or OnStar
systems.
$/c: Press to silence the
vehicle speakers only. Press again
to turn the sound on. For vehicles
with OnStar or Bluetooth systems,
press to reject an incoming call,
or end a current call.
_SRC^: Press to select an audio
source.
Toggle up or down to select the next
or previous favorite radio station,
CD, or MP3 track.
+
x−: Press + to increase the
volume; press −to decrease the
volume.
For more information, see Steering
Wheel Controls on page 5‑2.
Page 27 of 428
Black plate (21,1)GMC Terrain Owner Manual (Include Mex) - 2012
In Brief 1-21
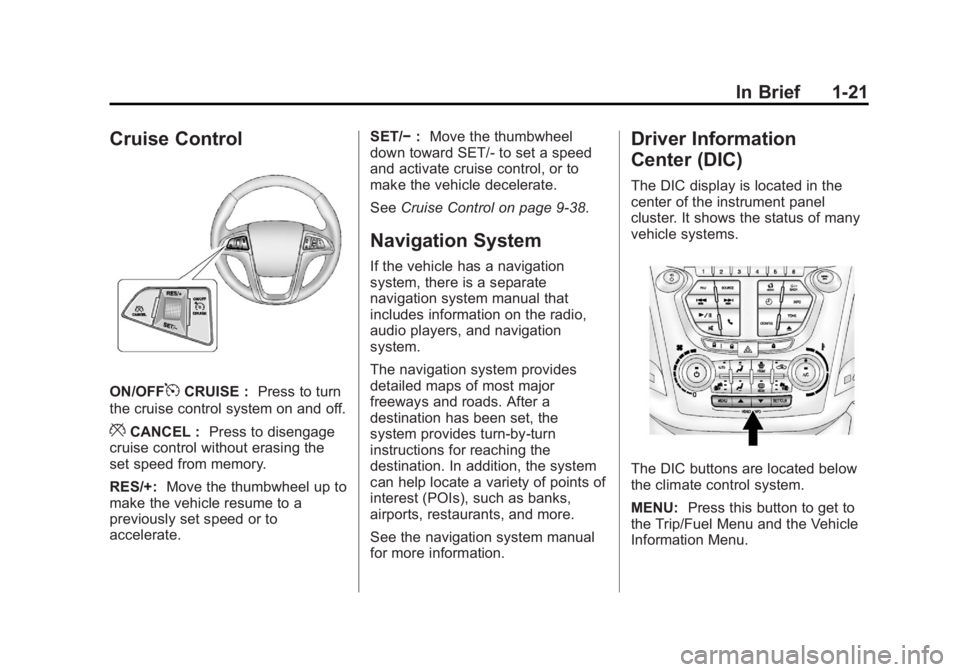
Cruise Control
ON/OFF5CRUISE :Press to turn
the cruise control system on and off.
*CANCEL : Press to disengage
cruise control without erasing the
set speed from memory.
RES/+: Move the thumbwheel up to
make the vehicle resume to a
previously set speed or to
accelerate. SET/−
:Move the thumbwheel
down toward SET/- to set a speed
and activate cruise control, or to
make the vehicle decelerate.
See Cruise Control on page 9‑38.
Navigation System
If the vehicle has a navigation
system, there is a separate
navigation system manual that
includes information on the radio,
audio players, and navigation
system.
The navigation system provides
detailed maps of most major
freeways and roads. After a
destination has been set, the
system provides turn-by-turn
instructions for reaching the
destination. In addition, the system
can help locate a variety of points of
interest (POIs), such as banks,
airports, restaurants, and more.
See the navigation system manual
for more information.
Driver Information
Center (DIC)
The DIC display is located in the
center of the instrument panel
cluster. It shows the status of many
vehicle systems.
The DIC buttons are located below
the climate control system.
MENU: Press this button to get to
the Trip/Fuel Menu and the Vehicle
Information Menu.
Page 29 of 428
Black plate (23,1)GMC Terrain Owner Manual (Include Mex) - 2012
In Brief 1-23
Rear Vision
Camera (RVC)
If available, the rear vision camera
displays a view of the area behind
the vehicle when the vehicle is
shifted into R (Reverse). The
display will appear on the radio
screen.
To clean the camera lens, located
above the license plate, rinse it with
water and wipe it with a soft cloth.
SeeRear Vision Camera (RVC) on
page 9‑45.
Ultrasonic Parking Assist
If available, Ultrasonic Rear Parking
Assist (URPA) system uses sensors
on the rear bumper to assist with
parking and avoiding objects while
in R (Reverse). It operates at
speeds less than 8 km/h (5 mph).
URPA uses audible beeps to
provide distance and system
information. Keep the sensors on the vehicle's
rear bumper clean to ensure proper
operation.
See
Ultrasonic Parking Assist on
page 9‑43 for more information.
Roof Rack System
The roof rack cross rails can be
locked in four positions along the
roof rack side rails. Lift the lever to
release and move the cross rail.
Push the lever down to completely
engage into the side rail holes. Slide
the cross rails back and forth until
the lock pins engage in the holes
and a click is heard.
When the roof rack is not in use,
lock one cross rail at the furthest
forward position and lock the other
cross rail at the furthest rearward
position to reduce wind noise. See
Roof Rack System on page 4‑2.
Power Outlets
The accessory power outlets can be
used to connect electrical
equipment, such as a cell phone or
MP3 player.
There are four accessory power
outlets in the following locations:
below the CD slot, inside the center
console storage, on the rear of the
center console storage, and in the
rear cargo compartment.
To use the outlets, remove the cover
and close when not in use.
SeePower Outlets on page 5‑6.
Page 120 of 428
Black plate (6,1)GMC Terrain Owner Manual (Include Mex) - 2012
5-6 Instruments and Controls
Day + or Day−:Press the Day +
or Day −display buttons to increase
or decrease the day.
Display: Press Display to turn the
display of the time on the screen on
or off.
Power Outlets
The accessory power outlets can be
used to connect electrical
equipment, such as a cell phone or
MP3 player.
There are four accessory power
outlets in the following locations:
below the CD slot, inside the center
console storage, on the rear of the
center console storage, and in the
rear cargo compartment. To use the outlets, remove the cover
and close when not in use.
Notice:
Leaving electrical
equipment plugged in for an
extended period of time while the
vehicle is off will drain the
battery. Always unplug electrical
equipment when not in use and
do not plug in equipment that
exceeds the maximum 20 ampere
rating.
Certain accessory plugs may not be
compatible with the accessory
power outlets and could overload
vehicle and adapter fuses. If a
problem is experienced, see your
dealer. When adding electrical equipment,
be sure to follow the installation
instructions included with the
equipment. See
Add-On Electrical
Equipment on page 9‑64.
Notice: Hanging heavy
equipment from the power outlet
can cause damage not covered
by the vehicle warranty. The
power outlets are designed for
accessory power plugs only, such
as cell phone charge cords.
Page 159 of 428
Black plate (1,1)GMC Terrain Owner Manual (Include Mex) - 2012
Infotainment System 7-1
Infotainment
System
Introduction
Infotainment . . . . . . . . . . . . . . . . . . . 7-1
Theft-Deterrent Feature . . . . . . . 7-2
Overview . . . . . . . . . . . . . . . . . . . . . . 7-3
Radio
AM-FM Radio . . . . . . . . . . . . . . . . . 7-8
Satellite Radio . . . . . . . . . . . . . . . 7-11
Radio Reception . . . . . . . . . . . . . 7-13
Multi-Band Antenna . . . . . . . . . . 7-14
Audio Players
CD Player . . . . . . . . . . . . . . . . . . . 7-14
MP3 . . . . . . . . . . . . . . . . . . . . . . . . . 7-16
Auxiliary Devices . . . . . . . . . . . . 7-18
Rear Seat Infotainment
Rear Seat Entertainment(RSE) System . . . . . . . . . . . . . . 7-22
Rear Seat Audio (RSA) System . . . . . . . . . . . . . . . . . . . . . 7-32
Phone
Bluetooth (Overview) . . . . . . . . 7-34
Bluetooth (InfotainmentControls) . . . . . . . . . . . . . . . . . . . 7-36
Bluetooth (Voice Recognition) . . . . . . . . . . . . . . . 7-39
Trademarks and License
Agreements
Trademarks and License
Agreements . . . . . . . . . . . . . . . . 7-46
Introduction
Infotainment
Read the following pages to
become familiar with the audio
system's features.
{WARNING
Taking your eyes off the road for
extended periods could cause a
crash resulting in injury or death
to you or others. Do not give
extended attention to
entertainment tasks while driving.
This system provides access to
many audio and non‐audio listings.
Page 163 of 428
Black plate (5,1)GMC Terrain Owner Manual (Include Mex) - 2012
Infotainment System 7-5
A. VOL/O
B.g(Seek Down)
C. FAV (Favorite Pages 1-6)
D. SOURCE
E. Buttons 1 to 6
F.
FHOME (Home Page)
G.
EBACK
H. INFO (Information)
I. MENU/SEL (Menu/Select)
J.
k(Play/Pause)
K.
?(Mute)
L.
5(Phone Menu)
M.
l(Seek Up)
N.
H(Clock Menu)
O. CONFIG (Configuration Menu)
P.
X(Eject)
Q. TONE
Infotainment Control Buttons
The buttons on the faceplate are
used to start primary functions while
using the infotainment system.
VOL/
O(Volume/Power):
1. Press to turn the system on and off.
2. Turn to adjust the volume.
k(Play/Pause): Presskto start,
pause, and resume playback. See
CD Player on page 7‑14, and MP3
on page 7‑16 for more information.
SOURCE: Press to change the
audio sources such as AM-FM
Radio, XM™ (if equipped), CD,
and AUX.
TONE: Press to access the sound
menu screen to adjust bass,
midrange, and treble. See AM-FM
Radio on page 7‑8 for more
information. INFO (Information):
Press to
toggle through an audio information
screen.
CONFIG (Configure): Press to
adjust features for radio, display,
phone, vehicle, and time.
HOME: See“Home Page” following
in this section.
MENU/SEL: Turn to highlight a
feature. Press to activate the
highlighted feature.
5(Phone): SeeBluetooth
(Overview) on page 7‑34 or
Bluetooth (Infotainment Controls) on
page 7‑36 orBluetooth (Voice
Recognition) on page 7‑39 for more
information.
EBACK: Press to return to the
previous screen in a menu.
If on a page accessed directly by a
faceplate button or Home Page
screen button, pressing
EBACK
will go to the previous menu.
Page 164 of 428
Black plate (6,1)GMC Terrain Owner Manual (Include Mex) - 2012
7-6 Infotainment System
FAV (Favorite Pages 1-6):Press
to display the current page number
above the preset buttons. The
stored stations for each list display
on the touch-sensitive preset
buttons at the bottom of the screen.
The number of preset FAV lists can
be changed in the
Configuration Menu.
l(Seek Up):
1. Press to seek the next track.
2. Press and hold to fast forward through a track.
3. Release the button to return to playing speed. See CD Player
on page 7‑14 andMP3 on
page 7‑16 for more information.
4. For AM, FM, or XM (if equipped), press to seek to the next strong
station.
g(Seek Down):
1. Press to seek to the beginning of the current or previous track.
If the track has been playing for
less than five seconds, it seeks
the previous track. If longer than
five seconds, the current track
starts from the beginning.
2. Press and hold to quickly reverse through a track. Release
the button to return to playing
speed. See CD Player on
page 7‑14 andMP3 on
page 7‑16 for more information.
3. For AM, FM, or XM (if equipped), press to seek to the previous
strong station.
Preset Buttons (1-6): The preset
buttons numbered one through six
can be used to select stored AM,
FM, and XM (if equipped) stations.
H: Press to set the time.
X(Eject): Press to eject a disc
from the CD player. See CD Player
on page 7‑14.
Touch Screen Buttons
Touch screen buttons are on the
screen and highlighted when a
feature is available. Some toggle
screen buttons highlight when active
and gray out when inactive.
Home Page
The infotainment system displays a
home page that makes accessing
many of the features an easy
process.
Back: If on page two of the Home
Page, press Back to return to page
one of the Home Page. If on page
one, Back serves no function.
Home: While navigating through
other menus, press to go back to
the Home Page to start a different
feature.
FAV: Press to display a page of
stored (favorite) AM, FM, or XM (if
equipped) stations. Keep pressing
FAV to scroll through the favorite
pages.
Page 165 of 428
Black plate (7,1)GMC Terrain Owner Manual (Include Mex) - 2012
Infotainment System 7-7
Info:Press to toggle through an
audio information screen.
The Home Page Menu lists the
options Customize Home Page and
Restore Home Page Defaults.
Out of all available Home Page
icons, up to eight icons can be
selected and sorted for the first
Home Page screen.
Home Page Features
Various functions are disabled when
the vehicle is moving.
Press the Now Playing screen
button to display the active source
page. The sources available are
AM, FM, XM (if equipped), CD,
USB/iPod, and AUX.
See AM-FM Radio on page 7‑8,
Satellite Radio on page 7‑11, CD
Player on page 7‑14, and Auxiliary
Devices on page 7‑18. Press the Phone screen button to
display the Phone main page. See
Bluetooth (Overview) on page 7‑34
or
Bluetooth (Infotainment Controls)
on page 7‑36 orBluetooth (Voice
Recognition) on page 7‑39.
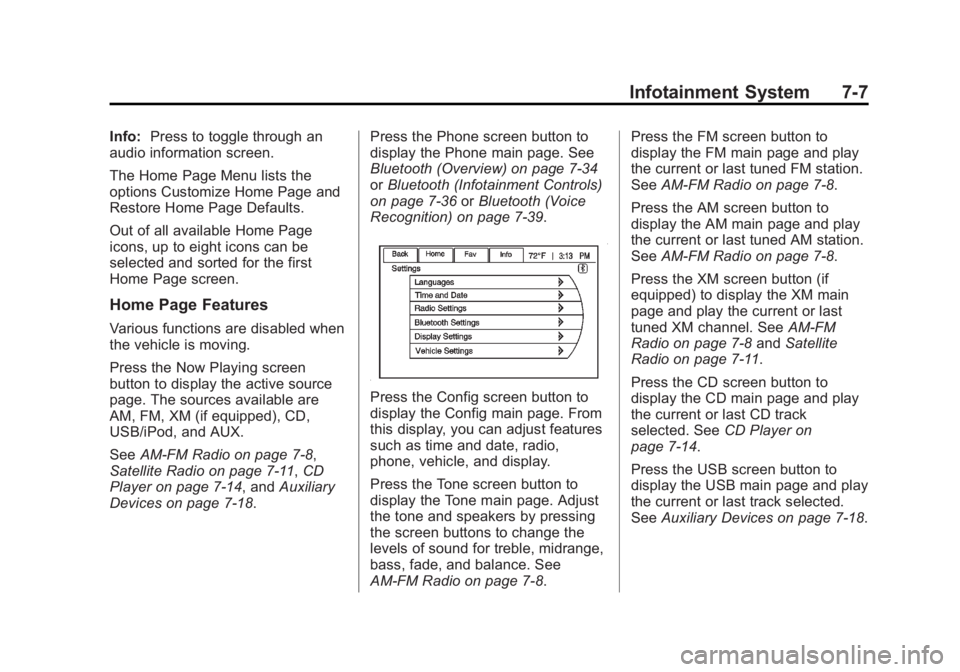
Press the Config screen button to
display the Config main page. From
this display, you can adjust features
such as time and date, radio,
phone, vehicle, and display.
Press the Tone screen button to
display the Tone main page. Adjust
the tone and speakers by pressing
the screen buttons to change the
levels of sound for treble, midrange,
bass, fade, and balance. See
AM-FM Radio on page 7‑8. Press the FM screen button to
display the FM main page and play
the current or last tuned FM station.
See
AM-FM Radio on page 7‑8.
Press the AM screen button to
display the AM main page and play
the current or last tuned AM station.
See AM-FM Radio on page 7‑8.
Press the XM screen button (if
equipped) to display the XM main
page and play the current or last
tuned XM channel. See AM-FM
Radio on page 7‑8 andSatellite
Radio on page 7‑11.
Press the CD screen button to
display the CD main page and play
the current or last CD track
selected. See CD Player on
page 7‑14.
Press the USB screen button to
display the USB main page and play
the current or last track selected.
See Auxiliary Devices on page 7‑18.