tire pressure GMC TERRAIN 2013 Owner's Manual
[x] Cancel search | Manufacturer: GMC, Model Year: 2013, Model line: TERRAIN, Model: GMC TERRAIN 2013Pages: 364, PDF Size: 5.26 MB
Page 5 of 364
Black plate (5,1)GMC Terrain/Terrain Denali Owner Manual - 2013 - crc 1st edition - 5/8/12
Introduction v
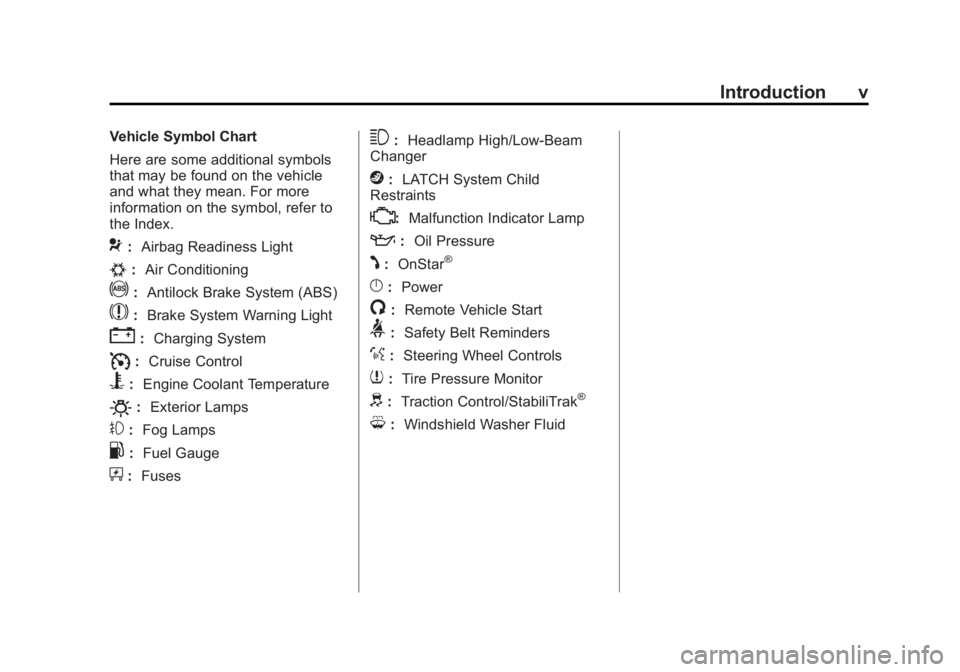
Vehicle Symbol Chart
Here are some additional symbols
that may be found on the vehicle
and what they mean. For more
information on the symbol, refer to
the Index.
9:Airbag Readiness Light
#:Air Conditioning
!:Antilock Brake System (ABS)
$:Brake System Warning Light
":Charging System
I:Cruise Control
B: Engine Coolant Temperature
O:Exterior Lamps
#:Fog Lamps
.: Fuel Gauge
+:Fuses
3: Headlamp High/Low-Beam
Changer
j: LATCH System Child
Restraints
*: Malfunction Indicator Lamp
::Oil Pressure
J:OnStar®
}: Power
/:Remote Vehicle Start
>:Safety Belt Reminders
%: Steering Wheel Controls
7:Tire Pressure Monitor
d:Traction Control/StabiliTrak®
M:Windshield Washer Fluid
Page 7 of 364
Black plate (1,1)GMC Terrain/Terrain Denali Owner Manual - 2013 - crc 1st edition - 5/8/12
In Brief 1-1
In Brief
Instrument Panel
Instrument Panel . . . . . . . . . . . . . . 1-2
Initial Drive Information
Initial Drive Information . . . . . . . . 1-4
Remote Keyless Entry (RKE)System . . . . . . . . . . . . . . . . . . . . . . 1-4
Remote Vehicle Start . . . . . . . . . 1-4
Door Locks . . . . . . . . . . . . . . . . . . . 1-5
Liftgate . . . . . . . . . . . . . . . . . . . . . . . . 1-6
Windows . . . . . . . . . . . . . . . . . . . . . . 1-6
Seat Adjustment . . . . . . . . . . . . . . 1-7
Memory Features . . . . . . . . . . . . . 1-8
Heated Seats . . . . . . . . . . . . . . . . . 1-9
Head Restraint Adjustment . . . . 1-9
Safety Belts . . . . . . . . . . . . . . . . . . 1-10
Passenger Sensing System . . . . . . . . . . . . . . . . . . . . . 1-10 Mirror Adjustment . . . . . . . . . . . . 1-10
Steering Wheel
Adjustment . . . . . . . . . . . . . . . . . 1-11
Interior Lighting . . . . . . . . . . . . . . 1-11
Exterior Lighting . . . . . . . . . . . . . 1-12
Windshield Wiper/Washer . . . . 1-12
Climate Controls . . . . . . . . . . . . . 1-13
Parking Brake . . . . . . . . . . . . . . . 1-14
Transmission . . . . . . . . . . . . . . . . 1-15
Vehicle Features
Steering Wheel Controls . . . . . 1-15
Cruise Control . . . . . . . . . . . . . . . 1-16
Infotainment System . . . . . . . . . 1-16
Driver Information Center (DIC) . . . . . . . . . . . . . . . 1-16
Forward Collision Alert (FCA)
System . . . . . . . . . . . . . . . . . . . . . 1-17
Lane Departure Warning (LDW) . . . . . . . . . . . . . 1-17 Side Blind Zone
Alert (SBZA) . . . . . . . . . . . . . . . 1-18
Rear Vision Camera (RVC) . . . . . . . . . . . . . 1-18
Ultrasonic Parking Assist . . . . 1-18
Roof Rack System . . . . . . . . . . . 1-18
Power Outlets . . . . . . . . . . . . . . . 1-19
Universal Remote System . . . 1-19
Performance and Maintenance
Traction Control
System (TCS) . . . . . . . . . . . . . . 1-19
StabiliTrak
®System . . . . . . . . . 1-20
Tire Pressure Monitor . . . . . . . . 1-20
Engine Oil Life System . . . . . . 1-20
Fuel E85 (85% Ethanol) . . . . . 1-21
Driving for Better Fuel Economy . . . . . . . . . . . . . . . . . . . 1-21
Roadside Assistance Program . . . . . . . . . . . . . . . . . . . . 1-21
OnStar
®. . . . . . . . . . . . . . . . . . . . . 1-22
Page 26 of 364
Black plate (20,1)GMC Terrain/Terrain Denali Owner Manual - 2013 - crc 1st edition - 5/8/12
1-20 In Brief
StabiliTrak®System
The StabiliTrak system assists with
directional control of the vehicle in
difficult driving conditions. The
system is on when the vehicle is
started.
.To turn off both Traction
Control and StabiliTrak, press
and hold
guntilgandi
illuminate and the appropriate
DIC message displays. See
Vehicle Messages on page 5‑24.
.Pressgagain to turn on both
systems.
See StabiliTrak
®System on
page 9‑33.
Tire Pressure Monitor
This vehicle may have a Tire
Pressure Monitor System (TPMS).
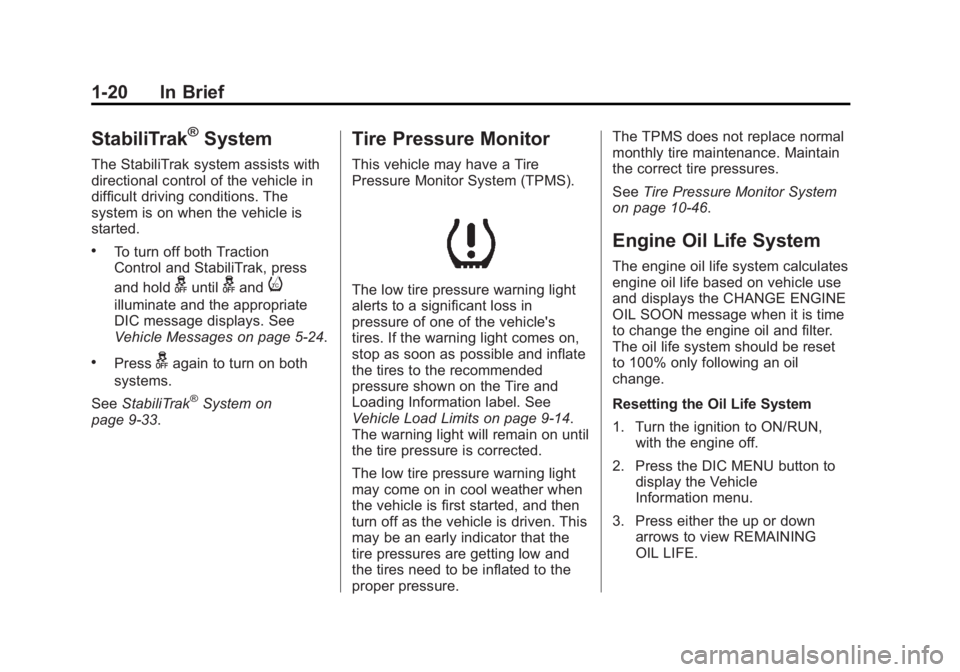
The low tire pressure warning light
alerts to a significant loss in
pressure of one of the vehicle's
tires. If the warning light comes on,
stop as soon as possible and inflate
the tires to the recommended
pressure shown on the Tire and
Loading Information label. See
Vehicle Load Limits on page 9‑14.
The warning light will remain on until
the tire pressure is corrected.
The low tire pressure warning light
may come on in cool weather when
the vehicle is first started, and then
turn off as the vehicle is driven. This
may be an early indicator that the
tire pressures are getting low and
the tires need to be inflated to the
proper pressure. The TPMS does not replace normal
monthly tire maintenance. Maintain
the correct tire pressures.
See
Tire Pressure Monitor System
on page 10‑46.
Engine Oil Life System
The engine oil life system calculates
engine oil life based on vehicle use
and displays the CHANGE ENGINE
OIL SOON message when it is time
to change the engine oil and filter.
The oil life system should be reset
to 100% only following an oil
change.
Resetting the Oil Life System
1. Turn the ignition to ON/RUN, with the engine off.
2. Press the DIC MENU button to display the Vehicle
Information menu.
3. Press either the up or down arrows to view REMAINING
OIL LIFE.
Page 105 of 364
Black plate (1,1)GMC Terrain/Terrain Denali Owner Manual - 2013 - crc 1st edition - 5/8/12
Instruments and Controls 5-1
Instruments and
Controls
Controls
Steering Wheel Adjustment . . . 5-2
Steering Wheel Controls . . . . . . 5-2
Horn . . . . . . . . . . . . . . . . . . . . . . . . . . 5-3
Windshield Wiper/Washer . . . . . 5-3
Rear Window Wiper/Washer . . . . . . . . . . . . . . . . . . . . . . 5-4
Compass . . . . . . . . . . . . . . . . . . . . . 5-5
Power Outlets . . . . . . . . . . . . . . . . . 5-5
Warning Lights, Gauges, and
Indicators
Warning Lights, Gauges, and Indicators . . . . . . . . . . . . . . . . . . . . 5-6
Instrument Cluster . . . . . . . . . . . . 5-7
Speedometer . . . . . . . . . . . . . . . . . 5-8
Odometer . . . . . . . . . . . . . . . . . . . . . 5-8
Tachometer . . . . . . . . . . . . . . . . . . . 5-8
Fuel Gauge . . . . . . . . . . . . . . . . . . . 5-8
Engine Coolant Temperature Gauge . . . . . . . . . . . . . . . . . . . . . . . 5-9
Safety Belt Reminders . . . . . . . 5-10
Airbag Readiness Light . . . . . . 5-10 Passenger Airbag Status
Indicator . . . . . . . . . . . . . . . . . . . . 5-11
Charging System Light . . . . . . 5-12
Malfunction Indicator Lamp . . . . . . . . . . . . . 5-12
Brake System Warning Light . . . . . . . . . . . . . . . . . . . . . . . 5-14
Antilock Brake System (ABS) Warning Light . . . . . . . . . . . . . . 5-15
Lane Departure Warning (LDW) Light . . . . . . . . . . . . . . . . 5-16
Forward Collision Alert (FCA) Warning Light . . . . . . . . . . . . . . 5-16
Traction Off Light . . . . . . . . . . . . 5-16
StabiliTrak
®OFF Light . . . . . . . 5-17
Traction Control System (TCS)/StabiliTrak
®Light . . . . 5-17
Tire Pressure Light . . . . . . . . . . 5-18
Engine Oil Pressure Light . . . . 5-18
Fuel Economy Light . . . . . . . . . 5-19
Low Fuel Warning Light . . . . . . 5-19
Security Light . . . . . . . . . . . . . . . . 5-19
High-Beam On Light . . . . . . . . . 5-20
Front Fog Lamp Light . . . . . . . . 5-20
Lamps On Reminder . . . . . . . . . 5-20
Cruise Control Light . . . . . . . . . 5-20
Information Displays
Driver Information Center (DIC) . . . . . . . . . . . . . . . 5-21
Vehicle Messages
Vehicle Messages . . . . . . . . . . . 5-24
Battery Voltage and ChargingMessages . . . . . . . . . . . . . . . . . . 5-24
Brake System Messages . . . . 5-25
Compass Messages . . . . . . . . . 5-25
Cruise Control Messages . . . . 5-25
Door Ajar Messages . . . . . . . . . 5-25
Engine Cooling System Messages . . . . . . . . . . . . . . . . . . 5-25
Engine Oil Messages . . . . . . . . 5-26
Engine Power Messages . . . . 5-27
Fuel System Messages . . . . . . 5-27
Key and Lock Messages . . . . . 5-27
Object Detection System Messages . . . . . . . . . . . . . . . . . . 5-27
Ride Control System Messages . . . . . . . . . . . . . . . . . . 5-28
Airbag System Messages . . . . 5-29
Security Messages . . . . . . . . . . 5-29
Service Vehicle Messages . . . 5-29
Tire Messages . . . . . . . . . . . . . . . 5-30
Transmission Messages . . . . . 5-30
Vehicle Reminder Messages . . . . . . . . . . . . . . . . . . 5-31
Page 122 of 364
Black plate (18,1)GMC Terrain/Terrain Denali Owner Manual - 2013 - crc 1st edition - 5/8/12
5-18 Instruments and Controls
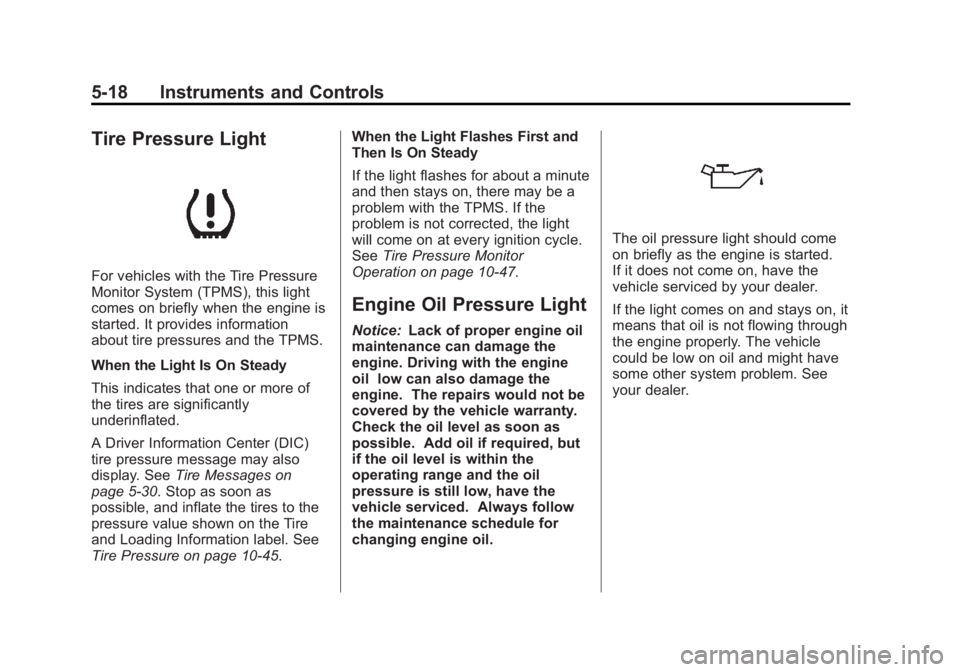
Tire Pressure Light
For vehicles with the Tire Pressure
Monitor System (TPMS), this light
comes on briefly when the engine is
started. It provides information
about tire pressures and the TPMS.
When the Light Is On Steady
This indicates that one or more of
the tires are significantly
underinflated.
A Driver Information Center (DIC)
tire pressure message may also
display. SeeTire Messages on
page 5‑30. Stop as soon as
possible, and inflate the tires to the
pressure value shown on the Tire
and Loading Information label. See
Tire Pressure on page 10‑45. When the Light Flashes First and
Then Is On Steady
If the light flashes for about a minute
and then stays on, there may be a
problem with the TPMS. If the
problem is not corrected, the light
will come on at every ignition cycle.
See
Tire Pressure Monitor
Operation on page 10‑47.
Engine Oil Pressure Light
Notice: Lack of proper engine oil
maintenance can damage the
engine. Driving with the engine
oil low can also damage the
engine. The repairs would not be
covered by the vehicle warranty.
Check the oil level as soon as
possible. Add oil if required, but
if the oil level is within the
operating range and the oil
pressure is still low, have the
vehicle serviced. Always follow
the maintenance schedule for
changing engine oil.
The oil pressure light should come
on briefly as the engine is started.
If it does not come on, have the
vehicle serviced by your dealer.
If the light comes on and stays on, it
means that oil is not flowing through
the engine properly. The vehicle
could be low on oil and might have
some other system problem. See
your dealer.
Page 127 of 364
Black plate (23,1)GMC Terrain/Terrain Denali Owner Manual - 2013 - crc 1st edition - 5/8/12
Instruments and Controls 5-23
Timer
This display can be used as a timer.
To start the timer, press SET/CLR
while Timer is displayed. The
display will show the amount of time
that has passed since the timer was
last reset, not including time the
ignition is off. Time will continue to
be counted as long as the ignition is
on, even if another display is being
shown on the DIC. The timer will
record up to 99 hours, 59 minutes
and 59 seconds (99:59:59) after
which the display will return to zero.
To stop the timer, press SET/CLR
briefly while Timer is displayed. To
reset the timer to zero, press and
hold SET/CLR.
Navigation
This display is used for the OnStar
or Navigation System Turn-by-Turn
guidance. SeeOnStar Overview on
page 14‑1 or the Navigation manual,
if the vehicle has navigation, for
more information. Blank Display
This display shows no information.
Vehicle Information Menu
Items
Press the MENU button until Vehicle
Information Menu is displayed. Then
press
Rto scroll through the
following menu items:
.Unit
.Tire Pressure
.Remaining Oil Life
.Blank Display
Unit
Press SET/CLR to enter the unit
menu. Then press
QorRto switch
between METRIC or US when the
Unit display is active. Press SET/
CLR to confirm the setting. This will
change the displays on the cluster
and DIC to either metric or English
(US) measurements. Tire Pressure
The display will show a vehicle with
the approximate pressures of all
four tires. Tire pressure is displayed
in either kilopascal (kPa) or in
pounds per square inch (psi).
See
Tire Pressure Monitor System
on page 10‑46 andTire Pressure
Monitor Operation on page 10‑47 for
more information.
Remaining Oil Life
This display shows an estimate of
the oil's remaining useful life.
If REMAINING OIL LIFE 99% is
displayed, that means 99% of the
current oil life remains.
When the remaining oil life is low,
the CHANGE ENGINE OIL SOON
message will appear on the display.
See Engine Oil Messages on
page 5‑26. The oil should be
changed as soon as possible. See
Engine Oil on page 10‑8. In addition
to the engine oil life system
monitoring the oil life, additional
maintenance is recommended in the
Page 134 of 364
Black plate (30,1)GMC Terrain/Terrain Denali Owner Manual - 2013 - crc 1st edition - 5/8/12
5-30 Instruments and Controls
Tire Messages
SERVICE TIRE MONITOR
SYSTEM
This message displays if there is a
problem with the Tire Pressure
Monitor System (TPMS). SeeTire
Pressure Monitor Operation on
page 10‑47.
TIRE LEARNING ACTIVE
This message displays when the
system is learning new tires. See
Tire Pressure Monitor Operation on
page 10‑47.
TIRE LOW ADD AIR TO TIRE
This message displays when the
pressure in one or more of the tires
is low.
This message also displays LEFT
FRONT, RIGHT FRONT, LEFT
REAR, or RIGHT REAR to indicate
the location of the low tire. The low tire pressure warning light
will also come on. See
Tire
Pressure Light on page 5‑18.
If a tire pressure message appears
on the DIC, stop as soon as you
can. Inflate the tires by adding air
until the tire pressure is equal to the
values shown on the Tire and
Loading Information label. See Tires
on page 10‑38, Vehicle Load Limits
on page 9‑14, and Tire Pressure on
page 10‑45.
You can receive more than one tire
pressure message at a time. The
DIC also shows the tire pressure
values. See Driver Information
Center (DIC) on page 5‑21.
Transmission Messages
SERVICE TRANSMISSION
This message displays if there is a
problem with the transmission. See
your dealer.
SHIFT TO PARK
This message displays when the
transmission needs to be shifted to
P (Park). This may appear when
attempting to remove the key from
the ignition or from the vehicle if the
vehicle is not in P (Park).
TRANSMISSION HOT —IDLE
ENGINE
This message displays and a chime
sounds if the transmission fluid in
the vehicle gets hot. Driving with the
transmission fluid temperature high
can cause damage to the vehicle.
Stop the vehicle and let it idle to
allow the transmission to cool. This
message clears when the fluid
temperature reaches a safe level.
Page 166 of 364
Black plate (6,1)GMC Terrain/Terrain Denali Owner Manual - 2013 - crc 1st edition - 5/8/12
9-6 Driving and Operating
material on the road. Learn to
recognize warning clues—such
as enough water, ice, or packed
snow on the road to make a
mirrored surface —and slow
down when you have any doubt.
.Try to avoid sudden steering,
acceleration, or braking,
including reducing vehicle speed
by shifting to a lower gear. Any
sudden changes could cause
the tires to slide.
Remember: Antilock brakes help
avoid only the braking skid.
Off-Road Driving
All-wheel-drive vehicles can be
used for off-road driving. Vehicles
without all-wheel drive and vehicles
not equipped with All Terrain (AT) or
On-Off Road (OOR) tires must not
be driven off-road except on a level,
solid surface. To contact the tire
manufacturer for more information
about the original equipment tires, see the Limited Warranty and
Owner Assistance Information
manual.
Controlling the vehicle is the key to
successful off-road driving. One of
the best ways to control the vehicle
is to control the speed.
{WARNING
When driving off-road, bouncing
and quick changes in direction
can easily throw you out of
position. This could cause you to
lose control and crash. You and
your passengers should always
wear safety belts.
Before Driving Off-Road
.Have all necessary maintenance
and service work completed.
.Fuel the vehicle, fill fluid levels,
and check inflation pressure in
all tires, including the spare,
if equipped.
.Read all the information about
all-wheel-drive vehicles in this
manual.
.Make sure all underbody
shields, if equipped, are properly
attached.
.Know the local laws that apply to
off-road driving.
To gain more ground clearance if
needed, it may be necessary to
remove the front fascia lower
air dam.
Notice: Operating the vehicle for
extended periods without the
front fascia lower air dam
installed can cause improper air
flow to the engine. Re‐attach the
front fascia air dam after off-road
driving.
Page 175 of 364
Black plate (15,1)GMC Terrain/Terrain Denali Owner Manual - 2013 - crc 1st edition - 5/8/12
Driving and Operating 9-15
WARNING (CONTINUED)
vehicle handles. This could
cause loss of control and a
crash. Overloading can also
shorten the life of the vehicle.
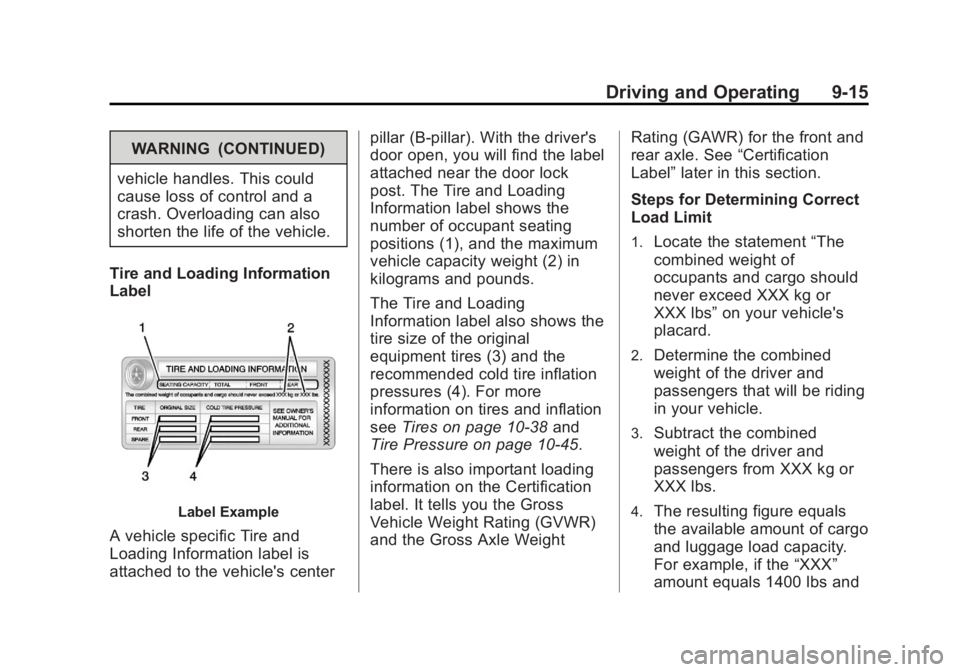
Tire and Loading Information
Label
Label Example
A vehicle specific Tire and
Loading Information label is
attached to the vehicle's center pillar (B-pillar). With the driver's
door open, you will find the label
attached near the door lock
post. The Tire and Loading
Information label shows the
number of occupant seating
positions (1), and the maximum
vehicle capacity weight (2) in
kilograms and pounds.
The Tire and Loading
Information label also shows the
tire size of the original
equipment tires (3) and the
recommended cold tire inflation
pressures (4). For more
information on tires and inflation
see
Tires on page 10‑38 and
Tire Pressure on page 10‑45.
There is also important loading
information on the Certification
label. It tells you the Gross
Vehicle Weight Rating (GVWR)
and the Gross Axle Weight Rating (GAWR) for the front and
rear axle. See
“Certification
Label” later in this section.
Steps for Determining Correct
Load Limit
1.Locate the statement “The
combined weight of
occupants and cargo should
never exceed XXX kg or
XXX lbs” on your vehicle's
placard.
2.Determine the combined
weight of the driver and
passengers that will be riding
in your vehicle.
3.Subtract the combined
weight of the driver and
passengers from XXX kg or
XXX lbs.
4.The resulting figure equals
the available amount of cargo
and luggage load capacity.
For example, if the “XXX”
amount equals 1400 lbs and
Page 177 of 364
Black plate (17,1)GMC Terrain/Terrain Denali Owner Manual - 2013 - crc 1st edition - 5/8/12
Driving and Operating 9-17
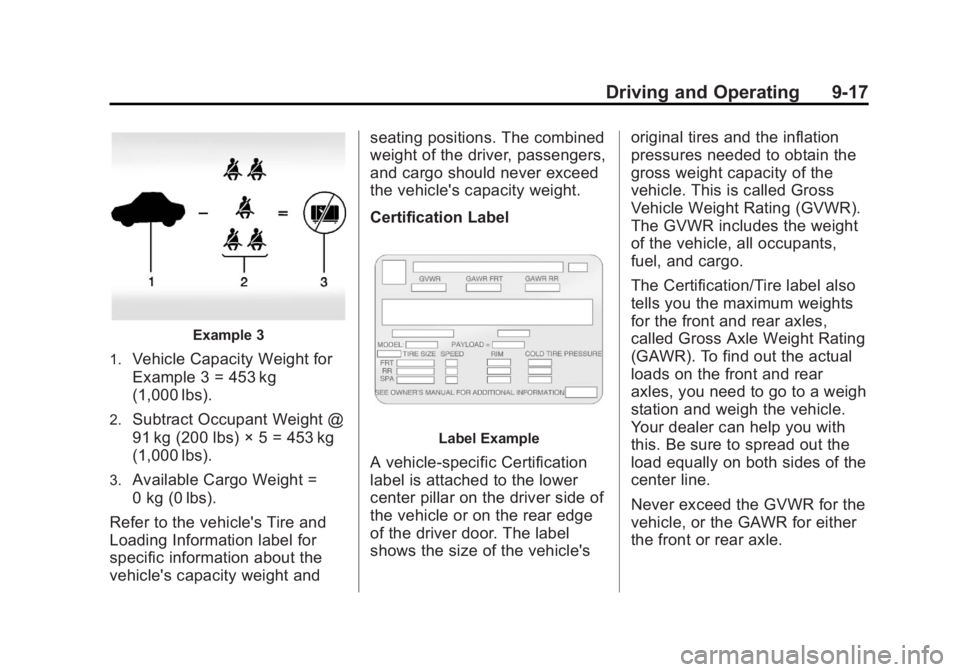
Example 3
1.
Vehicle Capacity Weight for
Example 3 = 453 kg
(1,000 lbs).
2.Subtract Occupant Weight @
91 kg (200 lbs) × 5 = 453 kg
(1,000 lbs).
3.Available Cargo Weight =
0 kg (0 lbs).
Refer to the vehicle's Tire and
Loading Information label for
specific information about the
vehicle's capacity weight and seating positions. The combined
weight of the driver, passengers,
and cargo should never exceed
the vehicle's capacity weight.
Certification Label
Label Example
A vehicle-specific Certification
label is attached to the lower
center pillar on the driver side of
the vehicle or on the rear edge
of the driver door. The label
shows the size of the vehicle's
original tires and the inflation
pressures needed to obtain the
gross weight capacity of the
vehicle. This is called Gross
Vehicle Weight Rating (GVWR).
The GVWR includes the weight
of the vehicle, all occupants,
fuel, and cargo.
The Certification/Tire label also
tells you the maximum weights
for the front and rear axles,
called Gross Axle Weight Rating
(GAWR). To find out the actual
loads on the front and rear
axles, you need to go to a weigh
station and weigh the vehicle.
Your dealer can help you with
this. Be sure to spread out the
load equally on both sides of the
center line.
Never exceed the GVWR for the
vehicle, or the GAWR for either
the front or rear axle.